


 本文介绍如何在SpringBoot项目中使用YAML格式的配置文件,并通过@ConfigurationProperties实现对象属性注入,同时讨论了配置文件的加载优先级。
SpringBoot 配置文件默认为application.properties,把之前项目中的配置文件application.properties改成application.yml,因为现在的趋势是使用yaml,它是类似于标准通用标记语言的子集XML的数据描述语言,语法比XML简单很多。
一、自定义属性与加载
1,application.yml:
test:
user:
username : zhangsan
age : 18
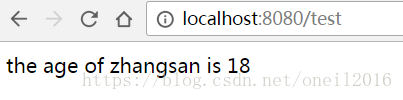
toString: the age of ${test.user.username} is ${test.user.age}2,pojo类:
PropertiesConfig.java:
package com.cx.springbootdemo.pojo;

import org.springframework.beans.factory.annotation.Value;
import org.springframework.stereotype.Component;

@Component
public class PropertiesConfig {

    @Value("${test.user.username}")
    private String username;

    @Value("${test.user.age}")
    private String age;

    @Value("${test.user.toString}")
    private String toString;

    public String getUsername() {
        return username;
    }

    public void setUsername(String username) {
        this.username = username;
    }

    public String getAge() {
        return age;
    }

    public void setAge(String age) {
        this.age = age;
    }

    public String getToString() {
        return toString;
    }

    public void setToString(String toString) {
        this.toString = toString;
    }
}
3,controller:
package com.cx.springbootdemo.controller;

import com.cx.springbootdemo.pojo.PropertiesConfig;
import com.cx.springbootdemo.pojo.User;
import org.springframework.beans.factory.annotation.Autowired;
import org.springframework.http.ResponseEntity;
import org.springframework.web.bind.annotation.RequestMapping;
import org.springframework.web.bind.annotation.RequestMethod;
import org.springframework.web.bind.annotation.RestController;

@RestController
public class IndexController {
    @RequestMapping("/index")
    public ResponseEntity helloWord() {
        return ResponseEntity.ok("hello word22223233");
    }

    @Autowired
    private PropertiesConfig propertiesConfig;

    @RequestMapping(value = "test", method = RequestMethod.GET)
    public String test(){
//		return propertiesConfig.getUsername() + ":" + propertiesConfig.getAge();
        return propertiesConfig.getToString();
    }

    @Autowired
    private User user;

    @RequestMapping(value = "test2", method = RequestMethod.GET)
    public String test2(){
        return user.getUsername() + ":" + user.getAge();
    }

}
自定义属性注入bean
将上面application.yml文件中的test.user注入到User对象里,注意这里的prefix指定的是test.user,对应配置文件中的结构
package com.cx.springbootdemo.pojo;

import org.springframework.boot.context.properties.ConfigurationProperties;
import org.springframework.stereotype.Component;

@Component
@ConfigurationProperties(prefix = "test.user")
public class User {

    private String username;

    private int age;

    public String getUsername() {
        return username;
    }

    public void setUsername(String username) {
        this.username = username;
    }

    public int getAge() {
        return age;
    }

    public void setAge(int age) {
        this.age = age;
    }
}
上面的controller已经包含test2方法。
访问 http://localhost:8080/test2 ==> zhangsan : 18
官方支持默认配置文件属性
属性加载优先级
1. @TestPropertySource 注解
2. 命令行参数
3. Java系统属性(System.getProperties())
4. 操作系统环境变量
5. 只有在random.*里包含的属性会产生一个RandomValuePropertySource
6. 在打包的jar外的应用程序配置文件(application-{profile}.properties,包含YAML和profile变量)
7. 在打包的jar内的应用程序配置文件(application-{profile}.properties,包含YAML和profile变量)
8. 在@Configuration类上的@PropertySource注解
9. 默认属性(使用SpringApplication.setDefaultProperties指定)
也就是说比如我配置文件配置了一个name=zhangsan,然后将项目打成jar,运行的时候,如果我们使用 java -jar app.jar --name="Spring",那么注入的进去的就是Spring,优先级高。
配置文件优先级
查看SpringBoot官方文档,可以发现

翻译:
- 当前目录下的一个/config子目录
- 当前目录
- 一个classpath下的/config包
- classpath根路径(root)
也就是说:如果我们有多个配置文件,比如 src/main/resource/application.yml。
test:
  user:
    username : zhangsan
    age : 18
    toString: the age of ${test.user.username} is ${test.user.age}

name: SpringBoot-root

test2: ${test1}-root

test3: SpringCloud-root

server:
  port: 8080
src/main/resource/config/application.yml
test:
  user:
    username: lisi

name: SpringBoot-config

test1: ${name}-config

test4: ${test3}-config

server:
  port: 9090
根据优先级,可以得到能够加载到SpringBoot应用的属性为:
test:
  user:
    username : lisi
    age : 18
    toString: the age of lisi is 18

name: SpringBoot-config
test1: SpringBoot-config-config
test2: SpringBoot-config-config-root
test3: SpringCloud-root
test4: SpringCloud-root-config

server:
  port: 9090
注意优先级高的配置文件中存在和优先级低的配置文件相同属性时,取优先级高配置文件的,不冲突的时候,优先级低的配置文件属性同样会被加载,而不是只加载优先级高的配置文件属性。
1、普通自定义属性,使用@Value("${xxx}")注入 2、注入对象,使用@ConfigurationProperties(prefix="test.user")


 1万+
1万+

 被折叠的 条评论
为什么被折叠?
被折叠的 条评论
为什么被折叠?
 到【灌水乐园】发言


