


 本文档详细介绍了如何在CentOS7上安装和配置Gost代理工具,包括安装脚本、配置HTTPS证书、生成配置文件、转发服务及Dockerfile构建。此外,还提供了启动和卸载Gost的步骤,以及如何将Socks5转发为带认证的HTTP服务。
Centos7安装gost
Centos7安装gost脚本
gost2项目站点 :https://v2.gost.run/
gostv3项目地址: https://github.com/go-gost/gost
#!/usr/bin/env bash

# !!!声明:该脚本仅适用于Centos7安装gostv3和gost2

# 定义gost版本
GOST_VERSION=3.0.0

# 判断gost版本
GOST_MAIN_VERSION=$(echo $GOST_VERSION | awk -F "." '{ print $1 }')

# 0 ifCMD函数,判断上一条命令(不等于0)没执行成就停止,成功就继续运行
function ifcmd() {
    if [ $? -ne 0 ]; then
        exit
    fi
}

# 1 检查依赖包
function check_dependencies() {
    # 判断wget是否存在,如果不存在就安装wget
    which wget || yum install -y wget || apt install -y wget

    ifcmd
}

# 2. 下载gost安装包
function download_ins_pkg() {
    if [[ "${GOST_MAIN_VERSION}" == "3" ]]; then
        echo "下载gost3"
        download_gost3_pkg
    elif [[ "${GOST_MAIN_VERSION}" == "2" ]]; then
        echo "下载gost2"
        download_gost3_pkg
    else
        echo "大版本号不匹配,脚本停止" && exit 1
    fi
}

# 2.1 下载gost3安装包
function download_gost3_pkg() {
    # 如果下载出错,就使用镜像站下载
    ## 如果下载出错,就使用镜像站下载
    ## -T 3 3秒未响应就使用国内镜像下载
    ls /usr/local/src/gost_"$GOST_VERSION"_linux_amd64.tar.gz &>/dev/null && echo "gost3安装文件已经存在" && exit 1
    wget -cO /usr/local/src/gost_"$GOST_VERSION"_linux_amd64.tar.gz https://github.com/go-gost/gost/releases/download/v$GOST_VERSION/gost_"$GOST_VERSION"_linux_amd64.tar.gz --no-check-certificate ||
        wget -cO /usr/local/src/gost_"$GOST_VERSION"_linux_amd64.tar.gz https://ghproxy.com/https://github.com/go-gost/gost/releases/download/v$GOST_VERSION/gost_"$GOST_VERSION"_linux_amd64.tar.gz --no-check-certificate

    ## 如果二进制包没下载下来,退出
    ifcmd
}

# 2.2 下载gost2安装包
function download_gost2_pkg() {
    # 如果下载出错,就使用镜像站下载
    ## -T=3 3秒未响应就使用国内镜像下载
    ls /usr/local/src/gost-linux-amd64-$GOST_VERSION.gz &>/dev/null && echo "gost2安装文件已经存在" && exit 1
    wget -cO /usr/local/src/gost-linux-amd64-$GOST_VERSION.gz https://github.com/ginuerzh/gost/releases/download/v$GOST_VERSION/gost-linux-amd64-$GOST_VERSION.gz --no-check-certificate ||
        wget -cO /usr/local/src/gost-linux-amd64-$GOST_VERSION.gz https://ghproxy.com/https://github.com/ginuerzh/gost/releases/download/v$GOST_VERSION/gost-linux-amd64-$GOST_VERSION.gz --no-check-certificate

    # 如果二进制包没下载下来,退出
    ifcmd
}

# 3 解压gost.gz
function unzip() {
    if [[ "${GOST_MAIN_VERSION}" == "3" ]]; then
        echo "解压gost3"
        unzip_gost3_pkg
    elif [[ "${GOST_MAIN_VERSION}" == "2" ]]; then
        echo "解压gost2"
        download_gost2_pkg
    else
        echo "大版本号不匹配,脚本停止" && exit 1
    fi

}

# 3.0 打印gost版本
function print_gost_version(){
    /opt/gost/gost -V
}

# 3.1 解压gost2压缩包
function unzip_gost2_pkg() {
    cd /usr/local/src/ || exit

    # 如果gzip不支持-k参数就不执行-k参数了
    gzip -dk gost-linux-amd64-"$GOST_VERSION".gz || gzip -d gost-linux-amd64-"$GOST_VERSION".gz

    # 将可执行程序文件修改为gost,赋予gost可执行程序,
    ls /usr/local/src/gost &>/dev/null && echo "src下的gost2可执行文件已经存在" && exit 1
    mv gost-linux-amd64-"$GOST_VERSION" gost && chmod +x gost

    # 进入目录成功就返回原目录,进入目录失败就创建/opt/gost目录
    (cd /opt/gost && cd -) || mkdir -p /opt/gost

    # 将gost可执行文件移动到/opt/gost/
    ls /opt/gost/gost &>/dev/null && echo "gost2可执行文件已经存在" && exit 1
    mv gost /opt/gost/

    ifcmd
}

# 3.2 解压gost3压缩包
function unzip_gost3_pkg() {
    cd /usr/local/src/ || exit

    # 解压gost3到当前目录
    tar xvf gost_"$GOST_VERSION"_linux_amd64.tar.gz

    # 赋予gost3可执行权限
    chmod +x gost

    # 进入目录成功就返回原目录,进入目录失败就创建/opt/gost目录
    (cd /opt/gost && cd -) || mkdir -p /opt/gost

    # 将gost可执行文件移动到/opt/gost/
    ls /opt/gost/gost &>/dev/null && echo "gost安装文件已经存在" && exit 1
    mv gost /opt/gost/

    ifcmd
}

# 4 生成配置文件
function gen_config_file() {
    if [[ "${GOST_MAIN_VERSION}" == "3" ]]; then
        echo "生成gost3的配置文件"
        gen_gost3_config_file
    elif [[ "${GOST_MAIN_VERSION}" == "2" ]]; then
        echo "生成gost2的配置文件"
        gen_gost2_config_file
    else
        echo "大版本号不匹配,脚本停止" && exit 1
    fi

}

# 4.1 生成gost3配置文件
function gen_gost3_config_file() {
    # 进入/opt/gost,失败就创建目录再进入目录
    cd /opt/gost || (mkdir -p /opt/gost && cd /opt/gost || exit)
    ls /opt/gost/gost.yaml &>/dev/null && echo "gost配置文件已经存在" && exit 1
    # 定义gost配置文件
    ## 进入/opt/gost,失败就创建目录再进入目录
    cd /opt/gost || (mkdir -p /opt/gost && cd /opt/gost || exit)

    ## 将配置文件写入gost.yaml文件
    echo '
services:
  - name: service-0
    addr: :10808
    handler:
      type: auto
      auth:
        username: xxx
        password: Xxxxx
    listener:
      type: tcp
' >/opt/gost/gost.yaml

    ifcmd
}

# 4.2 生成gost2配置文件
function gen_gost2_config_file() {

    # 进入/opt/gost,失败就创建目录再进入目录
    cd /opt/gost || (mkdir -p /opt/gost && cd /opt/gost || exit)
    ls /opt/gost/gost.json &>/dev/null && echo "gost配置文件已经存在" && exit 1

    # 将配置文件写入gost.json文件
    echo '{
    "ServeNodes": [
        "admin:admin123@:10808"
    ],
    "ChainNodes": [
        "socks5://:1080"
    ]
}' >/opt/gost/gost.json

    ifcmd

}

# 5.1 获取service文件目录
function get_service_dir() {
    ## 服务文件目录
    service_dir=' '

    ## 判断/etc/systemd/system/	目录是否存在
    if [ -d /etc/systemd/system/	 ]; then
        # Centos7的service目录是这个
        service_dir=/etc/systemd/system/
    else
        # 如果没有/usr/lib这个目录,就是Ubuntu系统
        service_dir=/etc/systemd/system/
    fi
}

# 5 生成service文件
function gen_gost_service_file() {
    local _config_file=' '
    if [[ "${GOST_MAIN_VERSION}" == "3" ]]; then
        echo "解压gost3"
        _config_file=/opt/gost/gost.yaml
    elif [[ "${GOST_MAIN_VERSION}" == "2" ]]; then
        echo "解压gost2"
        _config_file=/opt/gost/gost.json
    else
        echo "大版本号不匹配,脚本停止" && exit 1
    fi

    # 获取service文件目录
    get_service_dir
    # 判断service文件是否存在
    ls ${service_dir}gost.service &>/dev/null && echo "gost服务文件已经存在" && exit 1
    # 创建gost.service文件
    echo "
[Unit]
Description=gost service
After=network.target
Wants=network.target

[Service]
Type=simple
User=root
Nice=-20
ExecStart=/opt/gost/gost -C $_config_file
# \是反转义符
ExecReload=/bin/kill -HUP \$MAINPID
KillMode=control-group
Restart=always
# 最大运行秒数(7天自动重启)
RuntimeMaxSec=604800
RestartSec=2s

[Install]
WantedBy=multi-user.target
" >${service_dir}gost.service
    # 重载服务
    systemctl daemon-reload
    ifcmd
}

# 6 启动gost服务
function start_gost_service() {

    # 设置gost服务开机自启
    systemctl enable --now gost

    ## 查看gost服务状态是否活跃
    systemctl is-active gost
}

# 7 安装gost
function install_gost() {
    # 2 下载安装包
    download_ins_pkg
    # 3 解压gost.gz
    unzip
    # 4 生成配置文件
    gen_config_file
    # 5 生成service文件
    gen_gost_service_file
    # 6 启动gost服务
    start_gost_service
    # 打印gost版本
    print_gost_version
}

# 8 卸载gost
function uninstall_gost() {
    # 打印gost版本
    print_gost_version
    # 停止服务
    systemctl disable --now gost || echo "gost服务未找到"
    # 获取service文件目录
    get_service_dir
    # 删除service文件
    rm -rf "${service_dir}"gost.service
    # 重载服务
    systemctl daemon-reload
    # 删除安装包
    find /usr/local/src/ -name "gost*" | xargs rm -rf
    # 删除主程序
    rm -rf /opt/gost/
    # 删除配置文件
    rm -rf /opt/gost
    # 刷新索引数据库
    updatedb
    # 查看还有哪些gost相关的文件
    locate gost
    echo "卸载完成"
}


#开始菜单
function start_menu() {
    # 先进行安装前环境检查
    check_dependencies
    clear
    echo "========================="
    echo " 介绍:适用于CentOS7"
    echo " 作者:Miles"
    echo " 网站:https://blog.youkuaiyun.com/omaidb"
    echo "========================="
    echo "注意:本脚本只支持Centos7"
    echo "1. 安装gost"
    echo "2. 卸载gost"
    echo "0. 退出脚本"
    echo "请输入数字:"
    read -r num
    case "$num" in
    1)
        echo "开始安装gost"
        install_gost
        ;;
    2)
        echo "开始卸载gost"
        uninstall_gost
        ;;
    0)
        exit 1
        ;;
    *)
        clear
        echo "请输入正确数字"
        sleep 5s
        start_menu
        ;;
    esac
}

# main方法,显示菜单
start_menu
配置https
签发证书
从签证机构签发的证书有3个文件
ca_bundle.crtcertificate.crtprivate.key
合并证书
# 将这两个crt证书合并为一个crt证书
cat certificate.crt ca_bundle.crt > ca.crt
配置证书
编辑`gost.json
{
    # 保留之前的配置
    "Debug": false,
    "Retries": 0,
    "ServeNodes": [
        "qiaofei:qiaofei123@:10808",
        # 添加https
        "https://admin:admin123@:443?cert=/usr/local/gost/ca.crt&key=/usr/local/gost/private.key"
    ],
    "ChainNodes": [
        "socks5://:1080"
    ]
}
gostv3生成配置文件
参考: https://latest.gost.run/getting-started/configuration-overview/
gostv3项目地址: https://github.com/go-gost/gost/releases/tag/v3.0.0-beta.2
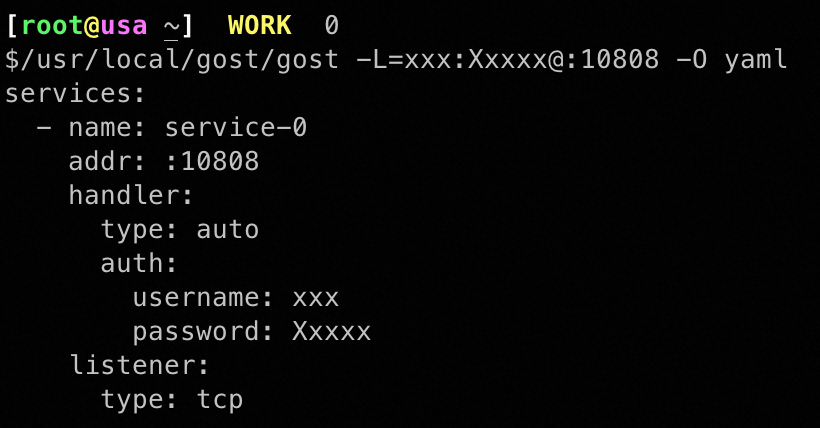
-O yaml导出yaml配置
# 默认自动服务
## -L 指定本地服务
## -O 指定配置格式
/usr/local/gost/gost -L :1080 -O yaml
/usr/local/gost/gost -L=xxx:xxxxx.@:1080 -O yaml

# ?udp=true 允许udp转发
gost -L=xxx:xxxxx.@:1080?udp=true

## -L 指定本地服务
gost -L socks5://user:pass@:1080?udp=true
services:
  - name: service-0
    addr: :1080
    handler:
      type: auto
      auth:
        username: xxx
        password: xxx
      metadata:
        udp: "true"
    listener:
      type: tcp
      metadata:
        udp: "true"
    metadata:
      udp: "true"
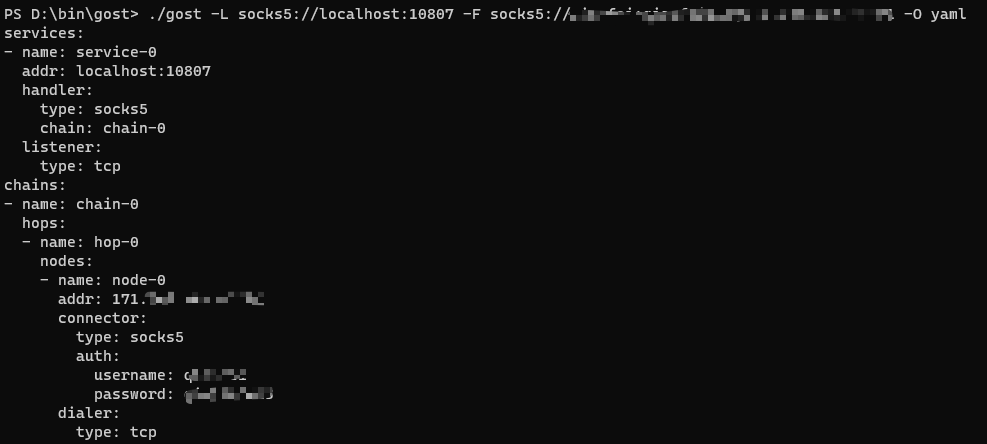
转发后端服务并生成yaml配置
# 生成yaml配置
## -L 指定本地服务
## -F - 指定转发服务
## -O 指定配置格式
/usr/local/gost/gost -L socks5://localhost:10807 -F socks5://qxxx:qxxx123@111.229.229.99:9921 -O yaml
将socks5转发为带认证的http
## -L 指定本地服务
## -F - 指定转发服务
## -O 指定配置格式
gost -L http://user:pass@127.0.0.1:1080 -F socks5://127.0.0.1:1080 -O yaml
运行时指定配置文件
# -C 指定配置文件
gost -C gost.yml
构建gost3的Dockerfile
# 阶段1,解压gost压缩包
## 请勿使用latest标签
FROM alpine:latest as unzip
# 设置gost版本号
ARG GOST_VERSION=3.0.0-rc8
# 下载GOST3压缩包
ADD https://github.com/go-gost/gost/releases/download/v"${GOST_VERSION}"/gost_"${GOST_VERSION}"_linux_amd64.tar.gz .
# 解压gost压缩包
RUN tar xvf gost_${GOST_VERSION}_linux_amd64.tar.gz

# 阶段2,复制gost可执行程序
FROM alpine:latest as copy_gost_bin
# 作者信息
LABEL qiaofei.li="https://blog.youkuaiyun.com/omaidb"
# 设置工作目录
WORKDIR /app
# 将unzip阶段的的gost可执行程序复制到当前目录
COPY --from=unzip gost .
# 将本地的配置文件复制到当前目录
COPY gost.yaml .
# USER <用户名>[:<用户组>]
# USER nobody:nobody
# 容器使用的端口
# EXPOSE 1080/tcp
# EXPOSE 1080/udp
# 运行主程序--指定绝对路径
ENTRYPOINT /app/gost -C gost.yaml
构建容器
# 构建容器
docker build -t gost .

# 修改tag
docker tag gost:latest omaidb/gost:latest

# 推送到仓库
docker push omaidb/gost:latest
启动容器
# 启动gost容器
docker run --name gost -dti -p 1080:1080 -p 1080:1080/udp --restart always -v /etc/gost/gost.yaml:/etc/gost/gost.yaml omaidb/gost


 367
367

 被折叠的 条评论
为什么被折叠?
被折叠的 条评论
为什么被折叠?
 到【灌水乐园】发言


