


一、Springfox 与 Swagger 简介
1.1 Springfox
Springfox 是一个开源的API Doc的框架, 它的前身是swagger-springmvc,能够完美的支持springmvc,可以将spring 接口方法自动转换为接口文档。 目前spring fox 正致力于对更多JSON API规范和标准的扩展和支持,例如:swagger,RAML和jsonapi。
1.2 Swagger
Swagger是一个规范和完整的框架,用于生成、描述、调用和可视化 RESTful 风格的 Web 服务,支持从整个API生命周期(从设计和文档到测试和部署)的开发。
swagger 是一个综合的开源项目,包含swagger-core、swagger-ui、swagger-codegen、swagger-editor等多个子项目。
swagger-core:Swagger Core是OpenAPI规范(以前称为Swagger规范)的Java实现。
swagger-ui:依据可视化文档,提供与API资源的可视化交互。
swagger-codegen:开源的代码生成器,根据Swagger定义的RESTful API可以自动建立服务端和客户端的连接。
swagger-editor:开源的api文档编辑器。
下图为swagger-ui 提供的文档可视化界面示例:

1.3 OpenApi、Swagger、Springfox的关系
Swagger Core 是 OpenApi 规范(以前称为Swagger规范)的Java 实现,而 Springfox 提供 Swagger 与 spring 的集成支持。
二、spring boot 集成 swagger 2.0
2.1 导入项目相关依赖
<!--swagger2-->
<dependency>
    <groupId>io.springfox</groupId>
    <artifactId>springfox-swagger2</artifactId>
    <version>2.9.2</version>
</dependency>
<!--swagger-ui -->
<dependency>
    <groupId>io.springfox</groupId>
    <artifactId>springfox-swagger-ui</artifactId>
    <version>2.9.2</version>
</dependency>
2.2 进行swagger个性化配置、并用@EnableSwagger2开启Swagger支持
这里需要说明的是swagger虽然是一个非常直观易用的接口调试插件,但是有可能导致接口信息泄露的危险,所以建议在开发环境和测试环境开启,在生产环境关闭。这里一共给出三种Swagger开关切换的方法:
如下面代码所示,在配置文件中配置自定义的开关参数,并在创建Docket时候,在链式调用的enable()方法中传入;
在SwaggerConfig配置类上添加@Profile({"dev","test"})注解,指明在开发环境和测试环境下激活此配置类,打包或者部署时候使用spring.profiles.active指明环境即可;
在配置文件中配置自定义的开关参数,并在SwaggerConfig配置类上添加@ConditionalOnProperty(name = "swagger.enable", havingValue = "true"),指明配置类的生效条件
注:@ConditionalOnProperty 注解说明
@ConditionalOnProperty注解能够控制某个@configuration修饰的配置类是否生效。具体操作是通过name和havingValue属性来实现,name对应application.properties(yml)中的某个属性值,如果该值为空,则返回false;如果值不为空,则将该值与havingValue指定的值进行比较,如果一样则返回true;否则返回false。如果返回值为false,则该configuration不生效;为true则生效。
/**
 * @author : heibaiying
 * @description :  Swagger 配置类
 */
@Configuration
@EnableSwagger2
public class SwaggerConfig {

    /***
     * 一个标准的swagger注解
     */
    @ApiOperation(notes = "查询所有产品", value = "产品查询接口")
    @ApiImplicitParams(
            @ApiImplicitParam(name = "id", value = "产品编号", paramType = "path", defaultValue = "1")
    )
    @ApiResponses(value = {
            @ApiResponse(code = 200, message = "请求成功"),
            @ApiResponse(code = 400, message = "无效的请求"),
            @ApiResponse(code = 401, message = "未经过授权认证"),
            @ApiResponse(code = 403, message = "已经过授权认证,但是没有该资源对应的访问权限"),
            @ApiResponse(code = 404, message = "服务器找不到给定的资源,商品不存在"),
            @ApiResponse(code = 500, message = "服务器错误")
    })
    @GetMapping(value = "/product/{id}", produces = "application/json")
    public ResponseEntity<Product> getProduct(@PathVariable long id) {
        Product product = new Product(id, "product" + id, new Date());
        return ResponseEntity.ok(product);
    }


    /***
     * 如果用实体类接收参数,则用实体类对应的属性名称指定参数
     */
    @ApiOperation(notes = "保存产品", value = "产品保存接口")
    @ApiImplicitParams({
            @ApiImplicitParam(name = "id", value = "产品编号", paramType = "body", defaultValue = "1"),
            @ApiImplicitParam(name = "name", value = "产品名称", paramType = "body"),
            @ApiImplicitParam(name = "date", value = "产品生产日期", paramType = "body")
    }
    )
    @PostMapping(value = "/product")
    public ResponseEntity<Void> saveProduct(@RequestBody Product product) {
        System.out.println(product);
        return ResponseEntity.ok().build();
    }


    /***
     * 在配置类中指明了该接口不被扫描到,可以在配置类中使用正则指定某一类符合规则的接口不被扫描到
     */
    @ApiOperation(notes = "该接口会被忽略", value = "产品保存接口")
    @PostMapping(value = "/ignore")
    public ResponseEntity<Product> ignore() {
        return ResponseEntity.ok().build();
    }

    /**
     * 不加上任何swagger相关的注解也会被扫描到 如果不希望被扫描到,需要用 @ApiIgnore 修饰
     */
    @PostMapping(value = "/normal")
    public ResponseEntity<Void> normal() {
        return ResponseEntity.ok().build();
    }

    @ApiIgnore
    @PostMapping(value = "/apiIgnore")
    public ResponseEntity<Void> apiIgnore() {
        return ResponseEntity.ok().build();
    }
}
application.yml:
#swagger启用开关
swagger:
  enable: true
2.3 swagger注解的使用和说明
@Slf4j
@Api(value = "产品接口", description = "产品信息接口")
@RestController
public class ProductController {
/***
* 一个标准的swagger注解
*/
@ApiOperation(notes = "查询所有产品", value = "产品查询接口")
@ApiImplicitParams(
@ApiImplicitParam(name = "id", value = "产品编号", paramType = "path", defaultValue = "1")
)
@ApiResponses(value = {
@ApiResponse(code = 200, message = "请求成功"),
@ApiResponse(code = 400, message = "无效的请求"),
@ApiResponse(code = 401, message = "未经过授权认证"),
@ApiResponse(code = 403, message = "已经过授权认证,但是没有该资源对应的访问权限"),
@ApiResponse(code = 404, message = "服务器找不到给定的资源,商品不存在"),
@ApiResponse(code = 500, message = "服务器错误")
})
@GetMapping(value = "/product/{id}", produces = "application/json")
public ResponseEntity<Product> getProduct(@PathVariable long id) {
Product product = new Product(id, "product" + id, new Date());
return ResponseEntity.ok(product);
}
/***
* 如果用实体类接收参数,则用实体类对应的属性名称指定参数
*/
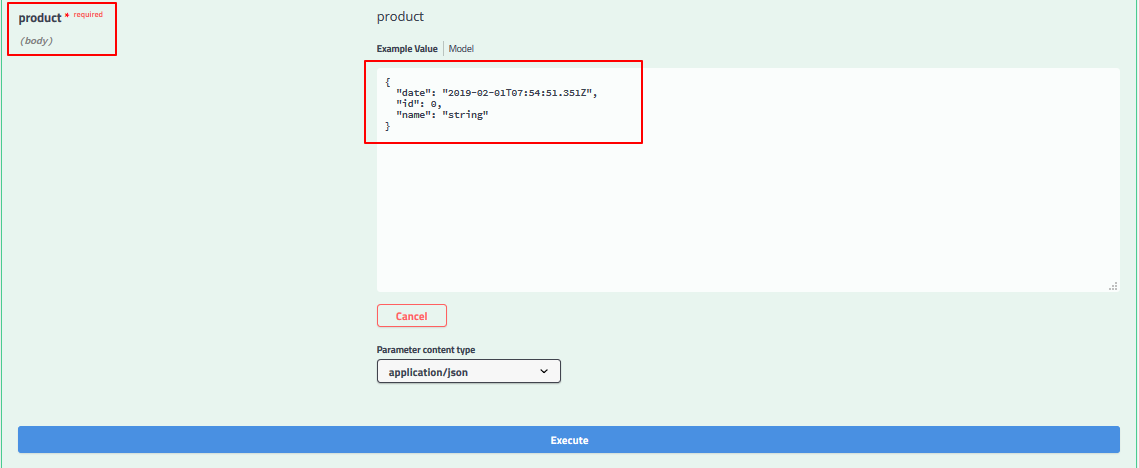
@ApiOperation(notes = "保存产品", value = "产品保存接口")
@ApiImplicitParams({
@ApiImplicitParam(name = "id", value = "产品编号", paramType = "body", defaultValue = "1"),
@ApiImplicitParam(name = "name", value = "产品名称", paramType = "body"),
@ApiImplicitParam(name = "date", value = "产品生产日期", paramType = "body")
}
)
@PostMapping(value = "/product")
public ResponseEntity<Void> saveProduct(@RequestBody Product product) {
System.out.println(product);
return ResponseEntity.ok().build();
}
/***
* 在配置类中指明了该接口不被扫描到,可以在配置类中使用正则指定某一类符合规则的接口不被扫描到
*/
@ApiOperation(notes = "该接口会被忽略", value = "产品保存接口")
@PostMapping(value = "/ignore")
public ResponseEntity<Product> ignore() {
return ResponseEntity.ok().build();
}
/**
* 不加上任何swagger相关的注解也会被扫描到 如果不希望被扫描到,需要用 @ApiIgnore 修饰
*/
@PostMapping(value = "/normal")
public ResponseEntity<Void> normal() {
return ResponseEntity.ok().build();
}
@ApiIgnore
@PostMapping(value = "/apiIgnore")
public ResponseEntity<Void> apiIgnore() {
return ResponseEntity.ok().build();
}
}
swagger 为了最大程度防止对逻辑代码的侵入,基本都是依靠注解来完成文档描述。常用注解如下:
@Api:Api 用在类上,说明该类的作用;
@ApiOperation:用在方法上,说明方法的作用;
@ApiParam:用在参数上,说明参数的作用;
@ApiImplicitParams:用在方法上说明方法参数的作用;
@ApiImplicitParam:用在@ApiImplicitParams注解中,描述每个具体参数;
@ApiResponses:一组@ApiResponse的配置;
@ApiResponse:请求返回的配置;
@ResponseHeader:响应头的配置;
@ApiModel:描述一个Model的信息(一般用在post创建的时候,使用@RequestBody接收参数的场景);
@ApiModelProperty:描述model的属性。
@ApiIgnore:可以用于类、方法、属性,代表该方法、类、属性不被swagger的文档所管理。
2.4 swagger-ui 可视化接口文档
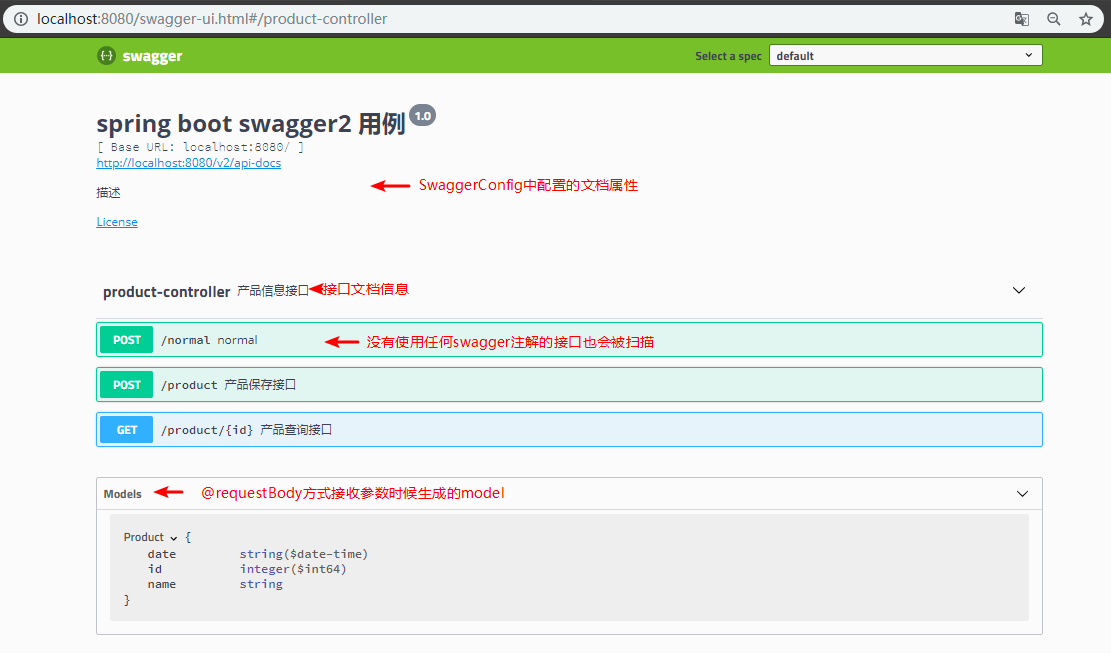
接口文档访问地址:http://localhost:8080/swagger-ui.html ,文档主界面如下:
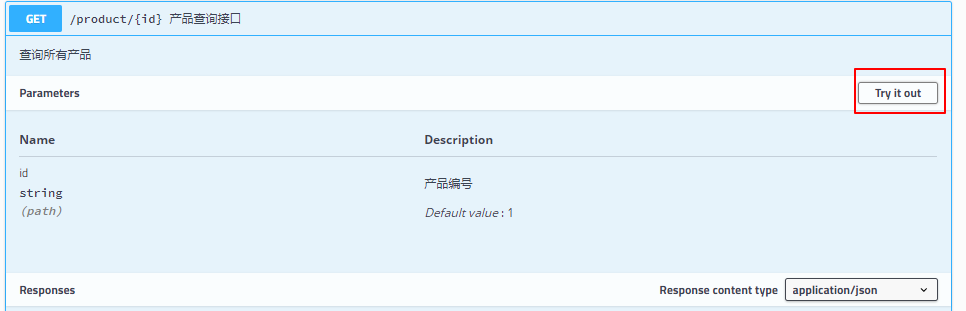
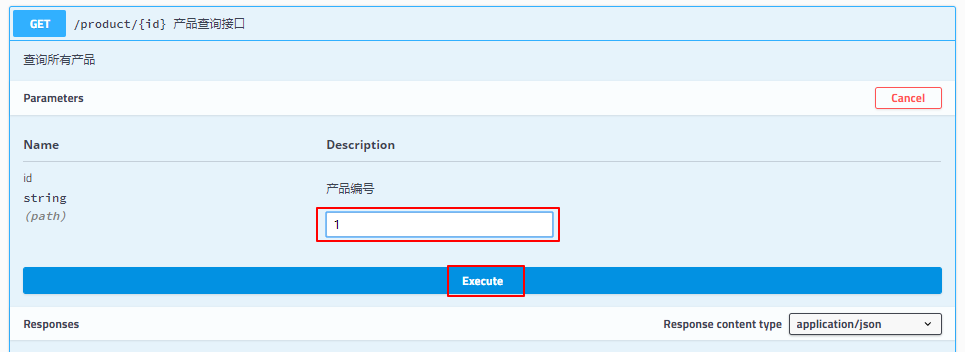
2.5 利用swagger-ui进行接口测试
点击对应接口的try it out按钮可以进行接口测试,此时可以输入对应的参数的值,然后点击下方的Execute按钮发送请求
转自:https://blog.youkuaiyun.com/m0_37809146/article/details/87160740


 22万+
22万+

 被折叠的 条评论
为什么被折叠?
被折叠的 条评论
为什么被折叠?
 到【灌水乐园】发言


