


 本文深入探讨了Apache Shiro框架中的身份认证流程,包括身份验证的原理、主要组件如Subject、Realm、Token的作用,以及如何在实际项目中进行登陆和退出操作。同时,提供了具体的代码示例和异常处理说明。
导语
下面就来按照顺序依次介绍一下Shiro的使用场景,场景代码后续会放到GitHub上面希望大家可以多多支持。首先先来介绍一下Shiro的身份认证。
文章目录
Shiro身份验证
身份验证
也就是说在应用中证明他就是它本人,在一般情况下例如用户提供了一些身份验证的信息,用来标识它本人,在Shiro中,用户需要提供principals(身份)和credentials(证明)给Shiro,从而应用能验证身份信息。
principals
身份,用来表明主体(Subject)标识的属性,可以是任意对象,例如用户名、手机号等等,但是要有一点,这个标识必须是唯一的,一个主体可以有多个principals,但是只能有一个Primary principals,一般情况下选用唯一标识。
credentials
凭证,这个凭证类似于只有用户知道的一个安全码,这个是每个用户唯一的,类似于密码安全证书等等。对于Shiro最常见的认证就是利用用户名和密码,也就是principals和credentials的组合来实现。
Realm
安全验证主体的数据源
入门小例子
环境准备
这里使用Maven构建工程,所以需要大家有一定的Maven基础。当然也可以参考GitHub -support-shiro
    <dependencies>
        <dependency>
            <groupId>junit</groupId>
            <artifactId>junit</artifactId>
            <version>4.9</version>
        </dependency>
        <dependency>
            <groupId>org.apache.shiro</groupId>
            <artifactId>shiro-core</artifactId>
            <version>1.4.0</version>
        </dependency>
        <dependency>
            <groupId>commons-logging</groupId>
            <artifactId>commons-logging</artifactId>
            <version>1.2</version>
        </dependency>
    </dependencies>
登陆/退出操作
1、准备用户身份凭据
在resource目录下面创建一个shiro.ini的文件,内容如下,通过[users]指定了三个数据主体,nihui/123,test/123,admin/123。
[users]
nihui=123
test=123
admin=123
编写测试
进入到源码目录com.nihui.shiro.loginandlogout.LoginLogoutTest,中查看测试类如下
public class LoginLogoutTest {
    public static void main(String[] args) {
        //1、获取SecurityManager工厂,
        Factory<SecurityManager> factory = new IniSecurityManagerFactory("classpath:shiro.ini");
        //2、得到一个SecurityManager实例,绑定到SecurityUtils
        SecurityManager securityManager = factory.getInstance();
        SecurityUtils.setSecurityManager(securityManager);

        //得到Subject 以及用户名密码的身份验证Token
        Subject subject = SecurityUtils.getSubject();
        UsernamePasswordToken token = new UsernamePasswordToken("nihui","123");
        // 验证登陆

        try {
            subject.login(token);
        }catch (AuthenticationException e){
            //身份认证失败
        }
        System.out.println(subject.isAuthenticated()); //true表示用户已经登陆

        //退出操作
        subject.logout();

    }
}
首先通过new IniSecurityManagerFactory()方法,指定一个ini配置文件,来创建一个SecurityManager工厂;直接获取SecurityManager实例并绑定到SecurityUtils,这个是一个全局的设置所以只设置一次就可以了。
完成绑定操作接下来就是认证操作,使用Subject绑定Token,通过login方法获取登陆成功验证。这里需要重要的提示几个异常操作,异常捕获机制捕获的是AuthenticationException类以及其子类,那么它的子类有那些呢?
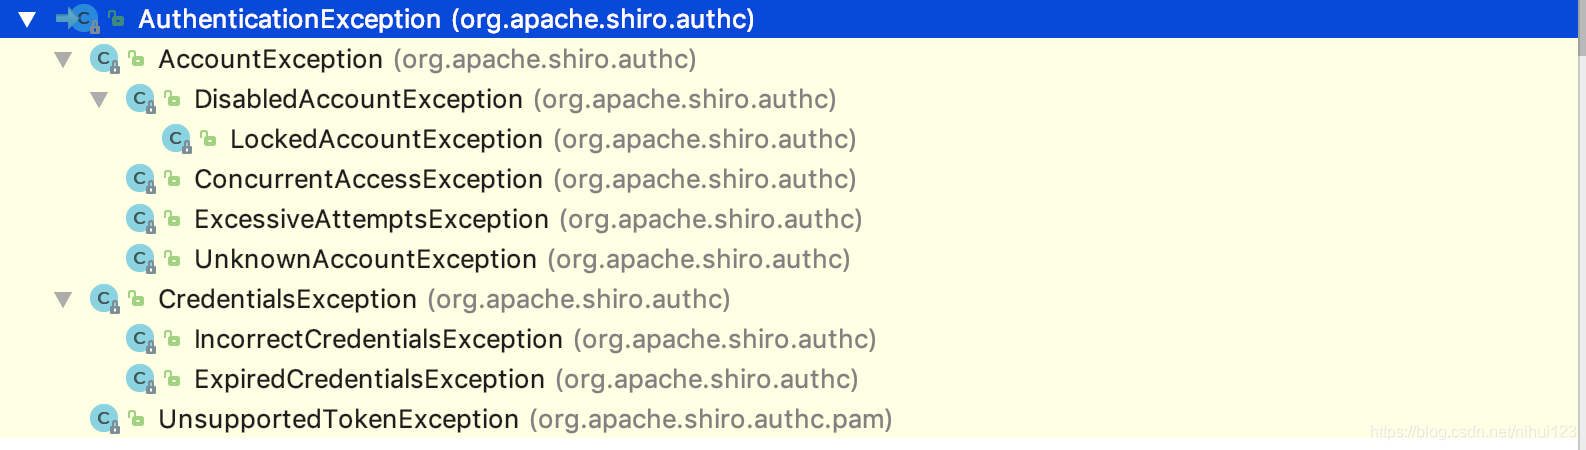
- DisabledAccountException :禁用账号异常
- LockedAccountException:锁定账号异常
- UnknownAccountException:未知账号异常
- ExcessiveAttemptsException:登陆失败次数过多异常
- IncorrectCredentialsException:错误凭证,也就是密码错误
- ExpiredCredentialsException:过期凭证异常
具体使用实例
@RequestMapping(value = "/login",method = RequestMethod.POST)
public @ResponseBody String login(@RequestBody Admin admin, HttpSession httpSession, HttpServletRequest request){
     String flag = "false";
     String username = admin.getUsername();
     String password = admin.getPassword();

     if (StringUtils.isEmpty(username)||StringUtils.isEmpty(password)){
         flag = "用户或者密码为空";
         return JSON.toJSONString(flag);
     }
//        CustomerAuthenticationToken token = new CustomerAuthenticationToken(username,password,false);
     UsernamePasswordToken token = new UsernamePasswordToken(username,password);
//        token.setLoginForm("1");
     System.out.println(token.getPassword());
     Subject currentUser = SecurityUtils.getSubject();

     System.out.println();
     try {
         logger.info("对用户["+username+"]进行登陆验证.验证开始");
         currentUser.login(token);
         flag = "success";
         logger.info("对用户["+username+"]进行登陆验证.验证通过");
     }catch (UnknownAccountException uae){
         logger.info("对用户["+username+"]进行登陆验证.验证未通过,未知账户");
         flag = "未知账户";
     }catch (IncorrectCredentialsException ice){
         ice.printStackTrace();
         logger.info("对用户["+username+"]进行登陆验证.验证未通过,错误的凭证");
         flag = "密码不正确";
     }catch (LockedAccountException lae){
         logger.info("对用户["+username+"]进行登陆验证.验证未通过,账户已锁定");
         flag = "账户已锁定";
     }catch (ExcessiveAttemptsException eae){
         logger.info("对用户["+username+"]进行登陆验证.验证未通过,错误次数过多");
         flag = "用户名或密码错误次数过多";
     }catch (AuthenticationException ae){
         logger.info("对用户["+username+"]进行登陆验证.验证未通过,堆栈轨迹如下");
         ae.printStackTrace();
         flag = "用户名或密码不正确";
     }

      //验证是否成功
     if (currentUser.isAuthenticated()){
         Session session = SecurityUtils.getSubject().getSession();
         session.setAttribute("loginType","1");
         session.setTimeout(LOGIN_TIME_OUT);
         String ip = IpUtil.getIpAddr(request);
         //记录登陆日志
         //logService.insertLoginLog(username,ip,request.getContextPath());
         return JSON.toJSONString(flag);
     }else {
         token.clear();
         return JSON.toJSONString(flag);
     }
}
步骤总结
- 1、收集用户身份凭证,例如用户名密码
- 2、调用Subject.login方法进行登陆操作,如果失败将会得到对应的异常,根据异常提示用户错误信息:或者是是否登陆成功
- 3、调用Subject.logout退出系统
注意
- 1、用户名可以通过硬编码的方式配置到ini文件中,当然也可以存储到数据库中需要的时候从数据库进行查询操作,并且在存储的时候用户名密码要进行加密处理
- 2、用户身份Token可能不仅仅可以用用户名和密码,也可以是手机号或者是邮箱,或者是多个验证组合。
身份认证流程
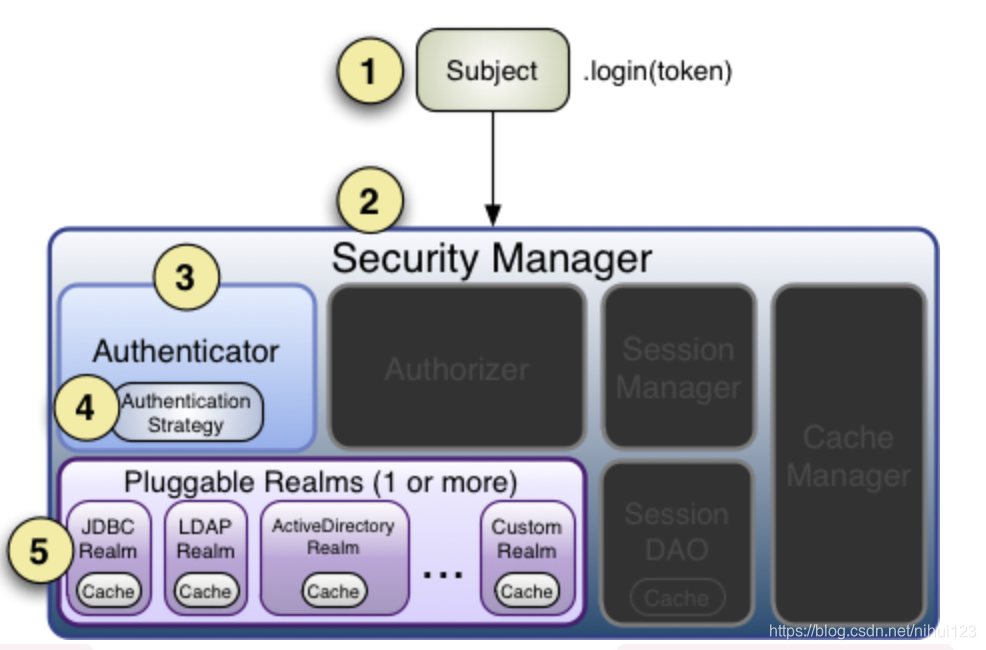
通过上图主要流程如下(按照图中所标注的步骤)
主要流程
- 1、调用 Subject.login进行登陆操作,将登陆委托给SecurityManager,在这之前必须通过SecurityUtils.setSecurityManager的设置。
- 2、SecurityManager 负责真正实现身份验证的逻辑,首先会委托给Authenticator进行验证。
- 3、Authenticator 作为真正的身份验证者,是ShiroApi的入口点,在此可以进行自定义的设置。
- 4、Authenticator会将身份验证工作委托给AuthenticationStrategy,进行多个Realm身份验证操作,默认ModularRealmAuthenticator 会调用AuthenticationStrategy进行多Realm身份验证。
- 5、Authenticator 会把相应的token传入Realm,从Realm获取身份验证信息,如果没有返回就会抛出异常身份验证失败,这里可以设置多个Realm按照顺序进行访问。
查看源码
从上面内容可以知道,其实Subject就是应用于SecurityManager之间的代理,在org.apache.shiro.subject.support.DelegatingSubject 类中有Subject代理的具体实现内容。如下
login(AuthenticationToken token) Subject的登陆方法
public void login(AuthenticationToken token) throws AuthenticationException {
		//类似于清理缓存操作
        clearRunAsIdentitiesInternal();
        Subject subject = securityManager.login(this, token);
		//身份获取
        PrincipalCollection principals;

        String host = null;
		//判断是否实现的是默认的代理
        if (subject instanceof DelegatingSubject) {
            DelegatingSubject delegating = (DelegatingSubject) subject;
            //we have to do this in case there are assumed identities - we don't want to lose the 'real' principals:
            principals = delegating.principals;
            host = delegating.host;
        } else {
        	//如果不是则获取到对应的自定义的用户身份认证
            principals = subject.getPrincipals();
        }

        if (principals == null || principals.isEmpty()) {
            String msg = "Principals returned from securityManager.login( token ) returned a null or " +
                    "empty value.  This value must be non null and populated with one or more elements.";
            throw new IllegalStateException(msg);
        }

        this.principals = principals;
        this.authenticated = true;
        if (token instanceof HostAuthenticationToken) {
            host = ((HostAuthenticationToken) token).getHost();
        }
        if (host != null) {
            this.host = host;
        }
        Session session = subject.getSession(false);
        if (session != null) {
            this.session = decorate(session);
        } else {
            this.session = null;
        }
    }
上面代码到进入之后先完成了一个类似于清理的操作。然后回调了SecurityManager接口的login方法。这个方法的实际实现在org.apache.shiro.mgt.DefaultSecurityManager类中,具体内容如下
    public Subject login(Subject subject, AuthenticationToken token) throws AuthenticationException {
    	//认证信息
        AuthenticationInfo info;
        try {
        	//获取到认证信息
            info = authenticate(token);
        } catch (AuthenticationException ae) {
            try {
                onFailedLogin(token, ae, subject);
            } catch (Exception e) {
                if (log.isInfoEnabled()) {
                    log.info("onFailedLogin method threw an " +
                            "exception.  Logging and propagating original AuthenticationException.", e);
                }
            }
            throw ae; //propagate
        }

        Subject loggedIn = createSubject(token, info, subject);

        onSuccessfulLogin(token, info, loggedIn);

        return loggedIn;
    }
createSubject(token, info, subject) 创建一个Subject对象
上面代码最为关键的地方就是,下面这个方法
Subject loggedIn = createSubject(token, info, subject);
这里先来看一下createSubject()方法的实现
  protected Subject createSubject(AuthenticationToken token, AuthenticationInfo info, Subject existing) {
        SubjectContext context = createSubjectContext();
        context.setAuthenticated(true);
        context.setAuthenticationToken(token);
        context.setAuthenticationInfo(info);
        if (existing != null) {
            context.setSubject(existing);
        }
        return createSubject(context);
    }
最终经过一层一层的回调,实现了下面这个方法从而产生了一个Subject对象。然后继续通过SecurityManager进行管理操作。
 //since 1.2
    public DelegatingSubject(PrincipalCollection principals, boolean authenticated, String host,
                             Session session, boolean sessionCreationEnabled, SecurityManager securityManager) {
        if (securityManager == null) {
            throw new IllegalArgumentException("SecurityManager argument cannot be null.");
        }
        this.securityManager = securityManager;
        this.principals = principals;
        this.authenticated = authenticated;
        this.host = host;
        if (session != null) {
            this.session = decorate(session);
        }
        this.sessionCreationEnabled = sessionCreationEnabled;
    }
也就是说,最终返回的还是一个Subject对象,那么接下来看一下onSuccessfulLogin(token, info, loggedIn);
onSuccessfulLogin(token, info, loggedIn) 登陆成功判断
org.apache.shiro.mgt.AbstractRememberMeManager类中有如下一个方法。
protected void onSuccessfulLogin(AuthenticationToken token, AuthenticationInfo info, Subject subject) {
        rememberMeSuccessfulLogin(token, info, subject);
    }
在上面方法中调用了
  protected void rememberMeSuccessfulLogin(AuthenticationToken token, AuthenticationInfo info, Subject subject) {
        RememberMeManager rmm = getRememberMeManager();
        if (rmm != null) {
            try {
                rmm.onSuccessfulLogin(subject, token, info);
            } catch (Exception e) {
                if (log.isWarnEnabled()) {
                    String msg = "Delegate RememberMeManager instance of type [" + rmm.getClass().getName() +
                            "] threw an exception during onSuccessfulLogin.  RememberMe services will not be " +
                            "performed for account [" + info + "].";
                    log.warn(msg, e);
                }
            }
        } else {
            if (log.isTraceEnabled()) {
                log.trace("This " + getClass().getName() + " instance does not have a " +
                        "[" + RememberMeManager.class.getName() + "] instance configured.  RememberMe services " +
                        "will not be performed for account [" + info + "].");
            }
        }
    }
AbstractRememberMeManager 用户管理器
/**
 * Abstract implementation of the {@code RememberMeManager} interface that handles
 * {@link #setSerializer(org.apache.shiro.io.Serializer) serialization} and
 * {@link #setCipherService encryption} of the remembered user identity.
 * <p/>
 * The remembered identity storage location and details are left to subclasses.
 * <h2>Default encryption key</h2>
 * This implementation uses an {@link AesCipherService AesCipherService} for strong encryption by default.  It also
 * uses a default generated symmetric key to both encrypt and decrypt data.  As AES is a symmetric cipher, the same
 * {@code key} is used to both encrypt and decrypt data, BUT NOTE:
 * <p/>
 * Because Shiro is an open-source project, if anyone knew that you were using Shiro's default
 * {@code key}, they could download/view the source, and with enough effort, reconstruct the {@code key}
 * and decode encrypted data at will.
 * <p/>
 * Of course, this key is only really used to encrypt the remembered {@code PrincipalCollection} which is typically
 * a user id or username.  So if you do not consider that sensitive information, and you think the default key still
 * makes things 'sufficiently difficult', then you can ignore this issue.
 * <p/>
 * However, if you do feel this constitutes sensitive information, it is recommended that you provide your own
 * {@code key} via the {@link #setCipherKey setCipherKey} method to a key known only to your application,
 * guaranteeing that no third party can decrypt your data.  You can generate your own key by calling the
 * {@code CipherService}'s {@link org.apache.shiro.crypto.AesCipherService#generateNewKey() generateNewKey} method
 * and using that result as the {@link #setCipherKey cipherKey} configuration attribute.
 *
 * @since 0.9
 */
- 处理{@code remembermemanager}接口的抽象实现{@link setserializer(org.apache.shiro.io.serializer)序列化}和记住的用户标识的{@link setcipherservice encryption}。
- 记住的标识存储位置和详细信息留给子类。默认加密密钥,默认情况下,此实现使用{@link aescipherservice aescipherservice}进行强加密。它也使用默认生成的对称密钥来加密和解密数据。因为aes是对称密码,所以{@code key}用于加密和解密数据
注意
因为shiro是一个开源项目,如果有人知道您使用的是shiro的默认值{@code key},他们可以下载/查看源代码,并通过足够的努力重新构建{@code key}随意解码加密数据。当然,这个密钥实际上只用于加密记住的{@code principalCollection},它通常是用户ID或用户名。所以如果你不考虑这些敏感信息,你认为默认的密钥,那么你可以忽略这个问题。但是,如果您认为这是敏感信息,建议您提供自己的{@code key}通过{@link setcipherkey setcipherkey}方法指向一个只有应用程序知道的密钥,保证没有第三方可以解密您的数据。您可以通过调用{@code cipherservice}的{@link org.apache.shiro.crypto.aescipherservice{generatenewkey()generatenewkey}方法并将该结果用作{@link setcipherkey cipherkey}配置属性。
总结
由于Shiro是开源的,所以为了安全起见,在使用的时候可以加入自己默认一些加密算法。所以说有时间还是要简单的学习一下Shiro源码有关的知识。了解其中提到的AES加密算法。或者是在使用的时候可以先对用户名密码进行加密操作。


 486
486

 被折叠的 条评论
为什么被折叠?
被折叠的 条评论
为什么被折叠?
 到【灌水乐园】发言


