


 本文介绍了如何通过Spring注解来实现Service的配置。首先,需修改Spring配置文件添加相应代码;接着,创建Service类并使用@Service注解标记,指定bean名称;然后,在测试类中,利用ApplicationContext获取并调用Service的方法进行测试;最后,确保pom.xml中配置了junit依赖以运行测试。
一、修改Spring配置文件,添加下面代码
<!-- 自动扫描dao和service包(自动注入) -->
<context:component-scan base-package="com.maventest.dao,com.maventest.service" />
二、编写service类,使用注解符号,标识该类,并指定调用名称为“userService”
import org.springframework.stereotype.Service;
@Service("userService")
/**
 *
 */
package com.maventest.service.impl;

import org.springframework.stereotype.Service;

import com.maventest.service.UserServiceI;

/**
 * @author MyPC
 *
 */
@Service("userService")
public class UserServiceImpl implements UserServiceI {

	/* (non-Javadoc)
	 * @see com.maventest.service.UserServiceI#addUser()
	 */
	@Override
	public void addUser() {
		System.out.println("add user");

	}

}
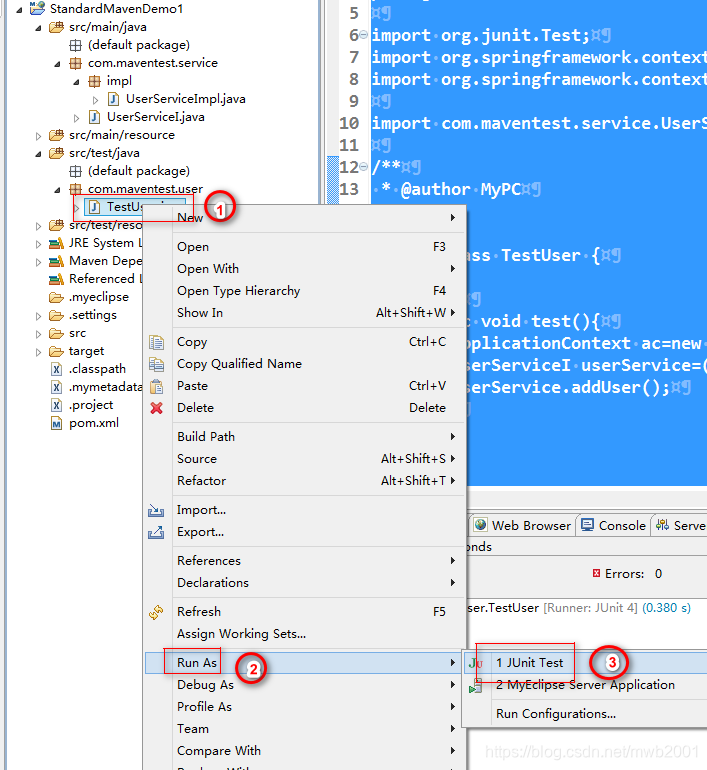
三、测试类中调用service类中的方法,测试配置是否成功
ApplicationContext ac=new ClassPathXmlApplicationContext(new String[]{"classpath:spring.xml"});
UserServiceI userService=(UserServiceI) ac.getBean("userService");
userService.addUser();
/**
 *
 */
package com.maventest.user;

import org.junit.Test;
import org.springframework.context.ApplicationContext;
import org.springframework.context.support.ClassPathXmlApplicationContext;

import com.maventest.service.UserServiceI;

/**
 * @author MyPC
 *
 */
public class TestUser {

	@Test
	public void test(){
		ApplicationContext ac=new ClassPathXmlApplicationContext(new String[]{"classpath:spring.xml"});
		UserServiceI userService=(UserServiceI) ac.getBean("userService");
		userService.addUser();

	}

}
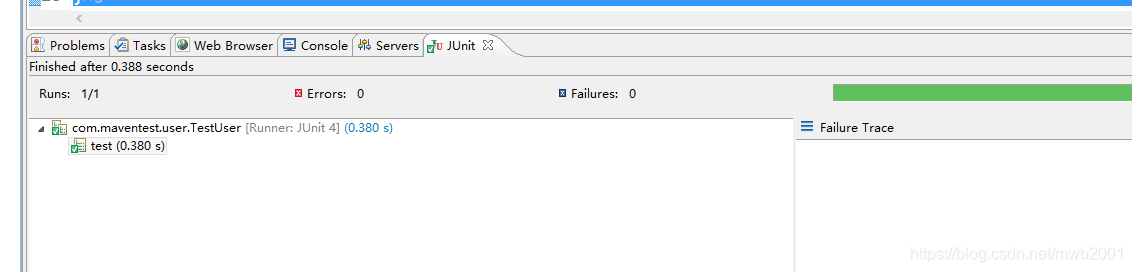
四、执行结果
需要在pom.xml中配置junit 的jar信息
<!-- junit -->
<dependency>
	<groupId>junit</groupId>
	<artifactId>junit</artifactId>
	<version>4.11-beta-1</version>
       <!-- scope配置为test表示仅测试使用,发布包不会使用到该jar包 -->
	<scope>test</scope>
</dependency>


 2818
2818

 被折叠的 条评论
为什么被折叠?
被折叠的 条评论
为什么被折叠?
 到【灌水乐园】发言


