


 本文通过设计一个SpringHelloWorld示例,介绍了控制反转(IoC)和面向切面(AOP)的核心概念,展示了Spring从XML配置到Java配置和注解配置的简化过程,最后探讨了SpringBoot在简化开发中的作用。
目录
一. 前言
本文主要通过一个示例,向你展示 Spring Framework 组件的典型应用场景和基于这个场景设计出的简单案例,并以此引出 Spring 的核心要点,比如 IOC 和 AOP 等;在此基础上还引入了不同的配置方式, 如 XML,Java 配置和注解方式的差异。
Spring 和 Spring Framework 的组件,对于开发者来说有几个问题:
- 首先,对于 Spring 进阶,直接去看 IOC 和 AOP,存在一个断层,所以需要整体上构建对Spring 框架认知上进一步深入,这样才能构建知识体系。
- 其次,很多开发者入门都是从 Spring Boot 开始的,他对 Spring 整体框架底层,以及发展历史不是很了解;特别是对于一些老旧项目维护和底层 Bug 分析没有全局观。
- 再者,Spring 代表的是一种框架设计理念,需要全局上理解 Spring Framework 组件是如何配合工作的,需要理解它设计的初衷和未来趋势。
如下是官方在解释 Spring 框架的常用场景的图:
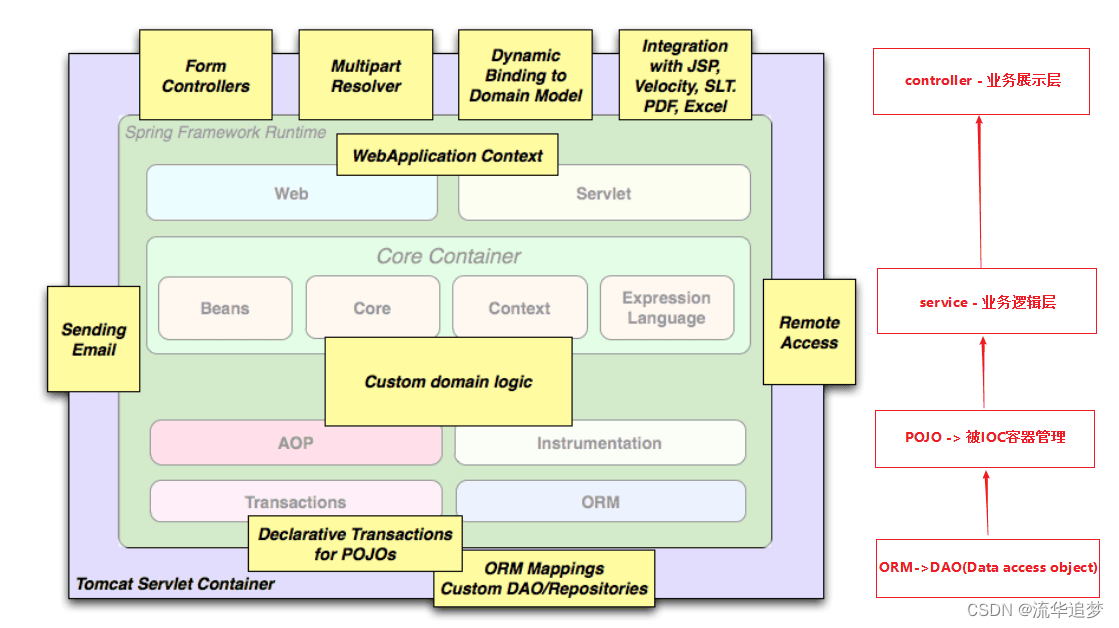
引入这个图,最重要的原因是为后面设计一个案例帮助你构建认知。
二. 设计一个 Spring 的 HelloWorld
结合上图的使用场景,设计一个查询用户的案例的两个需求,来看 Spring 框架帮我们简化了什么开发工作:
- 查询用户数据,来看 DAO + POJO -> Service 的初始化和装载。
- 给所有 Service 的查询方法记录日志。
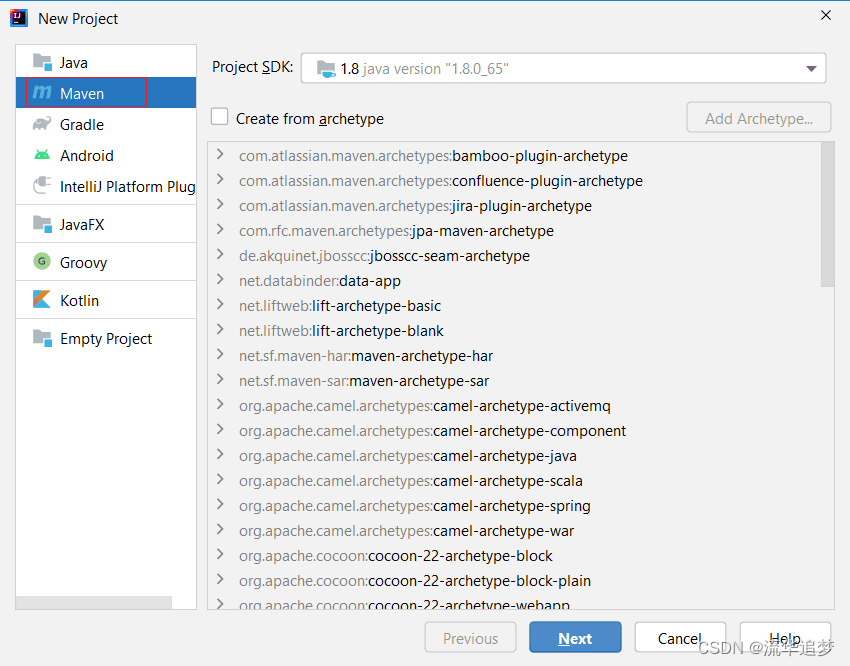
2.1. 创建 HelloWorld 项目
创建一个 Maven 的 Java 项目:
引入 Spring 框架的 POM 依赖,以及查看这些依赖之间的关系:
<?xml version="1.0" encoding="UTF-8"?>
<project xmlns="http://maven.apache.org/POM/4.0.0"
         xmlns:xsi="http://www.w3.org/2001/XMLSchema-instance"
         xsi:schemaLocation="http://maven.apache.org/POM/4.0.0 http://maven.apache.org/xsd/maven-4.0.0.xsd">
    <modelVersion>4.0.0</modelVersion>

    <groupId>com.lm.it</groupId>
    <artifactId>lm-spring-framework-demo-helloworld-xml</artifactId>
    <version>1.0-SNAPSHOT</version>

    <properties>
        <maven.compiler.source>8</maven.compiler.source>
        <maven.compiler.target>8</maven.compiler.target>
        <spring.version>5.3.9</spring.version>
        <aspectjweaver.version>1.9.6</aspectjweaver.version>
    </properties>

    <dependencies>
        <dependency>
            <groupId>org.springframework</groupId>
            <artifactId>spring-context</artifactId>
            <version>${spring.version}</version>
        </dependency>
        <dependency>
            <groupId>org.springframework</groupId>
            <artifactId>spring-core</artifactId>
            <version>${spring.version}</version>
        </dependency>
        <dependency>
            <groupId>org.springframework</groupId>
            <artifactId>spring-beans</artifactId>
            <version>${spring.version}</version>
        </dependency>
        <dependency>
            <groupId>org.aspectj</groupId>
            <artifactId>aspectjweaver</artifactId>
            <version>${aspectjweaver.version}</version>
        </dependency>
    </dependencies>
</project>
POJO - User:
package com.lm.it.springframework.entity;

/**
 * User
 */
public class User {
    /**
     * user's name.
     */
    private String name;

    /**
     * user's age.
     */
    private int age;

    /**
     * init.
     *
     * @param name name
     * @param age  age
     */
    public User(String name, int age) {
        this.name = name;
        this.age = age;
    }

    public String getName() {
        return name;
    }

    public void setName(String name) {
        this.name = name;
    }

    public int getAge() {
        return age;
    }

    public void setAge(int age) {
        this.age = age;
    }
}
DAO 获取 POJO, UserDaoServiceImpl(mock 数据):
package com.lm.it.springframework.dao;

import java.util.Collections;
import java.util.List;

import tech.pdai.springframework.entity.User;

/**
 * UserDao
 */
public class UserDaoImpl {
    /**
     * init.
     */
    public UserDaoImpl() {
    }

    /**
     * mocked to find user list.
     *
     * @return user list
     */
    public List<User> findUserList() {
        return Collections.singletonList(new User("流华追梦", 18));
    }
}
增加 daos.xml:
<?xml version="1.0" encoding="UTF-8"?>
<beans xmlns="http://www.springframework.org/schema/beans"
       xmlns:xsi="http://www.w3.org/2001/XMLSchema-instance"
       xsi:schemaLocation="http://www.springframework.org/schema/beans
 http://www.springframework.org/schema/beans/spring-beans.xsd">

    <bean id="userDao" class="com.lm.it.springframework.dao.UserDaoImpl">
        <!-- additional collaborators and configuration for this bean go here -->
    </bean>

    <!-- more bean definitions for data access objects go here -->
</beans>
业务层 UserServiceImpl(调用DAO层):
package com.lm.it.springframework.service;

import java.util.List;

import com.lm.it.springframework.dao.UserDaoImpl;
import com.lm.it.springframework.entity.User;

/**
 * UserService
 */
public class UserServiceImpl {
    /**
     * user dao impl.
     */
    private UserDaoImpl userDao;

    /**
     * init.
     */
    public UserServiceImpl() {
    }

    /**
     * find user list.
     *
     * @return user list
     */
    public List<User> findUserList() {
        return this.userDao.findUserList();
    }

    /**
     * set dao.
     *
     * @param userDao user dao
     */
    public void setUserDao(UserDaoImpl userDao) {
        this.userDao = userDao;
    }
}
增加 services.xml:
<?xml version="1.0" encoding="UTF-8"?>
<beans xmlns="http://www.springframework.org/schema/beans"
       xmlns:xsi="http://www.w3.org/2001/XMLSchema-instance"
       xsi:schemaLocation="http://www.springframework.org/schema/beans
 http://www.springframework.org/schema/beans/spring-beans.xsd">

    <!-- services -->
    <bean id="userService" class="com.lm.it.springframework.service.UserServiceImpl">
        <property name="userDao" ref="userDao"/>
        <!-- additional collaborators and configuration for this bean go here -->
    </bean>

    <!-- more bean definitions for services go here -->
</beans>
拦截所有 service 中的方法,并输出记录:
package com.lm.it.springframework.aspect;

import java.lang.reflect.Method;

import org.aspectj.lang.ProceedingJoinPoint;
import org.aspectj.lang.annotation.Around;
import org.aspectj.lang.annotation.Aspect;
import org.aspectj.lang.reflect.MethodSignature;
import org.springframework.context.annotation.EnableAspectJAutoProxy;

/**
 * LogAspect
 */
@Aspect
public class LogAspect {
    /**
     * aspect for every methods under service package.
     */
    @Around("execution(* com.lm.it.springframework.service.*.*(..))")
    public Object businessService(ProceedingJoinPoint pjp) throws Throwable {
        // get attribute through annotation
        Method method = ((MethodSignature) pjp.getSignature()).getMethod();
        System.out.println("execute method: " + method.getName());

        // continue to process
        return pjp.proceed();
    }
}
增加 aspects.xml:
<?xml version="1.0" encoding="UTF-8"?>
<beans xmlns="http://www.springframework.org/schema/beans"
       xmlns:xsi="http://www.w3.org/2001/XMLSchema-instance"
       xmlns:aop="http://www.springframework.org/schema/aop"
       xmlns:context="http://www.springframework.org/schema/context"
       xsi:schemaLocation="http://www.springframework.org/schema/beans
 http://www.springframework.org/schema/beans/spring-beans.xsd
 http://www.springframework.org/schema/aop
 http://www.springframework.org/schema/aop/spring-aop.xsd
 http://www.springframework.org/schema/context
 http://www.springframework.org/schema/context/spring-context.xsd
">

    <context:component-scan base-package="com.lm.it.springframework" />

    <aop:aspectj-autoproxy/>

    <bean id="logAspect" class="com.lm.it.springframework.aspect.LogAspect">
        <!-- configure properties of aspect here as normal -->
    </bean>

    <!-- more bean definitions for data access objects go here -->
</beans>
组装 App:
package com.lm.it.springframework;
import java.util.List;
import com.lm.it.springframework.entity.User;
import com.lm.it.springframework.service.UserServiceImpl;
import org.springframework.context.ApplicationContext;
import org.springframework.context.support.ClassPathXmlApplicationContext;
/**
* App
*/
public class App {
/**
* main interfaces.
*
* @param args args
*/
public static void main(String[] args) {
// create and configure beans
ApplicationContext context =
new ClassPathXmlApplicationContext("aspects.xml", "daos.xml", "services.xml");
// retrieve configured instance
UserServiceImpl service = context.getBean("userService", UserServiceImpl.class);
// use configured instance
List<User> userList = service.findUserList();
// print info from beans
userList.forEach(a -> System.out.println(a.getName() + "," + a.getAge()));
}
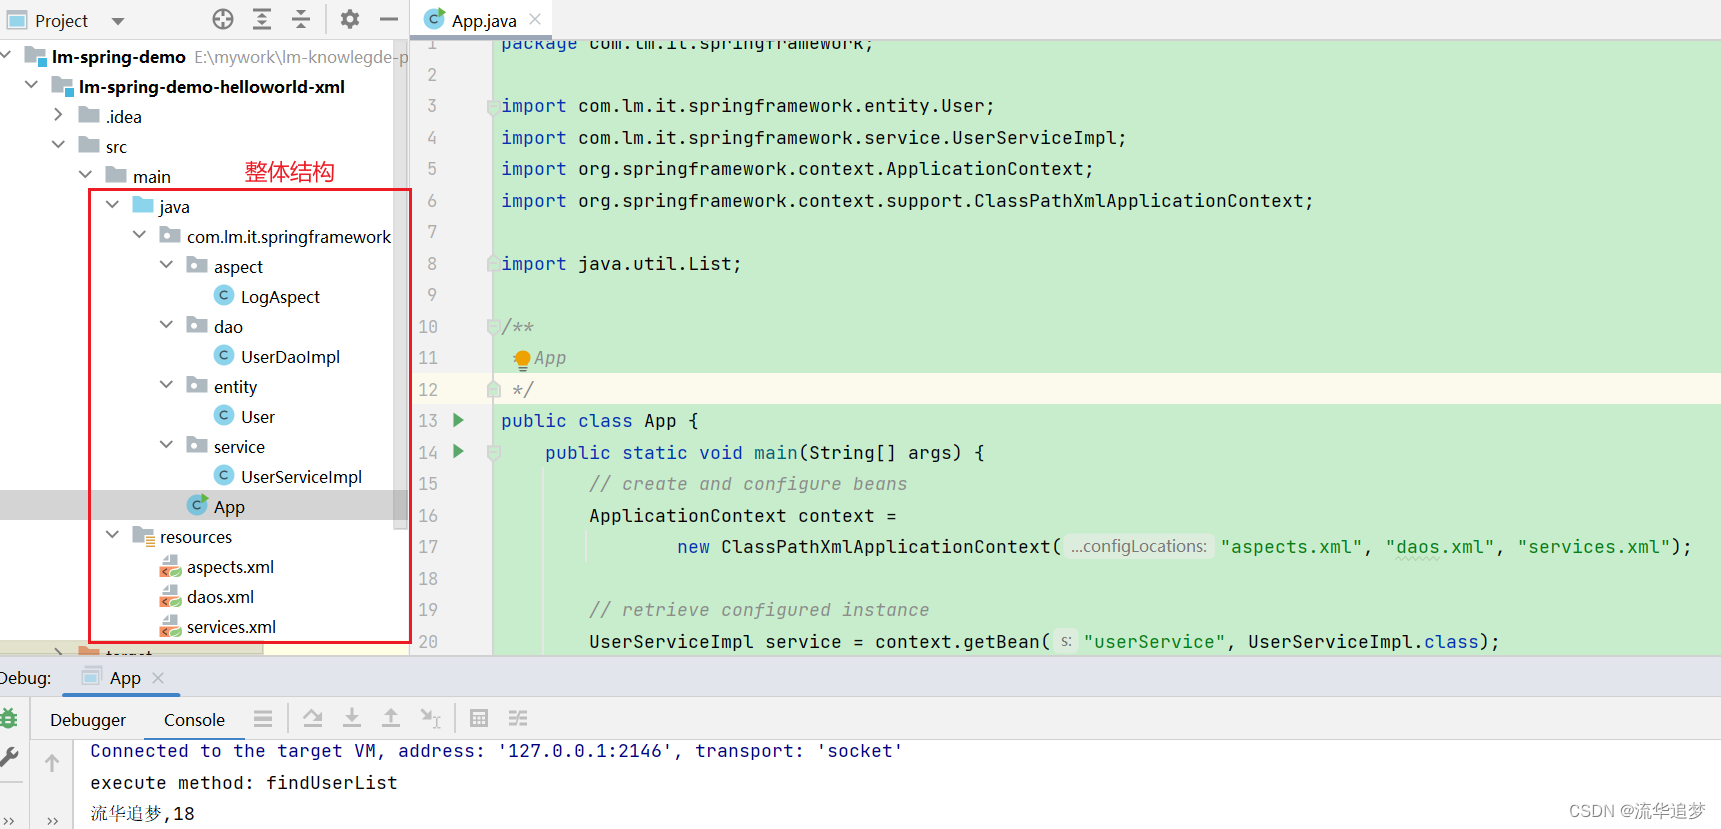
}整体结构和运行 App:
至此,整个 HelloWorld 示例完成。那么这个例子体现了 Spring 的哪些核心要点呢?请继续往下看。
2.2. 核心要点一:控制反转(IOC)
来看第一个需求:查询用户(service 通过调用 dao 查询 POJO),本质上如何创建User/Dao/Service 等。
1. 如果没有 Spring 框架,我们需要自己创建 User/Dao/Service 等,比如:
UserDaoImpl userDao = new UserDaoImpl();
UserSericeImpl userService = new UserServiceImpl();
userService.setUserDao(userDao);
List<User> userList = userService.findUserList();
2. 有了 Spring 框架,可以将原有 Bean 的创建工作转给框架,需要用时从 Bean 的容器中获取即可,这样便简化了开发工作,Bean 的创建和使用分离了:
// create and configure beans
ApplicationContext context =
        new ClassPathXmlApplicationContext("aspects.xml", "daos.xml", "services.xml");

// retrieve configured instance
UserServiceImpl service = context.getBean("userService", UserServiceImpl.class);

// use configured instance
List<User> userList = service.findUserList();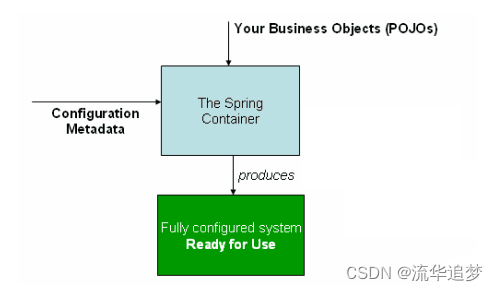
更进一步,你便能理解为何会有如下的知识点了:
- Spring 框架管理这些 Bean 的创建工作,即由用户管理 Bean 转变为框架管理 Bean,这个就叫控制反转 - Inversion of Control(IoC)。
- Spring 框架托管创建的 Bean 放在哪里呢? 这便是 IoC Container。
- Spring 框架为了更好让用户配置 Bean,必然会引入不同方式来配置 Bean。这便是 xml 配置,Java 配置,注解配置等支持。
- Spring 框架既然接管了 Bean 的生成,必然需要管理整个 Bean 的生命周期等。
- 应用程序代码从 Ioc Container 中获取依赖的 Bean,注入到应用程序中,这个过程叫 依赖注入(Dependency Injection,DI),所以说控制反转是通过依赖注入实现的,其实它们是同一个概念的不同角度描述。通俗来说就是 IoC 是设计思想,DI 是实现方式。
- 在依赖注入时,有哪些方式呢?这就是构造器方式,@Autowired、@Resource、 @Qualifier... 同时 Bean 之间存在依赖(可能存在先后顺序问题,以及循环依赖问题等)。
2.3. 核心要点二:面向切面(AOP)
来看第二个需求:给 Service 所有方法调用添加日志(调用方法时),本质上是解耦问题。
1. 如果没有 Spring 框架,我们需要在每个 service 的方法中都添加记录日志的方法,比如:
/**
* find user list.
*
* @return user list
*/
public List<User> findUserList() {
    System.out.println("execute method findUserList");
    return this.userDao.findUserList();
}
2. 有了Spring框架,通过 @Aspect 注解定义了切面,这个切面中定义了拦截所有 service 的方法,并记录日志;可以明显看到,框架将日志记录和业务需求的代码解耦了,不再是侵入式的了:
/**
* aspect for every methods under service package.
*/
@Around("execution(* com.lm.it.springframework.service.*.*(..))")
public Object businessService(ProceedingJoinPoint pjp) throws Throwable {
    // get attribute through annotation
    Method method = ((MethodSignature) pjp.getSignature()).getMethod();
    System.out.println("execute method: " + method.getName());

    // continue to process
    return pjp.proceed();
}
更进一步,你便能理解为何会有如下的知识点了:
- Spring 框架通过定义切面,通过拦截切点实现了不同业务模块的解耦,这个就叫面向切面编程 - Aspect Oriented Programming(AOP)。
- 为什么 @Aspect 注解使用的是 aspectj 的 jar 包呢?这就引出了 Aspect4J 和 Spring AOP 的历史渊源,只有理解了 Aspect4J 和 Spring 的渊源才能理解有些注解上的兼容设计。
- 如何支持更多拦截方式来实现解耦,以满足更多场景需求呢? 这就是 @Around、 @Pointcut... 等的设计。
- 那么 Spring 框架又是如何实现 AOP 的呢?这就引入代理技术,分静态代理和动态代理,动态代理又包含 JDK 代理和 CGLIB 代理等。
三. Spring 框架如何逐步简化开发
通过上述的框架介绍和例子,已经初步知道了 Spring 设计的两个大的要点:IOC和AOP。从框架的设计角度而言,更为重要的是简化开发,比如提供更为便捷的配置 Bean 的方式,直至 0配置(即约定大于配置)。这里我将通过 Spring 历史版本的发展和 SpringBoot 的推出等,来帮你理解Spring 框架是如何逐步简化开发的。
3.1. Java 配置方式改造
在前文的例子中, 是通过 xml 配置方式实现的,这种方式实际上比较麻烦,我们通过 Java 配置进行改造:
- User、UserDaoImpl、UserServiceImpl、LogAspect 不用改;
- 将原通过 xml 配置转换为 Java 配置。
增加 BeansConfig:
package com.lm.it.springframework.config;

import org.springframework.context.annotation.Bean;
import org.springframework.context.annotation.Configuration;
import org.springframework.context.annotation.EnableAspectJAutoProxy;
import com.lm.it.springframework.aspect.LogAspect;
import com.lm.it.springframework.dao.UserDaoImpl;
import com.lm.it.springframework.service.UserServiceImpl;

/**
 * BeansConfig
 */
@EnableAspectJAutoProxy
@Configuration
public class BeansConfig {
    /**
     * @return user dao
     */
    @Bean("userDao")
    public UserDaoImpl userDao() {
        return new UserDaoImpl();
    }

    /**
     * @return user service
     */
    @Bean("userService")
    public UserServiceImpl userService() {
        UserServiceImpl userService = new UserServiceImpl();
        userService.setUserDao(userDao());
        return userService;
    }

    /**
     * @return log aspect
     */
    @Bean("logAspect")
    public LogAspect logAspect() {
        return new LogAspect();
    }
}
在 App 中加载 BeansConfig 的配置:
package com.lm.it.springframework;

import java.util.List;

import org.springframework.context.annotation.AnnotationConfigApplicationContext;
import com.lm.it.springframework.config.BeansConfig;
import com.lm.it.springframework.entity.User;
import com.lm.it.springframework.service.UserServiceImpl;

/**
 * App
 */
public class App {
    /**
     * main interfaces.
     *
     * @param args args
     */
    public static void main(String[] args) {
        // create and configure beans
        AnnotationConfigApplicationContext context = new AnnotationConfigApplicationContext(BeansConfig.class);

        // retrieve configured instance
        UserServiceImpl service = context.getBean("userService", UserServiceImpl.class);

        // use configured instance
        List<User> userList = service.findUserList();

        // print info from beans
        userList.forEach(a -> System.out.println(a.getName() + "," + a.getAge()));
    }
}
整体结构和运行 App:

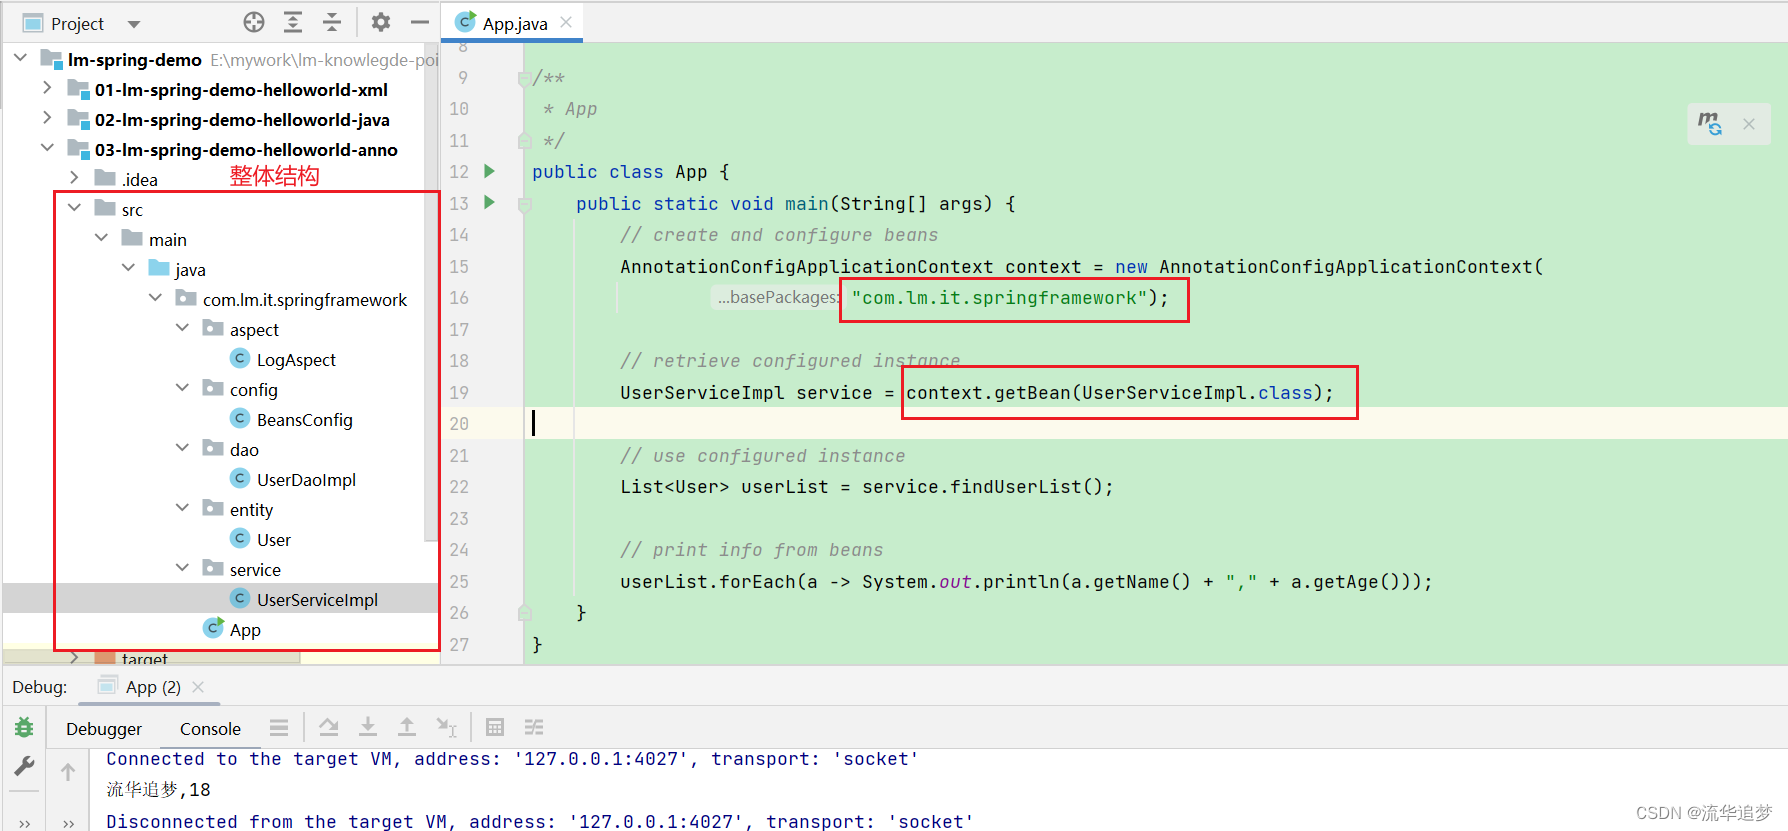
3.2. 注解配置方式改造
更进一步,Java 5 开始提供注解支持,Spring 2.5 开始完全支持基于注解的配置并且也支持JSR250 注解。在 Spring 后续的版本发展倾向于通过注解和 Java 配置结合使用。
BeanConfig 不再需要 Java 配置:
package com.lm.it.springframework.config;

import org.springframework.context.annotation.ComponentScan;
import org.springframework.context.annotation.ComponentScans;
import org.springframework.context.annotation.Configuration;
import org.springframework.context.annotation.EnableAspectJAutoProxy;

/**
 * BeansConfig
 */
@Configuration
@EnableAspectJAutoProxy
public class BeansConfig {

}
UserDaoImpl 增加了 @Repository 注解:
/**
 * UserDao
 */
@Repository
public class UserDaoImpl {
    /**
     * mocked to find user list.
     *
     * @return user list
     */
    public List<User> findUserList() {
        return Collections.singletonList(new User("流华追梦", 18));
    }
}
UserServiceImpl 增加了 @Service 注解,并通过 @Autowired 注入 userDao:
/**
 * UserService
 */
@Service
public class UserServiceImpl {
    /**
     * user dao impl.
     */
    @Autowired
    private UserDaoImpl userDao;

    /**
     * find user list.
     *
     * @return user list
     */
    public List<User> findUserList() {
        return userDao.findUserList();
    }
}
在 App 中扫描 com.lm.it.springframework 包:
package com.lm.it.springframework;

import java.util.List;

import org.springframework.context.annotation.AnnotationConfigApplicationContext;
import com.lm.it.springframework.entity.User;
import com.lm.it.springframework.service.UserServiceImpl;

/**
 * App
 */
public class App {
    /**
     * main interfaces.
     *
     * @param args args
     */
    public static void main(String[] args) {
        // create and configure beans
        AnnotationConfigApplicationContext context = new AnnotationConfigApplicationContext(
                "com.lm.it.springframework");

        // retrieve configured instance
        UserServiceImpl service = context.getBean(UserServiceImpl.class);

        // use configured instance
        List<User> userList = service.findUserList();

        // print info from beans
        userList.forEach(a -> System.out.println(a.getName() + "," + a.getAge()));
    }
}
整体结构和运行 App:
四. SpringBoot 托管配置
SpringBoot 实际上通过约定大于配置的方式,使用 xx-starter 统一的对 Bean 进行默认初始化,用户只需要很少的配置就可以进行开发了。很多开发者都是从 SpringBoot 开始着手开发的,所以这个比较好理解。我们需要的是将知识点都串联起来,构筑认知体系。
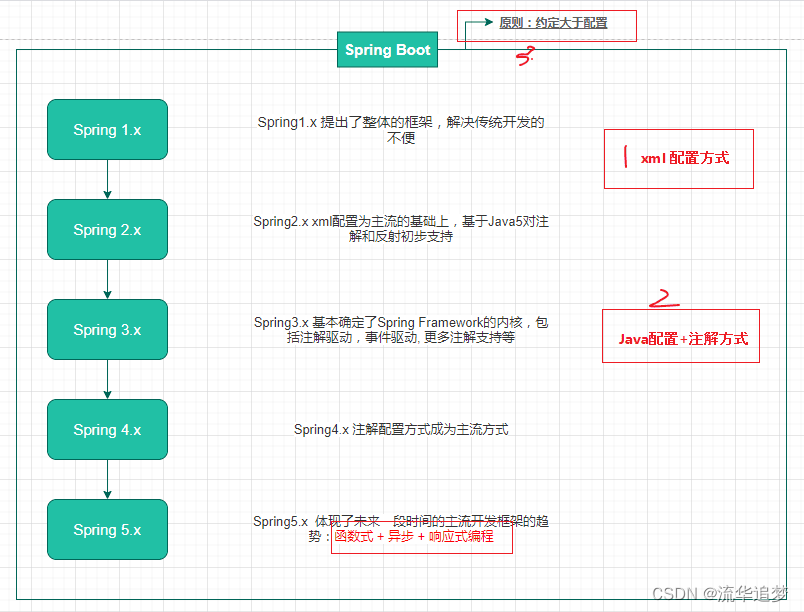
结合 Spring 历史版本和 SpringBoot 看发展:


 537
537

 被折叠的 条评论
为什么被折叠?
被折叠的 条评论
为什么被折叠?
 到【灌水乐园】发言


