


目录
1.3 支持 IEEE 802.11b/g/n 和 API 配置协议模式
1.5 支持高性能特性 (AMSDU, AMPDU, HT40, QoS)
1. 功能列表
一些相关功能介绍,了解一下都是什么含义。
1.1 支持四个虚拟接口
支持 4 个虚拟接口,即 STA、AP、Sniffer 和 reserved。
- STA (Station) 模式:作为客户端,连接到无线路由器。这是最常见的模式(如手机连Wi-Fi)。
- AP (Access Point) 模式:作为热点,让其他设备连接到自己。
- Sniffer (监控) 模式:一种特殊模式,可以捕获空中的所有 Wi-Fi 数据包,用于网络分析、调试或频谱监测。
- Reserved (保留) 模式:通常为未来功能或特殊用例保留。
1.2 三种网络拓扑模式
支持仅 station 模式、仅 AP 模式、station/AP 共存模式。
- Station 模式:作为客户端,连接到现有的无线路由器(就像手机或笔记本电脑连接 Wi-Fi 一样)。这是最常用的模式。
- SoftAP 模式:自身作为一个 Wi-Fi 热点,让其他设备(如手机、电脑)连接到它。
- Station+SoftAP 模式:同时工作在两种模式下,既连接到路由器,又自身作为热点。
1.3 支持 IEEE 802.11b/g/n 和 API 配置协议模式
支持使用 IEEE 802.11b、IEEE 802.11g、IEEE 802.11n 和 API 配置协议模式。
- 802.11b/g/n:定义了其支持的 Wi-Fi 物理层标准,兼容目前几乎所有 2.4 GHz 频段的路由器。
- API 配置:指可以通过编程接口(API)动态地配置和切换这些协议模式,例如为了省电或兼容性,可以强制只使用 g 模式。
1.4 支持丰富的安全协议
支持 WPA/WPA2/WPA3/WPA2-企业版/WPA3-企业版/WAPI/WPS 和 DPP。
- WPA/WPA2/WPA3:个人用户常用的安全协议,安全性逐代增强。WPA3 提供了更强的保护,防止离线字典攻击。
- WPA2-企业版/WPA3-企业版:用于公司、学校等大型网络,需要用户名、密码和 RADIUS 服务器进行认证,安全性极高。
- WAPI:中国强制推行的无线局域网安全标准。
- WPS:简化路由器连接的功能。
- DPP:一种更现代、更安全的配网协议,用于替代 WPS,通常通过扫描二维码完成。
1.5 支持高性能特性 (AMSDU, AMPDU, HT40, QoS)
支持 AMSDU、AMPDU、HT40、QoS 以及其它主要功能。
- AMSDUs & AMPDUs:将多个数据帧聚合在一起发送,减少了协议开销,大大提高了数据传输效率。
- HT40:使用 40 MHz 频宽(而不是传统的 20 MHz),使数据传输速率翻倍。
- QoS:服务质量,可以对网络流量区分优先级(例如,视频通话的数据优先于文件下载),保证关键应用的流畅性。
1.6 支持 Modem-sleep
一种低功耗模式。在 CPU 工作时,Wi-Fi modem(调制解调器)可以暂时进入睡眠状态,并在预定的时间间隔醒来接收来自路由器的信标(Beacon)。如果路由器没有缓存数据给它,它会立刻再次入睡。
更多详细可以了解乐鑫官方手册。
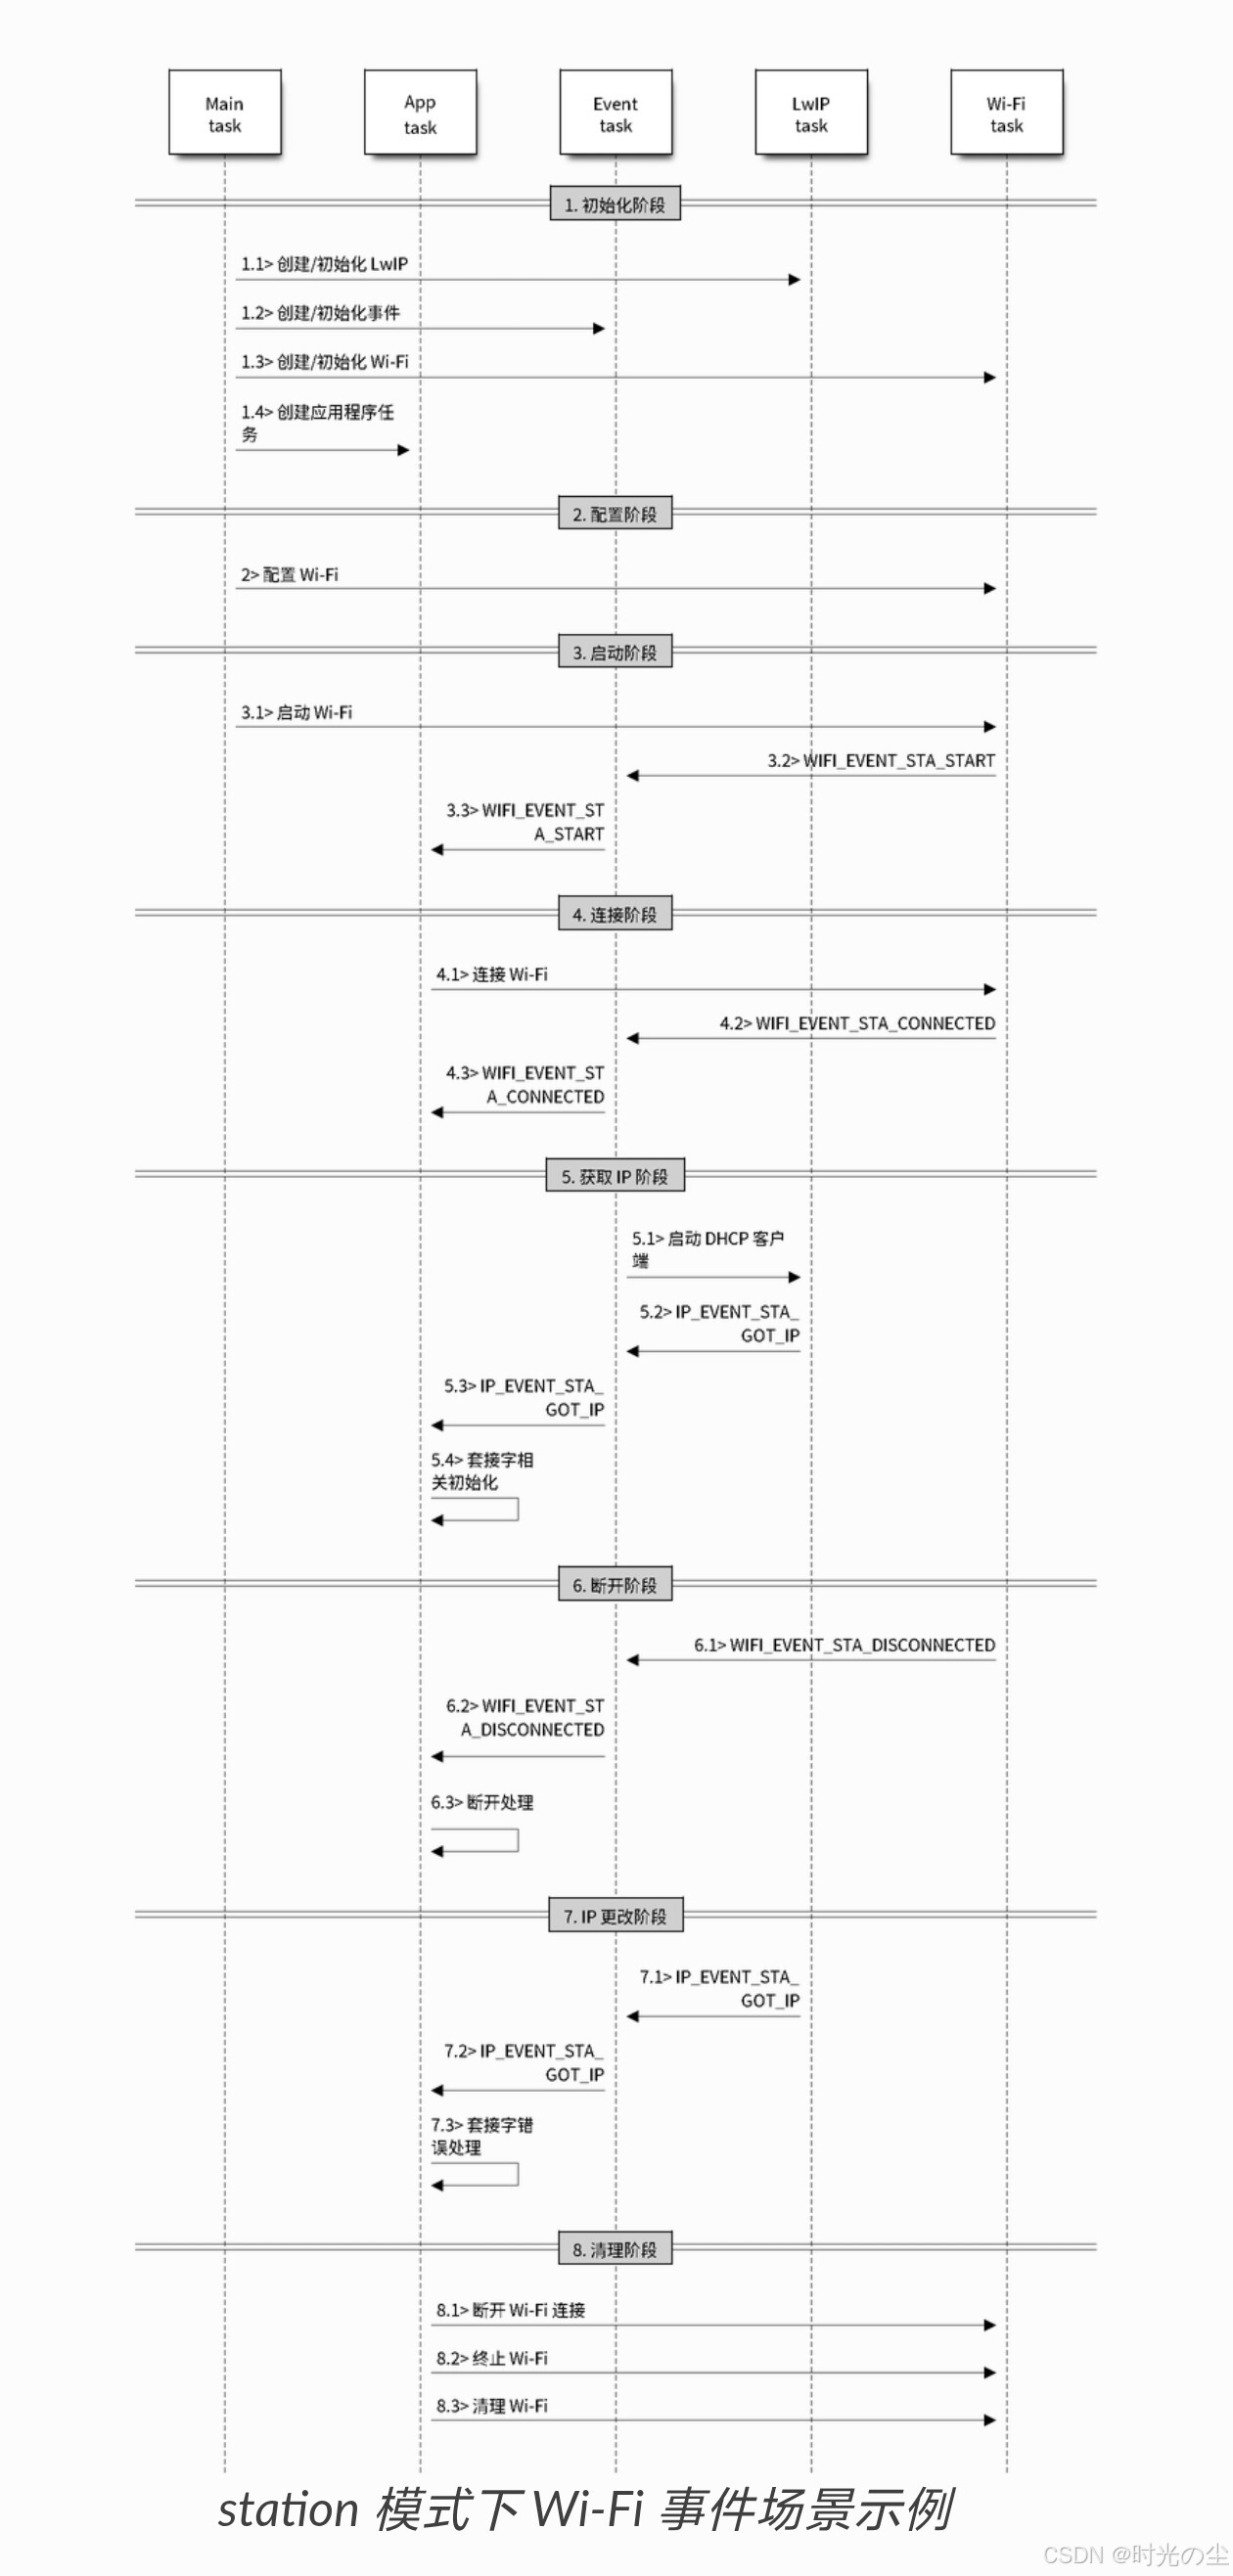
2. station 模式下代码编写
我们通过官方给定的这个流程去注册使用一下:
2.1 准备工作
开始前新建一个空白工程,不熟悉可以参考:
头文件包含,首先我们想要使用 WIFI 的 API 函数,其头文件肯定要包含:
#include "esp_wifi.h" // ESP32 WiFi功能库然后通过官方手册我们知道,Wi-Fi 事件处理是在 esp_event 库 的基础上进行的,因此我们需要将它的头文件也包含进来:
#include "esp_event.h" // ESP32事件循环处理库然后加一些保存配置和打印日志的头文件,方便查找报错,完整头文件配置:
#include <stdio.h>
#include "nvs_flash.h"          // 非易失性存储(NVS)库,用于保存配置信息
#include "esp_wifi.h"           // ESP32 WiFi功能库
#include "esp_event.h"          // ESP32事件循环处理库
#include "esp_log.h"            // ESP32日志功能库
#include "esp_err.h"            // ESP32错误码定义
#include <string.h>             // 标准字符串操作库
2.2 初始化阶段
根据流程图我们先进行初始化配置,首先通过调用函数 esp_netif_init() 创建一个 LwIP 核心任务,并初始化 LwIP 相关工作:
    // 初始化TCP/IP网络接口
    ESP_ERROR_CHECK(esp_netif_init());
其中 ESP_ERROR_CHECK() 是错误检测函数,自动检查ESP-IDF函数的返回值,如果出现错误则立即终止程序执行并输出详细的错误信息。
然后通过调用函数 esp_event_loop_create() 创建一个系统事件任务,并初始化应用程序事件的回调函数,不过这里我们使用默认事件循环函数 esp_event_loop_create_default() ,默认事件循环是一种特殊循环,用于处理系统事件(如 Wi-Fi 事件)。用户无法使用该循环的句柄,创建、删除、注册/注销处理程序以及事件发布均通过用户事件循环 API 的变体完成,两者其实没有多大差异,唯一区别在于默认事件循环的 API 不需要指定循环句柄,这样可以节省内存而无需创建自己的循环:
    // 创建默认事件循环
    ESP_ERROR_CHECK(esp_event_loop_create_default());
然后是初始化wifi配置,首先绑定网络接口,我们可以调用函数 esp_netif_create_default_wifi_ap() 或 esp_netif_create_default_wifi_sta() 创建有 TCP/IP 堆栈的默认网络接口实例绑定 station 或 AP,这里我们使用 STA 模式因此调用:
    // 创建默认的WiFi站接口
    esp_netif_create_default_wifi_sta();
然后同过调用函数 esp_wifi_init() 创建 Wi-Fi 驱动程序任务,并初始化 Wi-Fi 驱动程序,这里我们初始化默认配置,因此调用 wifi_init_config_t 结构体,让其值等于 WIFI_INIT_CONFIG_DEFAULT() ,这个宏会返回一个预配置的默认值集合,这些默认值经过官方测试和优化,适合大多数应用场景,我们直接调用即可:
    // 初始化WiFi配置为默认值
    wifi_init_config_t cfg = WIFI_INIT_CONFIG_DEFAULT();
    ESP_ERROR_CHECK(esp_wifi_init(&cfg));
然后创建一个应用程序任务,找到函数:
typedef void (*esp_event_handler_t)(
    void* event_handler_arg,      // 用户自定义参数
    esp_event_base_t event_base,  // 事件基类型
    int32_t event_id,            // 具体事件ID
    void* event_data             // 事件相关数据
);
把其复制过来,稍微修改一下,创建一个 WIFI 和 IP 事件处理函数:
void wifi_event_handle(void* event_handler_arg, esp_event_base_t event_base,
                      int32_t event_id, void* event_data)
{
}
内容下边使用的时候进行填充。
2.3 配置阶段
首先注册WIFI事件处理函数,调用 esp_event_handler_register() 函数,其函数原型:
/**
 * @brief Register an event handler to the system event loop (legacy).
 *
 * This function can be used to register a handler for either: (1) specific events,
 * (2) all events of a certain event base, or (3) all events known by the system event loop.
 *
 *  - specific events: specify exact event_base and event_id
 *  - all events of a certain base: specify exact event_base and use ESP_EVENT_ANY_ID as the event_id
 *  - all events known by the loop: use ESP_EVENT_ANY_BASE for event_base and ESP_EVENT_ANY_ID as the event_id
 *
 * Registering multiple handlers to events is possible. Registering a single handler to multiple events is
 * also possible. However, registering the same handler to the same event multiple times would cause the
 * previous registrations to be overwritten.
 *
 * @param[in] event_base the base ID of the event to register the handler for
 * @param[in] event_id the ID of the event to register the handler for
 * @param[in] event_handler the handler function which gets called when the event is dispatched
 * @param[in] event_handler_arg data, aside from event data, that is passed to the handler when it is called
 *
 * @note the event loop library does not maintain a copy of event_handler_arg, therefore the user should
 * ensure that event_handler_arg still points to a valid location by the time the handler gets called
 *
 * @return
 *  - ESP_OK: Success
 *  - ESP_ERR_NO_MEM: Cannot allocate memory for the handler
 *  - ESP_ERR_INVALID_ARG: Invalid combination of event base and event ID
 *  - Others: Fail
 */
esp_err_t esp_event_handler_register(esp_event_base_t event_base,
                                     int32_t event_id,
                                     esp_event_handler_t event_handler,
                                     void *event_handler_arg);
翻译一下:
/**
* @brief 将事件处理程序注册到系统事件循环(旧版)。*
此函数可用于为以下任一情况注册处理程序:(1)特定事件,(2)某个事件基的所有事件,或者(3)系统事件循环所知的所有事件。*
*  - 具体事件:指定确切的 event_base 和 event_id
*  - 某一基础的所有事件:指定确切的 event_base 并使用 ESP_EVENT_ANY_ID 作为 event_id
*  - 环中已知的所有事件:使用 ESP_EVENT_ANY_BASE 作为 event_base 并使用 ESP_EVENT_ANY_ID 作为 event_id*
可以为事件注册多个处理程序。也可以为多个事件注册单个处理程序。但是,多次为同一事件注册相同的处理程序会导致之前的注册被覆盖。*
* @param[in] event_base 要注册处理程序的事件的基础 ID
* @param[in] event_id 要注册处理程序的事件的 ID
* @param[in] event_handler 当事件分发时被调用的处理程序函数
* @param[in] event_handler_arg 调用处理程序时传递给它的除事件数据之外的数据*
* @注意:事件循环库不会保留 event_handler_arg 的副本,因此用户应确保在调用处理程序时,event_handler_arg 仍指向有效位置。*
* 返回值
*  - ESP_OK:成功
*  - ESP_ERR_NO_MEM:无法为处理程序分配内存
*  - ESP_ERR_INVALID_ARG:事件基和事件 ID 的组合无效
*  - 其他:失败*/

esp_err_t esp_event_handler_register(esp_event_base_t event_base,
                                     int32_t event_id,
                                     esp_event_handler_t event_handler,
                                     void *event_handler_arg);
对于要注册处理的事件,我们这是wifi事件,所以我们调用 WIFI_EVENT 监听索引 wifi 事件,对于要处理的ID,我们选择所有事件 ID 因此调用 ESP_EVENT_ANY_ID ,调用函数用我们初始化配置的函数 wifi_event_handle ,本次调用数不需要传参因此为 NULL:
    // 注册WiFi事件处理函数
    esp_event_handler_register(WIFI_EVENT, ESP_EVENT_ANY_ID, wifi_event_handle, NULL);
对于IP事件同样的操作:
    // 注册IP事件处理函数
    esp_event_handler_register(IP_EVENT, IP_EVENT_STA_GOT_IP, wifi_event_handle, NULL);
然后是配置wifi链接参数,调用 wifi_config_t 结构体,其函数原型:
/** @brief Configuration data for device's AP or STA or NAN.
 *
 * The usage of this union (for ap, sta or nan configuration) is determined by the accompanying
 * interface argument passed to esp_wifi_set_config() or esp_wifi_get_config()
 *
 */
typedef union {
    wifi_ap_config_t  ap;  /**< configuration of AP */
    wifi_sta_config_t sta; /**< configuration of STA */
    wifi_nan_config_t nan; /**< configuration of NAN */
} wifi_config_t;
翻译一下:
/** @brief 设备的 AP(接入点)、STA(站点)或 NAN(网络接入节点)的配置数据。*
此联合体的使用方式(适用于 ap、sta 或 nan 配置)由传递给 esp_wifi_set_config() 或 esp_wifi_get_config() 的相关接口参数来决定。*
*/
typedef 结构体如下:
{
    wifi_ap_config_t ap;  /* AP 的配置 */
    wifi_sta_config_t sta; /* STA 的配置 */
    wifi_nan_config_t nan; /* NAN 的配置 */
} wifi_config_t;
这里对应的就是我们的三种模式,我们使用sta配置,对于sta其要配置的参数如下:
/** @brief STA configuration settings for the device */
typedef struct {
    uint8_t ssid[32];                         /**< SSID of target AP. */
    uint8_t password[64];                     /**< Password of target AP. */
    wifi_scan_method_t scan_method;           /**< do all channel scan or fast scan */
    bool bssid_set;                           /**< whether set MAC address of target AP or not. Generally, station_config.bssid_set needs to be 0; and it needs to be 1 only when users need to check the MAC address of the AP.*/
    uint8_t bssid[6];                         /**< MAC address of target AP*/
    uint8_t channel;                          /**< channel of target AP. Set to 1~13 to scan starting from the specified channel before connecting to AP. If the channel of AP is unknown, set it to 0.*/
    uint16_t listen_interval;                 /**< Listen interval for ESP32 station to receive beacon when WIFI_PS_MAX_MODEM is set. Units: AP beacon intervals. Defaults to 3 if set to 0. */
    wifi_sort_method_t sort_method;           /**< sort the connect AP in the list by rssi or security mode */
    wifi_scan_threshold_t  threshold;         /**< When scan_threshold is set, only APs which have an auth mode that is more secure than the selected auth mode and a signal stronger than the minimum RSSI will be used. */
    wifi_pmf_config_t pmf_cfg;                /**< Configuration for Protected Management Frame. Will be advertised in RSN Capabilities in RSN IE. */
    uint32_t rm_enabled:1;                    /**< Whether Radio Measurements are enabled for the connection */
    uint32_t btm_enabled:1;                   /**< Whether BSS Transition Management is enabled for the connection */
    uint32_t mbo_enabled:1;                   /**< Whether MBO is enabled for the connection */
    uint32_t ft_enabled:1;                    /**< Whether FT is enabled for the connection */
    uint32_t owe_enabled:1;                   /**< Whether OWE is enabled for the connection */
    uint32_t transition_disable:1;            /**< Whether to enable transition disable feature */
    uint32_t reserved:26;                     /**< Reserved for future feature set */
    wifi_sae_pwe_method_t sae_pwe_h2e;        /**< Configuration for SAE PWE derivation method */
    wifi_sae_pk_mode_t sae_pk_mode;           /**< Configuration for SAE-PK (Public Key) Authentication method */
    uint8_t failure_retry_cnt;                /**< Number of connection retries station will do before moving to next AP. scan_method should be set as WIFI_ALL_CHANNEL_SCAN to use this config.
                                                   Note: Enabling this may cause connection time to increase incase best AP doesn't behave properly. */
    uint32_t he_dcm_set:1;                                        /**< Whether DCM max.constellation for transmission and reception is set. */
    uint32_t he_dcm_max_constellation_tx:2;                       /**< Indicate the max.constellation for DCM in TB PPDU the STA supported. 0: not supported. 1: BPSK, 2: QPSK, 3: 16-QAM. The default value is 3. */
    uint32_t he_dcm_max_constellation_rx:2;                       /**< Indicate the max.constellation for DCM in both Data field and HE-SIG-B field the STA supported. 0: not supported. 1: BPSK, 2: QPSK, 3: 16-QAM. The default value is 3. */
    uint32_t he_mcs9_enabled:1;                                   /**< Whether to support HE-MCS 0 to 9. The default value is 0. */
    uint32_t he_su_beamformee_disabled:1;                         /**< Whether to disable support for operation as an SU beamformee. */
    uint32_t he_trig_su_bmforming_feedback_disabled:1;            /**< Whether to disable support the transmission of SU feedback in an HE TB sounding sequence. */
    uint32_t he_trig_mu_bmforming_partial_feedback_disabled:1;    /**< Whether to disable support the transmission of partial-bandwidth MU feedback in an HE TB sounding sequence. */
    uint32_t he_trig_cqi_feedback_disabled:1;                     /**< Whether to disable support the transmission of CQI feedback in an HE TB sounding sequence. */
    uint32_t he_reserved:22;                                      /**< Reserved for future feature set */
    uint8_t sae_h2e_identifier[SAE_H2E_IDENTIFIER_LEN];/**< Password identifier for H2E. this needs to be null terminated string */
} wifi_sta_config_t;
翻译一下:
/** @brief 设备的 STA 配置设置 */
typedef struct {
  uint8_t ssid[32];                         /**< 目标 AP 的 SSID。 */
  uint8_t password[64];                     /**< 目标 AP 的密码。 */
  wifi_scan_method_t scan_method;           /**< 是否进行所有信道扫描或快速扫描 */
  bool bssid_set;                           /**< 是否设置目标 AP 的 MAC 地址。通常,station_config.bssid_set 需要为 0;只有在用户需要检查 AP 的 MAC 地址时才需要设置为 1。 */
  uint8_t bssid[6];                         /**< 目标 AP 的 MAC 地址 */
  uint8_t channel;                          /**< 目标 AP 的信道。设置为 1~13 以从指定的信道开始扫描后再连接到 AP。如果 AP 的信道未知,则将其设置为 0。 */
  uint16_t listen_interval;                 /**< 当 WIFI_PS_MAX_MODEM 设置时,ESP32 站点接收信标时的监听间隔。单位:AP 信标间隔。默认值为 3,如果设置为 0 则为 0。 */
}*/
wifi_sort_method_t 类型的变量“sort_method”:/** 依据 rssi 或安全模式对列表中的连接 AP 进行排序 */
wifi_scan_threshold_t 类型的变量“threshold”:/** 当“scan_threshold”被设置时,只有那些认证模式比所选认证模式更安全且信号强度高于最小 RSSI 的 AP 才会被使用。 */*/
wifi_pmf_config_t pmf_cfg;  /**< 用于保护管理帧的配置。该配置将在 RSN 描述符中的 RSN 属性中进行通告。 */*/
uint32_t rm_enabled:1;  /**< 该连接是否启用无线电测量功能 */
uint32_t btm_enabled:1;  /**< 该连接是否启用 BSS 转换管理功能 */
uint32_t mbo_enabled:1;  /**< 该连接是否启用 MBO 功能 */
uint32_t ft_enabled:1;  /**< 该连接是否启用 FT 功能 */
uint32_t owe_enabled:1;  /**< 该连接是否启用 OWE 功能 */
uint32_t transition_disable:1;  /**< 是否启用连接过渡禁用功能 */
uint32_t reserved:26;  /**< 用于未来功能集预留 */
wifi_sae_pwe_method_t sae_pwe_h2e;  /**< SAE PWE 推导方法的配置 */
wifi_sae_pk_mode_t sae_pk_mode;  /**< SAE-PK(公钥)认证方法的配置 */
uint8_t failure_retry_cnt;  /**< 站点在移动到下一个 AP 之前将进行的连接重试次数。扫描方法应设置为 WIFI_ALL_CHANNEL_SCAN 以使用此配置。
注意:启用此功能可能会导致连接时间增加,如果最佳 AP 的表现不佳。  */*/
uint32_t he_dcm_set:1;                                        /**< 表示是否已设置传输和接收时 DCM(数字编码调制)的最大星座图参数。  */*/
uint32_t he_dcm_max_constellation_tx:2;                       /**< 表示 STA 支持的 TB PPDU 中 DCM 的最大星座数。0:不支持。1:BPSK;2:QPSK;3:16-QAM。默认值为 3。  */*/
uint32_t he_dcm_max_constellation_rx:2;                       /**< 表示 STA 支持的数据字段和 HE-SIG-B 字段中 DCM 的最大星座数。0:不支持。1:BPSK;2:QPSK;3:16-QAM。默认值为 3。  */*/
uint32_t he_mcs9_enabled:1;                                   /**< 是否支持 HE-MCS 0 到 9 的功能。默认值为 0。  */*/
uint32_t he_su_beamformee_disabled:1;                         /**< 是否禁用作为 SU 激发器进行操作的支持功能。  */*/
uint32_t he_trig_su_bmforming_feedback_disabled:1;  /**< 是否禁用在 HE TB 测量序列中支持 SU 反馈的传输功能。  */*/
uint32_t he_trig_mu_bmforming_partial_feedback_disabled:1;  /**< 是否禁用在 HE TB 测量序列中支持部分带宽 MU 反馈的功能。  */*/
uint32_t he_trig_cqi_feedback_disabled:1;  /**< 是否禁用在 HE TB 测量序列中支持 CQI 反馈的传输。  */*/
uint32_t he_reserved:22;                                      /**< 用于未来功能集预留 */
uint8_t sae_h2e_identifier[SAE_H2E_IDENTIFIER_LEN];/**< 用于 H2E 的密码标识符。此标识符需以空字符结尾的字符串 */
} wifi_sta_config_t
上面说要的配置,在实际使用的时候我们可能不需要这么多,只去我们现在需要的,我这里只是举一个简单的例子,因此就只需要配置其需要连接的网络ID和密码,以及认证模式等:
wifi_config_t wifi_config = {
    .sta = {
        .ssid = "Your_SSID",                    // WiFi名称
        .password = "Your_Password",            // WiFi密码
        .threshold.authmode = WIFI_AUTH_WPA2_PSK, // 认证模式
        .pmf_cfg = {
            .capable = true,      // 支持PMF
            .required = false     // 不强制要求PMF
        },
    }
};
注意这里的wifi是你想要链接的wifi和密码,我这里手机开了一个热点链接,其宏定义:
#define Your_SSID      "Honor"  // 要连接的WiFi网络名称
#define Your_Password  "www11011211"  // WiFi密码
不过这里我为了防止之前的数据,因此做了一个清空操作:
    // 配置WiFi连接参数
    wifi_config_t wifi_config = {
        .sta.threshold.authmode = WIFI_AUTH_WPA2_PSK,  // 认证模式为WPA2
        .sta.pmf_cfg.capable = true,      // 支持受保护的管理帧(PMF)
        .sta.pmf_cfg.required = false,    // 不强制要求PMF
    };

    // 清空并设置SSID
    strncpy((char*)wifi_config.sta.ssid, TEST_SSID, sizeof(wifi_config.sta.ssid) - 1);
    wifi_config.sta.ssid[sizeof(wifi_config.sta.ssid) - 1] = '\0'; // 确保null终止

    // 清空并设置密码
    strncpy((char*)wifi_config.sta.password, TEST_PASSWORD, sizeof(wifi_config.sta.password) - 1);
    wifi_config.sta.password[sizeof(wifi_config.sta.password) - 1] = '\0';
然后调用函数 esp_wifi_set_mode() (WIFI_MODE_STA) 将 Wi-Fi 模式配置为 station 模式。可通过调用其它 esp_wifi_set_xxx API 进行更多设置,例如:协议模式、国家代码、带宽等。请参阅 ESP32-S3 Wi-Fi 配置:
    // 设置WiFi为站模式(STA)
    ESP_ERROR_CHECK(esp_wifi_set_mode(WIFI_MODE_STA));
调用 esp_wifi_set_config() 应用上述配置:
    // 应用WiFi配置
    ESP_ERROR_CHECK(esp_wifi_set_config(WIFI_IF_STA, &wifi_config));
2.4 启动阶段
调用函数 esp_wifi_start() 启动 Wi-Fi 驱动程序:
    // 启动WiFi
    ESP_ERROR_CHECK(esp_wifi_start());
2.5 连接阶段
调用函数 esp_wifi_connect() 后,Wi-Fi 驱动程序将启动内部扫描/连接过程,如果内部扫描/连接过程成功,将产生 WIFI_EVENT_STA_CONNECTED 事件。然后,事件任务将启动 DHCP 客户端服务,最终触发 DHCP 程序:
    if(event_base == WIFI_EVENT)  // 处理WiFi相关事件
    {
        switch (event_id)
        {
        case WIFI_EVENT_STA_START:  // 站模式(STA)启动事件
            esp_wifi_connect();     // 开始连接AP
            break;
        case WIFI_EVENT_STA_CONNECTED:  // 成功连接到AP
            ESP_LOGI(TAG,"ESP32已连接到AP!");
            break;
        case WIFI_EVENT_STA_DISCONNECTED:  // 从AP断开连接
            esp_wifi_connect();     // 尝试重新连接
            ESP_LOGI(TAG,"ESP32连接AP失败! 正在重试...");
            break;
        default:
            break;
        }
    }
2.6 获取IP阶段
DHCP 客户端初始化完成,Wi-Fi 驱动程序将进入获取 IP 阶段,如果 Wi-Fi 成功从 DHCP 服务器接收到 IP 地址,则将引发 IP_EVENT_STA_GOT_IP 事件,事件任务将执行正常处理:
    else if(event_base == IP_EVENT)  // 处理IP相关事件
    {
        switch (event_id)
        {
        case IP_EVENT_STA_GOT_IP:  // 成功获取IP地址
            ESP_LOGI(TAG,"ESP32已获取IP地址");
            break;

        default:
            break;
        }
    }
2.7 完整代码
#include <stdio.h>
#include "nvs_flash.h"          // 非易失性存储(NVS)库,用于保存配置信息
#include "esp_wifi.h"           // ESP32 WiFi功能库
#include "esp_event.h"          // ESP32事件循环处理库
#include "esp_log.h"            // ESP32日志功能库
#include "esp_err.h"            // ESP32错误码定义
#include <string.h>             // 标准字符串操作库

#define TEST_SSID      "Honor"  // 要连接的WiFi网络名称
#define TEST_PASSWORD  "www11011211"  // WiFi密码

#define TAG "sta"  // 日志标签

// WiFi和IP事件处理函数
void wifi_event_handle(void* event_handler_arg, esp_event_base_t event_base,
                      int32_t event_id, void* event_data)
{
    if(event_base == WIFI_EVENT)  // 处理WiFi相关事件
    {
        switch (event_id)
        {
        case WIFI_EVENT_STA_START:  // 站模式(STA)启动事件
            esp_wifi_connect();     // 开始连接AP
            break;
        case WIFI_EVENT_STA_CONNECTED:  // 成功连接到AP
            ESP_LOGI(TAG,"ESP32已连接到AP!");
            break;
        case WIFI_EVENT_STA_DISCONNECTED:  // 从AP断开连接
            esp_wifi_connect();     // 尝试重新连接
            ESP_LOGI(TAG,"ESP32连接AP失败! 正在重试...");
            break;
        default:
            break;
        }
    }
    else if(event_base == IP_EVENT)  // 处理IP相关事件
    {
        switch (event_id)
        {
        case IP_EVENT_STA_GOT_IP:  // 成功获取IP地址
            ESP_LOGI(TAG,"ESP32已获取IP地址");
            break;

        default:
            break;
        }
    }
}

// 主应用程序入口
void app_main(void)
{
    // 初始化NVS(非易失性存储)
    ESP_ERROR_CHECK(nvs_flash_init());
    // 初始化TCP/IP网络接口
    ESP_ERROR_CHECK(esp_netif_init());
    // 创建默认事件循环
    ESP_ERROR_CHECK(esp_event_loop_create_default());
    // 创建默认的WiFi站接口
    esp_netif_create_default_wifi_sta();

    // 初始化WiFi配置为默认值
    wifi_init_config_t cfg = WIFI_INIT_CONFIG_DEFAULT();
    ESP_ERROR_CHECK(esp_wifi_init(&cfg));

    // 注册WiFi事件处理函数
    esp_event_handler_register(WIFI_EVENT, ESP_EVENT_ANY_ID, wifi_event_handle, NULL);
    // 注册IP事件处理函数
    esp_event_handler_register(IP_EVENT, IP_EVENT_STA_GOT_IP, wifi_event_handle, NULL);

    // 配置WiFi连接参数
    wifi_config_t wifi_config = {
        .sta.threshold.authmode = WIFI_AUTH_WPA2_PSK,  // 认证模式为WPA2
        .sta.pmf_cfg.capable = true,      // 支持受保护的管理帧(PMF)
        .sta.pmf_cfg.required = false,    // 不强制要求PMF
    };

    // 清空并设置SSID
    strncpy((char*)wifi_config.sta.ssid, TEST_SSID, sizeof(wifi_config.sta.ssid) - 1);
    wifi_config.sta.ssid[sizeof(wifi_config.sta.ssid) - 1] = '\0'; // 确保null终止

    // 清空并设置密码
    strncpy((char*)wifi_config.sta.password, TEST_PASSWORD, sizeof(wifi_config.sta.password) - 1);
    wifi_config.sta.password[sizeof(wifi_config.sta.password) - 1] = '\0';

    // 设置WiFi为站模式(STA)
    ESP_ERROR_CHECK(esp_wifi_set_mode(WIFI_MODE_STA));
    // 应用WiFi配置
    ESP_ERROR_CHECK(esp_wifi_set_config(WIFI_IF_STA, &wifi_config));
    // 启动WiFi
    ESP_ERROR_CHECK(esp_wifi_start());

    return;
}
验证一下,我们先打开手机热点,将程序下载到板子上:
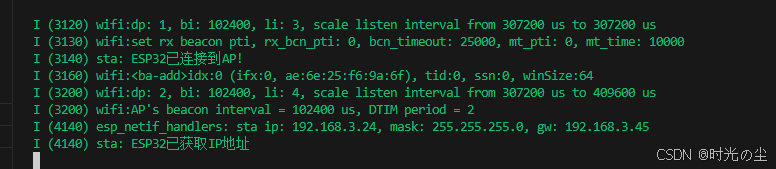
可以发现此时板子的IP为192.168.3.45,能够正常获取到IP,假如我们此时关闭手机热点:
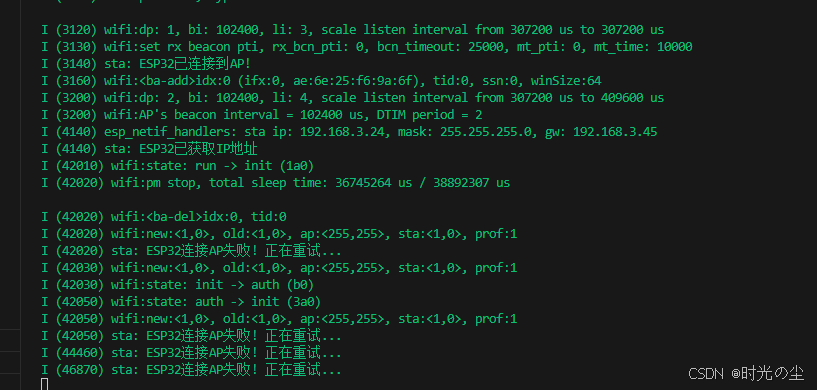
可以看到此时移植在重新连接。


 被折叠的 条评论
为什么被折叠?
被折叠的 条评论
为什么被折叠?
 到【灌水乐园】发言


