


1.在 uni-app 中,直接通过 uni.request() 获取消息队列的数据(如 RabbitMQ)并进行处理并不直接支持,因为 RabbitMQ 是一个消息队列服务,需要通过服务器中介与其交互。因此,您通常需要一个中间层后端(比如 Node.js 或其他后端技术),通过该后端从 RabbitMQ 获取消息,再将这些消息传递给 uni-app 前端。
- 配置 Node.js 服务与 RabbitMQ 的连接:在 Node.js 服务中设置 RabbitMQ 的连接,声明队列并监听队列中的消息。
- 让 UniApp 前端请求 Node.js 服务:UniApp 向 Node.js 后端发送 HTTP 请求,Node.js 后端从 RabbitMQ 队列中获取并返回消息。
- Node.js 处理消息并发送到前端:Node.js 服务消费消息并通过 HTTP 响应返回给 UniApp。
以 Node.js 为例,使用 amqplib 库来与 RabbitMQ 进行通信。
安装必要的依赖
npm install amqplib express
创建后端服务(Node.js)
// server.js
const express = require('express');
const amqp = require('amqplib');
const app = express();
const port = 3000;
// 连接 RabbitMQ 的设置
const RABBITMQ_URL = 'amqp://admin:admin@192.***.**.**:5672'; // //格式为 amqp://用户名:密码@主机地址:端口 (端口一般默认为5672)
const QUEUE_NAME = 'your_queue_name'; // 替换为您的队列名称
// 中间件:解析 JSON 请求
app.use(express.json());
// 连接到 RabbitMQ 并设置队列监听
async function connectToRabbitMQ() {
try {
const connection = await amqp.connect(RABBITMQ_URL);
const channel = await connection.createChannel();
await channel.assertQueue(QUEUE_NAME, { durable: true });
// 定期发送消息到队列用于模拟
setInterval(() => {
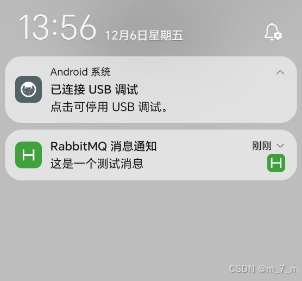
const message = { content: '这是一个测试消息' };
channel.sendToQueue(QUEUE_NAME, Buffer.from(JSON.stringify(message)), {
persistent: true
});
}, 5000); // 每5秒发送一次消息
return channel;
} catch (error) {
console.error('RabbitMQ 连接失败:', error);
}
}
// 监听队列并提供 API 获取消息
app.get('/receive', async (req, res) => {
try {
const channel = await connectToRabbitMQ();
channel.consume(QUEUE_NAME, (msg) => {
if (msg !== null) {
const message = JSON.parse(msg.content.toString());
res.json({ message: message.content });
channel.ack(msg); // 确认消息已处理
}
}, { noAck: false });
} catch (error) {
res.status(500).json({ error: '无法获取消息' });
}
});
app.listen(port, () => {
console.log(`后端服务启动,端口:${port}`);
});
2. 前端:uni-app 获取消息并显示通知
前端部分,您需要在 uni-app 中通过 uni.request() 从后端获取 RabbitMQ 消息,并使用 plus.push.createMessage() 创建本地通知。
2.1 创建 notification.js 模块
// notification.js
export default {
  /**
   * 获取消息并显示本地通知
   * @param {string} url - 后端接口地址
   */
  fetchAndNotify(url) {
    this.fetchMessage(url)
      .then((message) => {
        if (message) {
          this.createLocalNotification(message);
        }
      })
      .catch((err) => {
        console.error("获取消息失败:", err);
        uni.showToast({
          title: '获取消息失败',
          icon: 'none'
        });
      });
  },

  /**
   * 通过接口获取 RabbitMQ 消息
   * @param {string} url - 后端接口地址
   * @returns {Promise<string>} - 返回消息内容
   */
  fetchMessage(url) {
    return new Promise((resolve, reject) => {
      uni.request({
        url: url, // 后端 API 地址
        method: 'GET',
        success(res) {
          if (res.statusCode === 200 && res.data && res.data.message) {
            resolve(res.data.message);
          } else {
            reject("消息内容为空或状态码异常");
          }
        },
        fail(err) {
          reject(err);
        }
      });
    });
  },

  /**
   * 创建本地通知
   * @param {string} message - 消息内容
   */
  createLocalNotification(message) {
    const platform = uni.getSystemInfoSync().platform;

    // 确保只有在App中执行
    if (platform === 'android' || platform === 'ios') {
        this.checkNotificationAuthorized();//检查app是否开启了通知权限 安卓苹果通用
      // 使用 plus.push 创建消息通知
      plus.push.createMessage(message, 'RabbitMQ 消息通知', {
        cover: true,  // 是否覆盖已有的消息通知
        sound: 'default',  // 设置声音
        badge: 1,  // 设置角标数字
      });

      // 如果需要跳转到指定页面,可以在这里添加跳转逻辑
      // uni.navigateTo({
      //   url: '/pages/message/message?msg=' + encodeURIComponent(message)
      // });
    }
  },
    // 检查app是否开启了通知权限 安卓苹果通用
	checkNotificationAuthorized() {
		const notificationAuthorized =
       uni.getAppAuthorizeSetting().notificationAuthorized
		if (notificationAuthorized !== 'authorized') {
			uni.showModal({
				title: '通知权限',
				content: '您还没有开启通知权限,无法接收到消息通知,请前往设置!',
				confirmText: '去设置',
				showCancel: false,
				success:(res) => {
					if (res.confirm) uni.openAppAuthorizeSetting()
				}
			});
		}
	},

};
2.2 页面调用
<template>
  <view class="container">
    <button @click="handleFetchMessage">获取消息并显示通知</button>
  </view>
</template>

<script>
import notification from '@/utils/notification.js';  // 导入封装好的通知模块

export default {
  data() {
    return {};
  },
  methods: {
    /**
     * 获取消息并触发通知
     */
    handleFetchMessage() {
        let url = 'http://192.**.*.*:8081/receive'//(自己电脑启的node服务,app请求地址连的自己的电脑ip)
		// #ifdef H5
		url = '/api/receive'; // node.js服务接口地址(在manifest.json配置解决跨域问题)
		// #endif
      notification.fetchAndNotify(url);
    }
  }
};
</script>

<style scoped>
/* 适当的样式 */
</style>
manifest.json配置跨域问题
"h5": {
		"devServer": {
			"port": 19183, //浏览器运行端口
			"disableHostCheck": true, //设置跳过host检查
			"proxy": {
				"/api": {
					"target": "http://localhost:8081", //目标接口域名
					"changeOrigin": true, //是否跨域
					"secure": false, // 设置支持https协议的代理
					"pathRewrite": {
						"^/api": ""
					}
				}
			}
		},
3. 配置 manifest.json 权限
使用 plus.push.createMessage() 显示本地通知,确保在 manifest.json 文件中为 Android 和 iOS 设置了相关权限。
Android 权限配置
{
  "app-plus": {
    "distribute": {
      "android": {
        "permissions": [
          "android.permission.VIBRATE",
          "android.permission.INTERNET",
          "android.permission.ACCESS_NETWORK_STATE"
        ]
      }
    }
  }
}
iOS 权限配置
{
  "app-plus": {
    "distribute": {
      "ios": {
        "permissions": [
          "ios.permission.NOTIFICATIONS"
        ]
      }
    }
  }
}
4. 测试
- 后端服务:启动后端服务,确保 RabbitMQ 正常运行并能够通过
/receive接口获取消息。 - 前端调试:运行
uni-app前端,点击按钮获取消息并推送通知。
总结
通过这种方式,您可以实现 uni-app 从后端获取 RabbitMQ 消息并推送本地通知的功能。主要思路是使用后端服务(例如 Node.js + RabbitMQ)作为消息队列中介,uni-app 前端通过 HTTP 请求获取消息并进行显示。


 2420
2420

 被折叠的 条评论
为什么被折叠?
被折叠的 条评论
为什么被折叠?
 到【灌水乐园】发言


