


前言
依赖注入的核心思想是将对象的创建和依赖关系的维护交给外部容器(如Spring容器)来管理,而不是在对象内部自行创建或寻找其依赖。这样,对象之间就形成了松散的耦合关系,使得代码更加清晰、易于管理和测试。
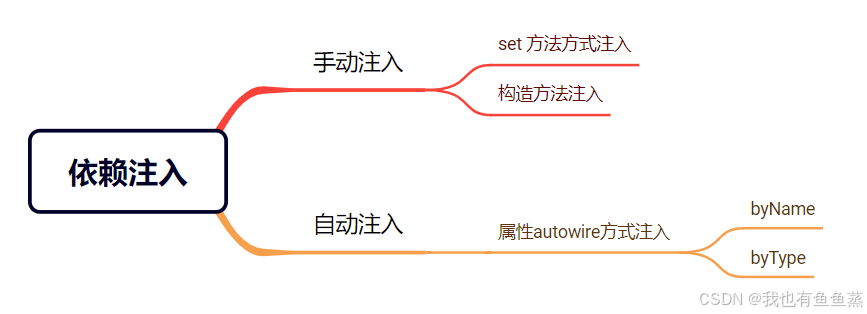
实现依赖注入的方式分为手动注入和自动注入,而手动注入又分为set方式注入和构造方法注入,如下图:
手动注入
set方法注入
set方式注入依赖的方式的步骤如下:
- 提供两个类,其中一个类的属性有另外一个类的对象,并且提供set方法。
- 将这两个类都交给spring管理(使用ref注入)
示例:
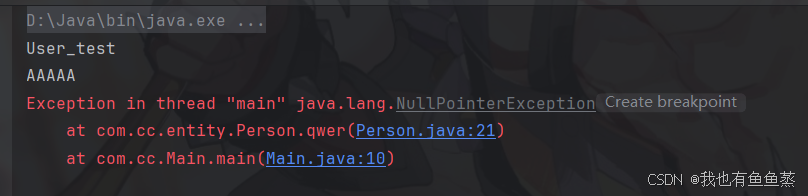
提供一个Person类和User类,其中Person类中有一个User属性,提供了set方法:
User类:
public class User {
    public void test(){
        System.out.println("User_test");
    }
}
Person类:
public class Person {
    User userTest;

    public void setUserTest(User userTest) {
        this.userTest = userTest;
    }
    public void qwer(){
        userTest.test();
    }
}
spring.xml:
<?xml version="1.0" encoding="UTF-8"?>
<beans xmlns="http://www.springframework.org/schema/beans"
xmlns:xsi="http://www.w3.org/2001/XMLSchema-instance"
xsi:schemaLocation="http://www.springframework.org/schema/beans http://www.springframework.org/schema/beans/spring-beans.xsd">
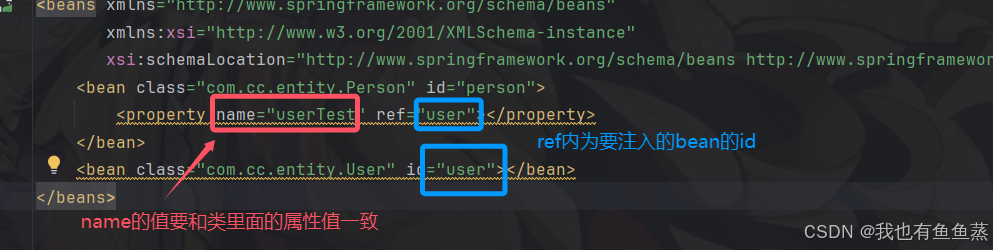
<bean class="com.cc.entity.Person" id="person">
<property name="userTest" ref="user"></property>
</bean>
<bean class="com.cc.entity.User" id="user"></bean>
</beans>
测试类:
public class Main {
    public static void main(String[] args) {
        ClassPathXmlApplicationContext classPathXmlApplicationContext = new ClassPathXmlApplicationContext("spring.xml");
        Person bean = (Person) classPathXmlApplicationContext.getBean("person");
        bean.qwer();
    }
}
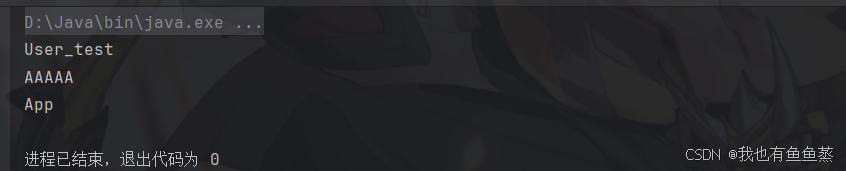
运行结果:

构造方法注入
构造器方式注入与set方式注入的区别不大,只需:
- 将set方法改成带参数的构造方法、
- 将bean.xml里面的<property>标签换成<constructor-arg>标签
修改后的的Person类如下:
public class Person {
    User userTest;

    public Person(User ooo) {
        this.userTest = ooo;
    }

    public void qwer() {
        userTest.test();
    }
}
修改后的spring.xml如下:
<?xml version="1.0" encoding="UTF-8"?>
<beans xmlns="http://www.springframework.org/schema/beans"
xmlns:xsi="http://www.w3.org/2001/XMLSchema-instance"
xsi:schemaLocation="http://www.springframework.org/schema/beans http://www.springframework.org/schema/beans/spring-beans.xsd">
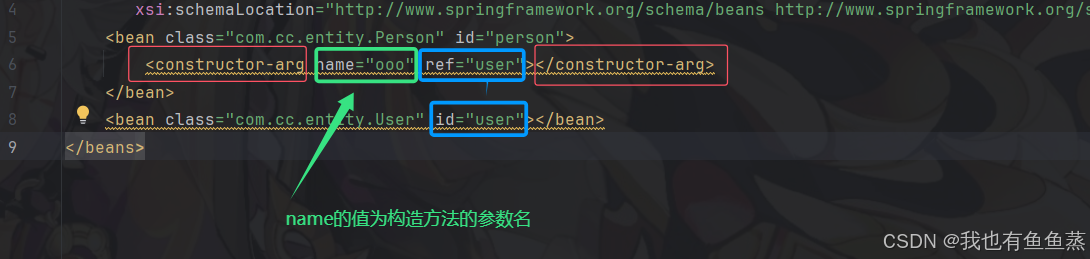
<bean class="com.cc.entity.Person" id="person">
<constructor-arg name="ooo" ref="user"></constructor-arg>
</bean>
<bean class="com.cc.entity.User" id="user"></bean>
</beans>
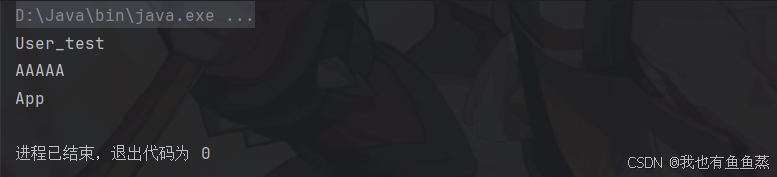
 测试结果不变,说明这个方法也能成功注入。
自动注入
自动注入需要用到关键属性autowire,不需要我们手动在bean.xml文件里面用标签去配置,而该属性的值可以为byName或byType。
byName
byName表示通过属性名自动装配。具体来说,Spring IoC容器会查看Person类中所有的属性,然后尝试在容器中查找与这些属性名相匹配的bean(即bean的ID或name属性与Person类的属性名相同),并将它们注入到Person类的相应属性中。如果找不到匹配的bean,则属性不会被设置。
演示:
重新配 置spring.xml,将A与App交给spring管理:
<?xml version="1.0" encoding="UTF-8"?>
<beans xmlns="http://www.springframework.org/schema/beans"
       xmlns:xsi="http://www.w3.org/2001/XMLSchema-instance"
       xsi:schemaLocation="http://www.springframework.org/schema/beans http://www.springframework.org/schema/beans/spring-beans.xsd">
    <bean class="com.cc.entity.Person" id="person" autowire="byName">
    </bean>
    <bean class="com.cc.entity.User" id="user"></bean>
    <bean class="com.cc.entity.A" id="a"></bean>
    <bean class="com.cc.entity.App" id="app"></bean>
</beans>
在Person类提供属性和set方法并且进行测试:
public class Person {
    A a;
    User user;
    App app ;

    public void setApp(App app) {
        this.app = app;
    }
    public void setA(A a) {
        this.a = a;
    }
    public void setUser(User userTest) {
        this.user = userTest;
    }

    public void qwer() {
        user.test();
        a.test();
        app.test();
    }
}
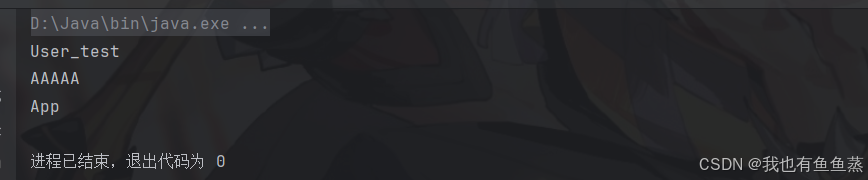
可以看到设置autowire属性就以及将App、A、UserTest注入到Person中,接下来继续测试
修改xml文件中app的id值为app111:
<bean class="com.cc.entity.App" id="app11"></bean>
提示 NullPointerException表示没有通过set赋值,再将set方法改为 setApp11:
public void setApp11(App app) {
        this.app = app;
    }
得出结论:容器根据set方法来寻找名字相同的bean并注入。
继续测试,将A的id值改成Aa,并且修改对应的set方法:
<bean class="com.cc.entity.A" id="Aa"></bean>
public void setAa(A a) {
        this.a = a;
    }

能够看到:id值与set对应了但仍然报错!原因是bean标签内的id值为大写的A开头。
将id修改为小写重新测试。
所以在配置bean标签时要注意id值不能为大写!
byType
byType 自动装配的工作方式是:Spring容器会检查当前bean的所有属性,查看它们的类型,然后在容器中查找与这些类型相匹配的bean。如果找到一个或多个匹配的bean,Spring会将它们注入到相应的属性中。如果没有找到匹配的bean,则属性不会被设置(对于非必选依赖)或者抛出异常(对于必选依赖)。
测试:
spring.xml:
<?xml version="1.0" encoding="UTF-8"?>
<beans xmlns="http://www.springframework.org/schema/beans"
       xmlns:xsi="http://www.w3.org/2001/XMLSchema-instance"
       xsi:schemaLocation="http://www.springframework.org/schema/beans http://www.springframework.org/schema/beans/spring-beans.xsd">
    <bean class="com.cc.entity.Person" id="person" autowire="byType">
    </bean>
    <bean class="com.cc.entity.User" id="user"></bean>
    <bean class="com.cc.entity.A" id="a"></bean>
    <bean class="com.cc.entity.App" id="app"></bean>
</beans>
Person类:
public class Person {
    A a;
    User user;
    App app ;

    public void setApp11(App app) {
        this.app = app;
    }
    public void setAa(A a) {
        this.a = a;
    }
    public void setUser(User userTest) {
        this.user = userTest;
    }

    public void qwer() {
        user.test();
        a.test();
        app.test();
    }
}
修改了spring.xml内bean标签的id,使id与set方法名不一致,查看测试结果:

注:该方法注入的相同类型只能是一个,否测报错!
使用byName注入两个相同的属性:
    <bean class="com.cc.entity.App" id="app11"></bean>
    <bean class="com.cc.entity.App" id="app22"></bean>
App app ; App app2; public void setApp11(App app) { this.app = app; } public void setApp22(App app) { this.app2 = app; }

使用byType注入两个相同的属性:
运行时报错:
NoUniqueBeanDefinitionException: No qualifying bean of type 'com.cc.entity.App' available: expected single matching bean but found 2: app11,app22
说明不能同时存在多个同类型的bean


 3万+
3万+

 被折叠的 条评论
为什么被折叠?
被折叠的 条评论
为什么被折叠?
 到【灌水乐园】发言


