


🌈hello,你好鸭,我是Ethan,西安电子科技大学大三在读,很高兴你能来阅读。
✔️目前博客主要更新Java系列、项目案例、计算机必学四件套等。
🏃人生之义,在于追求,不在成败,勤通大道。加油呀!
🔥个人主页:Ethan Yankang
🔥推荐:史上最强八股文||一分钟看完我的几百篇博客
🔥温馨提示:划到文末发现专栏彩蛋 点击这里直接传送
🔥本篇概览:详细讲解了在Java Spring AMQP客户端声明队列与交换机的两种方式——基于Bean、基于注解(多用后者)。🌈⭕🔥
【计算机领域一切迷惑的源头都是基本概念的模糊,算法除外】
🔥 微服务全集
🔥 前一篇章
🌈引出
之前我们都是在终端声明交换机与队列,这在实际生产之中是不现实的。因为在实际开发时,队列和交换机是程序员定义的,将来项目上线,又要交给运维去创建。那么程序员就需要把程序中运行的所有队列和交换机都写下来,交给运维。在这个过程中是很容易出现错误的。
因此推荐的做法是由程序启动时检查队列和交换机是否存在,如果不存在自动创建。
3.8.1.基本API
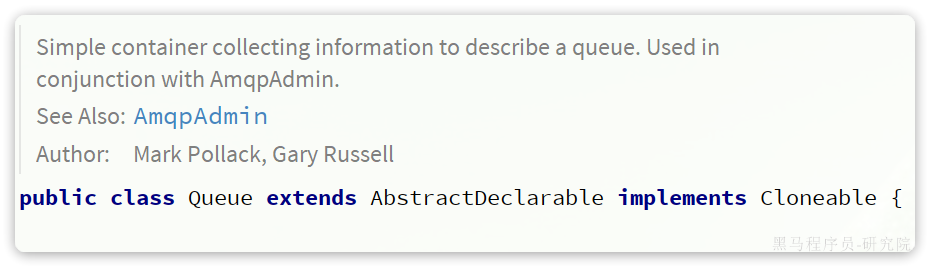
SpringAMQP提供了一个Queue类【Java集合全集请点击此处】,用来创建队列:
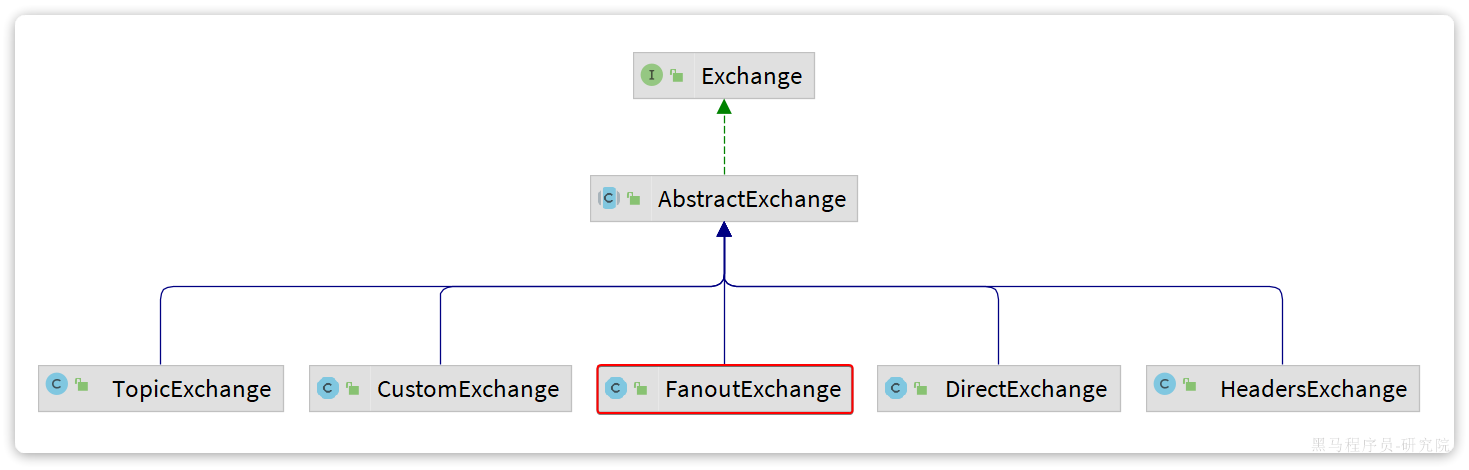
SpringAMQP还提供了一个Exchange接口,来表示所有不同类型的交换机:
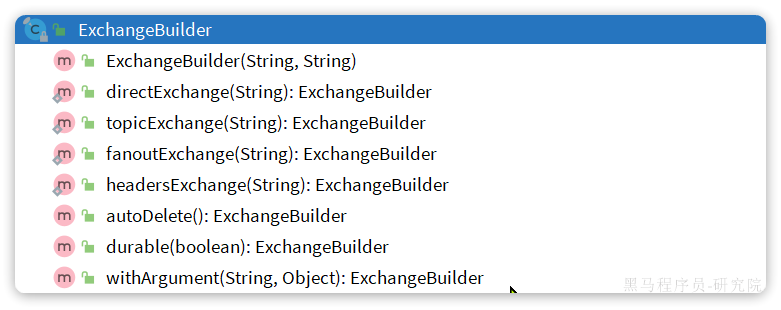
我们可以自己创建队列和交换机,不过SpringAMQP还提供了ExchangeBuilder来简化这个过程:
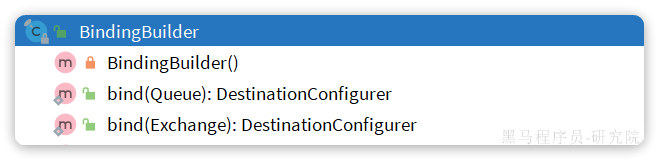
而在绑定队列和交换机时,则需要使用BindingBuilder来创建Binding对象:
3.8.2.fanout示例
在consumer中创建一个类,声明队列和交换机:
package com.itheima.consumer.config;

import org.springframework.amqp.core.Binding;
import org.springframework.amqp.core.BindingBuilder;
import org.springframework.amqp.core.FanoutExchange;
import org..amqp.core.Queue;
import org.springframework.context.annotation.Bean;
import org.springframework.context.annotation.Configuration;

@Configuration
public class FanoutConfig {
    /**
     * 声明交换机
     * @return Fanout类型交换机
     */
    @Bean
    public FanoutExchange fanoutExchange(){
        return new FanoutExchange("hmall.fanout");
    }

    /**
     * 第1个队列
     */
    @Bean
    public Queue fanoutQueue1(){
        return new Queue("fanout.queue1");
    }

    /**
     * 绑定队列和交换机
     */
    @Bean
    public Binding bindingQueue1(Queue fanoutQueue1, FanoutExchange fanoutExchange){
        return BindingBuilder.bind(fanoutQueue1).to(fanoutExchange);
    }

    /**
     * 第2个队列
     */
    @Bean
    public Queue fanoutQueue2(){
        return new Queue("fanout.queue2");
    }

    /**
     * 绑定队列和交换机
     */
    @Bean
    public Binding bindingQueue2(Queue fanoutQueue2, FanoutExchange fanoutExchange){
        return BindingBuilder.bind(fanoutQueue2).to(fanoutExchange);
    }
}
3.8.2.direct示例
direct模式由于要绑定多个KEY,会非常麻烦,每一个Key都要编写一个binding:
package com.itheima.consumer.config;

import org.springfrAamework.amqp.core.*;
import org.springframework.context.annotation.Bean;
import org.springframework.context.annotation.Configuration;

@Configuration
public class DirectConfig {

    /**
     * 声明交换机
     * @return Direct类型交换机
     */
    @Bean
    public DirectExchange directExchange(){
        return ExchangeBuilder.directExchange("hmall.direct").build();
    }

    /**
     * 第1个队列
     */
    @Bean
    public Queue directQueue1(){
        return new Queue("direct.queue1");
    }

    /**
     * 绑定队列和交换机
     */
    @Bean
    public Binding bindingQueue1WithRed(Queue directQueue1, DirectExchange directExchange){
        return BindingBuilder.bind(directQueue1).to(directExchange).with("red");
    }
    /**
     * 绑定队列和交换机
     */
    @Bean
    public Binding bindingQueue1WithBlue(Queue directQueue1, DirectExchange directExchange){
        return BindingBuilder.bind(directQueue1).to(directExchange).with("blue");
    }

    /**
     * 第2个队列
     */
    @Bean
    public Queue directQueue2(){
        return new Queue("direct.queue2");
    }

    /**
     * 绑定队列和交换机
     */
    @Bean
    public Binding bindingQueue2WithRed(Queue directQueue2, DirectExchange directExchange){
        return BindingBuilder.bind(directQueue2).to(directExchange).with("red");
    }
    /**
     * 绑定队列和交换机
     */
    @Bean
    public Binding bindingQueue2WithYellow(Queue directQueue2, DirectExchange directExchange){
        return BindingBuilder.bind(directQueue2).to(directExchange).with("yellow");
    }
}
3.8.4.🔥基于注解声明
基于@Bean的方式声明队列和交换机比较麻烦,Spring还提供了基于注解方式来声明。
例如,我们同样声明Direct模式的交换机和队列:
@RabbitListener(bindings = @QueueBinding(
    value = @Queue(name = "direct.queue1"),
    exchange = @Exchange(name = "hmall.direct", type = ExchangeTypes.DIRECT),
    key = {"red", "blue"}
))
public void listenDirectQueue1(String msg){
    System.out.println("消费者1接收到direct.queue1的消息:【" + msg + "】");
}

@RabbitListener(bindings = @QueueBinding(
    value = @Queue(name = "direct.queue2"),
    exchange = @Exchange(name = "hmall.direct", type = ExchangeTypes.DIRECT),
    key = {"red", "yellow"}
))
public void listenDirectQueue2(String msg){
    System.out.println("消费者2接收到direct.queue2的消息:【" + msg + "】");
}
是不是简单多了。 再试试Topic模式:
@RabbitListener(bindings = @QueueBinding(
    value = @Queue(name = "topic.queue1"),
    exchange = @Exchange(name = "hmall.topic", type = ExchangeTypes.TOPIC),
    key = "china.#"
))
public void listenTopicQueue1(String msg){
    System.out.println("消费者1接收到topic.queue1的消息:【" + msg + "】");
}

@RabbitListener(bindings = @QueueBinding(
    value = @Queue(name = "topic.queue2"),
    exchange = @Exchange(name = "hmall.topic", type = ExchangeTypes.TOPIC),
    key = "#.news"
))
public void listenTopicQueue2(String msg){
    System.out.println("消费者2接收到topic.queue2的消息:【" + msg + "】");
}
💖💖💖💖💖💖💖💖💖💖💖💖💖💖💖💖💖💖
热门专栏推荐
🌈🌈计算机科学入门系列 关注走一波💕💕
🌈🌈CSAPP深入理解计算机原理 关注走一波💕💕
🌈🌈微服务项目之黑马头条 关注走一波💕💕
🌈🌈redis深度项目之黑马点评 关注走一波💕💕
🌈🌈JAVA面试八股文系列专栏 关注走一波💕💕
🌈🌈JAVA基础试题集精讲 关注走一波💕💕
🌈🌈代码随想录精讲200题 关注走一波💕💕
总栏
🌈🌈JAVA基础要夯牢 关注走一波💕💕
🌈🌈JAVA后端技术栈 关注走一波💕💕
🌈🌈JAVA面试八股文 关注走一波💕💕
🌈🌈JAVA项目(含源码深度剖析) 关注走一波💕💕
🌈🌈计算机四件套 关注走一波💕💕
🌈🌈数据结构与算法 关注走一波💕💕
🌈🌈必知必会工具集 关注走一波💕💕
🌈🌈书籍网课笔记汇总 关注走一波💕💕
📣非常感谢你阅读到这里,如果这篇文章对你有帮助,希望能留下你的点赞👍 关注❤收藏✅ 评论💬,大佬三连必回哦!thanks!!!
📚愿大家都能学有所得,功不唐捐!


 4万+
4万+

 被折叠的 条评论
为什么被折叠?
被折叠的 条评论
为什么被折叠?
 到【灌水乐园】发言


