


 本文详细介绍如何通过Ant编译Tomcat源码,并使用IDEA导入项目进行学习。包括配置pom.xml文件、构建环境、配置项目等步骤。
准备学习一下tomcat的原理,下载tomcat的源码准备学习一下,今天导入成功,记录一下导入的教程,网络上有比较多的教程,我主要通过这篇教程调试成功的,但是也是试了几次才成功。https://www.jb51.net/article/144696.htm
一、通过Ant编译源码
需要下载Ant,并配置好环境变量,我的tomcat是在github上下载的,所以目录直接是tomcat,在这个目录下直接 打开命令行,输入ant就可以进行编译,编译成功会显示 成功。
二、idea配置
首先需要新建一个pom.xml文件文件的内容如下
<?xml version="1.0" encoding="UTF-8"?>
<project xmlns="http://maven.apache.org/POM/4.0.0"
  xmlns:xsi="http://www.w3.org/2001/XMLSchema-instance"
  xsi:schemaLocation="http://maven.apache.org/POM/4.0.0 http://maven.apache.org/xsd/maven-4.0.0.xsd">

  <modelVersion>4.0.0</modelVersion>
  <groupId>org.apache.tomcat</groupId>
  <artifactId>Tomcat8.0</artifactId>
  <name>Tomcat8.0</name>
  <version>8.0</version>

  <build>
    <finalName>Tomcat8.0</finalName>
    <sourceDirectory>java</sourceDirectory>
    <!--<testSourceDirectory>test</testSourceDirectory>-->
    <resources>
      <resource>
        <directory>java</directory>
      </resource>
    </resources>
    <!--<testResources>-->
      <!--<testResource>-->
        <!--<directory>test</directory>-->
      <!--</testResource>-->
    <!--</testResources>-->
    <plugins>
      <plugin>
        <groupId>org.apache.maven.plugins</groupId>
        <artifactId>maven-compiler-plugin</artifactId>
        <version>3.1</version>
        <configuration>
          <encoding>UTF-8</encoding>
          <source>1.8</source>
          <target>1.8</target>
        </configuration>
      </plugin>
    </plugins>
  </build>

  <dependencies>
    <dependency>
      <groupId>junit</groupId>
      <artifactId>junit</artifactId>
      <version>4.12</version>
      <scope>test</scope>
    </dependency>
    <dependency>
      <groupId>org.easymock</groupId>
      <artifactId>easymock</artifactId>
      <version>3.4</version>
    </dependency>
    <dependency>
      <groupId>ant</groupId>
      <artifactId>ant</artifactId>
      <version>1.7.0</version>
    </dependency>
    <dependency>
      <groupId>wsdl4j</groupId>
      <artifactId>wsdl4j</artifactId>
      <version>1.6.2</version>
    </dependency>
    <dependency>
      <groupId>javax.xml</groupId>
      <artifactId>jaxrpc</artifactId>
      <version>1.1</version>
    </dependency>
    <dependency>
      <groupId>org.eclipse.jdt.core.compiler</groupId>
      <artifactId>ecj</artifactId>
      <version>4.5.1</version>
    </dependency>
  </dependencies>
</project>
然后通过idea的import project导入项目,在项目过程中选择maven,然后一路next,这个时候导入完成,但是还不能跑起来,
1)新建文件夹catalina-home,把ant编译后生成的output/build ;将这些复制到源码包到catalina-home中。
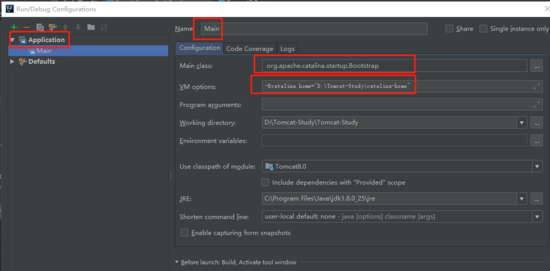
2)配置项目,Edit Configurations ,点左上方绿色加号,选择Apllication。
需要配置的两项依次是:org.apache.catalina.startup.Bootstrap、-Dcatalina.home="D:\Tomcat-Study\catalina-home"
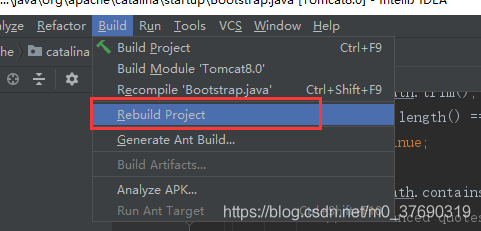
然后将项目重新build 一遍之后 直接点run,进入localhost:8080


 1033
1033

 被折叠的 条评论
为什么被折叠?
被折叠的 条评论
为什么被折叠?
 到【灌水乐园】发言


