


 本文介绍了如何在Linux环境中安装Apache ActiveMQ 5.12.0,包括解压、启动、状态检查和端口开放。同时,强调了在访问Queues页面时可能出现的503错误及其解决方案,并提供了在工程中配置ActiveMQ的步骤,包括解决jar包冲突问题、整合Spring配置文件及后台监听事件处理的示例。
工具:apache-activemq-5.12.0-bin.tar.gz
下载:
linux中
1.已经安装了jdk
2.sftp模式将apache-activemq-5.12.0-bin.tar.gz复制到linux中
3.tar zxf apache-activemq-5.12.0-bin.tar.gz 解压缩
4.cd apache-activemq-5.12.0/bin进入目录
5 ./activemq start启动
6.ps aux|grep activemq 查看状态

7.注意(要将8161端口号开放)/sbin/iptables -I INPUT -p tcp –dport 8161 -j ACCEPT
8.192.168.64.129:8161/admin 通过浏览器访问(192.168.64.129为安装mq的机子的ip)用户名:admin 密码:admin


注意:如果Queues页面报错503是因为安装mq的机器名没有映射到127.0.0.1上
直接在bin目录下写命令
1.查看机器名 cat /etc/sysconfig/network
2.查看目前拥有机器名 cat /etc/hosts
注意:在工程中配置访问时tcp://192.168.64.129:61616(需要将61616端口开放,方法同上)
项目实例:
1.引入jar包
注意在应用到项目工程上时可能引起jar包冲突slf4j包,解决方法如下:
打开activemq\lib目录
拷贝
activemq-broker-5.8.0.jar
activemq-client-5.8.0.jar
geronimo-j2ee-management_1.1_spec-1.0.1.jar
geronimo-jms_1.1_spec-1.1.1.jar
slf4j-api-1.6.6.jar
activemq-core.jar
2.编写spring整合activemq配置文件
消息发送者:spring-activemqsend.xml
<?xml version="1.0" encoding="UTF-8"?>
<beans xmlns="http://www.springframework.org/schema/beans"
xmlns:context="http://www.springframework.org/schema/context" xmlns:p="http://www.springframework.org/schema/p"
xmlns:aop="http://www.springframework.org/schema/aop" xmlns:tx="http://www.springframework.org/schema/tx"
xmlns:xsi="http://www.w3.org/2001/XMLSchema-instance"
xsi:schemaLocation="http://www.springframework.org/schema/beans http://www.springframework.org/schema/beans/spring-beans-4.2.xsd
http://www.springframework.org/schema/context http://www.springframework.org/schema/context/spring-context-4.2.xsd
http://www.springframework.org/schema/aop http://www.springframework.org/schema/aop/spring-aop-4.2.xsd http://www.springframework.org/schema/tx http://www.springframework.org/schema/tx/spring-tx-4.2.xsd
http://www.springframework.org/schema/util http://www.springframework.org/schema/util/spring-util-4.2.xsd">

<!-- JMS服务厂商提供的ConnectionFactory -->
<bean id="targetConnectionFactory" class="org.apache.activemq.ActiveMQConnectionFactory">
    <constructor-arg name="brokerURL" value="tcp://192.168.64.129:61616"/>
</bean>
<!-- spring对象ConnectionFactory的封装 -->
<bean id="connectionFactory" class="org.springframework.jms.connection.SingleConnectionFactory">
    <property name="targetConnectionFactory" ref="targetConnectionFactory"></property>
</bean>
<!-- 配置JMSTemplate -->
<bean id="jmsTemplate" class="org.springframework.jms.core.JmsTemplate">
    <property name="connectionFactory" ref="connectionFactory"/>
</bean>
<!-- 配置消息的Destination对象 -->
<bean id="test-queue" class="org.apache.activemq.command.ActiveMQQueue">
    <constructor-arg name="name" value="test-queue"></constructor-arg>
</bean>
<bean id="itemAddtopic" class="org.apache.activemq.command.ActiveMQTopic">
    <constructor-arg name="name" value="item-add-topic"></constructor-arg>
</bean>
</beans>
消息接受者:spring-activemqaccept.xml
<?xml version="1.0" encoding="UTF-8"?>
<beans xmlns="http://www.springframework.org/schema/beans"
xmlns:context="http://www.springframework.org/schema/context" xmlns:p="http://www.springframework.org/schema/p"
xmlns:aop="http://www.springframework.org/schema/aop" xmlns:tx="http://www.springframework.org/schema/tx"
xmlns:xsi="http://www.w3.org/2001/XMLSchema-instance"
xsi:schemaLocation="http://www.springframework.org/schema/beans http://www.springframework.org/schema/beans/spring-beans-4.2.xsd
http://www.springframework.org/schema/context http://www.springframework.org/schema/context/spring-context-4.2.xsd
http://www.springframework.org/schema/aop http://www.springframework.org/schema/aop/spring-aop-4.2.xsd http://www.springframework.org/schema/tx http://www.springframework.org/schema/tx/spring-tx-4.2.xsd
http://www.springframework.org/schema/util http://www.springframework.org/schema/util/spring-util-4.2.xsd">

<!-- JMS服务厂商提供的ConnectionFactory -->
<bean id="targetConnectionFactory" class="org.apache.activemq.ActiveMQConnectionFactory">
    <constructor-arg name="brokerURL" value="tcp://192.168.64.129:61616"/>
</bean>
<!-- spring对象ConnectionFactory的封装 -->
<bean id="connectionFactory" class="org.springframework.jms.connection.SingleConnectionFactory">
    <property name="targetConnectionFactory" ref="targetConnectionFactory"></property>
</bean>
<!-- 配置消息的Destination对象 -->
<bean id="test-queue" class="org.apache.activemq.command.ActiveMQQueue">
    <constructor-arg name="name" value="test-queue"></constructor-arg>
</bean>
<bean id="itemAddTopic" class="org.apache.activemq.command.ActiveMQTopic">
    <constructor-arg name="name" value="item-add-topic"></constructor-arg>
</bean>
<!-- 配置消息的接收者 -->
<bean id="myMessageListener" class="com.ly.activemq.MyMessageListener"/>
<bean class="org.springframework.jms.listener.DefaultMessageListenerContainer">
    <property name="connectionFactory" ref="connectionFactory" />
    <property name="destination" ref="test-queue" />
    <property name="messageListener" ref="myMessageListener" />
</bean>
<bean id="itemAddMessageListener" class="com.ly.activemq.ItemAddMessageListener"/>
<bean class="org.springframework.jms.listener.DefaultMessageListenerContainer">
    <property name="connectionFactory" ref="connectionFactory" />
    <property name="destination" ref="itemAddTopic" />
    <property name="messageListener" ref="itemAddMessageListener" />
</bean>

</beans>
3后台监听事件处理代码:
package com.ly.activemq;
import java.io.File;
import java.io.FileWriter;
import java.io.Writer;
import java.util.HashMap;
import java.util.List;
import java.util.Map;
import javax.jms.Message;
import javax.jms.MessageListener;
import javax.jms.TextMessage;
import org.apache.solr.client.solrj.SolrServer;
import org.apache.solr.common.SolrInputDocument;
import org.springframework.beans.factory.annotation.Autowired;
import org.springframework.beans.factory.annotation.Value;
import org.springframework.web.servlet.view.freemarker.FreeMarkerConfigurer;

import com.ly.pojo.Good;
import com.ly.pojo.GoodImage;
import com.ly.service.GoodImageService;
import com.ly.service.GoodService;

/**
 * 监听商品添加事件,同步索引库
 * <p>Title: ItemAddMessageListener</p>
 * <p>Description: </p>
 * <p>Company: www.itcast.cn</p>
 * @version 1.0
 */
public class ItemAddMessageListener implements MessageListener{

@Autowired
private GoodService goodService;
@Autowired
private SolrServer solrServer;

@Value("${HTML_OUT_PATH}")
private String HTML_OUT_PATH;
//商品图片service
@Autowired
private GoodImageService goodImageService;

@Override
public void onMessage(Message message) {
    try {
        //从消息中取商品id
        TextMessage textMessage = (TextMessage) message;
        String text = textMessage.getText();
        long goodId = Long.parseLong(text);
        //根据商品id查询数据,取商品信息
        //等待事务提交
        Thread.sleep(1000);
        Good good = goodService.getById((int)goodId);
        //导入数据到solr中
        //创建文档对象
        SolrInputDocument document = new SolrInputDocument();
        //向文档对象中添加域
        document.addField("id", good.getId());
        document.addField("good_price", good.getPrice());
        document.addField("good_source", good.getSource());
        document.addField("good_description", good.getDescription());
        document.addField("good_marketprice", good.getMarketprice());
        document.addField("good_name", good.getName());
        document.addField("good_image", good.getImage());
        //把文档对象写入索引库
        solrServer.add(document);
        //提交
        solrServer.commit();

    } catch (Exception e) {
        e.printStackTrace();
    }

}
}
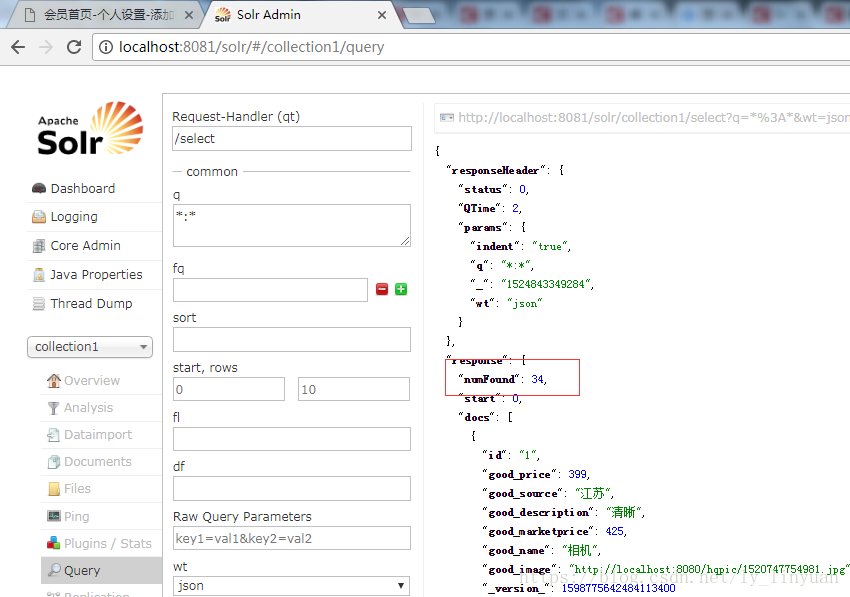
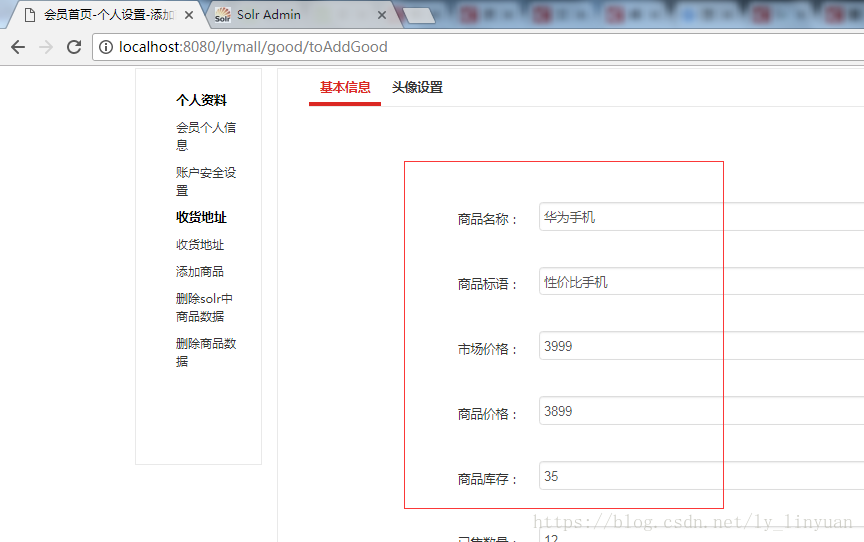
我这里以添加一个商品信息就发送消息往solr中添加商品信息为示例
效果:


 1554
1554

 被折叠的 条评论
为什么被折叠?
被折叠的 条评论
为什么被折叠?
 到【灌水乐园】发言


