


 本文基于Android P,通过HIDL中的HelloWorld实例分析,介绍HIDL使用。涵盖确定环境、创建核心hal、编译文件、创建服务与实现、添加rc文件、启动服务及实现客户端等步骤,还提及相关编程规范、数据类型等知识。
前言:
从Android HIDL 详解 一文得知HIDL 使用passthrough 模式,为了与原来的HAL 版本兼容。除了passthrough 模式,还有一种binderized模式。本文通过HIDL 中的Helloworld 进行实例分析,进一步了解HIDL 使用。
本文source code 基于Android P。
Step 1 确定环境
Android HIDL 编程规范一文中得知需要确定HIDL 的目录结构和软件包名称
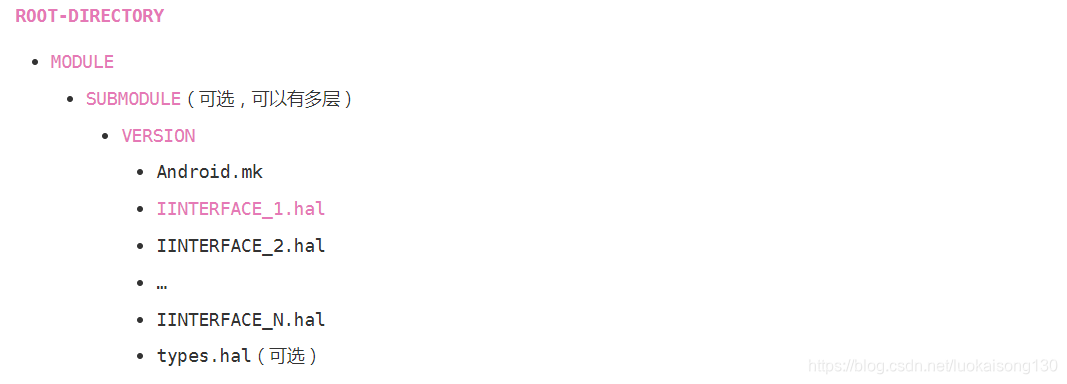
下表列出了软件包前缀和位置:
| 软件包前缀 | 位置 |
|---|---|
android.hardware.* | hardware/interfaces/* |
android.frameworks.* | frameworks/hardware/interfaces/* |
android.system.* | system/hardware/interfaces/* |
android.hidl.* | system/libhidl/transport/* |
如上表,hardware/interfaces 目录一般放的是源生hal 相关的接口,如下图所示:
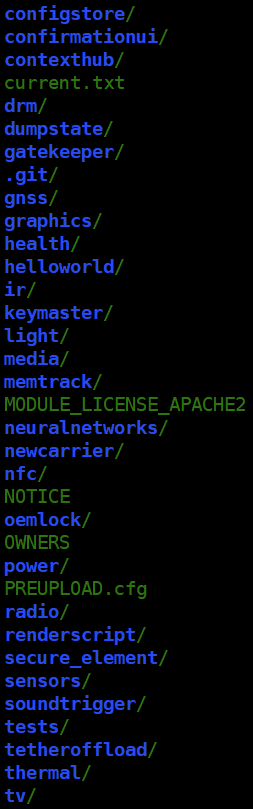
除了上表中提到这几个源生的目录,一般OEM 的hal 都是在vendor下,详细看Android HIDL 接口和软件包使用 一文。
本文中Helloworld 位于hardware/interfaces中,所以目录路径为hardware/interfaces/helloworld/1.0。
确定目录后就是确定软件包名,根据Android HIDL 接口和软件包使用 一文得知在 hardware/interfaces目录下的软件包package 为android.hardware,所以package name 应该是 android.hardware.helloworld@1.0。
Step 2 创建核心hal
确定HIDL 模块的路径和包名之后,需要创建一个hal 文件,这个文件包含了client 需要调用HAL 的入口api,这里命名为IHelloWorld.hal,代码如下:
-
package android.hardware.helloworld@
1.0;
-
-
interface
IHelloWorld {
-
justTest(
string name) generates (
string result, HelloTest
value);
-
-
justTest1(HelloTest name);
-
};
其中HelloTest 是用户自定义类型,如果是模块公共的类型,可以定义在types.hal 中,例如这里:
-
package android.hardware.
helloworld@
1.0;
-
-
enum HelloTest : uint8_t {
-
V_TEST1 =
0,
-
V_TEST2 =
1,
-
};
详细代码格式和数据类型可以查看:Android HIDL 编程规范 和 Android HIDL 中的数据类型。
Step 3 创建编译的Android.bp
根据Step 2中的hal 文件利用hidl-gen(详细看 Android HIDL 中 hidl-gen使用) 生成对应的Android.bp:
-
// This file is autogenerated by hidl-gen -Landroidbp.
-
-
hidl_interface {
-
name:
"android.hardware.helloworld@1.0",
-
root:
"android.hardware",
-
vndk: {
-
enabled:
true,
-
},
-
srcs: [
-
"types.hal",
-
"IHelloWorld.hal",
-
],
-
interfaces: [
-
"android.hidl.base@1.0",
-
],
-
types: [
-
"HelloTest",
-
],
-
gen_java:
true,
-
}
注意:
- name 需要与package name 相同,编译的时候会根据需要生成对应的so 或jar
- root 即为与hidl 对应的root name,详细看Step 1
- interfaces 为编译过程中依赖的接口名称,如c 中的shared library
- types 为模块中所需要的自定义类型
- 如果有需要的java 代码可以将 gen_java 设为 true,如果没有(例如passthrough 模式)需要将这里设为false。不过一般通过update_makefiles.sh 就可以自动生成。详细看Android HIDL 中 hidl-gen使用
Step 4 编译HIDL
在对应的hidl 目录下mm 编译或者在根目录下make PQName 即可,最终在out/soong/.interfaces/hardware/interfaces/下会生成对应模块的obj,这里目录决定为hardware/interfaces其实就是跟上面root 设定有关系。详细如下图:
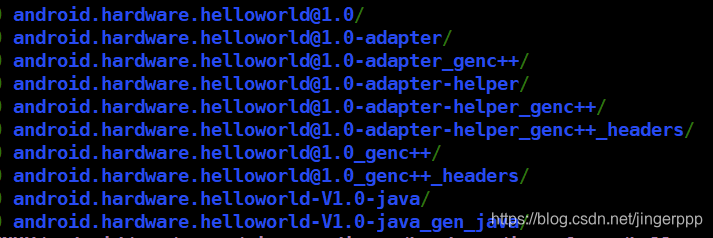
其中:
- android.hardware.helloworld@1.0 就是模块对应的库文件;
- android.hardware.helloworld@1.0_genc++ 为生成对应的C++临时文件,在使用的时候都是链接到这里;
-
-rw-rw-r-- 1
shift
shift 26745 1月 22 14:20 HelloWorldAll.cpp
-
-rw-rw-r-- 1
shift
shift 281 1月 22 14:20 HelloWorldAll.cpp.d
-
-rw-rw-r-- 1
shift
shift 874 1月 22 14:20 types.cpp
- android.hardware.helloworld@1.0_genc++_headers 为生成的C++ 所需的头文件;
-
-rw-rw-r-- 1
shift
shift 2264 1月 22 14:20 BnHwHelloWorld.h
-
-rw-rw-r-- 1
shift
shift 3008 1月 22 14:20 BpHwHelloWorld.h
-
-rw-rw-r-- 1
shift
shift 17785 1月 22 14:20 BsHelloWorld.h
-
-rw-rw-r-- 1
shift
shift 519 1月 22 14:20 hwtypes.h
-
-rw-rw-r-- 1
shift
shift 5296 1月 22 14:20 IHelloWorld.h
-
-rw-rw-r-- 1
shift
shift 279 1月 22 14:20 IHelloWorld.h.d
-
-rw-rw-r-- 1
shift
shift 684 1月 22 14:20 IHwHelloWorld.h
-
-rw-rw-r-- 1
shift
shift 4520 1月 22 14:20 types.h
- android.hardware.helloworld-V1.0-java 为java 代码所使用的java 库文件;
- android.hardware.helloworld-V1.0-java_gen_java 为java 代码所使用的java 文件
-
-rw-rw-r-- 1
shift
shift 922 1月 22 14:20 HelloTest.java
-
-rw-rw-r-- 1
shift
shift 24875 1月 22 14:20 IHelloWorld.java
-
-rw-rw-r-- 1
shift
shift 287 1月 22 14:20 IHelloWorld.java.d
Step 5 创建service 和impl
其实当IHelloworld.hal 创建完成就可以创建对应的HIDL 实现代码(impl 和service),而hidl-gen 也提供了默认生成的方式,详细看Android HIDL 中 hidl-gen使用,最终生成的文件为:
-
-rw-rw-r-- 1
shift
shift 973 1月 17 20:05 Android.bp
-
-rw-rw-r-- 1
shift
shift 605 1月 17 20:05 HelloWorld.cpp
-
-rw-rw-r-- 1
shift
shift 1159 1月 17 20:05 HelloWorld.h
先来看下HelloWorld.h:
-
#include <android/hardware/helloworld/1.0/IHelloWorld.h>
-
#include <hidl/MQDescriptor.h>
-
#include <hidl/Status.h>
-
-
namespace android {
-
namespace hardware {
-
namespace helloworld {
-
namespace V1_0 {
-
namespace implementation {
-
-
using ::android::hardware::hidl_array;
-
using ::android::hardware::hidl_memory;
-
using ::android::hardware::hidl_string;
-
using ::android::hardware::hidl_vec;
-
using ::android::hardware::Return;
-
using ::android::hardware::Void;
-
using ::android::sp;
-
-
struct HelloWorld :
public IHelloWorld {
-
// Methods from ::android::hardware::helloworld::V1_0::IHelloWorld follow.
-
Return<
void> justTest(
const hidl_string& name, justTest_cb _hidl_cb) override;
-
Return<
void> justTest1(::android::hardware::helloworld::V1_0::HelloTest name) override;
-
-
// Methods from ::android::hidl::base::V1_0::IBase follow.
-
-
};
-
-
// FIXME: most likely delete, this is only for passthrough implementations
-
// extern "C" IHelloWorld* HIDL_FETCH_IHelloWorld(const char* name);
-
-
}
// namespace implementation
-
}
// namespace V1_0
-
}
// namespace helloworld
-
}
// namespace hardware
-
}
// namespace android
如果是实用passthrough 模式,则需要打开HIDL_FETCH_IHelloWorld() 函数的注释,并且在-impl 的C++文件中实现,例如这里如果使用passthrough 模式,需要在HelloWorld.cpp 中实现该函数,详细可以看nfc 或tv 等模块中实现。
再来看下HelloWorld.cpp:
-
#define LOG_TAG "HelloWorldImpl"
-
-
#include <log/log.h>
-
-
#include "HelloWorld.h"
-
-
namespace android {
-
namespace hardware {
-
namespace helloworld {
-
namespace V1_0 {
-
namespace implementation {
-
-
// Methods from ::android::hardware::helloworld::V1_0::IHelloWorld follow.
-
Return<
void> HelloWorld::justTest(
const hidl_string& name, justTest_cb _hidl_cb) {
-
ALOGD(
"justTest, name = %s", name.c_str());
-
-
_hidl_cb(name, HelloTest::V_TEST2);
-
-
ALOGD(
"justTest end.");
-
return Void();
-
}
-
-
Return<
void> HelloWorld::justTest1(::android::hardware::helloworld::V1_0::HelloTest name) {
-
ALOGD(
"justTest1, name = %hhu", name);
-
-
return Void();
-
}
-
-
-
// Methods from ::android::hidl::base::V1_0::IBase follow.
-
-
//IHelloWorld* HIDL_FETCH_IHelloWorld(const char* /* name */) {
-
//return new HelloWorld();
-
//}
-
//
-
}
// namespace implementation
-
}
// namespace V1_0
-
}
// namespace helloworld
-
}
// namespace hardware
-
}
// namespace android
这里就是实现的地方,其中使用passthrough 的时候需要使能HIDL_FETCH_IHelloWorld() 函数。
关于HIDL 相关的数据类型详细看:Android HIDL 中的数据类型
再来看下service.cpp:
-
#define LOG_TAG "android.hardware.helloworld@1.0-service"
-
-
#include <android/hardware/helloworld/1.0/IHelloWorld.h>
-
-
#include <hidl/LegacySupport.h>
-
#include "HelloWorld.h"
-
-
// Generated HIDL files
-
using android::hardware::helloworld::V1_0::IHelloWorld;
-
using android::hardware::helloworld::V1_0::implementation::HelloWorld;
-
-
using android::hardware::defaultPassthroughServiceImplementation;
-
using android::hardware::configureRpcThreadpool;
-
using android::hardware::joinRpcThreadpool;
-
-
int main() {
-
#if 0
-
return defaultPassthroughServiceImplementation<IHelloWorld>();
-
#else
-
sp<IHelloWorld> service =
new HelloWorld();
-
configureRpcThreadpool(
1,
true
/*callerWillJoin*/);
-
if(android::OK != service->registerAsService())
-
return
1;
-
joinRpcThreadpool();
-
#endif
-
}
Android.bp 是为了编译HIDL 实现部分的代码生成的默认编译文件(详细看Android HIDL 中 hidl-gen使用),可以根据实际的情况修改:
-
cc_library_shared {
-
name:
"android.hardware.helloworld@1.0-impl",
-
relative_install_path:
"hw",
-
proprietary: true,
-
srcs: [
-
"HelloWorld.cpp",
-
],
-
shared_libs: [
-
"libhidlbase",
-
"libhidltransport",
-
"libutils",
-
"android.hardware.helloworld@1.0",
-
],
-
}
如果其他模块需要so 则需要share lib,如果不需要刻意直接编译service,如下:
-
cc_binary {
-
name:
"android.hardware.helloworld@1.0-service",
-
defaults: [
"hidl_defaults"],
-
relative_install_path:
"hw",
-
vendor: true,
-
init_rc: [
"android.hardware.helloworld@1.0-service.rc"],
-
srcs: [
-
"HelloWorld.cpp",
-
"service.cpp"
-
],
-
shared_libs: [
-
"liblog",
-
"libhidlbase",
-
"libhidltransport",
-
"libutils",
-
"libhardware",
-
"android.hardware.helloworld@1.0",
-
],
-
}
注意:
- name:为变成生成的库文件名称,-impl 为实现的库文件,-service为服务端的库文件;
- init_rc:指定启动service 的rc 名称;
- relative_install_path:为生成库文件路径,通常与proprietary 和vendor 属性配套,一般都设为hw;
- proprietary:标记默认生成路径,设为true 代表为系统默认路径(system/lib64下),通常与relative_install_path 属性配套,缺省时默认为system/lib64 下;
- vendor:与proprietary 相同,设为true代表路径在vendor 下,默认OEM 都会设置在vendor 下;
Step 6 添加rc 文件
在实现了serivce 和impl 代码后需要添加rc 文件,文件名为android.hardware.helloworld@1.0-service.rc:
-
service helloworld-hal-
1-
0 /vendor/bin/hw/android.hardware.helloworld@1.
0-service
-
class hal
-
user
system
-
group
system
Step 7 启动service
需要注意的是,在应用起来之前需要使能service,一般有两种方式,一个是通过rc 中的service name,直接start;另外一种是通过selinux 中添加te 文件,设置domain 信息。对于selinux 配置,这里暂不分析,详细看 SELINUX 中文章。
Step 8 实现client 端
App 其他的代码这里不做展示,主要来看调用的地方:
-
private void test() {
-
IHelloWorld service =
null;
-
try {
-
service = IHelloWorld.getService(
true);
-
}
catch (RemoteException e) {
-
// TODO Auto-generated catch block
-
e.printStackTrace();
-
}
-
-
if (service ==
null) {
-
Log.e(TAG,
"test failed, service is null...");
-
return;
-
}
-
-
try {
-
service.justTest1((
byte)
123);
-
}
catch (RemoteException e) {
-
// TODO Auto-generated catch block
-
e.printStackTrace();
-
}
-
}
Android.mk 为:
-
LOCAL_PATH := $(call my-dir)
-
-
include $(CLEAR_VARS)
-
-
LOCAL_CERTIFICATE := platform
-
LOCAL_MODULE_TAGS := optional
-
-
LOCAL_SRC_FILES := $(call all-java-files-under, src)
-
-
LOCAL_PACKAGE_NAME := TestHIDLClient
-
-
#LOCAL_PROGUARD_FLAG_FILES := proguard.flags
-
-
LOCAL_PRIVATE_PLATFORM_APIS :=
true
-
-
LOCAL_STATIC_JAVA_LIBRARIES := \
-
android.hardware.helloworld-V1.0-java
-
-
include $(BUILD_PACKAGE)
打印log 如下:
-
01-23 13:57:20.424 6498 6498 I android_os_HwBinder: HwBinder: Starting thread pool for default::android.hardware.helloworld@1.0::IHelloWorld
-
01-23 13:57:20.424 572 3344 D audio_hw_primary: start_output_stream: enter: stream(0xedde7000)usecase(1: low-latency-playback) devices(0x2)
-
01-23 13:57:20.424 572 3344 E audio_hw_extn: audio_extn_perf_lock_acquire: Failed to acquire perf
lock, err:
-1
-
01
-23
13:
57:
20.424
572
3344 D audio_hw_primary: select_devices
for
use
case (
low-latency-playback)
-
01
-23
13:
57:
20.424
572
3344 D audio_hw_primary: select_devices: out_snd_device(
2: speaker) in_snd_device(
0: )
-
01
-23
13:
57:
20.424
572
3344 I msm8916_platform: platform_check_and_set_codec_backend_cfg:becf: afe: bitwidth
16, samplerate
48000 channels
2, backend_idx
0 usecase =
1 device (speaker)
-
01
-23
13:
57:
20.424
572
3344 D msm8916_platform: platform_split_snd_device: snd_device(
2)
num devices(
1) new_snd_devices(
0)
-
01
-23
13:
57:
20.424
6607
6607 D HelloWorldImpl: justTest1,
name =
123
相关文章:


 5752
5752

 被折叠的 条评论
为什么被折叠?
被折叠的 条评论
为什么被折叠?
 到【灌水乐园】发言


