


 本文详细介绍Spring框架中异步任务和定时任务的实现方法,包括@Async和@Scheduled注解的使用,以及如何配置邮件任务。
一、异步任务
在Java应用中,绝大多数情况下都是通过同步的方式来实现交互处理的;但是在 处理与第三方系统交互的时候,容易造成响应迟缓的情况,之前大部分都是使用 多线程来完成此类任务,其实,在Spring 3.x之后,就已经内置了@Async来完 美解决这个问题。
两个注解: @EnableAysnc、@Aysnc
1、添加 @EnableAysnc 注解,开启异步注解功能
@EnableAsync
@SpringBootApplication
public class Springboot12TaskApplication {

    public static void main(String[] args) {
        SpringApplication.run(Springboot12TaskApplication.class, args);
    }

}
2、使用 @Async 注解,告诉Spring这是一个异步方法
@Service
public class AsyncService {

    @Async
    public void hello(){
        try {
            Thread.sleep(3000);
        } catch (InterruptedException e) {
            e.printStackTrace();
        }
        System.out.println("处理数据中.....");
    }
}
3、测试
@RestController
public class AsyncController {

    @Autowired
    AsyncService asyncService;

    @GetMapping("/hello")
    public String hello(){
        asyncService.hello();
        return "success";
    }
}
二、定时任务
项目开发中经常需要执行一些定时任务,比如需要在每天凌晨时候,分析一次前 一天的日志信息。Spring为我们提供了异步执行任务调度的方式,提供 TaskExecutor 、TaskScheduler 接口。
两个注解:@EnableScheduling、@Scheduled
1、添加 @EnableScheduling 注解,开启基于注解的定时任务
@EnableScheduling
@SpringBootApplication
public class Springboot12TaskApplication {

    public static void main(String[] args) {
        SpringApplication.run(Springboot12TaskApplication.class, args);
    }

}
2、使用 @Scheduled 注解
@Service
public class ScheduledService {

    /***
     * second(秒), minute(分), hour(时), day of month(日), month(月), day of week(周几).
     * 0 * * * * MON-FRI
     * 【0 0/5 14,18 * * ?】每天14点整,和18点整,每隔5分钟执行一次
     * 【0 15 10 ? * 1-6】每个月的周一至周六10:15分执行一次
     * 【0 0 2 ? * 6L】每个月的最后一个周六凌晨2点执行一次
     * 【0 0 2 LW * ?】每个月的最后一个工作日凌晨2点执行一次
     * 【0 0 2-4 ? * 1#1】每个月的第一个周一凌晨2点到4点期间,每隔整点都执行一次
     **/
    //@Scheduled(cron = "0 * * * * MON-SAT")
    //@Scheduled(cron = "0,1,2,3,4 * * * * MON-SAT")
    //@Scheduled(cron = "0-4 * * * * MON-SAT")
    @Scheduled(cron = "0/4 * * * * MON-SAT") //每4秒执行一次
    public void hello(){
        System.out.println("hello.....");
    }
}
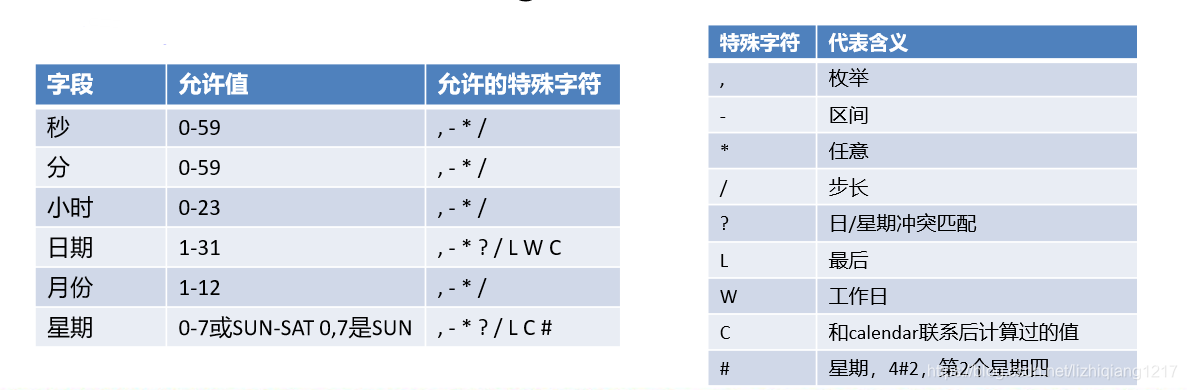
cron表达式:
三、邮件任务
自动配置MailSenderAutoConfiguration ;自动装配JavaMailSender。
1、引入依赖
<dependency>
    <groupId>org.springframework.boot</groupId>
    <artifactId>spring-boot-starter-mail</artifactId>
</dependency>
2、application.properties配置
spring.mail.username=1820600111@qq.com
#注意这里的密码不是邮箱密码而是授权码
spring.mail.password=ufppyfaasdqddbhd
spring.mail.host=smtp.qq.com
spring.mail.properties.mail.smtp.ssl.enable=true
3、测试
@RunWith(SpringRunner.class)
@SpringBootTest
public class Springboot12TaskApplicationTests {

    @Autowired
    JavaMailSenderImpl mailSender;

    @Test
    public void contextLoads() {
        SimpleMailMessage message = new SimpleMailMessage();
        //邮件设置
        message.setSubject("通知-今晚开会");
        message.setText("今晚7:30开会");
        message.setTo("1820600111@qq.com");
        message.setFrom("1820600111@qq.com");
        mailSender.send(message);
    }

    @Test
    public void test02() throws Exception {
        //创建一个复杂的消息邮件
        MimeMessage mimeMessage = mailSender.createMimeMessage();
        MimeMessageHelper helper = new MimeMessageHelper(mimeMessage, true);
        //邮件设置
        helper.setSubject("通知-今晚开会");
        helper.setText("<b style='color:red'>今天7:30开会</b>",true);
        helper.setTo("1820600111@qq.com");
        helper.setFrom("1820600111@qq.com");
        //上传附件
        helper.addAttachment("1.jpg",new File("D:\\data\\1.jpg"));
        helper.addAttachment("2.jpg",new File("D:\\data\\2.jpg"));
        mailSender.send(mimeMessage);
    }
}


 477
477

 被折叠的 条评论
为什么被折叠?
被折叠的 条评论
为什么被折叠?
 到【灌水乐园】发言


