


 本文详细介绍如何在本地搭建由三个节点组成的Redis集群,并通过Spring框架进行整合,实现集群模式下的二级缓存功能。文中提供了具体的配置代码示例,包括集群配置、连接池配置以及RedisTemplate的序列化设置。
前面实现了二级缓存。接下来要实现redis集群模式。本地实现6380 6381 6382模拟三台redis节点组成的集群
修改大致如下:
(1)修改redis单机节点的相关配置变为集群的配置;
spring.redis.cluster.nodes=127.0.0.1:6380,127.0.0.1:6381,127.0.0.1:6382
spring.redis.cluster.timeout=1000
spring.redis.cluster.max-redirects=3
spring.redis.cluster.password=123456
#单redis服务器加载此配置
spring.redis.database = 0
#spring.redis.host=127.0.0.1
#spring.redis.port=6379
#连接超时时间
#最大活跃连接数
spring.redis.jedis.pool.max-active=10
#最大空闲连接数
spring.redis.jedis.pool.max-idle=5
#最长等待时间。-1不等待
spring.redis.jedis.pool.max-wait=-1
#最小空闲数0
spring.redis.jedis.pool.min-idle=0
(2) redis集群的相关配置:有原先单机节点配置变为集群配置使用了jedispoolconconfig
package com.example.demo.config;

import com.example.demo.po.RedisClusterProperties;
import com.fasterxml.jackson.annotation.JsonAutoDetect;
import com.fasterxml.jackson.annotation.PropertyAccessor;
import com.fasterxml.jackson.databind.ObjectMapper;
import org.springframework.beans.factory.annotation.Autowired;
import org.springframework.beans.factory.annotation.Value;
import org.springframework.context.annotation.Bean;
import org.springframework.context.annotation.Configuration;
import org.springframework.context.annotation.PropertySource;
import org.springframework.core.env.MapPropertySource;
import org.springframework.data.redis.connection.RedisClusterConfiguration;
import org.springframework.data.redis.connection.RedisConnectionFactory;
import org.springframework.data.redis.connection.RedisNode;
import org.springframework.data.redis.connection.RedisPassword;
import org.springframework.data.redis.connection.jedis.JedisConnectionFactory;
import org.springframework.data.redis.connection.lettuce.LettuceConnectionFactory;
import org.springframework.data.redis.core.RedisTemplate;
import org.springframework.data.redis.serializer.Jackson2JsonRedisSerializer;
import org.springframework.data.redis.serializer.StringRedisSerializer;
import redis.clients.jedis.JedisPoolConfig;

import java.util.HashMap;
import java.util.HashSet;
import java.util.Map;
import java.util.Set;

@Configuration
public class RedisClusterConfig {


    @Value("${spring.redis.jedis.pool.max-active}")
    private String maxActive;

    @Value("${spring.redis.jedis.pool.max-idle}")
    private String maxIdle;

    @Value("${spring.redis.jedis.pool.max-wait}")
    private String maxWait;


    @Value("${spring.redis.jedis.pool.min-idle}")
    private String minIdle;


    @Autowired
    private RedisClusterProperties clusterProperties;

    @Bean
    public RedisTemplate<String,Object> redisTemplate(RedisConnectionFactory redisConnectionFactory){
        RedisTemplate<String, Object> template = new RedisTemplate<String, Object>();
        template.setConnectionFactory(redisConnectionFactory);
        Jackson2JsonRedisSerializer jackson2JsonRedisSerializer = new Jackson2JsonRedisSerializer(Object.class);
        ObjectMapper om = new ObjectMapper();
        om.setVisibility(PropertyAccessor.ALL, JsonAutoDetect.Visibility.ANY);
        om.enableDefaultTyping(ObjectMapper.DefaultTyping.NON_FINAL);
        jackson2JsonRedisSerializer.setObjectMapper(om);
        StringRedisSerializer stringRedisSerializer = new StringRedisSerializer();
        // key采用String的序列化方式
        template.setKeySerializer(stringRedisSerializer);
        // hash的key也采用String的序列化方式
        template.setHashKeySerializer(stringRedisSerializer);
        // value序列化方式采用jackson
        template.setValueSerializer(jackson2JsonRedisSerializer);
        // hash的value序列化方式采用jackson
        template.setHashValueSerializer(jackson2JsonRedisSerializer);
        template.afterPropertiesSet();
        return template;
    }

    /**
     * redis集群配置
     * @return
     */
    @Bean
    public RedisClusterConfiguration  redisClusterConfiguration() {
        RedisClusterConfiguration redisClusterConfiguration = new RedisClusterConfiguration();
        //Set<RedisNode> clusterNodes
        String[] serverArray = clusterProperties.getNodes().split(",");
        Set<RedisNode> nodes = new HashSet<RedisNode>();
        for(String ipPort:serverArray){
            String[] ipAndPort = ipPort.split(":");
            nodes.add(new RedisNode(ipAndPort[0].trim(),Integer.valueOf(ipAndPort[1])));
        }
        redisClusterConfiguration.setClusterNodes(nodes);
        redisClusterConfiguration.setMaxRedirects(Integer.valueOf(clusterProperties.getMaxRedirects()));
        redisClusterConfiguration.setPassword(RedisPassword.of(clusterProperties.getPassword()));
        return redisClusterConfiguration;
    }

    /**
     * @param
     * @return
     * @Description:redis连接工厂类
     * @date 2018/10/25 19:45
     */
   /* @Bean
    public RedisConnectionFactory myLettuceConnectionFactory(RedisClusterConfiguration redisClusterConfiguration) {
        RedisConnectionFactory redisConnectionFactory = new LettuceConnectionFactory(redisClusterConfiguration);
        return redisConnectionFactory;
    }*/

    @Bean
    public JedisPoolConfig getJedisPoolConfig() {
        JedisPoolConfig jedisPoolConfig = new JedisPoolConfig();
        // 最大空闲数
        jedisPoolConfig.setMaxIdle(Integer.valueOf(maxIdle));
        // 连接池的最大数据库连接数
        jedisPoolConfig.setMaxTotal(Integer.valueOf(maxActive));
        // 最大建立连接等待时间
        jedisPoolConfig.setMaxWaitMillis(Integer.valueOf(maxWait));
        return jedisPoolConfig;
    }

    /**
     * @param
     * @return
     * @Description:redis连接工厂类
     * @date 2018/10/25 19:45
     */
    @Bean
    public JedisConnectionFactory jedisConnectionFactory() {
        //集群模式
        JedisConnectionFactory  factory = new JedisConnectionFactory(redisClusterConfiguration(),getJedisPoolConfig());
        factory.setDatabase(0);
        factory.setTimeout(clusterProperties.getTimeout());
        factory.setUsePool(true);
        return factory;
    }


}
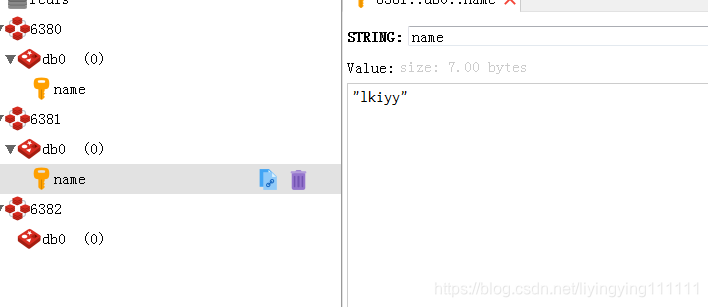
(3)集群启动后直接测试就行。被人亲测过。没有问题
在下图 两个节点中存储了name的信息


 21万+
21万+

 被折叠的 条评论
为什么被折叠?
被折叠的 条评论
为什么被折叠?
 到【灌水乐园】发言


