


1.概念
Spring Boot是由Pivotal团队提供的全新框架,其设计目的是用来简化新Spring应用的初始搭建以及开发过程。
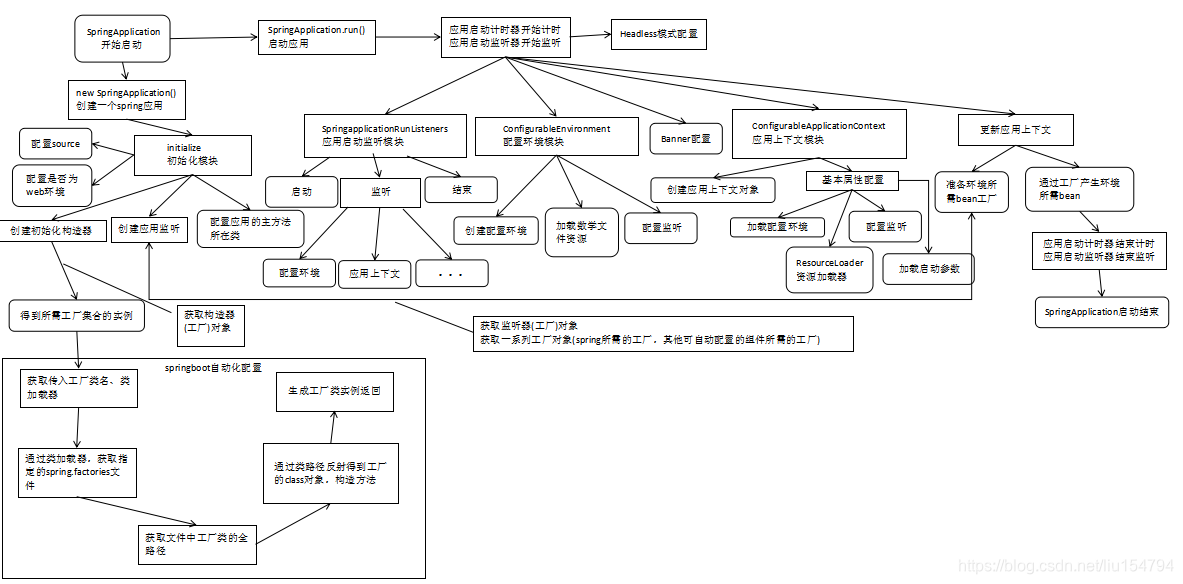
2.原理
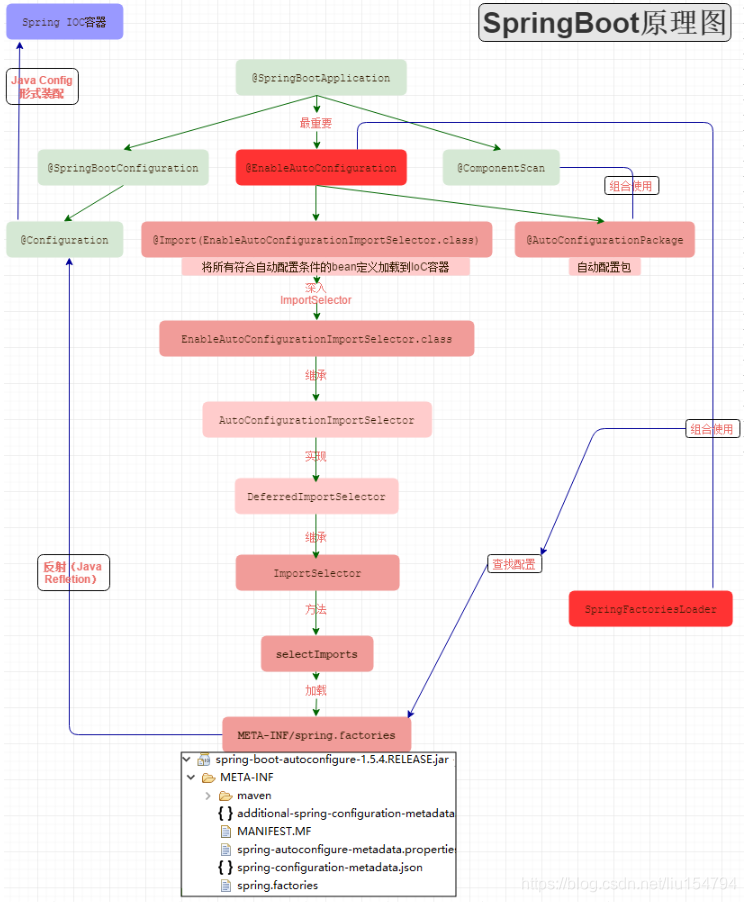
@Configuration:标注了@configuration的类定义都是JavaConfig配置类。
@EnableAutoConfiguration:借助@import将符合条件的配置类加载到ioc容器中。
@EnableAutoConfiguration借助AutoConfigurationImportSelector将配置类加载到ioc容器中,而AutoConfigurationImportSelector则借助工具类SpringFactoriesLoader完成自动配置。

自动配置的原理是:从classpath中找到所有META-INF/spring.factories配置文件,并将其中org.springframework.boot.autoconfigure.EnableAutoConfiguration对应的配置项通过反射实例化为对应的标注了@Configuration的JavaConfig形式的ioc容器配置类,然后汇总为一个并加载到ioc容器。

@ComponentScan:自动扫描并加载符合条件的组件,加载到IoC容器中。
3.示例
1.创建maven工程
2.更改pom.xml文件为以下代码
<?xml version="1.0" encoding="UTF-8"?>
<project xmlns="http://maven.apache.org/POM/4.0.0" xmlns:xsi="http://www.w3.org/2001/XMLSchema-instance"
         xsi:schemaLocation="http://maven.apache.org/POM/4.0.0 http://maven.apache.org/xsd/maven-4.0.0.xsd">
    <modelVersion>4.0.0</modelVersion>
    <groupId>com.example.demo</groupId>
    <artifactId>demo</artifactId>
    <version>0.0.1-SNAPSHOT</version>
    <!--    <packaging>war</packaging>-->
    <packaging>jar</packaging>


    <parent>
        <groupId>org.springframework.boot</groupId>
        <artifactId>spring-boot-starter-parent</artifactId>
        <version>2.0.2.RELEASE</version>
        <relativePath/> <!-- lookup parent from repository -->
    </parent>

    <properties>
        <project.build.sourceEncoding>UTF-8</project.build.sourceEncoding>
        <project.reporting.outputEncoding>UTF-8</project.reporting.outputEncoding>
        <java.version>1.8</java.version>
    </properties>


    <dependencies>
        <!-- springboot -->
        <dependency>
            <groupId>org.springframework.boot</groupId>
            <artifactId>spring-boot-starter-web</artifactId>
        </dependency>
        <dependency>
            <groupId>org.springframework.boot</groupId>
            <artifactId>spring-boot-starter-aop</artifactId>
        </dependency>

        <dependency>
            <groupId>org.springframework.boot</groupId>
            <artifactId>spring-boot-starter-cache</artifactId>
        </dependency>

        <dependency>
            <groupId>org.springframework.boot</groupId>
            <artifactId>spring-boot-starter-freemarker</artifactId>
        </dependency>

        <dependency>
            <groupId>org.springframework.boot</groupId>
            <artifactId>spring-boot-starter-actuator</artifactId>
        </dependency>


        <dependency>
            <groupId>org.springframework.boot</groupId>
            <artifactId>spring-boot-starter-jdbc</artifactId>
        </dependency>
        <!-- tomcat 的支持.-->
        <dependency>
            <groupId>org.springframework.boot</groupId>
            <artifactId>spring-boot-starter-tomcat</artifactId>
        </dependency>

        <!--jsp支持-->
        <!-- servlet 依赖. -->
        <dependency>
            <groupId>javax.servlet</groupId>
            <artifactId>javax.servlet-api</artifactId>
            <scope>provided</scope>
        </dependency>
        <dependency>
            <groupId>javax.servlet</groupId>
            <artifactId>jstl</artifactId>
        </dependency>

        <dependency>
            <groupId>org.apache.tomcat.embed</groupId>
            <artifactId>tomcat-embed-jasper</artifactId>
            <scope>provided</scope>
        </dependency>

    </dependencies>

    <build>
        <plugins>
            <plugin>
                <groupId>org.springframework.boot</groupId>
                <artifactId>spring-boot-maven-plugin</artifactId>
            </plugin>
        </plugins>
        <finalName>demo</finalName>
    </build>
</project>
3.创建启动类DemoApplication.java
package com.example;

import org.mybatis.spring.annotation.MapperScan;
import org.springframework.boot.SpringApplication;
import org.springframework.boot.autoconfigure.EnableAutoConfiguration;
import org.springframework.boot.autoconfigure.SpringBootApplication;
import org.springframework.boot.builder.SpringApplicationBuilder;
import org.springframework.boot.web.servlet.support.SpringBootServletInitializer;
import org.springframework.context.annotation.ComponentScan;

@SpringBootApplication
public class DemoApplication extends SpringBootServletInitializer {

    public static void main(String[] args) {
        SpringApplication.run(DemoApplication.class, args);
    }

}
4.创建TestController.java
package com.example.module;

import org.springframework.stereotype.Controller;
import org.springframework.web.bind.annotation.RequestMapping;
import org.springframework.web.bind.annotation.ResponseBody;


@Controller
public class Test2Controller {

    @RequestMapping(value = "/dgtest")
    @ResponseBody
    public String jsptest() {


        return "hello world";
    }


}
5.直接运行DemoApplication类的main方法
访问接口即可。


 21万+
21万+

 被折叠的 条评论
为什么被折叠?
被折叠的 条评论
为什么被折叠?
 到【灌水乐园】发言


