


1. 线性布局LinearLayout
所有包含在线性布局里的控件在线性方向上依次排列
1.1 子控件的排列方式
android:orientation="horizontal"   //水平
android:orientation="vertical"     //垂直
1.2 子控件的对齐方式
android:gravity="center_horizontal" 子控件水平方向居中
android:gravity="center_vertical" 子控件竖直方向居中
android:gravity="center" 子控件竖直方向和水平方向居中
android:gravity= start || end || top || bottom 子控件左对齐 || 右对齐 || 顶部对齐 || 底部对齐
android:gravity= left || right 子控件左对齐 || 右对齐
这里的start和left属性,end和right属性需要注意一下,这里写的是对于中国的情况而言。实际上,他们两个是不同的,left是绝对的左边,而start会根据不同的国家习惯改变。比如在从右向左顺序阅读的国家,start代表的就是在右边
注意:
android:gravity 是指本元素的子元素相对它的对齐方式,
android:layout_gravity 是指本元素相对它的父元素的对齐方式。
对于其他属性,如果加上layout_前缀,就代表着本元素相对父元素的属性
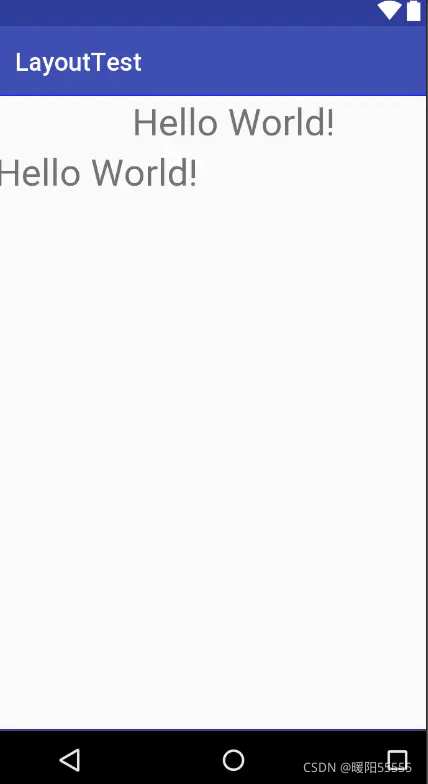
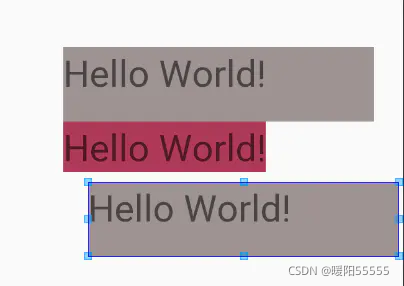
示例1:仅设置第一个子控件水平垂直
设置子控件的android:layout_gravity属性
<?xml version="1.0" encoding="utf-8"?>
<LinearLayout xmlns:android="http://schemas.android.com/apk/res/android"
    xmlns:tools="http://schemas.android.com/tools"
    android:layout_width="match_parent"
    android:layout_height="match_parent"
    android:orientation="vertical"
    tools:context="com.example.icephone_1.layouttest.MainActivity">

    <TextView
        android:id="@+id/tx_one"
        android:textSize="30sp"
        android:layout_gravity="center_horizontal"  //子控件设置水平垂直
        android:layout_width="wrap_content"
        android:layout_height="wrap_content"
        android:text="Hello World!" />
    <TextView
        android:id="@+id/tx_two"
        android:textSize="30sp"
        android:layout_width="wrap_content"
        android:layout_height="wrap_content"
        android:text="Hello World!" />

</LinearLayout>
效果:
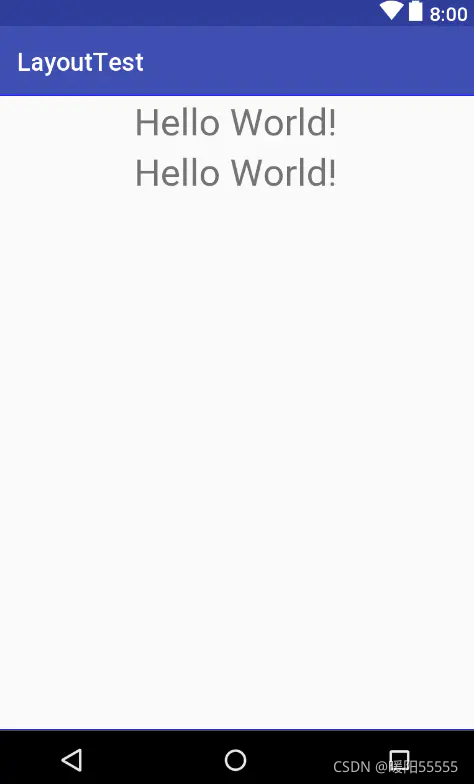
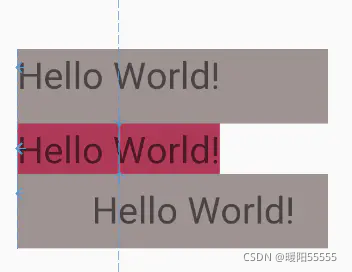
示例2:两个子组件均设置水平垂直
设置父组件的android:gravity属性
<?xml version="1.0" encoding="utf-8"?>
<LinearLayout xmlns:android="http://schemas.android.com/apk/res/android"
    xmlns:tools="http://schemas.android.com/tools"
    android:layout_width="match_parent"
    android:layout_height="match_parent"
    android:orientation="vertical"
    android:gravity="center_horizontal"    //设置LinearLayout水平垂直
    tools:context="com.example.icephone_1.layouttest.MainActivity">

    <TextView
        android:id="@+id/tx_one"
        android:textSize="30sp"
        android:layout_width="wrap_content"
        android:layout_height="wrap_content"
        android:text="Hello World!" />
    <TextView
        android:id="@+id/tx_two"
        android:textSize="30sp"
        android:layout_width="wrap_content"
        android:layout_height="wrap_content"
        android:text="Hello World!" />

</LinearLayout>
效果:
1.3 子控件的大小
layout_height= "wrap_content" 根据子控件内容的大小决定大小
layout_height= "match_parent" 子控件填满父容器
layout_height= "xdp" 直接设置大小
特殊情况下:
layout_height= "0dp"
layout_weight= "1"
当为0dp大小时,需要配合weight使用,表示比例
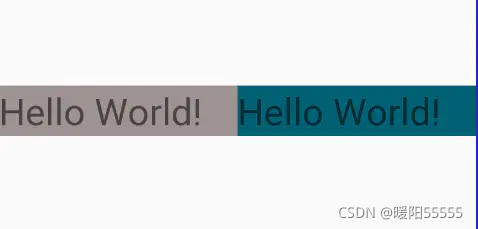
示例:两个子控件水平均分
<?xml version="1.0" encoding="utf-8"?>
<LinearLayout xmlns:android="http://schemas.android.com/apk/res/android"
    xmlns:tools="http://schemas.android.com/tools"
    android:layout_width="match_parent"
    android:layout_height="match_parent"
    android:orientation="horizontal"
    android:gravity="center"
    tools:context="com.example.icephone_1.layouttest.MainActivity">

    <TextView
        android:id="@+id/tx_one"
        android:textSize="30sp"
        android:layout_width="0dp"
        android:layout_height="wrap_content"
        android:layout_weight="1"        //设置占比例为1
        android:text="Hello World!"
        android:background="#9c9292"/>
    <TextView
        android:id="@+id/tx_two"
        android:textSize="30sp"
        android:layout_width="0dp"
        android:layout_height="wrap_content"
        android:layout_weight="1"        //设置占比例为1
        android:text="Hello World!"
        android:background="#0d6074"/>

</LinearLayout>
效果:
2. 相对布局RelativeLayout
相对布局更随意,它可以让子控件出现在整个布局的任何位置
2.1 子控件的对齐方式
android:layout_centerHrizontal 水平居中
android:layout_centerVertical 垂直居中
android:layout_centerInparent 相对于父元素完全居中
android:layout_alignParentBottom 贴紧父元素的下边缘
android:layout_alignParentLeft 贴紧父元素的左边缘
android:layout_alignParentRight 贴紧父元素的右边缘
android:layout_alignParentTop 贴紧父元素的上边缘
字面意思:align是排列的意思,alignParent就是排列在父容器的某个位置
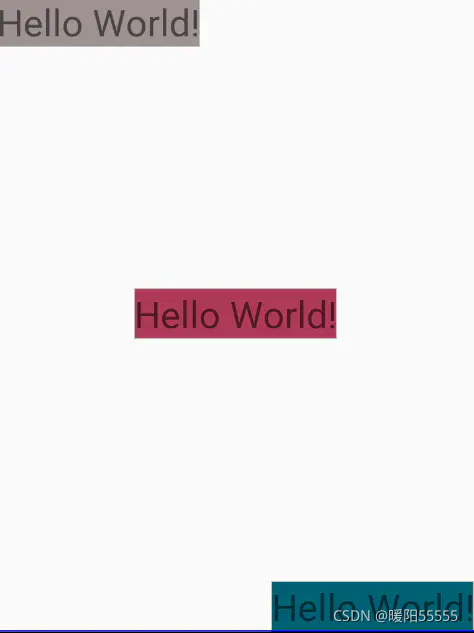
示例:把三个TextView上中下排列
<?xml version="1.0" encoding="utf-8"?>
<RelativeLayout xmlns:android="http://schemas.android.com/apk/res/android"
    xmlns:tools="http://schemas.android.com/tools"
    android:layout_width="match_parent"
    android:layout_height="match_parent"
    tools:context="com.example.icephone_1.layouttest.MainActivity">

    <TextView
        android:id="@+id/tx_one"
        android:textSize="30sp"
        android:layout_width="wrap_content"
        android:layout_height="wrap_content"

        android:layout_alignParentStart="true"
        android:layout_alignParentLeft="true"

        android:text="Hello World!"
        android:background="#9c9292" />

    <TextView
        android:id="@+id/tx_two"
        android:textSize="30sp"
        android:layout_width="wrap_content"
        android:layout_height="wrap_content"

        android:layout_alignParentBottom="true"
        android:layout_alignParentEnd="true"
        android:layout_alignParentRight="true"

        android:text="Hello World!"
        android:background="#0d6074" />

    <TextView
        android:id="@+id/tx_three"
        android:textSize="30sp"
        android:layout_width="wrap_content"
        android:layout_height="wrap_content"

        android:layout_centerInParent="true"

        android:text="Hello World!"
        android:background="#a73956" />

</RelativeLayout>
效果:
这里需要注意的是,在最新版本的Andorid中,单独使用包含Start或者End属性的话,会报错,提示需要再加入Left和Right属性;而单独使用Left和Right属性,会提示一个warning,提示推荐加入Start或者End属性
2.2 根据另一个控件的位置来确定控件的位置
android:layout_below 在某元素的下方
android:layout_above 在某元素的的上方
android:layout_toLeftOf 在某元素的左边
android:layout_toRightOf 在某元素的右边
android:layout_alignTop 本元素的上边缘和某元素的的上边缘对齐
android:layout_alignLeft 本元素的左边缘和某元素的的左边缘对齐
android:layout_alignBottom 本元素的下边缘和某元素的的下边缘对齐
android:layout_alignRight 本元素的右边缘和某元素的的右边缘对齐
基础组件属性值必须为id的引用名[“@id/id-name]
示例:把三个控件排成阶梯状
<?xml version="1.0" encoding="utf-8"?>
<RelativeLayout xmlns:android="http://schemas.android.com/apk/res/android"
    xmlns:tools="http://schemas.android.com/tools"
    android:layout_width="match_parent"
    android:layout_height="match_parent"
    tools:context="com.example.icephone_1.layouttest.MainActivity">

    <TextView
        android:id="@+id/tx_one"
        android:textSize="30sp"
        android:layout_width="250dp"
        android:layout_height="wrap_content"

        android:layout_alignStart="@+id/tx_three"
        android:layout_alignLeft="@+id/tx_three"
        android:layout_above="@+id/tx_three"

        android:text="Hello World!"
        android:background="#9c9292" />

    <TextView
        android:id="@+id/tx_two"
        android:textSize="30sp"
        android:layout_width="250dp"
        android:layout_height="wrap_content"

        android:layout_below="@+id/tx_three"
        android:layout_alignEnd="@+id/tx_three"
        android:layout_alignRight="@+id/tx_three"

        android:text="Hello World!"
        android:background="#0d6074" />

    <TextView
        android:id="@+id/tx_three"
        android:textSize="30sp"
        android:layout_width="wrap_content"
        android:layout_height="wrap_content"

        android:layout_centerInParent="true"

        android:text="Hello World!"
        android:background="#a73956" />

</RelativeLayout>
效果:

2.3 margin和padding的区别
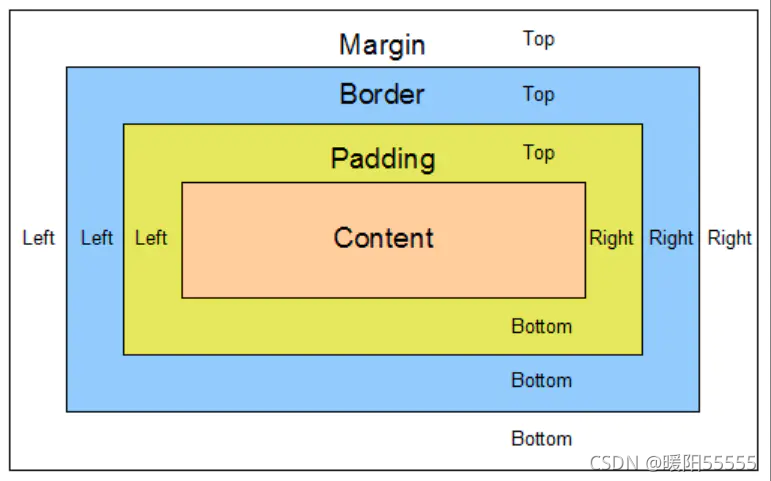
margin:该控件距离父控件或其他控件的边距
padding:该控件内部内容,如文本/图片距离该控件的边距
android:layout_marginBottom 离某元素底边缘的距离
android:layout_marginLeft 离某元素左边缘的距离
android:layout_marginRight 离某元素右边缘的距离
android:layout_marginTop 离某元素上边缘的距离
示例1:增加margin属性
    android:layout_marginTop="8dp"
    android:layout_marginLeft="20dp"
    android:layout_marginStart="20dp"
效果:
示例2:增加padding属性
    android:paddingTop="8dp"
    android:paddingLeft="20dp"
    android:paddingStart="60dp"
效果:
3. 堆栈布局FrameLayout
没有任何定位方式,当我们往里面添加控件的时候,会默认把他们放到这块区域的左上角,最上面的控件会遮挡下面的控件
android:foreground     //设置改帧布局容器的前景图像
android:foregroundGravity     //设置前景图像显示的位置
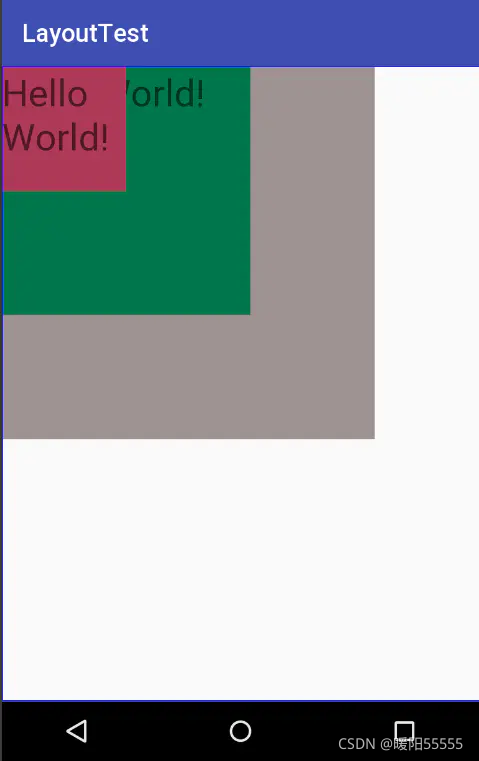
示例:3个TextView在左上角重叠排列
<?xml version="1.0" encoding="utf-8"?>
<FrameLayout xmlns:android="http://schemas.android.com/apk/res/android"
    xmlns:tools="http://schemas.android.com/tools"
    android:layout_width="match_parent"
    android:layout_height="match_parent"
    tools:context="com.example.icephone_1.layouttest.MainActivity">

    <TextView
        android:id="@+id/tx_one"
        android:textSize="30sp"
        android:layout_width="300dp"
        android:layout_height="300dp"
        android:text="Hello World!"
        android:background="#9c9292" />

    <TextView
        android:id="@+id/tx_two"
        android:textSize="30sp"
        android:layout_width="200dp"
        android:layout_height="200dp"
        android:text="Hello World!"
        android:background="#1c7649" />

    <TextView
        android:id="@+id/tx_three"
        android:textSize="30sp"
        android:layout_width="100dp"
        android:layout_height="100dp"
        android:text="Hello World!"
        android:background="#a73956" />

</FrameLayout>
效果:
文章转自博客:https://www.jianshu.com/p/2598626b1b04


 被折叠的 条评论
为什么被折叠?
被折叠的 条评论
为什么被折叠?
 到【灌水乐园】发言


