


 本文详细介绍了如何将Flowable工作流引擎与SpringBoot项目整合,包括POM依赖配置、MySQL数据库设置、BPMN流程定义、服务与控制器创建及启动流程实例,适合初学者快速上手。
一、什么是Flowable?
Flowable是用Java编写的轻量级业务流程引擎。Flowable流程引擎允许您部署BPMN 2.0流程定义(用于定义流程的行业XML标准),创建这些流程定义的流程实例,运行查询,访问活动或历史流程实例以及相关数据,以及更多其他功能。
当将Flowable添加到您的应用程序/服务/体系结构中时,它非常灵活。您可以通过包含Flowable库将引擎嵌入到应用程序或服务中,该库可以作为JAR使用。由于它是一个JAR,因此您可以轻松地将其添加到任何Java环境中:Java SE;Servlet容器,例如Tomcat或Jetty,Spring;Java EE服务器,例如JBoss或WebSphere,等等。或者,您可以使用Flowable REST API通过HTTP进行通信。还有一些Flowable应用程序(Flowable Modeler,Flowable Admin,Flowable IDM和Flowable Task),它们提供了用于处理流程和任务的现成示例UI。
二、Flowable和Activiti关系
Flowable是Activiti原班主创人员从Activiti分离出来的一套工作流引擎,是一个业务流程管理(BPM)和工作流系统,适用于开发人员和系统管理员。其核心是超快速、稳定的BPMN2流程引擎,易于与 Spring集成使用。
Activiti7是 Salaboy团队开发的。进行维护activiti6以及activiti5代码。目前的activiti5以及activiti6代码还是原Tijs Rademakers原有团队开发的。Salaboy团队目前在开发activiti7框架。对于activiti6以及activiti5的代码官方已经宣称暂停维护了。activiti7就是噱头 内核使用的还是activiti6。并没有为引擎注入更多的新特性,只是在activiti之外的上层封装了一些应用。
flowable是基于activiti-6.0.0.Beta4 分支开发的。目前Flowable已经修复了activiti6很多的bug,可以实现零成本从activiti迁移到flowable。
对比两个的功能:
flowable目前已经支持加签、动态增加实例中的节点、支持cmmn、dmn规范。这些都是activiti6目前版本没有的。
1、flowable已经支持所有的历史数据使用mongdb存储,activiti没有。
2、flowable支持事务子流程,activiti没有。
3、flowable支持多实例加签、减签,activiti没有。
4、flowable支持httpTask等新的类型节点,activiti没有。
5、flowable支持在流程中动态添加任务节点,activiti没有。
6、flowable支持历史任务数据通过消息中间件发送,activiti没有。
7、flowable支持java11,activiti没有。
8、flowable支持动态脚本,,activiti没有。
9、flowable支持条件表达式中自定义juel函数,activiti没有。
10、flowable支持cmmn规范,activiti没有。
11、flowable修复了dmn规范设计器,activit用的dmn设计器还是旧的框架,bug太多。
12、flowable屏蔽了pvm,activiti6也屏蔽了pvm(因为6版本官方提供了加签功能,发现pvm设计的过于臃肿,索性直接移除,这样加签实现起来更简洁、事实确实如此,如果需要获取节点、连线等信息可以使用bpmnmodel替代)。
13、flowable与activiti提供了新的事务监听器。activiti5版本只有事件监听器、任务监听器、执行监听器。
14、flowable对activiti的代码大量的进行了重构。
15、activiti以及flowable支持的数据库有h2、hsql、mysql、oracle、postgres、mssql、db2。其他数据库不支持的。使用国产数据库的可能有点失望了,需要修改源码了。
16、flowable支持jms、rabbitmq、mongodb方式处理历史数据,activiti没有。
目前Flowable已经修复了activiti6很多的bug,可以实现零成本从activiti迁移到flowable,Flowable对Spring Boot开发也进行了支持,而且开发来说Flowable比Activiti更易上手。
Activiti的GitHub地址:https://github.com/Activiti/Activiti
Flowable的GitHub地址:https://github.com/flowable/flowable-engine
三、Flowable与springBoot项目整合
使用版本
springBoot版本:2.2.1.RELEASE
flowable版本:6.4.2
1.创建SringBoot项目添加POM依赖
<?xml version="1.0" encoding="UTF-8"?>
<project xmlns="http://maven.apache.org/POM/4.0.0" xmlns:xsi="http://www.w3.org/2001/XMLSchema-instance"
         xsi:schemaLocation="http://maven.apache.org/POM/4.0.0 https://maven.apache.org/xsd/maven-4.0.0.xsd">
    <modelVersion>4.0.0</modelVersion>
    <parent>
        <groupId>org.springframework.boot</groupId>
        <artifactId>spring-boot-starter-parent</artifactId>
        <version>2.2.1.RELEASE</version>
        <relativePath/> <!-- lookup parent from repository -->
    </parent>
    <groupId>cn.linfenw</groupId>
    <artifactId>flowable_demo</artifactId>
    <version>0.0.1-SNAPSHOT</version>
    <name>flowable_demo</name>
    <description>flowable Demo project for Spring Boot</description>

    <properties>
        <java.version>1.8</java.version>
        <flowable.version>6.4.2</flowable.version>
    </properties>

    <dependencies>
        <dependency>
            <groupId>org.springframework.boot</groupId>
            <artifactId>spring-boot-starter</artifactId>
        </dependency>
        <!--REST support-->
        <dependency>
            <groupId>org.springframework.boot</groupId>
            <artifactId>spring-boot-starter-web</artifactId>
        </dependency>
        <dependency>
            <groupId>org.springframework.boot</groupId>
            <artifactId>spring-boot-starter-test</artifactId>
            <scope>test</scope>
            <exclusions>
                <exclusion>
                    <groupId>org.junit.vintage</groupId>
                    <artifactId>junit-vintage-engine</artifactId>
                </exclusion>
            </exclusions>
        </dependency>

        <!--flowable工作流-->
        <dependency>
            <groupId>org.flowable</groupId>
            <artifactId>flowable-spring-boot-starter</artifactId>
            <version>${flowable.version}</version>
        </dependency>

        <!--mysql-->
        <dependency>
            <groupId>mysql</groupId>
            <artifactId>mysql-connector-java</artifactId>
            <version>5.1.45</version>
        </dependency>

    </dependencies>

    <build>
        <plugins>
            <plugin>
                <groupId>org.springframework.boot</groupId>
                <artifactId>spring-boot-maven-plugin</artifactId>
            </plugin>
        </plugins>
    </build>

</project>
2.application.properties文件配置MySQL数据文件
#数据库配置
spring.datasource.url=jdbc:mysql://127.0.0.1:3306/flowable-spring-boot?characterEncoding=UTF-8
spring.datasource.username=root
spring.datasource.password=123456
spring.datasource.driver-class-name=com.mysql.jdbc.Driver
3.手动创建数据库
使用SQL命令或使用Nacivat数据库工具创建数据库,数据库名为:flowable-spring-boot
创建命令如下
CREATE DATABASE `flowable-spring-boot` DEFAULT CHARACTER SET utf8 COLLATE utf8_general_ci;4.在resources文件下创建processes文件夹
在processes文件夹下创建one-task-process.bpmn20.xml文件
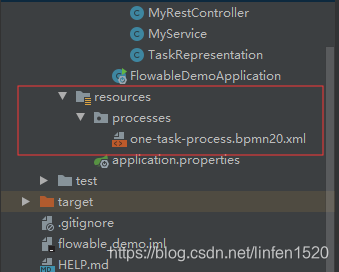
one-task-process.bpmn20.xml文件内容如下
<?xml version="1.0" encoding="UTF-8"?>
<definitions
        xmlns="http://www.omg.org/spec/BPMN/20100524/MODEL"
        xmlns:flowable="http://flowable.org/bpmn"
        targetNamespace="Examples">

    <process id="oneTaskProcess" name="The One Task Process">
        <startEvent id="theStart" />
        <sequenceFlow id="flow1" sourceRef="theStart" targetRef="theTask" />
        <userTask id="theTask" name="my task" flowable:assignee="kermit" />
        <sequenceFlow id="flow2" sourceRef="theTask" targetRef="theEnd" />
        <endEvent id="theEnd" />
    </process>

</definitions>
5.在项目中创建MyService.java
import org.flowable.engine.RuntimeService;
import org.flowable.engine.TaskService;
import org.flowable.task.api.Task;
import org.springframework.beans.factory.annotation.Autowired;
import org.springframework.stereotype.Service;
import org.springframework.transaction.annotation.Transactional;

import java.util.List;

@Service
public class MyService {

    @Autowired
    private RuntimeService runtimeService;

    @Autowired
    private TaskService taskService;

    @Transactional
    public void startProcess() {
        runtimeService.startProcessInstanceByKey("oneTaskProcess");
    }

    @Transactional
    public List<Task> getTasks(String assignee) {
        return taskService.createTaskQuery().taskAssignee(assignee).list();
    }

}
6.在项目中创建TaskRepresention.java实体类
public class TaskRepresentation {

        private String id;
        private String name;

        public TaskRepresentation(String id, String name) {
            this.id = id;
            this.name = name;
        }

        public String getId() {
            return id;
        }
        public void setId(String id) {
            this.id = id;
        }
        public String getName() {
            return name;
        }
        public void setName(String name) {
            this.name = name;
        }

    }
7.在项目中创建MyRestController.java文件
import org.flowable.task.api.Task;
import org.springframework.beans.factory.annotation.Autowired;
import org.springframework.http.MediaType;
import org.springframework.web.bind.annotation.RequestMapping;
import org.springframework.web.bind.annotation.RequestMethod;
import org.springframework.web.bind.annotation.RequestParam;
import org.springframework.web.bind.annotation.RestController;

import java.util.ArrayList;
import java.util.List;

@RestController
public class MyRestController {

    @Autowired
    private MyService myService;

    /**
     * 请求实例和返回结果
     * curl http://localhost:8080/tasks?assignee=kermit
     * []
     *
     * curl -X POST  http://localhost:8080/process
     * curl http://localhost:8080/tasks?assignee=kermit
     * [{"id":"10004","name":"my task"}]
     */


    /**
     * 启动process
     */
    @RequestMapping(value="/process", method= RequestMethod.POST)
    public void startProcessInstance() {
        myService.startProcess();
    }

    /**
     * 查询需要执行的任务tasks
     * @param assignee
     * @return
     */
    @RequestMapping(value="/tasks", method= RequestMethod.GET, produces= MediaType.APPLICATION_JSON_VALUE)
    public List<TaskRepresentation> getTasks(@RequestParam String assignee) {
        List<Task> tasks = myService.getTasks(assignee);
        List<TaskRepresentation> dtos = new ArrayList<TaskRepresentation>();
        for (Task task : tasks) {
            dtos.add(new TaskRepresentation(task.getId(), task.getName()));
        }
        return dtos;
    }


}
8.修改Application启动文件
import cn.linfenw.flowable_demo.jpa.JPAService;
import org.flowable.engine.RepositoryService;
import org.flowable.engine.RuntimeService;
import org.flowable.engine.TaskService;
import org.springframework.boot.CommandLineRunner;
import org.springframework.boot.SpringApplication;
import org.springframework.boot.autoconfigure.SpringBootApplication;
import org.springframework.context.annotation.Bean;

@SpringBootApplication
public class FlowableDemoApplication {

    public static void main(String[] args) {
        SpringApplication.run(FlowableDemoApplication.class, args);
    }
    @Bean
    public CommandLineRunner init(final RepositoryService repositoryService,
                                  final RuntimeService runtimeService,
                                  final TaskService taskService) {

        return new CommandLineRunner() {
            @Override
            public void run(String... strings) throws Exception {
                System.out.println("Number of process definitions : "
                        + repositoryService.createProcessDefinitionQuery().count());
                System.out.println("Number of tasks : " + taskService.createTaskQuery().count());
                runtimeService.startProcessInstanceByKey("oneTaskProcess");
                System.out.println("Number of tasks after process start: "
                        + taskService.createTaskQuery().count());
            }
        };
    }
}
9.启动项目
控制台打印了数据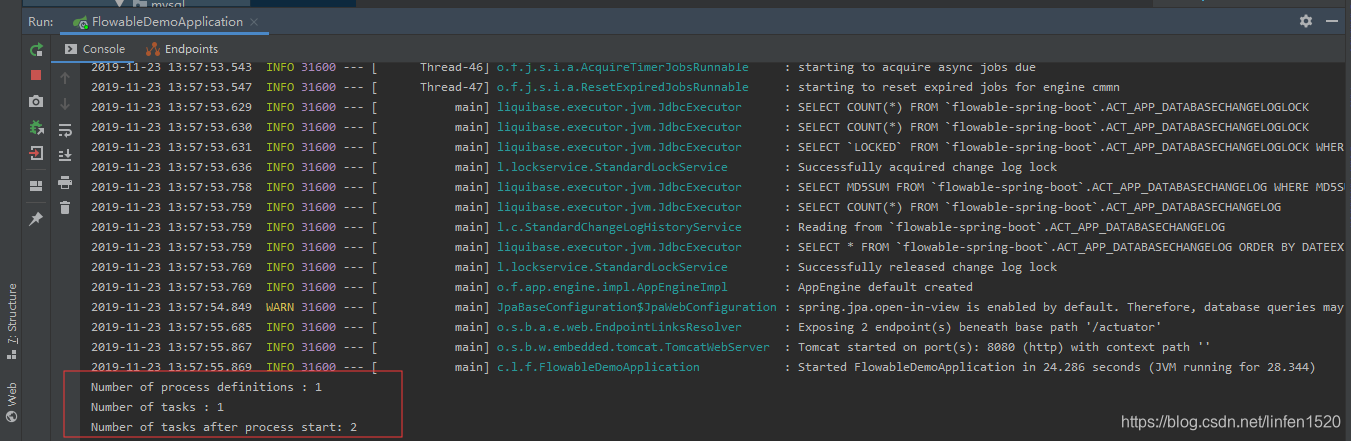
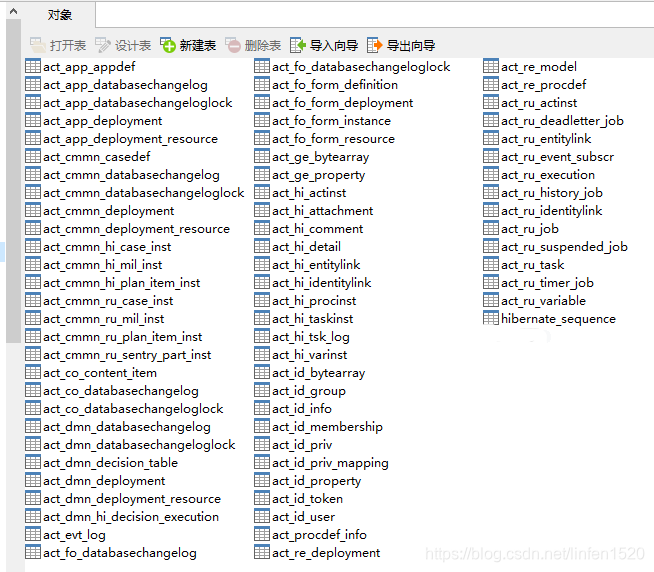
可以看到数据库中添加了28张表,说明配置成功
按照官方文件写的有点简单,下次再添加内容吧。
刚发现一个不错的Flowable的中文翻译文档https://tkjohn.github.io/flowable-userguide/
参考:
1.activiti与flowable的区别 https://blog.youkuaiyun.com/qq_30739519/article/details/82493456
2.Activiti的GitHub地址 https://github.com/Activiti/Activiti
3.Flowable的GitHub地址 https://github.com/flowable/flowable-engine
4.Flowable官方文档 https://www.flowable.org/docs/userguide/index.html#license


 1394
1394


 到【灌水乐园】发言


