http://examples.javacodegeeks.com/android/core/socket-core/android-socket-example/
In this tutorial we are going to see how to use Sockets in Android Applications. In Android, sockets work exactly as they do in Java SE. In this example we are going to see how to run an Server and a Client android Application in two different emulators. This requires some special configuration regarding port forwarding, but we are going to discuss this later on.
For this tutorial, we will use the following tools in a Windows 64-bit platform:
- JDK 1.7
- Eclipse 4.2 Juno
- Android SKD 4.2
First , we have to create two Android Application Project, one for the Server and one for the Client. I’m going to display in detail, the Project creation of the Server. Of course the same apply to the Client Project creation. Then, for the Client side I’m just going to present the necessary code.
1. Create a new Android Project
Open Eclipse IDE and go to File -> New -> Project -> Android -> Android Application Project. You have to specify the Application Name, the Project Name and the Package name in the appropriate text fields and then click Next.

In the next window make sure the “Create activity” option is selected in order to create a new activity for your project, and click Next. This is optional as you can create a new activity after creating the project, but you can do it all in one step.

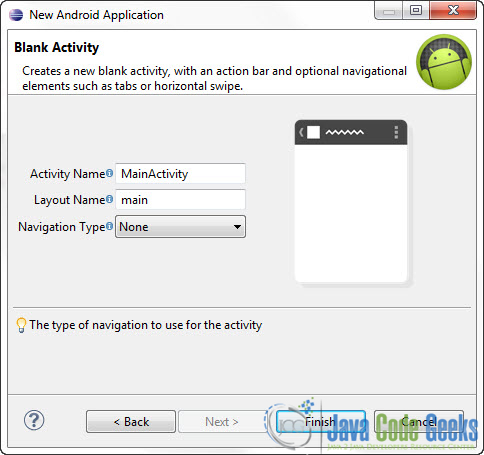
Select “BlankActivity” and click Next.

You will be asked to specify some information about the new activity. In the Layout Name text field you have to specify the name of the file that will contain the layout description of your app. In our case the file res/layout/main.xml will be created. Then, click Finish.
2. Create the main layout of the Server Application
Open res/layout/main.xml file :

And paste the following code :
main.xml:
01 | <?xml version="1.0" encoding="utf-8"?> |
03 | android:layout_width="fill_parent" |
04 | android:layout_height="fill_parent" |
05 | android:orientation="vertical" > |
08 | android:id="@+id/text2" |
09 | android:layout_width="wrap_content" |
10 | android:layout_height="wrap_content" |
3. Set up the Appropriate permission on AndroidManifest.xml
In order develop networking applications you have to set up the appropriate permissions in AndroidManifest.xml file :

These are the permissions:
1 | <uses-permission android:name="android.permission.INTERNET" > |
4 | <uses-permission android:name="android.permission.ACCESS_NETWORK_STATE" > |
AndroidManifest.xml:
01 | <?xml version="1.0" encoding="utf-8"?> |
03 | package="com.javacodegeeks.android.androidsocketserver" |
04 | android:versionCode="1" |
05 | android:versionName="1.0" > |
08 | android:minSdkVersion="8" |
09 | android:targetSdkVersion="17" /> |
11 | <uses-permission android:name="android.permission.INTERNET" > |
14 | <uses-permission android:name="android.permission.ACCESS_NETWORK_STATE" > |
18 | android:allowBackup="true" |
19 | android:icon="@drawable/ic_launcher" |
20 | android:label="@string/app_name" |
21 | android:theme="@style/AppTheme" > |
23 | android:name="com.javacodegeeks.android.androidsocketserver.Server" |
24 | android:label="@string/app_name" > |
26 | <action android:name="android.intent.action.MAIN" /> |
28 | <category android:name="android.intent.category.LAUNCHER" /> |
4. Main Server Activity
Open the source file of the main Activity and paste the following code:

Server.java:
001 | package com.javacodegeeks.android.androidsocketserver; |
003 | import java.io.BufferedReader; |
004 | import java.io.IOException; |
005 | import java.io.InputStreamReader; |
006 | import java.net.ServerSocket; |
007 | import java.net.Socket; |
009 | import android.app.Activity; |
010 | import android.os.Bundle; |
011 | import android.os.Handler; |
012 | import android.widget.TextView; |
014 | public class Server extends Activity { |
016 | private ServerSocket serverSocket; |
018 | Handler updateConversationHandler; |
020 | Thread serverThread = null; |
022 | private TextView text; |
024 | public static final int SERVERPORT = 6000; |
027 | public void onCreate(Bundle savedInstanceState) { |
029 | super.onCreate(savedInstanceState); |
030 | setContentView(R.layout.main); |
032 | text = (TextView) findViewById(R.id.text2); |
034 | updateConversationHandler = new Handler(); |
036 | this.serverThread = new Thread(new ServerThread()); |
037 | this.serverThread.start(); |
042 | protected void onStop() { |
045 | serverSocket.close(); |
046 | } catch (IOException e) { |
051 | class ServerThread implements Runnable { |
054 | Socket socket = null; |
056 | serverSocket = new ServerSocket(SERVERPORT); |
057 | } catch (IOException e) { |
060 | while (!Thread.currentThread().isInterrupted()) { |
064 | socket = serverSocket.accept(); |
066 | CommunicationThread commThread = new CommunicationThread(socket); |
067 | new Thread(commThread).start(); |
069 | } catch (IOException e) { |
076 | class CommunicationThread implements Runnable { |
078 | private Socket clientSocket; |
080 | private BufferedReader input; |
082 | public CommunicationThread(Socket clientSocket) { |
084 | this.clientSocket = clientSocket; |
088 | this.input = new BufferedReader(newInputStreamReader(this.clientSocket.getInputStream())); |
090 | } catch (IOException e) { |
097 | while (!Thread.currentThread().isInterrupted()) { |
101 | String read = input.readLine(); |
103 | updateConversationHandler.post(new updateUIThread(read)); |
105 | } catch (IOException e) { |
113 | class updateUIThread implements Runnable { |
116 | public updateUIThread(String str) { |
122 | text.setText(text.getText().toString()+"Client Says: "+ msg + "\n"); |
5. Code for the Client project
Go ahead and create a new Android Application project, as you did with the Server Application. And paste the following code snippets in the respective files:
main.xml:
01 | <?xml version="1.0" encoding="utf-8"?> |
03 | android:layout_width="fill_parent" |
04 | android:layout_height="fill_parent" |
05 | android:orientation="vertical" > |
08 | android:id="@+id/EditText01" |
09 | android:layout_width="fill_parent" |
10 | android:layout_height="wrap_content" |
11 | android:text="JavaCodeGeeks" > |
15 | android:id="@+id/myButton" |
16 | android:layout_width="wrap_content" |
17 | android:layout_height="wrap_content" |
18 | android:onClick="onClick" |
AndroidManifest.xml:
01 | <?xml version="1.0" encoding="utf-8"?> |
03 | package="com.javacodegeeks.android.androidsocketclient" |
04 | android:versionCode="1" |
05 | android:versionName="1.0" > |
08 | android:minSdkVersion="8" |
09 | android:targetSdkVersion="17" /> |
11 | <uses-permission android:name="android.permission.INTERNET" > |
14 | <uses-permission android:name="android.permission.ACCESS_NETWORK_STATE" > |
18 | android:allowBackup="true" |
19 | android:icon="@drawable/ic_launcher" |
20 | android:label="@string/app_name" |
21 | android:theme="@style/AppTheme" > |
23 | android:name="com.javacodegeeks.android.androidsocketclient.Client" |
24 | android:label="@string/app_name" > |
26 | <action android:name="android.intent.action.MAIN" /> |
28 | <category android:name="android.intent.category.LAUNCHER" /> |
Client.java:
01 | package com.javacodegeeks.android.androidsocketclient; |
03 | import java.io.BufferedWriter; |
04 | import java.io.IOException; |
05 | import java.io.OutputStreamWriter; |
06 | import java.io.PrintWriter; |
07 | import java.net.InetAddress; |
08 | import java.net.Socket; |
09 | import java.net.UnknownHostException; |
11 | import android.app.Activity; |
12 | import android.os.Bundle; |
13 | import android.view.View; |
14 | import android.widget.EditText; |
16 | public class Client extends Activity { |
18 | private Socket socket; |
20 | private static final int SERVERPORT = 5000; |
21 | private static final String SERVER_IP = "10.0.2.2"; |
24 | public void onCreate(Bundle savedInstanceState) { |
25 | super.onCreate(savedInstanceState); |
26 | setContentView(R.layout.main); |
28 | new Thread(new ClientThread()).start(); |
31 | public void onClick(View view) { |
33 | EditText et = (EditText) findViewById(R.id.EditText01); |
34 | String str = et.getText().toString(); |
35 | PrintWriter out = new PrintWriter(new BufferedWriter( |
36 | new OutputStreamWriter(socket.getOutputStream())), |
39 | } catch (UnknownHostException e) { |
41 | } catch (IOException e) { |
43 | } catch (Exception e) { |
48 | class ClientThread implements Runnable { |
54 | InetAddress serverAddr = InetAddress.getByName(SERVER_IP); |
56 | socket = new Socket(serverAddr, SERVERPORT); |
58 | } catch (UnknownHostException e1) { |
60 | } catch (IOException e1) { |
6. Port Forwarding
In order to interconnect the programs in the two different emulators this is what happens:
- The Server program will open the port 6000 on emulator A. That means that porst 6000 is open on the ip of the emulator which is 10.0.2.15.
- Now, the client in emulator B will connect to the locahost, that is the development machine, which is aliased at 10.0.2.2 at port 5000.
- The development machine (localhost) will forward the packets to 10.0.2.15 : 6000
So in order to do that we have to do some port forwatding on the emulator. To do that, run the Server Programm in order to open the first emulator:

Now, as you can see in the Window bar, we can access the cosnole of this emulator at localhost : 5554. Press Windows Button + R, write cmd on the text box to open a comman line. In order to connect to the emulator you have to do :

To perform the port forwarding write:
1 | redir add tcp:5000:6000 |

So now the packet will go through this direction : Emulator B -> development machine at 10.0.2.2 : 5000 -> Emulator A at 10.0.2.15 : 6000.
7. Run the client on another emulator.
In oder to run the client on another emulator, go to the Package explorer and Right Click on the Client Project. Go to Run As -> Run Configuration:

The select the Client Project for the list on the left and Click on the Target Tab. Select the second AVD and click Run:

8. Run the Application
Now that the client program is running you can send messages to the server:


 本文详细介绍了如何在Android应用中使用Socket进行网络通信,包括创建服务器和客户端应用,配置权限,以及实现服务器端接收客户端消息并响应的功能。通过示例代码展示了如何在两个不同的模拟器上运行服务器和客户端应用,并通过端口转发实现通信。


 1248
1248

 被折叠的 条评论
为什么被折叠?
被折叠的 条评论
为什么被折叠?
 到【灌水乐园】发言


