


第一步:申请测试号
1.打开微信测试号申请平台 http://mp.weixin.qq.com/debug/cgi-bin/sandbox?t=sandbox/login
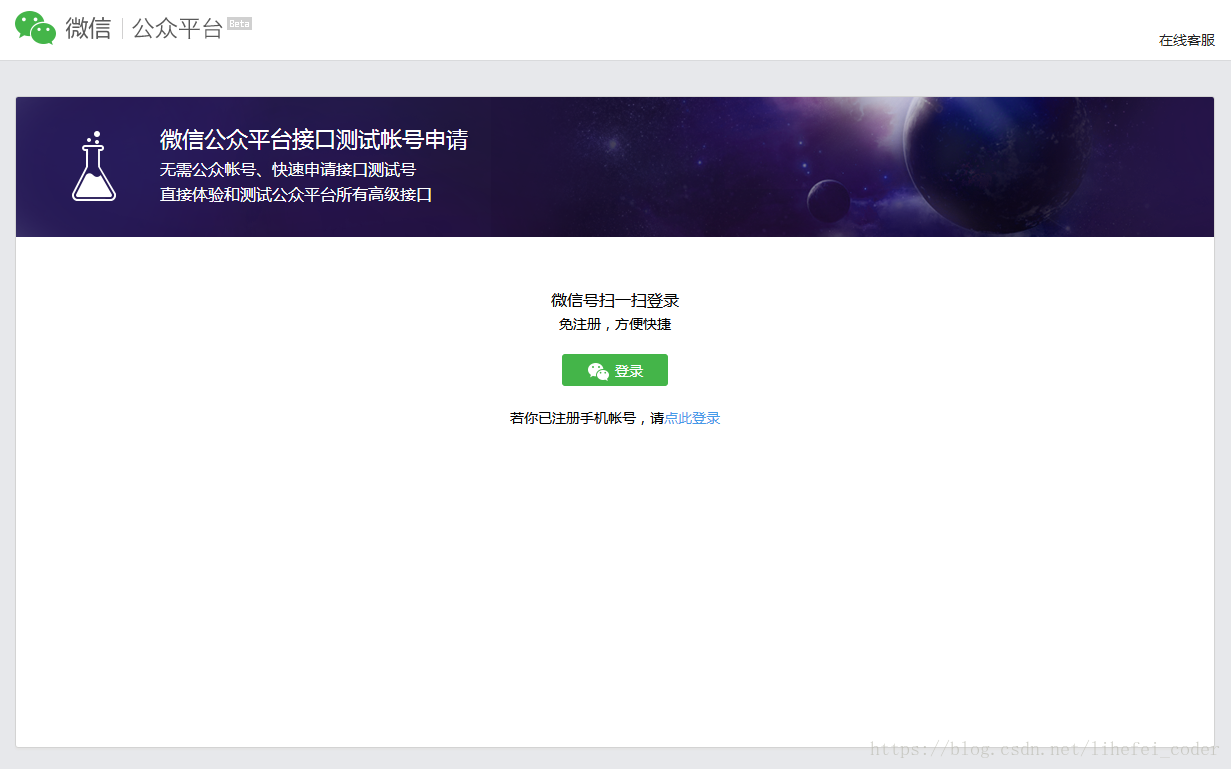
2.点击“登录”按钮,用微信扫码确认登录
3.确认登录后,测试号申请成功!
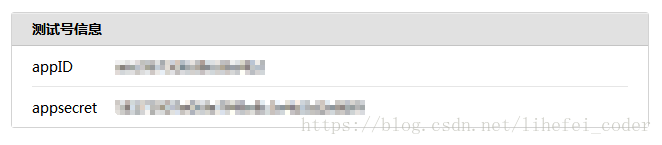
第二步:测试号管理
1.测试号信息
这里的appID、appsecret在后面很多接口调用中都需要用到
2.接口配置信息(这里需要有自己的服务器和映射成功的域名)
(本人用的是本地node服务器,用花生壳把本机的8080端口映射到了花生壳提供的二级免费域名的80端口)
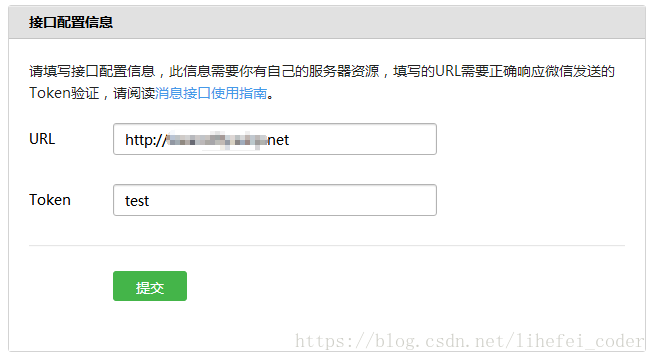
url填写自己的域名,token可以随意填
填写完后先不要提交,接下来编写nodejs服务端代码响应微信的提交请求,响应Token验证结果
server.js
*注意:以下用到的模块大部分需要先安装,安装步骤请在本人其他的博文中查看或自行百度安装
const express = require('express'); //web服务框架模块
const request = require('request'); //http请求模块
const fs = require('fs'); //文件系统模块
const path = require('path'); //文件路径模块
const sha1 = require('node-sha1'); //加密模块
const urlencode= require('urlencode'); //URL编译模块


const hostName = '127.0.0.1'; //ip或域名
const port = 8080; //端口


/**
 * [开启跨域便于接口访问]
 */
app.all('*', function(req, res, next) {
    res.header('Access-Control-Allow-Origin', '*'); //访问控制允许来源:所有
    res.header('Access-Control-Allow-Headers', 'Origin, X-Requested-With, Content-Type, Accept'); //访问控制允许报头 X-Requested-With: xhr请求
    res.header('Access-Control-Allow-Metheds', 'PUT, POST, GET, DELETE, OPTIONS'); //访问控制允许方法
    res.header('X-Powered-By', 'nodejs'); //自定义头信息,表示服务端用nodejs
    res.header('Content-Type', 'application/json;charset=utf-8');
    next();
});


/**
 * [设置验证微信接口配置参数]
 */
const config = {
	token: 'test', //对应测试号接口配置信息里填的token
	appid: 'xxxxxxxxxxxxxx', //对应测试号信息里的appID
	secret: 'xxxxxxxxxxxxxxxxxxxx', //对应测试号信息里的appsecret
	grant_type: 'client_credential' //默认
};


/**
 * [验证微信接口配置信息,]
 */
app.get('/', function(req, res) {

	const token = config.token; //获取配置的token
	const signature = req.query.signature; //获取微信发送请求参数signature
	const nonce = req.query.nonce; //获取微信发送请求参数nonce
	const timestamp = req.query.timestamp; //获取微信发送请求参数timestamp

	const str = [token, timestamp, nonce].sort().join(''); //排序token、timestamp、nonce后转换为组合字符串
	const sha = sha1(str); //加密组合字符串

	//如果加密组合结果等于微信的请求参数signature,验证通过
	if (sha === signature) {
		const echostr = req.query.echostr; //获取微信请求参数echostr
        res.send(echostr + ''); //正常返回请求参数echostr
	} else {
		res.send('验证失败');
	}
});


app.listen(port, hostName, function() {
    console.log(`服务器运行在http://${hostName}:${port}`);
});
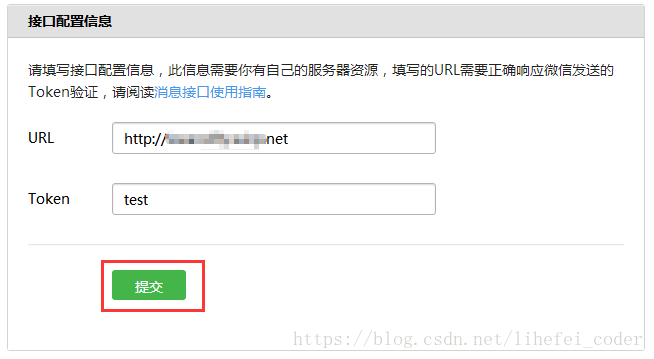
运行server.js启动node服务器,保证花生壳成功映射本地服务器至域名,外网可通过域名正常访问本地服务器
然后点击提交,提示“配置成功”表示接口配置完成
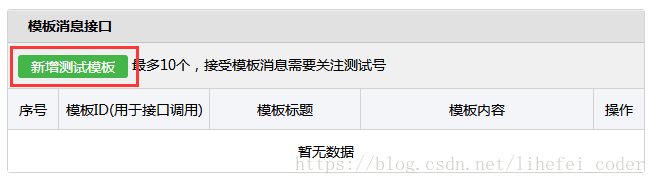
3.模板消息接口
新增测试模板,填写标题和内容

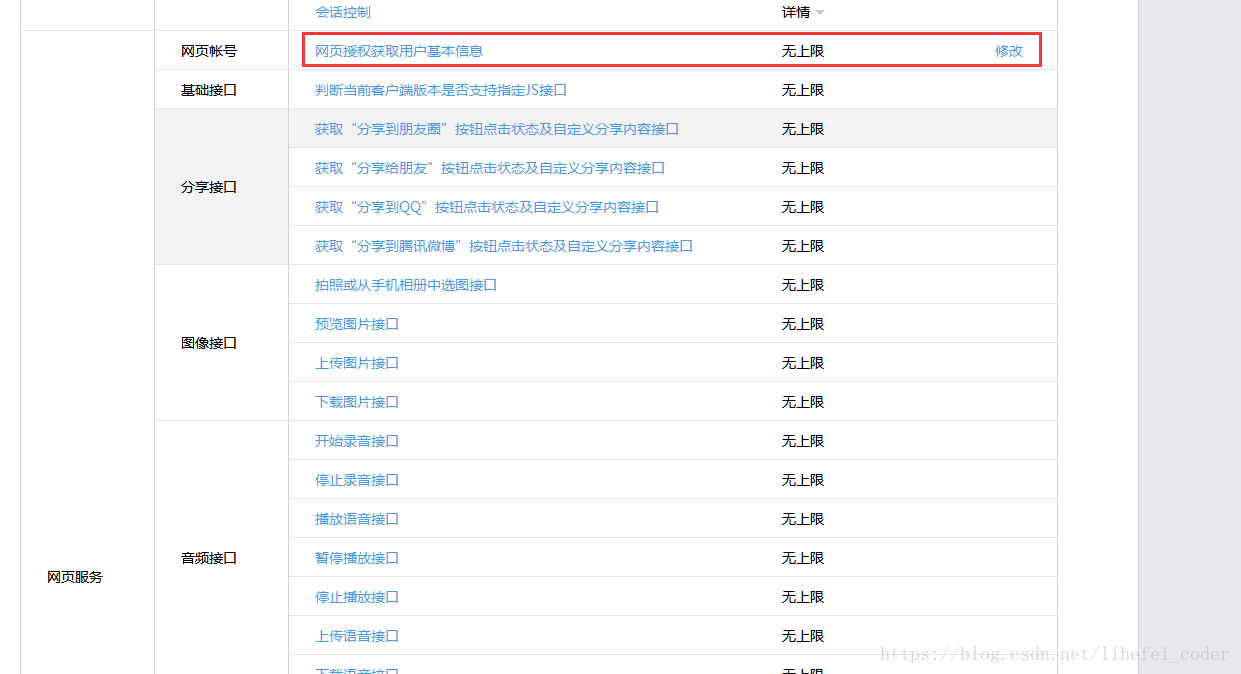
4.OAuth2.0网页授权
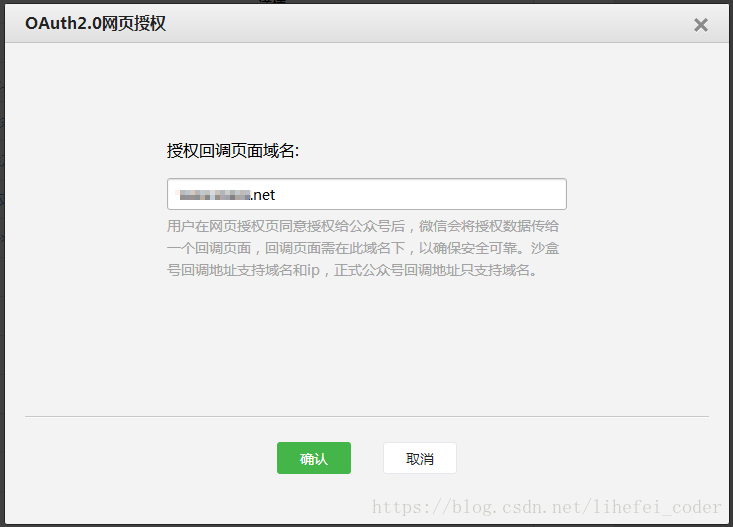
在网页服务 > 网页帐号 > 网页授权获取用户基本信息 > 修改
回调域名的填写自己的域名(注意,域名的格式不包含http://)
5.创建微信网页授权接口链接
在node服务器新增授权调用接口,在微信中访问这个接口地址会创建一个可以跳转到授权页面的链接
这步操作是为了使回调的接口得到code参数,因为发送模板消息必须要有用户的openid,而获取用户的openid必须要有code参数,code参数需要用户访问指定的链接触发授权后才会产生
继续在server.js的基础上增加
/**
 * [创建请求微信网页授权接口链接]
 */

app.get('/authentication', function(req, res) {

    const appid = config.appid;
    const redirect_uri = urlencode("http://www.xxx.net/code"); //这里的url需要转为加密格式,它的作用是访问微信网页鉴权接口成功后微信会回调这个地址,并把code参数带在回调地址中
    const scope = 'snsapi_userinfo';
    const url = `https://open.weixin.qq.com/connect/oauth2/authorize?appid=${appid}&redirect_uri=${redirect_uri}&response_type=code&scope=${scope}&state=STATE&connect_redirect=1#wechat_redirect`;

	const html =
    `<!DOCTYPE html>
    <html>
        <head>
        <meta charset="utf-8" >
        <title>微信鉴权引导</title>
        </head>
        <body><a href="${url}">跳转到鉴权页面</a></body>
    </html>`;

	res.setHeader('Content-Type', 'text/html');
    res.send(html);
});
*注意:每次修改server.js文件后需要重启node服务代码才会生效
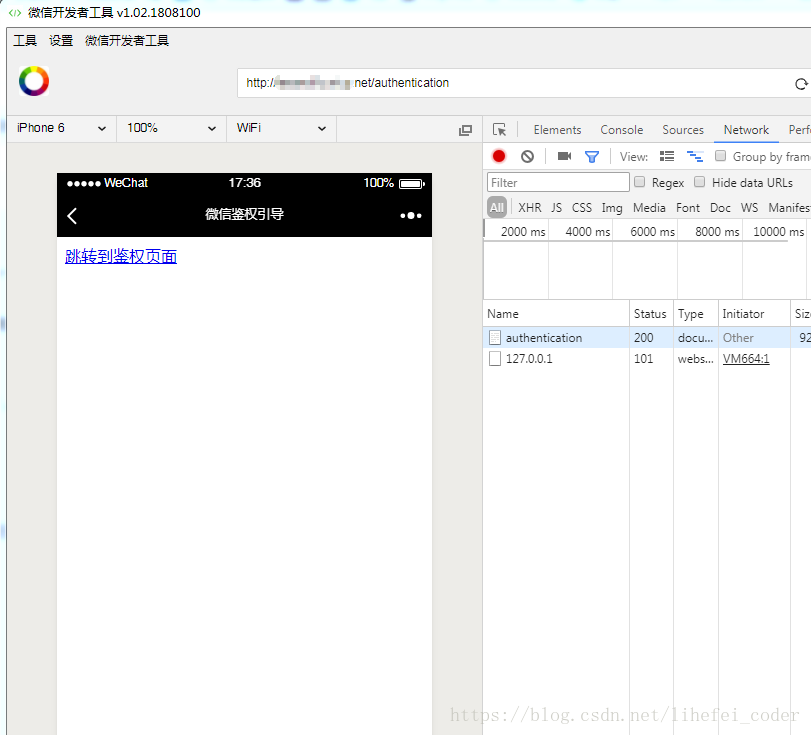
6.下载安装微信开发者工具调试
安装成功后登录开发者工具,访问刚才创建的接口地址 http://www.xxx.net/authentication,
可以看到鉴权的链接已经创建成功,但目前还没有写好获取code的接口,所以先不要点击
7.获取到code > 获取openid > 获取access_token > 发送模板消息
继续在server.js的基础上增加
/**
 * 网页授权回调接口,可以获取code
 */

app.get('/code', function(req, res) {

    const code = req.query.code; //微信回调这个接口后会把code参数带过来
	getOpenId(code); //把code传入getOpenId方法

});


/**
 * 获取openid
 * @param  { string } code [调用获取openid的接口需要code参数]
 */
function getOpenId(code) {
	const appid = config.appid;
    const secret = config.secret;

    const url = `https://api.weixin.qq.com/sns/oauth2/access_token?appid=${appid}&secret=${secret}&code=${code}&grant_type=authorization_code`;

    request(url, function(error, response, body) {

        if (!error && response.statusCode == 200) {
	       const openid =  body.openid;
		   getAccessToken(openid);   //获取openid成功后调用getAccessToken
        }

    });
}


/**
 * 获取access_token
 *  @param  { string } openid [发送模板消息的接口需要用到openid参数]
 */
function getAccessToken(openid) {
	const appid = config.appid;
    const secret = config.secret;
    const grant_type = config.grant_type;

    const url = `https://api.weixin.qq.com/cgi-bin/token?grant_type=${grant_type}&appid=${appid}&secret=${secret}`;

    request(url, function(error, response, body) {

        if (!error && response.statusCode == 200) {

            const access_token= JSON.parse(body).access_token;
            sendTemplateMsg(openid, access_token); //获取access_token成功后调用发送模板消息的方法

        } else {
            throw 'update access_token error';
        }
    });


}


/**
 * 发送模板消息
 * @param  { string } openid [发送模板消息的接口需要用到openid参数]
 * @param  { string } access_token [发送模板消息的接口需要用到access_token参数]
 */

function sendTemplateMsg(openid, access_token) {

        const url = `https://api.weixin.qq.com/cgi-bin/message/template/send?access_token=${access_token}`; //发送模板消息的接口

        const requestData = { //发送模板消息的数据
            touser: openid,
            template_id: 'XXXXXXXXXXXXXXXXXXXXXXXXXXXXXXXXXXX',
            url: 'http://weixin.qq.com/download',
            data: {
                first: {
                    value: '身份信息',
                    color: "#173177"
                },
                keyword1: {
                    value: '张三',
                    color: '#1d1d1d'
                },
                keyword2: {
                    value: '男',
                    color: '#1d1d1d'
                },
                keyword3: {
                    value: '45',
                    color: '#1d1d1d'
                },
                remark: {
                    value: '已登记!',
                    color: '#173177'
                }
            }
        };

        request({
            url: url,
            method: 'post',
            body: requestData,
        }, function(error, response, body) {
            if (!error && response.statusCode == 200) {
                console.log('模板消息推送成功');
            }
        });
    }
完整源码
server.js
const express = require('express'); //web服务框架模块
const request = require('request'); //http请求模块
const fs = require('fs'); //文件系统模块
const path = require('path'); //文件路径模块
const sha1 = require('node-sha1'); //加密模块
const urlencode= require('urlencode'); //URL编译模块

/**
 * [设置验证微信接口配置参数]
 */
const config = {
	token: 'test', //对应测试号接口配置信息里填的token
	appid: 'xxxxxxxxxxxxxx', //对应测试号信息里的appID
	secret: 'xxxxxxxxxxxxxxxxxxxx', //对应测试号信息里的appsecret
	grant_type: 'client_credential' //默认
};

/**
 * [开启跨域便于接口访问]
 */
app.all('*', function(req, res, next) {
    res.header('Access-Control-Allow-Origin', '*'); //访问控制允许来源:所有
    res.header('Access-Control-Allow-Headers', 'Origin, X-Requested-With, Content-Type, Accept'); //访问控制允许报头 X-Requested-With: xhr请求
    res.header('Access-Control-Allow-Metheds', 'PUT, POST, GET, DELETE, OPTIONS'); //访问控制允许方法
    res.header('X-Powered-By', 'nodejs'); //自定义头信息,表示服务端用nodejs
    res.header('Content-Type', 'application/json;charset=utf-8');
    next();
});


/**
 * [验证微信接口配置信息,]
 */
app.get('/', function(req, res) {

	const token = config.token; //获取配置的token
	const signature = req.query.signature; //获取微信发送请求参数signature
	const nonce = req.query.nonce; //获取微信发送请求参数nonce
	const timestamp = req.query.timestamp; //获取微信发送请求参数timestamp

	const str = [token, timestamp, nonce].sort().join(''); //排序token、timestamp、nonce后转换为组合字符串
	const sha = sha1(str); //加密组合字符串

	//如果加密组合结果等于微信的请求参数signature,验证通过
	if (sha === signature) {
		const echostr = req.query.echostr; //获取微信请求参数echostr
        res.send(echostr + ''); //正常返回请求参数echostr
	} else {
		res.send('验证失败');
	}
});

/**
 * [创建请求微信网页授权接口链接]
 */
app.get('/authentication', function(req, res) {

    const appid = config.appid;
    const redirect_uri = urlencode("http://www.xxx.net/code"); //这里的url需要转为加密格式,它的作用是访问微信网页鉴权接口成功后微信会回调这个地址,并把code参数带在回调地址中
    const scope = 'snsapi_userinfo';
    const url = `https://open.weixin.qq.com/connect/oauth2/authorize?appid=${appid}&redirect_uri=${redirect_uri}&response_type=code&scope=${scope}&state=STATE&connect_redirect=1#wechat_redirect`;

	const html =
    `<!DOCTYPE html>
    <html>
        <head>
        <meta charset="utf-8" >
        <title>微信鉴权引导</title>
        </head>
        <body><a href="${url}">跳转到鉴权页面</a></body>
    </html>`;

	res.setHeader('Content-Type', 'text/html');
    res.send(html);
});


/**
 * 网页授权回调接口,可以获取code
 */
app.get('/code', function(req, res) {
    const code = req.query.code; //微信回调这个接口后会把code参数带过来
	getOpenId(code); //把code传入getOpenId方法
});


/**
 * 获取openid
 * @param  { string } code [调用获取openid的接口需要code参数]
 */
function getOpenId(code) {
	const appid = config.appid;
    const secret = config.secret;

    const url = `https://api.weixin.qq.com/sns/oauth2/access_token?appid=${appid}&secret=${secret}&code=${code}&grant_type=authorization_code`;

    request(url, function(error, response, body) {

        if (!error && response.statusCode == 200) {
	       const openid =  body.openid;
		   getAccessToken(openid);   //获取openid成功后调用getAccessToken
        }

    });
}


/**
 * 获取access_token
 *  @param  { string } openid [发送模板消息的接口需要用到openid参数]
 */
function getAccessToken(openid) {
	const appid = config.appid;
    const secret = config.secret;
    const grant_type = config.grant_type;

    const url = `https://api.weixin.qq.com/cgi-bin/token?grant_type=${grant_type}&appid=${appid}&secret=${secret}`;

    request(url, function(error, response, body) {

        if (!error && response.statusCode == 200) {

            const access_token= JSON.parse(body).access_token;
            sendTemplateMsg(openid, access_token); //获取access_token成功后调用发送模板消息的方法

        } else {
            throw 'update access_token error';
        }
    });


}


/**
 * 发送模板消息
 * @param  { string } openid [发送模板消息的接口需要用到openid参数]
 * @param  { string } access_token [发送模板消息的接口需要用到access_token参数]
 */
function sendTemplateMsg(openid, access_token) {

    const url = `https://api.weixin.qq.com/cgi-bin/message/template/send?access_token=${access_token}`; //发送模板消息的接口

    const requestData = { //发送模板消息的数据
        touser: openid,
        template_id: 'XXXXXXXXXXXXXXXXXXXXXXXXXXXXXXXXXXX',
        url: 'http://weixin.qq.com/download',
        data: {
            first: {
                value: '身份信息',
                color: "#173177"
            },
            keyword1: {
                value: '张三',
                color: '#1d1d1d'
            },
            keyword2: {
                value: '男',
                color: '#1d1d1d'
            },
            keyword3: {
                value: '45',
                color: '#1d1d1d'
            },
            remark: {
                value: '已登记!',
                color: '#173177'
            }
        }
    };

    request({
        url: url,
        method: 'post',
        body: requestData,
    }, function(error, response, body) {
        if (!error && response.statusCode == 200) {
            console.log('模板消息推送成功');
        }
    });
}


const hostName = '127.0.0.1'; //ip或域名
const port = 8080; //端口
app.listen(port, hostName, function() {
    console.log(`服务器运行在http://${hostName}:${port}`);
});
接口依赖关系图
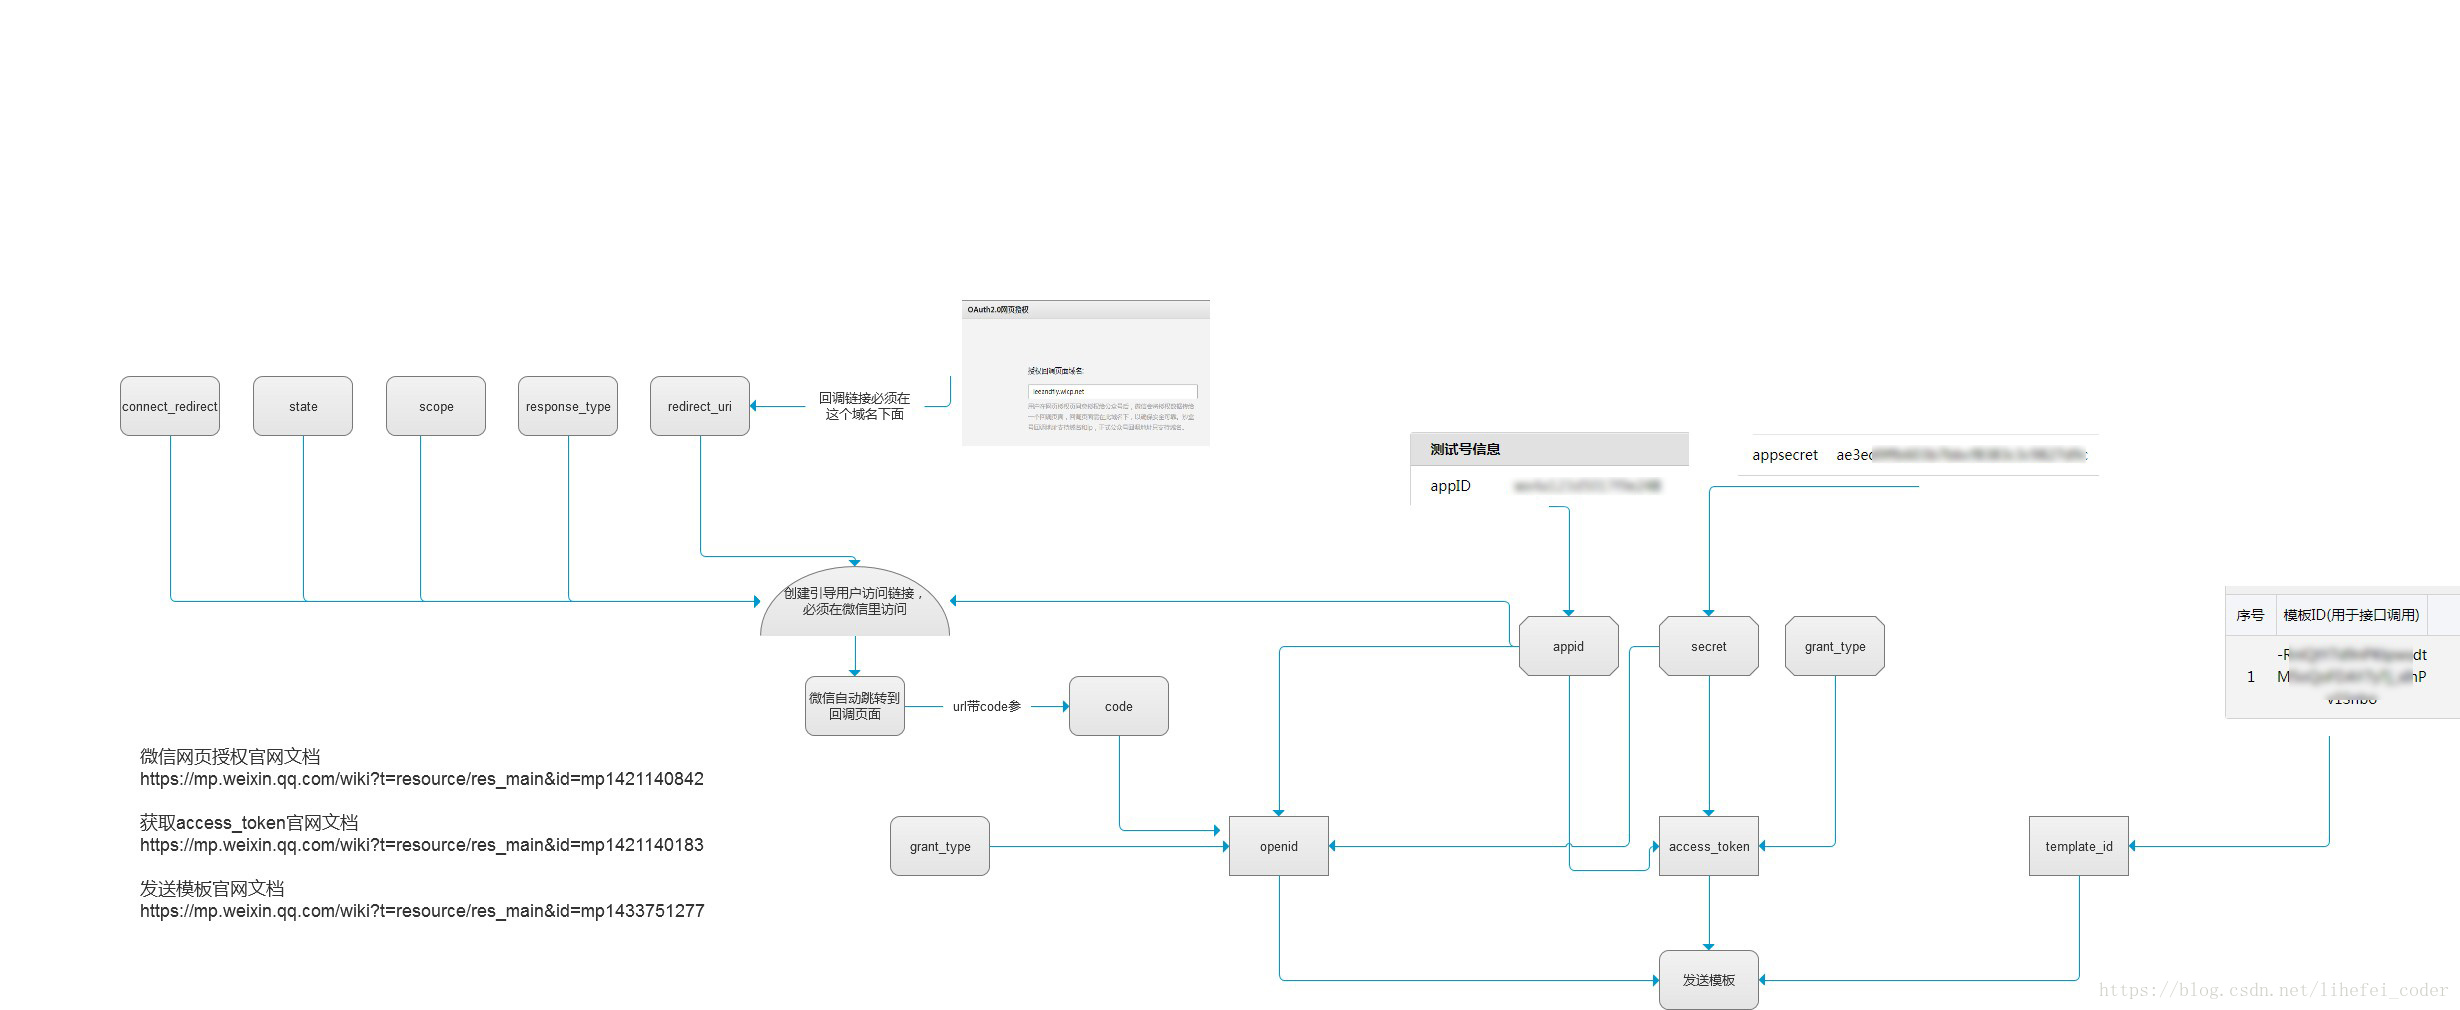
微信网页授权文档
https://mp.weixin.qq.com/wiki?t=resource/res_main&id=mp1421140842
获取access_token文档
https://mp.weixin.qq.com/wiki?t=resource/res_main&id=mp1421140183
发送模板文档
https://mp.weixin.qq.com/wiki?t=resource/res_main&id=mp1433751277


 3901
3901

 被折叠的 条评论
为什么被折叠?
被折叠的 条评论
为什么被折叠?
 到【灌水乐园】发言


