


 本文详细介绍了Vue项目打包优化的方法,包括使用compression-webpack-plugin、terser-webpack-plugin和image-webpack-loader等插件进行Gzip压缩、代码清理和图片压缩,以及通过cdn加速、Webpack Bundle Analyzer分析打包文件,实现首屏加载速度的显著提升。
一、打包优化
1.安装打包优化插件
npm install compression-webpack-plugin@1.1.12 -D
npm install terser-webpack-plugin@1.4.5 -D
npm install image-webpack-loader -D
| 包名称 | 作用 |
|---|---|
| compression-webpack-plugin | Gzip打包压缩,压缩js、html、css webpack版本如果低于4.0,安装时需要带上版本号 |
| terser-webpack-plugin | 清除console和debugger webpack版本如果低于4.0,安装时需要带上版本号 |
| image-webpack-loader | 压缩图片 |
2.配置打包优化参数
项目根目录下配置vue.config.js文件
const CompressionWebpackPlugin = require('compression-webpack-plugin');
const TerserPlugin = require('terser-webpack-plugin');
const isProduction = process.env.NODE_ENV === 'production'; //生产环境

//cdn加速地址
const cdn = {
    css: [],
    js: [
        'https://cdn.bootcss.com/vue/2.6.10/vue.runtime.min.js',
        'https://cdn.bootcss.com/vue-router/3.1.3/vue-router.min.js',
        'https://cdn.bootcss.com/vuex/3.1.2/vuex.min.js',
        'https://cdn.bootcss.com/axios/0.19.0/axios.min.js'
    ]
};

module.exports = {
    productionSourceMap: false, //不生成map文件,
    publicPath: isProduction ? './' : '/', //打包时区分开发环境与生产环境静态资源路径
    chainWebpack: config => {

    	// 生产环境
        if (isProduction) {

            // 注入cdn加速
            config.plugin('html').tap(args => {
                args[0].cdn = cdn;
                return args;
            });

            // 开启图片压缩
            config.module
                .rule('images')
                .test(/\.(png|jpe?g|gif|svg)(\?.*)?$/)
                .use('image-webpack-loader')
                .loader('image-webpack-loader')
                .options({ bypassOnDebug: true });
        }
    },
    configureWebpack: config => {
    	// 生产环境
        if (isProduction) {

            // 用cdn方式引入
            config.externals = {
                vue: 'Vue',
                vuex: 'Vuex',
                'vue-router': 'VueRouter',
                axios: 'axios'
            };

			// gzip压缩
             config.plugins.push(new CompressionWebpackPlugin({
                    algorithm: 'gzip', // 压缩算法
                    test: /\.js$|\.css$|\.html$/, // 匹配文件
                    threshold: 10240, // 压缩超过此大小的文件,以字节为单位
                    minRatio: 0.8,
                    deleteOriginalAssets: false // 不删除源文件
                })
             )

            // 删除console和debugger
            config.plugins.push(
                new TerserPlugin({
                    terserOptions: {
                        ecma: undefined,
                        warnings: false,
                        parse: {},
                        compress: {
                            drop_console: true,
                            drop_debugger: false, //是否删除debugger
                            pure_funcs: ['console.log'] // 移除console
                        }
                    }
                })
            );
        }
    }
};
在index.html页面批量注入cdn加速地址
<!DOCTYPE html>
<html lang="en">
    <head>
        <meta charset="utf-8" />
        <meta http-equiv="X-UA-Compatible" content="IE=edge" />
        <meta name="viewport" content="width=device-width,initial-scale=1.0" />
        <link rel="icon" href="<%= BASE_URL %>favicon.ico" />
        <title>vue项目build打包优化</title>
    </head>
    <body>
        <noscript>
            <strong>We're sorry but longdian-management doesn't work properly without JavaScript enabled. Please enable it to continue.</strong>
        </noscript>
        <div id="app"></div>
        <!-- 批量注入cdn加速地址 -->
        <% for (var i in htmlWebpackPlugin.options.cdn && htmlWebpackPlugin.options.cdn.js) { %>
        <script src="<%= htmlWebpackPlugin.options.cdn.js[i] %>"></script>
        <% } %>
    </body>
</html>
二、打包生成文件分析工具
1.安装分析工具
npm install webpack-bundle-analyzer -D
2.配置分析工具
在vue.config.js文件configureWebpack中继续添加配置
configureWebpack: (config) => {
    // 生产环境
    if (isProduction) {
    	// ...其他配置内容

    	// 添加分析工具
        const BundleAnalyzerPlugin = require('webpack-bundle-analyzer').BundleAnalyzerPlugin
        config.plugins.push(new BundleAnalyzerPlugin())
    }
}
3.打包时添加--report参数生成分析页面
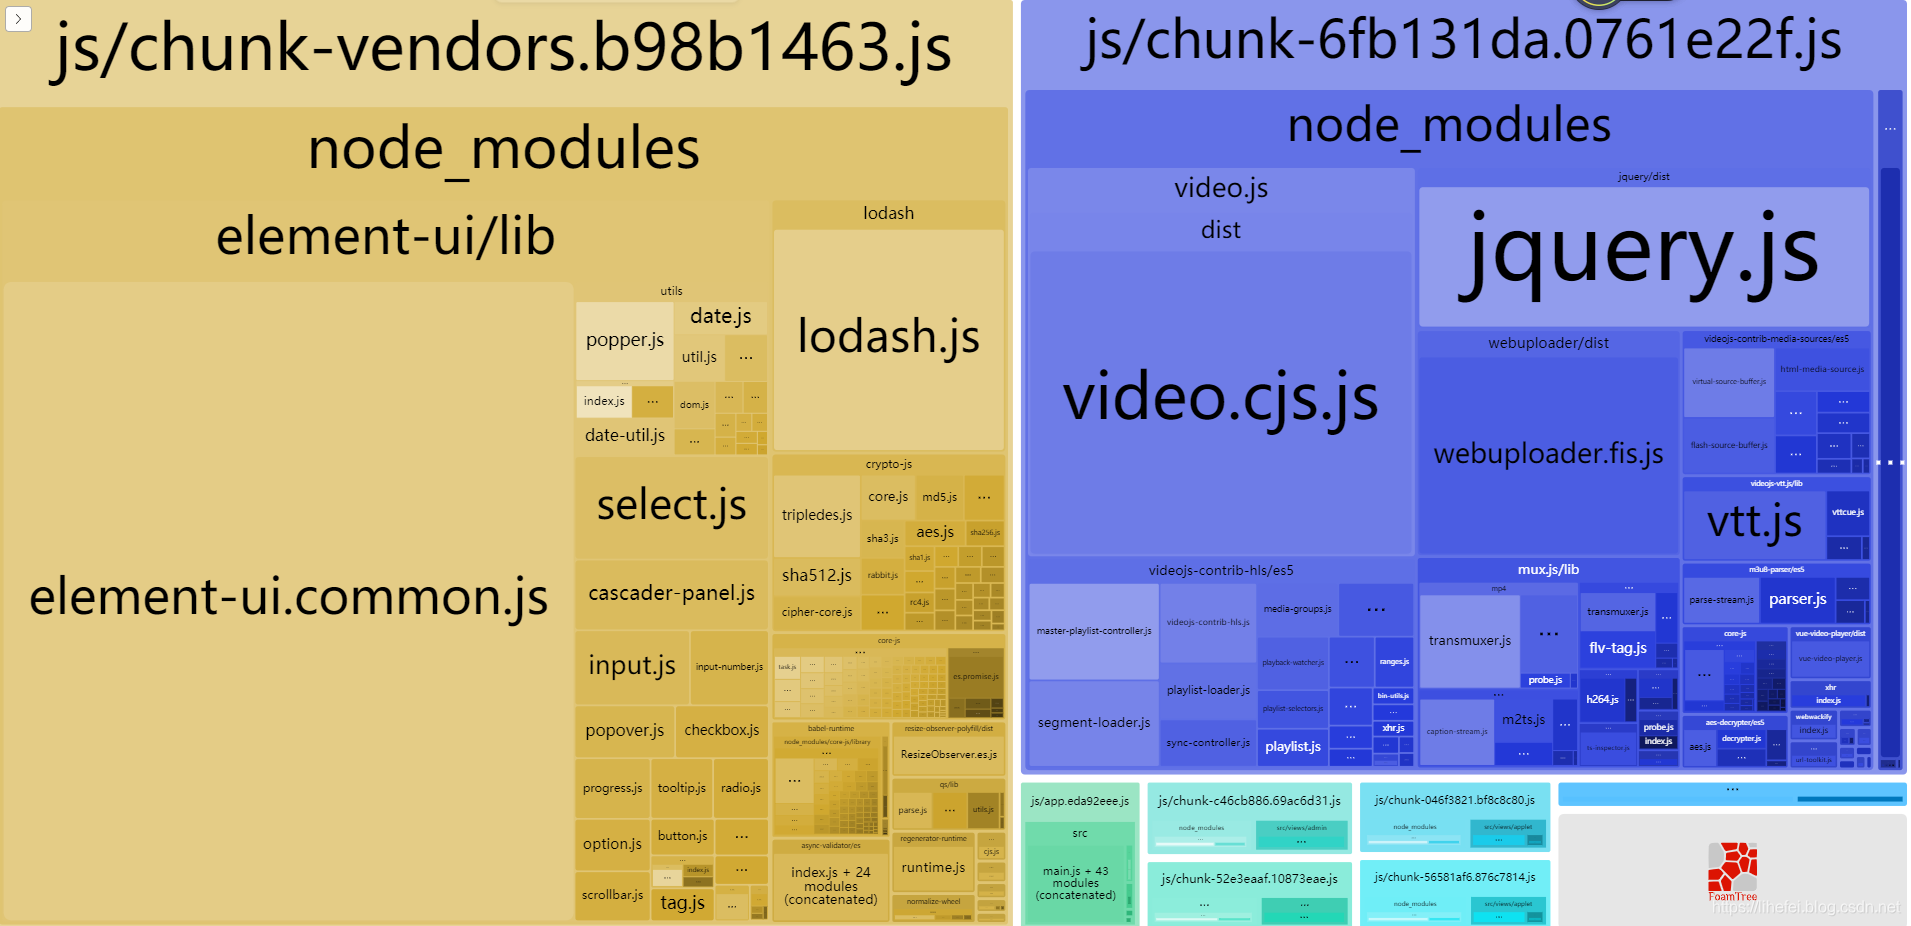
npm run build --report
打包后的分析页面效果
参考文章
vue-cli 3.0 build包太大导致首屏过长的解决方案
https://www.jianshu.com/p/d1fb954f5713?utm_source=oschina-app
vue打包优化
https://www.jianshu.com/p/171e8e529f35
https://www.jianshu.com/p/130a856467a1
vue cli3 优化配置生产去除console.log - from UglifyJs warnings is not a supported option
https://blog.youkuaiyun.com/sinat_35538827/article/details/99672544
Vue打包优化 详解 https://blog.youkuaiyun.com/zhenghao35791/article/details/93649587


 330
330

 被折叠的 条评论
为什么被折叠?
被折叠的 条评论
为什么被折叠?
 到【灌水乐园】发言


