


 文章展示了如何使用SpringBoot框架集成WebSocket,创建连接管理,包括连接开启、关闭的处理,以及向特定或所有客户端发送消息的逻辑。同时,提供了前端HTML页面的JavaScript代码示例,用于建立WebSocket连接、发送和接收消息。测试类说明了如何从后端向客户端发送数据。
所需依赖
        <!-- websocket-->
        <dependency>
            <groupId>org.springframework.boot</groupId>
            <artifactId>spring-boot-starter-websocket</artifactId>
            <version>2.7.0</version>
        </dependency>
实体类
import lombok.Data;

@Data
public class NoticeWebsocketResp {
    //通知类型
    private String noticeType;

    //通知内容
    private Object noticeInfo;
}
保持连接的Bean
import org.springframework.context.annotation.Bean;
import org.springframework.context.annotation.Configuration;
import org.springframework.web.socket.server.standard.ServerEndpointExporter;

@Configuration
public class WebSocketConfig {

    @Bean
    public ServerEndpointExporter serverEndpointExporter() {
        return new ServerEndpointExporter();
    }
}
配置类
import com.alibaba.fastjson.JSONObject;
import lombok.extern.slf4j.Slf4j;
import org.springframework.stereotype.Component;
import org.springframework.util.StringUtils;

import javax.websocket.*;
import javax.websocket.server.PathParam;
import javax.websocket.server.ServerEndpoint;
import java.io.IOException;
import java.util.*;
import java.util.concurrent.ConcurrentHashMap;


@Slf4j
@Component
@ServerEndpoint(value = "/SetRulesLogsend/{buildingId}")
public class SetRulesLogSocket { //记录连接的客户端
        public static Map<String, Session> clients = new ConcurrentHashMap<>();

        /**
         * buildingId关联sid(解决同一用户id,在多个web端连接的问题)
         */
        public static Map<String, Set<String>> conns = new ConcurrentHashMap<>();

        private String sid = null;

        private String buildingId;


        /**
         * 连接成功后调用的方法
         * @param session
         * @param buildingId
         */
        @OnOpen
        public void onOpen(Session session, @PathParam("buildingId") String buildingId) {
            this.sid = UUID.randomUUID().toString();
            this.buildingId = buildingId;
            clients.put(this.sid, session);

            Set<String> clientSet = conns.get(buildingId);

            if (clientSet==null){
                clientSet = new HashSet<>();
                conns.put(buildingId,clientSet);
            }
            clientSet.add(this.sid);
            log.info(this.sid + "连接开启!");
        }

        /**
         * 连接关闭调用的方法
         */
        @OnClose
        public void onClose() {
            log.info(this.sid + "连接断开!");
            clients.remove(this.sid);
        }

        /**
         * 判断是否连接的方法
         * @return
         */
        public static boolean isServerClose() {
            if (SetRulesLogSocket.clients.values().size() == 0) {
                log.info("已断开");
                return true;
            }else {
                log.info("已连接");
                return false;
            }
        }

        /**
         * 发送给所有用户
         * @param noticeType
         */
        public static void sendMessage(String noticeType){
            NoticeWebsocketResp noticeWebsocketResp = new NoticeWebsocketResp();
            noticeWebsocketResp.setNoticeType(noticeType);
            sendMessage(noticeWebsocketResp);
        }


        /**
         * 发送给所有用户
         * @param noticeWebsocketResp
         */
        public static void sendMessage(NoticeWebsocketResp noticeWebsocketResp){
            String message = JSONObject.toJSONString(noticeWebsocketResp);
            for (Session session1 : SetRulesLogSocket.clients.values()) {
                try {
                    session1.getBasicRemote().sendText(message);
                } catch (IOException e) {
                    e.printStackTrace();
                }
            }
        }

        /**
         * 根据buildingId-id发送给某一个用户
         * **/
        public static void sendMessageBybuildingId(String buildingId, NoticeWebsocketResp noticeWebsocketResp) {
            if (!StringUtils.isEmpty(buildingId)) {
                String message = JSONObject.toJSONString(noticeWebsocketResp);
                Set<String> clientSet = conns.get(buildingId);
                if (clientSet != null) {
                    Iterator<String> iterator = clientSet.iterator();
                    while (iterator.hasNext()) {
                        String sid = iterator.next();
                        Session session = clients.get(sid);
                        if (session != null) {
                            try {
                                session.getBasicRemote().sendText(message);
                            } catch (IOException e) {
                                e.printStackTrace();
                            }
                        }
                    }
                }
            }
        }

        /**
         * 收到客户端消息后调用的方法
         * @param message
         * @param session
         */
        @OnMessage
        public void onMessage(String message, Session session) {
            log.info("收到来自项目"+this.buildingId+"的信息:"+message);
        }

        /**
         * 发生错误时的回调函数
         * @param error
         */
        @OnError
        public void onError(Throwable error) {
            log.info("错误");
            error.printStackTrace();
        }
}
测试类
import com.baomidou.mybatisplus.core.toolkit.Wrappers;
import com.iot.base.entity.SetRulesLog;
import com.iot.base.service.ISetRulesLogService;
import com.iot.common.api.ApiResult;
import lombok.extern.slf4j.Slf4j;
import org.springframework.beans.factory.annotation.Autowired;
import org.springframework.web.bind.annotation.GetMapping;
import org.springframework.web.bind.annotation.RestController;

import java.util.List;
import java.util.Map;
import java.util.stream.Collectors;

@Slf4j
@RestController
public class wsController {
    @Autowired
    private ISetRulesLogService setRulesLog;
    @Autowired
    private SetRulesLogSocket socket;
    @GetMapping("/test")
    public ApiResult test() {
    //获取需要的数据通过sendMessageBybuildingId类发送给对应的会话
        List<SetRulesLog> list = setRulesLog.list(Wrappers.<SetRulesLog>lambdaQuery().eq(SetRulesLog::getReadStatus, 0));
        Map<String, List<SetRulesLog>> collect = list.stream().collect(Collectors.groupingBy(SetRulesLog::getBuildId));
        collect.forEach((k,v)->{
            NoticeWebsocketResp noticeWebsocketResp = new NoticeWebsocketResp();
            noticeWebsocketResp.setNoticeType(k);
            noticeWebsocketResp.setNoticeInfo(v);
            socket.sendMessageBybuildingId(k,noticeWebsocketResp);
        });
        return ApiResult.ok();
    }
}
前端代码
<!DOCTYPE HTML>
<html>
<head>
        <meta charset="UTF-8">
        <title>My WebSocket</title>
        <style>
            #message{
        margin-top: 40px;
        border: 1px solid gray;
        padding:20px;
                }
        </style>
</head>
<body>
<button onclick="conectWebSocket()">连接WebSocket</button>
<button onclick="closeWebSocket()">断开连接</button>
<hr />
<br />
消息:<input id="text" type="text" />
<button onclick="send()">发送消息</button>
<div id="message"></div>
</body>
<script type="text/javascript">
    var websocket = null;
    function conectWebSocket(){
        //判断当前浏览器是否支持WebSocket
        if ('WebSocket'in window) {
            // 连接信息 我的两个测试页面只有该处不同
            //websocket = new WebSocket("ws://localhost:8082/SetRulesLogsend/7");
            websocket = new WebSocket("ws://localhost:8082/SetRulesLogsend/8");
        } else {
            alert('Not support websocket')
        }
        //连接发生错误的回调方法
        websocket.onerror = function() {
            setMessageInnerHTML("error");
        };
        //连接成功建立的回调方法
        websocket.onopen = function(event) {
            setMessageInnerHTML("Loc MSG: 成功建立连接");
        }
        //接收到消息的回调方法
        websocket.onmessage = function(event) {
            setMessageInnerHTML(event.data);
        }
        //连接关闭的回调方法
        websocket.onclose = function() {
            setMessageInnerHTML("Loc MSG:关闭连接");
        }
        //监听窗口关闭事件,当窗口关闭时,主动去关闭websocket连接,防止连接还没断开就关闭窗口,server端会抛异常。
        window.onbeforeunload = function() {
            websocket.close();
        }
    }
    //将消息显示在网页上
    function setMessageInnerHTML(innerHTML) {
        document.getElementById('message').innerHTML += innerHTML + '<br/>';
    }
    //关闭连接
    function closeWebSocket() {
        websocket.close();
    }
    //发送消息
    function send() {
        var message = document.getElementById('text').value;
        websocket.send(message);
    }
</script>
</html>
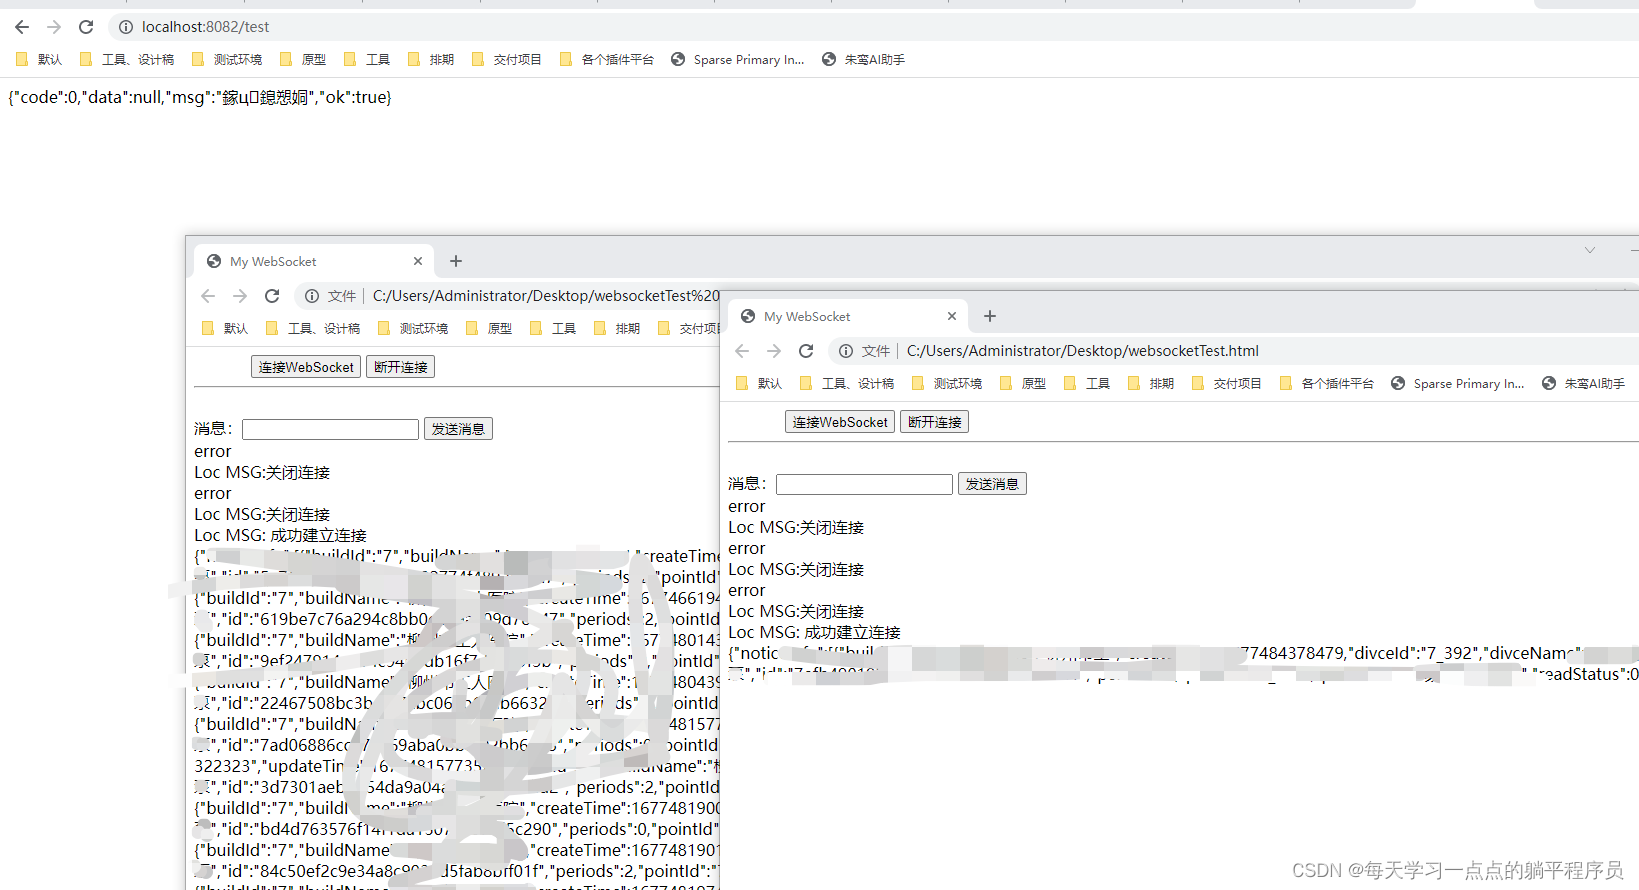
测试结果:


 1852
1852

 被折叠的 条评论
为什么被折叠?
被折叠的 条评论
为什么被折叠?
 到【灌水乐园】发言


