功能描述:
Authentication:身份认证/登录,验证用户是不是具有相应的身份。
Authorization:授权,即权限验证,验证某个已认证的用户是否具有某个权限,即判断用户能否进行某个操作。
Session Management:会话管理,即用户登录后就是一次会话,在没有退出之前,它的所有信息都在这个会话中。
Cryptography:加密,保护数据的安全性,如密码加密存储到数据库。
Web Support:web项目集成,非常容易集成到Web项目中。
Caching:缓存。比如用户登录后,其用户信息和权限都保存到缓存中,提高效率。
Concurrency:多线程的授权验证。支持在多线程之间进行并发验证。
Tesing:提供测试支持。
Run As:允许一个用户以另外一种身份来操作项目(对方允许的情况)。
Remember Me:记住我。即一次登录后,下次再来就不需要再重新登录了。
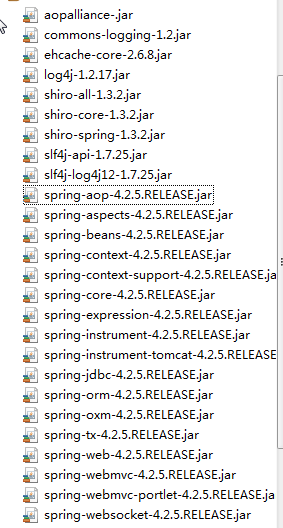
1.导包

2.配置web.xml
<?xml version="1.0" encoding="UTF-8"?>
<web-app xmlns:xsi="http://www.w3.org/2001/XMLSchema-instance" xmlns="http://xmlns.jcp.org/xml/ns/javaee" xsi:schemaLocation="http://xmlns.jcp.org/xml/ns/javaee http://xmlns.jcp.org/xml/ns/javaee/web-app_3_1.xsd" id="WebApp_ID" version="3.1">
  <display-name>Shiro</display-name>
  <welcome-file-list>
    <welcome-file>index.html</welcome-file>
    <welcome-file>index.htm</welcome-file>
    <welcome-file>index.jsp</welcome-file>
    <welcome-file>default.html</welcome-file>
    <welcome-file>default.htm</welcome-file>
    <welcome-file>default.jsp</welcome-file>
  </welcome-file-list>
  <!-- spring配置文件 -->
<context-param>
    <param-name>contextConfigLocation</param-name>
    <param-value>classpath:spring.xml</param-value>
</context-param>
<listener>
    <listener-class>org.springframework.web.context.ContextLoaderListener</listener-class>
</listener>
<!-- SpringMVC的配置文件 -->
<servlet>
    <servlet-name>springDispatcherServlet</servlet-name>
    <servlet-class>org.springframework.web.servlet.DispatcherServlet</servlet-class>
    <init-param>
        <param-name>contextConfigLocation</param-name>
        <param-value>classpath:springmvc.xml</param-value>
    </init-param>
    <load-on-startup>1</load-on-startup>
</servlet>
<servlet-mapping>
    <servlet-name>springDispatcherServlet</servlet-name>
    <url-pattern>/</url-pattern>
</servlet-mapping>

<!-- 添加shiro过滤器,用来拦截shiro请求 -->
<filter>
    <filter-name>shiroFilter</filter-name>
    <filter-class>
	    org.springframework.web.filter.DelegatingFilterProxy
    </filter-class>
    <init-param>
        <param-name>targetFilterLifecycle</param-name>
        <param-value>true</param-value>
    </init-param>
</filter>
<filter-mapping>
    <filter-name>shiroFilter</filter-name>
    <url-pattern>/*</url-pattern>
</filter-mapping>


</web-app>
3.配置spring.xml文件
<?xml version="1.0" encoding="UTF-8"?>
<beans xmlns="http://www.springframework.org/schema/beans"
	xmlns:xsi="http://www.w3.org/2001/XMLSchema-instance"
	xmlns:context="http://www.springframework.org/schema/context"
	xmlns:mvc="http://www.springframework.org/schema/mvc"
	xsi:schemaLocation="http://www.springframework.org/schema/mvc http://www.springframework.org/schema/mvc/spring-mvc-4.2.xsd
		http://www.springframework.org/schema/beans http://www.springframework.org/schema/beans/spring-beans.xsd
		http://www.springframework.org/schema/context http://www.springframework.org/schema/context/spring-context-4.2.xsd">
	<!-- SpringIOC的配置文件,排除@Controller和@ControllerAdvice注解修饰的类 -->
	 <!-- <context:component-scan base-package="com.znsd.shiro">
		<context:exclude-filter type="annotation" expression="org.springframework.stereotype.Controller" />
		<context:exclude-filter type="annotation" expression="org.springframework.web.bind.annotation.ControllerAdvice" />
	</context:component-scan>  -->
		<!-- 3.配置实现了realm接口的bean -->
    <bean id="shiroRealm" class="com.znsd.shiro.dao.Demo"></bean>

    <!-- 1.配置 securityManager管理器-->
	<bean id="securityManager" class="org.apache.shiro.web.mgt.DefaultWebSecurityManager">
	    <!-- 缓存管理器 -->
	    <property name="cacheManager" ref="cacheManager"/>
	    <!-- 配置session的管理方式 -->
	    <property name="realm" ref="shiroRealm"/>
	</bean>

	<!-- 2.配置缓存管理器,可以设置缓存 -->
	<bean id="cacheManager" class="org.apache.shiro.cache.ehcache.EhCacheManager">
	    <property name="cacheManagerConfigFile" value="classpath:ehcache.xml"/>
	</bean>

	<!-- 4.配置lifecycleBeanPostProcessor,可以自动调用配置在spring中的shrio对象生命周期方法。 -->
	<bean id="lifecycleBeanPostProcessor" class="org.apache.shiro.spring.LifecycleBeanPostProcessor"/>

	<!-- 5.启用IOC容器中的shiro注解,但必须在配置 lifecycleBeanPostProcessor 后才会生效。-->
	<bean class="org.springframework.aop.framework.autoproxy.DefaultAdvisorAutoProxyCreator"
	          depends-on="lifecycleBeanPostProcessor"/>
    <!-- 安全管理器 -->
	<bean class="org.apache.shiro.spring.security.interceptor.AuthorizationAttributeSourceAdvisor">
	    <property name="securityManager" ref="securityManager"/>
	</bean>

	<bean id="shiroFilter" class="org.apache.shiro.spring.web.ShiroFilterFactoryBean">
	    <property name="securityManager" ref="securityManager"/>
	    <property name="loginUrl" value="/laj"/>
	    <property name="successUrl" value="/index"/>
	    <property name="unauthorizedUrl" value="/unauthorized"/>
	    <property name="filterChainDefinitions">
	        <value>
	        	/admin=roles[admin]
	        	/user=roles[user]
	        	/index.jsp=anon
	            /login = anon
	            /index = anon
	            /laj = anon
	            /helow=authc
	            /logout=logout
	            /** = authc
	        </value>
	    </property>
	</bean>

	<!-- 添加自定义的Relm规则 -->
	 <bean id="shiroRealms" class="com.znsd.shiro.dao.Demo">
	    <property name="credentialsMatcher">
	    <bean class="org.apache.shiro.authc.credential.HashedCredentialsMatcher">
	   <!--  指定使用MD5加密方式加密前台密码 -->
	    <property name="hashAlgorithmName" value="MD5" />
	   <!--  指定使用MD5加密的次数 -->
	    <property name="hashIterations" value="10" />
	    </bean>
	    </property>
	</bean>
	 <bean id="shiroRealms2" class="com.znsd.shiro.dao.Demo">
	    <property name="credentialsMatcher">
	    <bean class="org.apache.shiro.authc.credential.HashedCredentialsMatcher">
	   <!--  指定使用MD5加密方式加密前台密码 -->
	    <property name="hashAlgorithmName" value="MD5" />
	   <!--  指定使用MD5加密的次数 -->
	    <property name="hashIterations" value="10" />
	    </bean>
	    </property>
	</bean>


</beans>
4.配置springMVC.xml文件
<?xml version="1.0" encoding="UTF-8"?>
<beans xmlns="http://www.springframework.org/schema/beans"
	xmlns:xsi="http://www.w3.org/2001/XMLSchema-instance"
	xmlns:mvc="http://www.springframework.org/schema/mvc"
	xmlns:aop="http://www.springframework.org/schema/aop"
	xmlns:context="http://www.springframework.org/schema/context"
	xsi:schemaLocation="http://www.springframework.org/schema/mvc http://www.springframework.org/schema/mvc/spring-mvc-4.2.xsd
		http://www.springframework.org/schema/beans http://www.springframework.org/schema/beans/spring-beans.xsd
		http://www.springframework.org/schema/context http://www.springframework.org/schema/context/spring-context-4.2.xsd
		http://www.springframework.org/schema/aop http://www.springframework.org/schema/aop/spring-aop-4.2.xsd">
		<!-- SpringMVC的配置文件,只扫描@Controller和@ControllerAdvice注解修饰的类 -->
	<!-- <context:component-scan base-package="com.znsd.shiro" use-default-filters="false">
		<context:include-filter type="annotation" expression="org.springframework.stereotype.Controller"/>
		<context:include-filter type="annotation" expression="org.springframework.web.bind.annotation.ControllerAdvice"/>
	</context:component-scan> -->
	<context:component-scan base-package="com.znsd.shiro" />
		<!-- 配置视图解析器 将视图返回字符串解析到:/WEB-INF/view/返回值.jsp 下-->
	<bean class="org.springframework.web.servlet.view.InternalResourceViewResolver">
		<!-- 视图前缀 -->
		<property name="prefix" value="/WEB-INF/index/" />
		<!-- 视图后置 -->
		<property name="suffix" value=".jsp" />
	</bean>
	<!-- 如果配置了mvc-controller会导致其它页面没法正常访问,还需要添加一个标签 -->
	<mvc:annotation-driven />
	<mvc:default-servlet-handler/>

</beans>
实现了realm接口的类
package com.znsd.shiro.dao;

import java.util.HashSet;
import java.util.Set;

import org.apache.shiro.authc.AuthenticationException;
import org.apache.shiro.authc.AuthenticationInfo;
import org.apache.shiro.authc.AuthenticationToken;
import org.apache.shiro.authc.LockedAccountException;
import org.apache.shiro.authc.SimpleAuthenticationInfo;
import org.apache.shiro.authc.UnknownAccountException;
import org.apache.shiro.authc.UsernamePasswordToken;
import org.apache.shiro.authz.AuthorizationInfo;
import org.apache.shiro.authz.SimpleAuthorizationInfo;
import org.apache.shiro.realm.AuthenticatingRealm;
import org.apache.shiro.realm.AuthorizingRealm;
import org.apache.shiro.subject.PrincipalCollection;
import org.apache.shiro.util.ByteSource;

public class Demo extends AuthorizingRealm {

	@Override
	protected AuthenticationInfo doGetAuthenticationInfo(AuthenticationToken token) throws AuthenticationException {
        //①、把AuthenticationToken转换为UsernamePasswordToken。
		UsernamePasswordToken upToken = (UsernamePasswordToken) token;
		//②、从UsernamePasswordToken中获取username
		String username = upToken.getUsername();
		System.out.println(username+"========");
		//③、调用数据库的方法,从数据库中查询username对应的记录。
		Student user = new Student("admin","123456");

		//④、若用户不存在,则可以跑出UnknownAccountException异常。
		if(user.getName()==null) {
			throw new UnknownAccountException("用户不存在.");
		}
		//⑤、根据用户信息的情况,决定是否需要抛出其它AuthenticationException异常。
		/*if(user.isLocked()) {
			throw new LockedAccountException("用户被锁定");
		}*/
		//生成加密的盐值
		ByteSource salt = ByteSource.Util.bytes("www.znsd.com");
		//这里的密码要是数据库中加密之后的密码。

		//⑥、根据用户的情况,来构建AuthenticationInfo对象并返回。
		AuthenticationInfo info = new SimpleAuthenticationInfo(user.getName(), user.getPass(),salt,username);
		return info;
	}

	@Override
	protected AuthorizationInfo doGetAuthorizationInfo(PrincipalCollection principals) {
		// 授权方法的步骤:
		// 1、从PrincipalCollection中来获取登录用户的信息。
		String user = (String) principals.getPrimaryPrincipal();
		System.out.println(user);
		// 2、利用登录用户的信息来验证当前用户的角色或者权限。
		Set<String> roles = new HashSet<>();
		roles.add("user");
		if ("admin".equals(user)) {
			System.out.println(user+"-------");
		    roles.add("admin");
		}
		// 3、创建SimpleAuthorizationInfo,并设置其roles属性。
		SimpleAuthorizationInfo info = new SimpleAuthorizationInfo(roles);
		// 4、返回SimpleAuthorizationInfo对象
		return info;
	}

}
@Controller里的代码
@RequestMapping("/login")
	public String login(@RequestParam("name")String name,@RequestParam("pass")String pass)
	{
		//获取当前的Subject
		Subject currentUser = SecurityUtils.getSubject();

		// 测试当前用户是否已经被认证,即是否已经登录。
		if (!currentUser.isAuthenticated()) {
		// 把用户名和密码封装为UsernamePasswordToken对象
		UsernamePasswordToken token
			= new UsernamePasswordToken(name, pass);
		// 记住密码
		token.setRememberMe(true);
		try {
		// 执行登录
		currentUser.login(token); //实际上调用Realm中的doGetAuthenticationInfo方法
		} catch (AuthenticationException e) { // 其他异常,是其他异常的父类
		    e.printStackTrace();
		}
											}
		return "login";

	}
shiro 配置参数的含义:
anon 任何用户发送的请求都能够访问
authc 经过认证的请求可访问,否则将会将请求重定向到 ini 配置文件配置的 authc.loginUrl 资源,进行认证操作
loginUrl=/login.jsp
用户认证资源地址是/login
successUrl=/
#认证成功后重定向到此资源
authc.usernameParam=username
#从请求参数中获取key=username的value作为用户名
authc.passwordParam=password
#从请求参数中获取key=password的value作为密码
authc.rememberMeParam=rememberMe
#从请求参数中获取key=rememberMe的value作为是否记住密码的标识
logout 结束会话 logout.redirectUrl=/
#结束会话后重定向到此资源


 本文介绍了如何将Apache Shiro框架与Spring和SpringMVC进行整合。主要涉及身份认证、授权、会话管理和缓存等功能,并详细阐述了配置web.xml、spring.xml和springMVC.xml文件的步骤,以及Shiro配置参数的含义。


 213
213

 被折叠的 条评论
为什么被折叠?


