转载声明:Ryan的博客文章欢迎您的转载,但在转载的同时,请注明文章的来源出处,不胜感激! :-)
http://blog.youkuaiyun.com/floodingfire/article/details/8144617
上一篇博客中,我们学习到了如何使用Android相册截图。在这篇博客中,我将向大家展示如何拍照截图。
拍照截图有点儿特殊,要知道,现在的Android智能手机的摄像头都是几百万的像素,拍出来的图片都是非常大的。因此,我们不能像对待相册截图一样使用Bitmap小图,无论大图小图都统一使用Uri进行操作。
一、首先准备好需要使用到的Uri:
1 | private static final String IMAGE_FILE_LOCATION = "file:///sdcard/temp.jpg";//temp file |
2 | Uri imageUri = Uri.parse(IMAGE_FILE_LOCATION); |
二、使用MediaStore.ACTION_IMAGE_CAPTURE可以轻松调用Camera程序进行拍照:
1 | Intent intent = new Intent(MediaStore.ACTION_IMAGE_CAPTURE); |
2 | intent.putExtra(MediaStore.EXTRA_OUTPUT, imageUri); |
3 | startActivityForResult(intent, TAKE_BIG_PICTURE); |
三、接下来就可以在
onActivityResult中拿到返回的数据(Uri),并将Uri传递给截图的程序。
01 | switch (requestCode) { |
02 | case TAKE_BIG_PICTURE: |
03 | Log.d(TAG, "TAKE_BIG_PICTURE: data = " + data); |
05 | cropImageUri(imageUri, 800, 400, CROP_BIG_PICTURE); |
08 | case TAKE_SMALL_PICTURE: |
09 | Log.i(TAG, "TAKE_SMALL_PICTURE: data = " + data); |
11 | cropImageUri(imageUri, 300, 150, CROP_SMALL_PICTURE); |
可以看到,无论是拍大图片还是小图片,都是使用的Uri,只是尺寸不同而已。我们将这个操作封装在一个方法里面。
01 | private void cropImageUri(Uri uri, int outputX, int outputY, int requestCode){ |
02 | Intent intent = new Intent("com.android.camera.action.CROP"); |
03 | intent.setDataAndType(uri, "image/*"); |
04 | intent.putExtra("crop", "true"); |
05 | intent.putExtra("aspectX", 2); |
06 | intent.putExtra("aspectY", 1); |
07 | intent.putExtra("outputX", outputX); |
08 | intent.putExtra("outputY", outputY); |
09 | intent.putExtra("scale", true); |
10 | intent.putExtra(MediaStore.EXTRA_OUTPUT, uri); |
11 | intent.putExtra("return-data", false); |
12 | intent.putExtra("outputFormat", Bitmap.CompressFormat.JPEG.toString()); |
13 | intent.putExtra("noFaceDetection", true); |
14 | startActivityForResult(intent, requestCode); |
四、最后一步,我们已经将数据传入裁剪图片程序,接下来要做的就是处理返回的数据了:
01 | switch (requestCode) { |
02 | case CROP_BIG_PICTURE: |
03 | Log.d(TAG, "CROP_BIG_PICTURE: data = " + data); |
05 | Bitmap bitmap = decodeUriAsBitmap(imageUri); |
06 | imageView.setImageBitmap(bitmap); |
09 | case CROP_SMALL_PICTURE: |
11 | Bitmap bitmap = decodeUriAsBitmap(imageUri); |
12 | imageView.setImageBitmap(bitmap); |
14 | Log.e(TAG, "CROP_SMALL_PICTURE: data = " + data); |
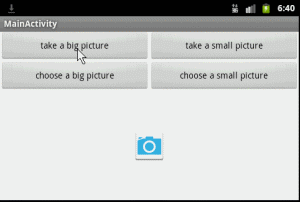
效果图:
代码托管于GitHub,会不定期更新:https://github.com/ryanhoo/PhotoCropper
http://mzh3344258.blog.51cto.com/1823534/808837
public class MyInformationActivity extends Activity  {

	private PopupWindow mImageSetWindow;

	private View mPopView;

	private LProgressDialog mDialog;

	private String IMAGE_FILE_LOCATION = "file:///";// temp file
	private String IMAGE_FILE_NAME = "";

	@Override
	protected void onCreate(Bundle savedInstanceState) {

		super.onCreate(savedInstanceState);

		setContentView(R.layout.me_page_information);

	}


	protected void onActivityResult(int requestCode, int resultCode, Intent data) {
		super.onActivityResult(requestCode, resultCode, data);
		if (mImageSetWindow != null) {
			mImageSetWindow.dismiss();
		}
		switch (requestCode) {

		case 1: // 拍照
			if (resultCode == Activity.RESULT_OK) {
				startPhotoZoom(Uri.parse(IMAGE_FILE_LOCATION + IMAGE_FILE_NAME));
			}
			break;
		case 2: // 相册
			if (data == null)
				break;
			Uri originalUri = data.getData();
			String path = originalUri.toString();
			String[] projection = { MediaStore.Images.Media.DATA };
			Cursor cursor = managedQuery(originalUri, projection, null, null,
					null);
			if (cursor != null) {
				int column_index = cursor
						.getColumnIndexOrThrow(MediaStore.Images.Media.DATA);
				cursor.moveToFirst();
				// 最后根据索引值获取图片路径
				path = cursor.getString(column_index);
				try {
					if (Integer.parseInt(Build.VERSION.SDK) < 14) {
						cursor.close();
					}
				} catch (Exception e) {
					e.printStackTrace();
				}
			}
//在4.4之后读取图片的地址发生改变,所以加了后面的代码。
                         <pre name="code" class="java">if (TextUtils.isEmpty(path)){
	                    if (oldPath!=null && oldPath.contains("/image%3A")) {
	                		String id = oldPath.split("/image%3A")[1];
	                    	//定义索引字段
	                    	String[] column = { MediaStore.Images.Media.DATA };
	                    	String sel = MediaStore.Images.Media._ID + "=?";
	                    	Cursor cursor2 = getContentResolver().query(MediaStore.Images.Media.EXTERNAL_CONTENT_URI,
	                    	column, sel, new String[]{ id }, null);
	                    	int columnIndex = cursor2.getColumnIndex(column[0]);
	                    	if (cursor2.moveToFirst()) {
	                    	//DATA字段就是本地资源的全路径
	                    		path = cursor2.getString(columnIndex);
	                    	}
	                    	//关闭游标
	                    	cursor2.close();
						}
	                    if (TextUtils.isEmpty(path)){
	                    	return;
	                    }
                    }
Logger.getLogger().e("======path====>" + path);File temp = new File(path);startPhotoZoom(Uri.fromFile(temp));break;case 3:if (data != null) {savePicData(data);}break;}}String photoPath = "";/** * 保存裁剪之后的图片数据到SDCARD中 * * @param picdata */private void savePicData(Intent picdata) {try {Bundle extras = picdata.getExtras();if (extras != null) {Bitmap photo = extras.getParcelable("data");String photoName = GameApp.getInstance().getmApp_init_token();String fileName = RemoteImageView.getDirectory("")+"/"+photoName+".png";File file = new File(fileName);if(file.exists()){file.delete();}file.createNewFile(); OutputStream outStream = new FileOutputStream(file); photo.compress(Bitmap.CompressFormat.JPEG, 80, outStream); outStream.flush(); outStream.close(); //上传修改的头像 // upLoadImage(photo);}} catch (Exception e) {e.printStackTrace();}}/** * 裁剪图片方法实现 * * @param uri */public void startPhotoZoom(Uri uri) {Intent intent = new Intent("com.android.camera.action.CROP");intent.setDataAndType(uri, "image/*");intent.putExtra("crop", "true");intent.putExtra("aspectX", 1);intent.putExtra("aspectY", 1);intent.putExtra("outputX", 90);intent.putExtra("outputY", 90);intent.putExtra("return-data", true);startActivityForResult(intent, 3);}private void popSelectWindow(View parent) {DisplayMetrics displayMetrics = new DisplayMetrics();getWindowManager().getDefaultDisplay().getMetrics(displayMetrics);int height = displayMetrics.heightPixels;int width = displayMetrics.widthPixels;if (mImageSetWindow == null) {LayoutInflater layoutInflater = (LayoutInflater) getSystemService(Context.LAYOUT_INFLATER_SERVICE);mPopView = layoutInflater.inflate(R.layout.popwindow_set_picture,null);Button cameraButton = (Button) mPopView.findViewById(R.id.captureButton);Button selectImageButton = (Button) mPopView.findViewById(R.id.selectImageButton);Button cancelButton = (Button) mPopView.findViewById(R.id.cancelButton);cameraButton.setOnClickListener(new View.OnClickListener() {@Overridepublic void onClick(View view) {Intent intent = new Intent(MediaStore.ACTION_IMAGE_CAPTURE);IMAGE_FILE_NAME = System.currentTimeMillis() + ".png";intent.putExtra(MediaStore.EXTRA_OUTPUT,Uri.parse(IMAGE_FILE_LOCATION + IMAGE_FILE_NAME));startActivityForResult(intent, 1);}});selectImageButton.setOnClickListener(new View.OnClickListener() {@Overridepublic void onClick(View view) {Intent intent = new Intent(Intent.ACTION_GET_CONTENT);intent.addCategory(Intent.CATEGORY_OPENABLE);intent.setType("image/*");startActivityForResult(intent, 2);}});cancelButton.setOnClickListener(new View.OnClickListener() {@Overridepublic void onClick(View view) {mImageSetWindow.dismiss();}});mImageSetWindow = new PopupWindow(mPopView, width, height / 2);}// 使其聚集mImageSetWindow.setFocusable(true);// 设置允许在外点击消失mImageSetWindow.setOutsideTouchable(true);// 这个是为了点击“返回Back”也能使其消失,并且并不会影响你的背景mImageSetWindow.setBackgroundDrawable(new BitmapDrawable());// popupWindow.showAsDropDown(parent, 20, 30);mImageSetWindow.showAtLocation(parent, Gravity.LEFT | Gravity.BOTTOM,0, 0);}private Handler mUiHandler = new Handler() {public void handleMessage(Message msg) {super.handleMessage(msg); if (msg.obj != null) {String strInfo = msg.obj.toString();ToastUtils.showTextToast(MyInformationActivity.this, strInfo);return;}if (msg.what == MESSAGE_UPLOAD_FAILURE) {ToastUtils.showTextToast(MyInformationActivity.this, "上传失败");}if (msg.what == MESSAGE_UPLOAD_SUCCESS) {ToastUtils.showTextToast(MyInformationActivity.this, "上传成功"); }}};public static final int MESSAGE_UPLOAD_FAILURE = 10;public static final int MESSAGE_UPLOAD_SUCCESS = 20; }


 本文介绍如何在Android应用中实现拍照截图功能,并通过Uri进行图片的大图与小图操作。此外,还提供了如何调用系统裁剪工具来处理图片的具体步骤。


 718
718

 被折叠的 条评论
为什么被折叠?
被折叠的 条评论
为什么被折叠?
 到【灌水乐园】发言


