


文章来自一口linux博客(Linux驱动 | 从0写一个设备树节点实例_linux camera 驱动 添加设备树-优快云博客) ,这里拿来做笔记使用。
一、前言
设备树是每一个Linux驱动工程师都必须掌握的一个知识点,有很多之前做单片机的朋友刚接触Linux驱动时,会一脸懵!
其实设备树的使用并没有大家想像的那么复杂,对于大部分工程师来说,只要会修改即可。
在学习设备树之前,大家一定要搞清楚什么是platform总线,有了这些基础知识后,我们就可以来编写一个设备树的实例。
下面彭老师就给大家讲解如何自己添加一个设备树节点,并如何在驱动中提取出设备树的信息。
二、测试平台
本次测试在开发板上操作,操作环境如下:
1. 编译环境
ubuntu 16.04
2. 交叉编译工具
root@ubuntu:/home/peng/linux-3.14# arm-none-linux-gnueabi-gcc -v
Using built-in specs.
COLLECT_GCC=arm-none-linux-gnueabi-gcc
COLLECT_LTO_WRAPPER=/home/peng/toolchain/gcc-4.6.4/bin/../libexec/gcc/arm-arm1176jzfssf-linux-gnueabi/4.6.4/lto-wrapper
Target: arm-arm1176jzfssf-linux-gnueabi
………………
gcc version 4.6.4 (crosstool-NG hg+default-2685dfa9de14 - tc0002)
3. 开发板
开发板:fs4412
soc:exynos4412
4. 内核版本
Linux kernel 3.14.0
三、内核解析设备树一般过程
-
系统启动后,uboot会从网络或者flash、sd卡中读取设备树文件(具体由uboot命令给出),
-
引导linux内核启动后,会把设备树镜像保存到的内存地址传递给Linux内核,Linux内核会解析设备树镜像,从设备树中提取硬件信息并逐一初始化。
-
其中设备树信息会被转换成
struct platform_device类型变量。 -
而驱动要解析设备树,必须定义
struct platform_driver类型结构体变量,并通过函数platform_driver_register()注册。 -
这两者都会注册到platform总线,当驱动和设备树节点匹配成功后,就调用
struct platform_driver中.probe方法。
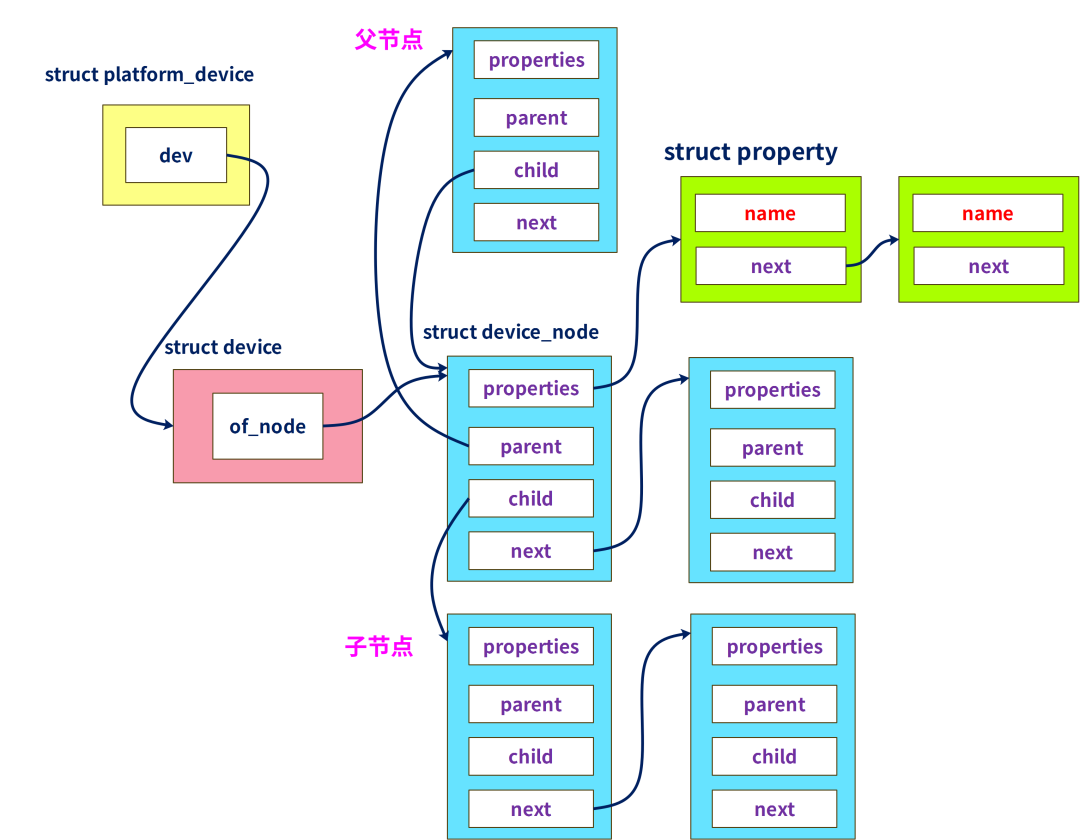
其中设备树节点会封装在struct device_node结构体变量中,各个属性信息会封装在 struct property结构体变量中, 他们与struct platform_device结构体之间关系如下:
这里罗列下上面的结构体定义
//platform总线用于描述设备硬件信息的结构体,包括该硬件的所有资源(io,memory、中断、DMA等等)
struct platform_device {
const char *name; //设备的名字,用于和驱动进行匹配的
int id;
bool id_auto;
struct device dev; //内核中维护的所有的设备必须包含该成员
u32 num_resources; //资源个数
struct resource *resource; //描述资源
const struct platform_device_id *id_entry;
/* MFD cell pointer */
struct mfd_cell *mfd_cell;
/* arch specific additions */
struct pdev_archdata archdata;
};
struct device {
struct device *parent;
struct device_private *p;
struct kobject kobj;
const char *init_name; /* initial name of the device */
const struct device_type *type;
struct mutex mutex; /* mutex to synchronize calls to its driver*/
struct bus_type *bus; /* type of bus device is on */
struct device_driver *driver; /* which driver has allocated this device */
void *platform_data; /* Platform specific data, device core doesn't touch it */
struct dev_pm_info power;
struct dev_pm_domain *pm_domain;
#ifdef CONFIG_PINCTRL
struct dev_pin_info *pins;
#endif
#ifdef CONFIG_NUMA
int numa_node; /* NUMA node this device is close to */
#endif
u64 *dma_mask; /* dma mask (if dma'able device) */
u64 coherent_dma_mask;/* Like dma_mask, but for
alloc_coherent mappings as
not all hardware supports
64 bit addresses for consistent
allocations such descriptors. */
struct device_dma_parameters *dma_parms;
struct list_head dma_pools; /* dma pools (if dma'ble) */
struct dma_coherent_mem *dma_mem; /* internal for coherent mem
override */
#ifdef CONFIG_DMA_CMA
struct cma *cma_area; /* contiguous memory area for dma allocations */
#endif
/* arch specific additions */
struct dev_archdata archdata;
struct device_node *of_node; /* associated device tree node */
struct acpi_dev_node acpi_node; /* associated ACPI device node */
dev_t devt; /* dev_t, creates the sysfs "dev" */
u32 id; /* device instance */
spinlock_t devres_lock;
struct list_head devres_head;
struct klist_node knode_class;
struct class *class;
const struct attribute_group **groups; /* optional groups */
void (*release)(struct device *dev);
struct iommu_group *iommu_group;
bool offline_disabled:1;
bool offline:1;
};
struct platform_driver {
int (*probe)(struct platform_device *); //当驱动和硬件信息匹配成功之后,就会调用probe函数,驱动所有的资源的注册和初始化全部放在probe函数中
int (*remove)(struct platform_device *); //硬件信息被移除了,或者驱动被卸载了,全部要释放,释放资源的操作就放在该函数中
void (*shutdown)(struct platform_device *); //关机时执行函数
int (*suspend)(struct platform_device *, pm_message_t state); //挂起函数
int (*resume)(struct platform_device *); //恢复函数
struct device_driver driver; // 管理的driver对象,通常driver->name用于和设备进行匹配
const struct platform_device_id *id_table; //往往一个驱动可能能同时支持多个硬件,这些硬件的名字都放在该结构体数组中
bool prevent_deferred_probe;
};
struct device_driver {
const char *name; 驱动名称
struct bus_type *bus; 所属总线
struct module *owner; 模块拥有者
const char *mod_name; 内建的模块使用
bool suppress_bind_attrs; 是否绑定到sysfs
const struct of_device_id *of_match_table; 设备树匹配表
const struct acpi_device_id *acpi_match_table; ACPI匹配表
int (*probe) (struct device *dev); 探测设备
int (*remove) (struct device *dev); 与设备脱离时调用
void (*shutdown) (struct device *dev); 在关机时关闭设备
int (*suspend) (struct device *dev, pm_message_t state); 使设备进入睡眠模式调用
int (*resume) (struct device *dev); 唤醒设备时调用
const struct attribute_group **groups; 自动创建的默认属性组
const struct dev_pm_ops *pm; 设备的功耗管理
struct driver_private *p; 驱动的私有数据
};
struct device_node {
const char *name; device node name
const char *type; 对应device_type的属性
phandle phandle; 对应该节点的phandle属性
const char *full_name; 从“/”开始的,表示该node的full path
struct property *properties; 该节点的属性列表
如果需要删除某些属性,kernel并非真的删除,而是挂入到deadprops的列表
struct property *deadprops; /* removed properties */
parent、child以及sibling将所有的device node连接起来
struct device_node *parent; //父节点
struct device_node *child; //子节点
struct device_node *sibling; //兄弟节点
通过该指针可以获取相同类型的下一个node
struct device_node *next; /* next device of same type */
通过该指针可以获取node global list下一个node
struct device_node *allnext; /* next in list of all nodes */
struct kobject kobj;
unsigned long _flags;
void *data;
#if defined(CONFIG_SPARC)
const char *path_component_name;
unsigned int unique_id;
struct of_irq_controller *irq_trans;
#endif
};
struct property {
char *name; 属性的名称
int length; 属性的长度
void *value; 属性的值
struct property *next; 下一个属性
unsigned long _flags;
unsigned int unique_id;
struct bin_attribute attr;
};
四、驱动架构
以下是一口君编写的驱动架构,
我们只需要将测试代码填充到hello_probe()中即可:
static int hello_probe(struct platform_device *pdev)
{
 printk("match ok \n");

//解析代码编写
 return 0;
}
static  int hello_remove(struct platform_device *pdev)
{
 printk("hello_remove \n");
 return 0;
}
static struct of_device_id beep_table[] = {
  {.compatible = "yikoulinux"},
};
static struct platform_driver hello_driver =
{
 .probe = hello_probe,
 .driver.name = "duang",
 .remove = hello_remove,
 .driver = {
  .name = "yikoupeng",
  .of_match_table = beep_table,
 },
};
static int hello_init(void)
{
 printk("hello_init \n");
 return platform_driver_register(&hello_driver);
}
static void hello_exit(void)
{
 printk("hello_exit \n");
 platform_driver_unregister(&hello_driver);
 return;
}
MODULE_LICENSE("GPL");
module_init(hello_init);
module_exit(hello_exit);
beep_table中的 compatible变量的值必须跟设备树节点中的compatible属性值一致,这样才会匹配成功。
五、设备树节点
下面是给出的设备树信息:
 yikou_node{
        compatible = "yikoulinux";
        reg = <0x114000a0 0x4 0x139D0000 0x20>;
        reg-names = "peng";
        interrupt-parent=<&gpx1>;
        interrupts =<1 2>,<2  2>;

        csm_gpios=<&gpx2 3 0 &gpx2 4 0 &gpx2 5 0 &gpx2 6 0>;

        crl0_gpio=<&gpx0 5 0>;
        crl1_gpio=<&gpx0 6 0>;
        rst_gpio=<&gpx0 7 0>;
        cfg_gpio=<&gpx0 4 0>;

  phy_ref_freq = <26000>;  /* kHz */
  suspend_poweroff;

  clock-names = "xusbxti",
   "otg";
  yikou_node {
   compatible = "leadcore,dsi-panel";
   panel_name = "lcd_rd_rm67295";
   refresh_en = <1>;
   bits-per-pixel = <32>;
  };
    };
其中包括常见reg、中断、整型值、bool值、字符串、子节点、时钟等属性。
一定要注意,很多属性的给出会因为使用的SOC平台的不同有所差异, 下面介绍下GPIO和中断编写原理:
1. GPIO
gpio信息的给出有以下两种方法:
csm_gpios=<&gpx2 3 0 &gpx2 4 0 &gpx2 5 0 &gpx2 6 0>;
 crl0_gpio=<&gpx0 5 0>;
 crl1_gpio=<&gpx0 6 0>;
 rst_gpio=<&gpx0 7 0>;
 cfg_gpio=<&gpx0 4 0>;
第1种是公用同一个名字,第2种是每一个gpio单独使用1个名字。
gpio需要指明父节点,关于gpio父节点的说明下说明文档(通常linux-3.14\Documentation下有关于该内核版本的一些模块说明,很重要):
linux-3.14\Documentation\devicetree\bindings\gpio.txt
For example, the following could be used to describe gpios pins to use
as chip select lines; with chip selects 0, 1 and 3 populated, and chip
select 2 left empty:

 gpio1: gpio1 {
  gpio-controller
   #gpio-cells = <2>;
 };
 gpio2: gpio2 {
  gpio-controller
   #gpio-cells = <1>;
 };
 [...]
  chipsel-gpios = <&gpio1 12 0>,
    <&gpio1 13 0>,
    <0>, /* holes are permitted, means no GPIO 2 */
    <&gpio2 2>;
Note that gpio-specifier length is controller dependent.  In the
above example, &gpio1 uses 2 cells to specify a gpio, while &gpio2
only uses one.

gpio-specifier may encode: bank, pin position inside the bank,
whether pin is open-drain and whether pin is logically inverted.
Exact meaning of each specifier cell is controller specific, and must
be documented in the device tree binding for the device.

Example of the node using GPIOs:

 node {
  gpios = <&qe_pio_e 18 0>;
 };

In this example gpio-specifier is "18 0" and encodes GPIO pin number,
and empty GPIO flags as accepted by the "qe_pio_e" gpio-controller.
翻译总结成如下几点:
-
gpio父节点需要包含属性
 gpio-controller、    表示是gpi控制器
 #gpio-cells = <2>;    表示子节点包括2个属性
-
对于子节点是2个属性的函数 比如:
gpios = <&qe_pio_e 18 0>;
父节点是qe_pio_e 其中18表示GPIO pin值,就是gpio下面管理的pin脚序号,该pin值一般就需要查询用户手册&电路图。
2. 中断
中断属性节点如下:
interrupt-parent=<&gpx1>;
interrupts =<1 2>,<2  2>;
其中
interrupt-parent=<&gpx1>;: 该中断信号所述的中断控制器
interrupts =<1 2>,<2  2>;  :描述中断属性,其中<>中第一个值表示该中断所述中断控制器index,第二个值表示中断触发方式
中断子节点格式如下:
linux-3.14\Documentation\devicetree\bindings\gpio.txt
Example of a peripheral using the GPIO module as an IRQ controller:

 funkyfpga@0 {
  compatible = "funky-fpga";
  ...
  interrupt-parent = <&gpio1>;   #父节点
  interrupts = <4 3>;     #节点属性
 };
中断子节点说明文档如下:
linux-3.14\Documentation\devicetree\bindings\interrupt-controller\interrupts.txt
  b) two cells
  ------------
  The #interrupt-cells property is set to 2 and the first cell defines the
  index of the interrupt within the controller, while the second cell is used
  to specify any of the following flags:
    - bits[3:0] trigger type and level flags
        1 = low-to-high edge triggered          上升沿
        2 = high-to-low edge triggered    下降沿
        4 = active high level-sensitive      高电平有效
        8 = active low level-sensitive          低电平有效
我们所填写的中断父节点gpx1定义如下(该文件由三星厂家出厂定制好):
linux-3.14\arch\arm\boot\dts\exynos4x12-pinctrl.dtsi
  gpx1: gpx1 {
   gpio-controller;        #gpio控制器
   #gpio-cells = <2>;      #子节点有2个属性

   interrupt-controller;  #中断控制器
   interrupt-parent = <&gic>;    #父节点gic
   interrupts = <0 24 0>, <0 25 0>, <0 26 0>, <0 27 0>,   #子节点属性约束
         <0 28 0>, <0 29 0>, <0 30 0>, <0 31 0>;
   #interrupt-cells = <2>;
  };
可见三星的exynos4412平台中gpx1,既可以做gpio控制器又可以做中断控制器,而gpx1作为中断控制器则路由到gic上。其中interrupts属性说明如下:
linux-3.14\Documentation\devicetree\bindings\arm\gic.txt
Main node required properties:

- compatible : should be one of:
 "arm,gic-400"
 "arm,cortex-a15-gic"
 "arm,cortex-a9-gic"
 "arm,cortex-a7-gic"
 "arm,arm11mp-gic"
- interrupt-controller : Identifies the node as an interrupt controller
- #interrupt-cells : Specifies the number of cells needed to encode an
  interrupt source.  The type shall be a <u32> and the value shall be 3.

  The 1st cell is the interrupt type; 0 for SPI interrupts, 1 for PPI
  interrupts.

  The 2nd cell contains the interrupt number for the interrupt type.
  SPI interrupts are in the range [0-987].  PPI interrupts are in the
  range [0-15].

  The 3rd cell is the flags, encoded as follows:
 bits[3:0] trigger type and level flags.
  1 = low-to-high edge triggered
  2 = high-to-low edge triggered
  4 = active high level-sensitive
  8 = active low level-sensitive
 bits[15:8] PPI interrupt cpu mask.  Each bit corresponds to each of
 the 8 possible cpus attached to the GIC.  A bit set to '1' indicated
 the interrupt is wired to that CPU.  Only valid for PPI interrupts.
翻译总结:
interrupts = <0 24 0>
-
第1个0 表示该中断是SPI类型中断,如果是1表示PPI类型中断
-
24表示中断号(通过查询电路图和datasheet获得)
-
第三个0表示中断触发方式
再强调一遍 不同的平台gpio、中断控制器管理可能不一样,所以填写方法可能会有差异,不可教条
六、驱动提取设备树信息方法
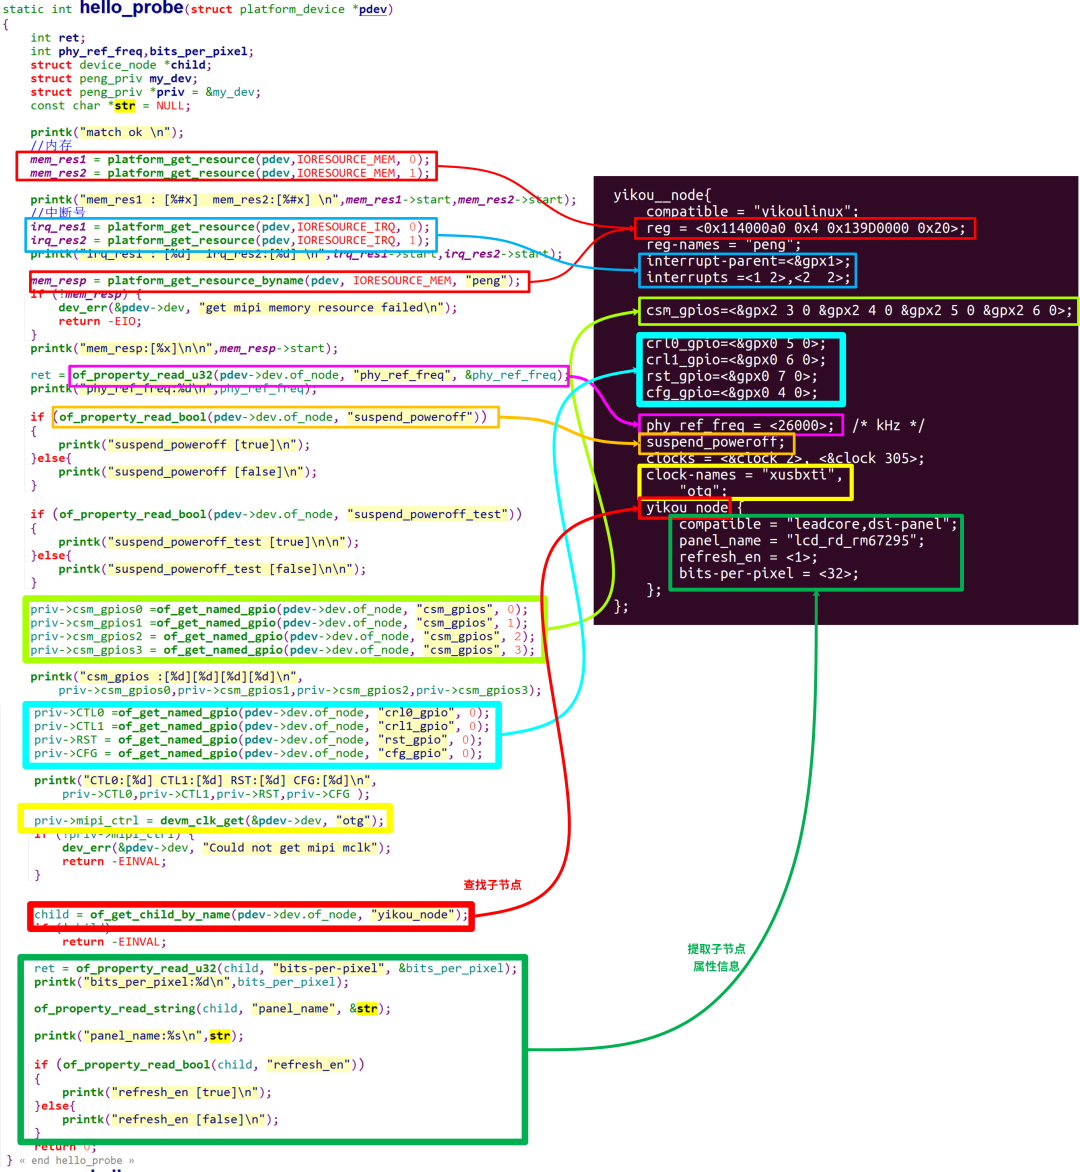
驱动解析代码与设备树节点之间关系如下,代码与属性用相同颜色框出:
of开头的函数请参考《手把手教linux驱动11-linux设备驱动统一模型》
Linux内核会解析设备树镜像,从设备树中提取硬件信息,被转换成struct platform_device类型变量,通过函数platform_driver_register()注册到platform总线后,当驱动和设备树节点匹配成功后,就调用struct platform_driver中.probe方法。在这里取出设备树节点的各个值转存到自定义结构体struct peng_priv中,供代码继续使用。
七、编译(ubuntu中操作)
驱动编译:
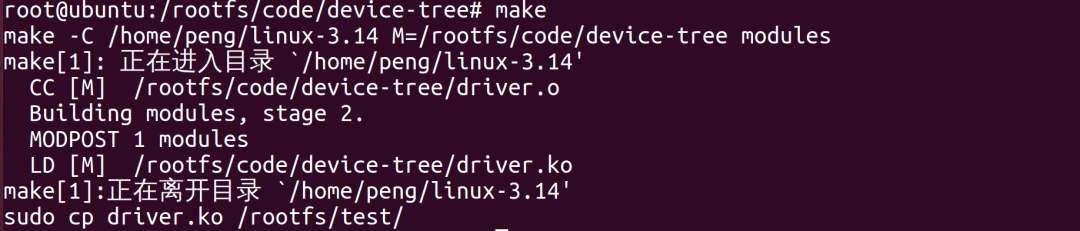
注意,内核必须提前编译好
设备树编译:

实际操作远不是执行一个命令那么简单,需要将第五小节的设备树结点信息拷贝到内核的.dts文件里面,比如arch/arm/boot/dts/exynos4412-itp-elite.dts。然后再去编译设备树。编译成功在开发板uboot下将.dtb文件烧录到开发板指定的内存区域。
除此之外驱动模块文件、设备树文件如何导入给开发板,差别也比较大,本文不再给出步骤。
八、加载模块(开发板上操作)
加载模块后执行结果如下:
[root@peng test]# insmod driver.ko
[   26.880000] hello_init
[   26.880000] match ok
[   26.880000] mem_res1 : [0x114000a0]  mem_res2:[0x139d0000]
[   26.885000] irq_res1 : [168]  irq_res2:[169]
[   26.890000] mem_resp:[114000a0]
[   26.890000]
[   26.895000] phy_ref_freq:26000
[   26.900000] suspend_poweroff [true]
[   26.900000] suspend_poweroff_test [false]
[   26.900000]
[   26.905000] csm_gpios :[231][232][233][234]
[   26.910000] CTL0:[217] CTL1:[218] RST:[219] CFG:[216]
[   26.915000] bits_per_pixel:32
[   26.920000] panel_name:lcd_rd_rm67295
[   26.925000] refresh_en [true]
其中打印的信息就是最终我们解析出的设备树里的硬件信息, 我们就可以根据这些信息进行相关资源申请、初始化。
同时设备树中的信息,会以文件节点形式创建在/proc/device-tree目录中:

//自定义存放硬件信息的值
struct peng_priv {
	int frame_num;
	int busy;
	int data_len;

	unsigned int csm_gpios0;
	unsigned int csm_gpios1;
	unsigned int csm_gpios2;
	unsigned int csm_gpios3;
	unsigned int CTL0;
	unsigned int CTL1;
	unsigned int RST;
	unsigned int CFG;

	struct clk *mipi_ctrl;

	int tx_len;
	int force_quit;
	int restart_tx;
	int csm_ctl_status;
};

//描述硬件内存的资源
static struct resource *mem_res1;
static struct resource *mem_res2;
static struct resource *mem_resp;
//描述硬件中断的资源
static struct resource *irq_res1;
static struct resource *irq_res2;

//Linux内核会解析设备树镜像,从设备树中提取硬件信息,被转换成struct platform_device类型变量
//通过函数platform_driver_register()注册到platform总线后,当驱动和设备树节点匹配成功后,就调用struct platform_driver中.probe方法
static int hello_probe(struct platform_device *pdev)
{
	int ret;
	int phy_ref_freq,bits_per_pixel;
	struct device_node *child;
	struct peng_priv my_dev;
	struct peng_priv *priv = &my_dev;
	const char *str = NULL;

	printk("match ok \n");
	//获取设备树的内存信息
	mem_res1 = platform_get_resource(pdev,IORESOURCE_MEM, 0);
	mem_res2 = platform_get_resource(pdev,IORESOURCE_MEM, 1);

	printk("mem_res1 : [%#x]  mem_res2:[%#x] \n",mem_res1->start,mem_res2->start);
	//获取设备树的中断信息
	irq_res1 = platform_get_resource(pdev,IORESOURCE_IRQ, 0);
	irq_res2 = platform_get_resource(pdev,IORESOURCE_IRQ, 1);
	printk("irq_res1 : [%d]  irq_res2:[%d] \n",irq_res1->start,irq_res2->start);

	mem_resp = platform_get_resource_byname(pdev, IORESOURCE_MEM, "peng");
	if (!mem_resp) {
		dev_err(&pdev->dev, "get mipi memory resource failed\n");
		return -EIO;
	}
	printk("mem_resp:[%x]\n\n",mem_resp->start);

	ret = of_property_read_u32(pdev->dev.of_node, "phy_ref_freq", &phy_ref_freq);
	printk("phy_ref_freq:%d\n",phy_ref_freq);

	if (of_property_read_bool(pdev->dev.of_node, "suspend_poweroff"))
	{
		printk("suspend_poweroff [true]\n");
	}else{
		printk("suspend_poweroff [false]\n");
	}

	if (of_property_read_bool(pdev->dev.of_node, "suspend_poweroff_test"))
	{
		printk("suspend_poweroff_test [true]\n\n");
	}else{
		printk("suspend_poweroff_test [false]\n\n");
	}

	priv->csm_gpios0 =of_get_named_gpio(pdev->dev.of_node, "csm_gpios", 0);
	priv->csm_gpios1 =of_get_named_gpio(pdev->dev.of_node, "csm_gpios", 1);
	priv->csm_gpios2 = of_get_named_gpio(pdev->dev.of_node, "csm_gpios", 2);
	priv->csm_gpios3 = of_get_named_gpio(pdev->dev.of_node, "csm_gpios", 3);

	printk("csm_gpios :[%d][%d][%d][%d]\n",
		priv->csm_gpios0,priv->csm_gpios1,priv->csm_gpios2,priv->csm_gpios3);

	priv->CTL0 =of_get_named_gpio(pdev->dev.of_node, "crl0_gpio", 0);
	priv->CTL1 =of_get_named_gpio(pdev->dev.of_node, "crl1_gpio", 0);
	priv->RST = of_get_named_gpio(pdev->dev.of_node, "rst_gpio", 0);
	priv->CFG = of_get_named_gpio(pdev->dev.of_node, "cfg_gpio", 0);

	printk("CTL0:[%d] CTL1:[%d] RST:[%d] CFG:[%d]\n",
		priv->CTL0,priv->CTL1,priv->RST,priv->CFG );

	priv->mipi_ctrl = devm_clk_get(&pdev->dev, "otg");
	if (!priv->mipi_ctrl) {
		dev_err(&pdev->dev, "Could not get mipi mclk");
		return -EINVAL;
	}


	child = of_get_child_by_name(pdev->dev.of_node, "yikou_node"); //获取设备子节点列表
	if (!child)
		return -EINVAL;

	ret = of_property_read_u32(child, "bits-per-pixel", &bits_per_pixel);
	printk("bits_per_pixel:%d\n",bits_per_pixel);

	of_property_read_string(child, "panel_name", &str);

	printk("panel_name:%s\n",str);

	if (of_property_read_bool(child, "refresh_en"))
	{
		printk("refresh_en [true]\n");
	}else{
		printk("refresh_en [false]\n");
	}
	return 0;
}
static 	int hello_remove(struct platform_device *pdev)
{
	printk("hello_remove \n");
	return 0;
}
static struct of_device_id beep_table[] = {
		{.compatible = "yikoulinux"},
};
static struct platform_driver hello_driver =
{
	.probe = hello_probe,
	.remove = hello_remove,
	.driver = {
		.name = "yikoupeng",
		.of_match_table = beep_table,
	},
};
static int hello_init(void)
{
	printk("hello_init \n");
	return platform_driver_register(&hello_driver);
}
static void hello_exit(void)
{
	printk("hello_exit \n");
	platform_driver_unregister(&hello_driver);
	return;
}
MODULE_LICENSE("GPL");
module_init(hello_init);
module_exit(hello_exit);


 被折叠的 条评论
为什么被折叠?
被折叠的 条评论
为什么被折叠?
 到【灌水乐园】发言


