


 本文深入解析Spring框架中的IOC容器概念与依赖注入(DI)机制,阐述了控制反转(IOC)的设计思想及其如何解决软件各层之间的耦合问题。介绍了创建IOC容器的多种方式,包括加载类路径下的配置文件和注解类。详细讲解了如何通过无参构造器和带参构造器创建对象,以及如何利用构造器和set方法进行依赖注入。此外,还展示了如何在Spring中为对象的集合属性赋值,并通过实例演示了DAO层与Service层的解耦过程。
一、Spring IOC 容器概述
1. 概述
spring-aop 模块提供了面向切面编程(AOP)的实现,可以定义诸如方法拦截器和切入点等,从而使实现功能的代码彻底的解耦出来。使用源码级的元数据,可以用类似于.Net属性的方式合并行为信息到代码中。
2. 作用
IOC(Inversion of Control):控制反转,不是什么技术,而是一种设计思想,旨在解决各层耦合。在Java开发中,IOC意味着将你设计好的对象交给容器控制,而不是传统的在对象内部直接控制;DI(Dependency Injection):依赖注入,IOC的一个重点是在系统运行中,动态的向某个对象提供它所需要的其他对象,这一点是通过依赖注入来实现的。
IOC:IOC容器自动创建对象,DI:从容器中自动寻找对象给对象属性赋值。
二、创建IOC容器
1. 容器的类的继承关系
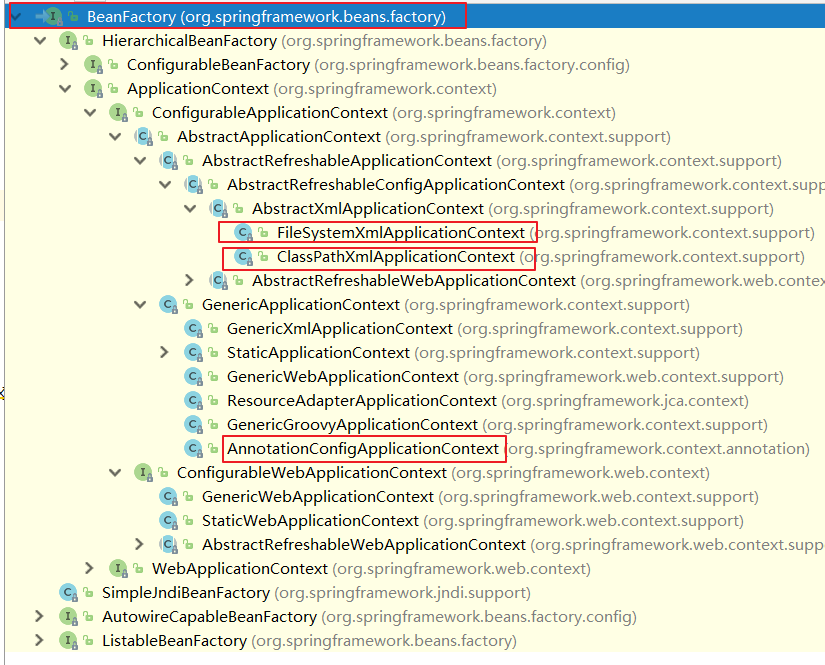
2. 创建容器的几种方式
常用:
//方式1:加载类路径下的配置文件
@Test
public void createObj(){
    ApplicationContext ac = new ClassPathXmlApplicationContext("applicationContext.xml");
}
//方式2:加载注解类
@Test
public void createObj2(){
    // 加载指定的注解类的方式创建容器
    ApplicationContext ac = new AnnotationConfigApplicationContext(SpringConfig.class);
}
三、IOC容器 – 控制反转(创建对象)
常用两种方式:
1. 调用无参构造器
<bean id="user" class="com.zz.entity.User"></bean>
2. 调用带参构造器
四、IOC容器 – 依赖注入(给对象属性赋值)
1. 调用带参构造器
applicationContext.xml
<!-- 通过构造器给对象属性赋值 -->
<!--  constructor-arg 通过构造函数给对象属性赋值
    index 表示第几个参数,从0开始
    value 表示参数值(直接给)
    ref   也是给参数赋值,值是引用容器中的另外的对象。
    name  对应构造函数的形参名称
    type  参数类型
-->

<!-- 调用Product有参构造函数 -->
<bean id="product" class="com.zz.entity.Product">
	<constructor-arg name="id" type="int" value="123"/>
    <constructor-arg name="name" type="String" ref="str"/>
</bean>
2. 调用set方法(property)
Product.class
// 提供set方法给对象属性赋值
public void setId(int id) {// id 表示属性
    this.id1=id;
}

public void setName(String name) {
    this.name = name;
}
applicationContext.xml
<!--2. 调用set方法给对象属性赋值-->
<!--
    property 给对象属性赋值
        name 相当于调用public void setName(String name)方法
		name是一个属性,即使setName 的 Name第一个字母小写
        value 传入set方法的值
        ref   值引用的是ioc容器中的其他的对象。
-->

<!-- 调用默认的无参构造函数 -->
<bean id="product" class="com.itheima.entity.Product">
    <property name="id" value="888"></property>
    <property name="name" ref="str"></property>
</bean>

<!--需求:创建一个字符串值是Jack  String str = new String(Jack);-->
<bean id="str" class="java.lang.String">
    <constructor-arg value="mike"></constructor-arg>
</bean>

补充:调用Set方法(P命名空间)
<bean id="product" class="com.zz.entity.Product" p:id="123" p:name-ref="str"/>
五、实例:集合属性赋值
public class Order {
    private String[] str;
    private List<String> list;
    private Map<String,String> map;
    private Set<String> set;
    private Properties prop;  省略get、set方法
}
<bean id="order" class="com.itheima.entity.Order">
    <!--给数组赋值-->
    <property name="str">
        <array>
            <value>cn</value>
            <value>usa</value>
        </array>
    </property>
    <!--list集合赋值-->
    <property name="list">
        <list>
            <value>cn</value>
            <value>china</value>
        </list>
    </property>
    <!--map赋值-->
    <property name="map">
        <map>
            <entry key="cn" value="China"></entry>
        </map>
    </property>
    <!--set集合赋值-->
    <property name="set">
        <set>
            <value>cn</value>
            <value>usa</value>
        </set>
    </property>
    <!--prop赋值-->
    <property name="prop">
        <props>
            <prop key="cn">China</prop>
            <prop key="usa">America</prop>
        </props>
    </property>
</bean>
六、Dao层、Service层 解耦
- 创建dao层对象,创建service层对象
- dao层对象注入service层中dao层对象
- 创建容器,getBean获取service对象,调用重写方法
七、SpringCURD Project
1. 创建表 account
drop table if exists `account`;
create table `account` (
    id int not null primary key auto_increment,
		uid int not null,
		money double
) Engine = InnoDB auto_increment = 1 Default charset = utf8;

INSERT account(uid,money) VALUES(12,1000);
2. 编写实体类
3. 编写dao层和dao层实现代码
AccountDaoImpl.class
private JdbcTemplate jdbcTemplate;
// 注入jdbcTemplate对象
public void setJdbcTemplate(JdbcTemplate jdbcTemplate) {
    this.jdbcTemplate = jdbcTemplate;
}
4. 编写service层和service层实现代码
AccountServiceImpl.class
 //注入dao
private IAccountDao accountDao;
public void setAccountDao(IAccountDao accountDao) {
    this.accountDao = accountDao;
}
5. ApplicationContext.xml配置文件
<!--0.加载外部的配置文件-->
<context:property-placeholder location="classpath:jdbc.properties"/>

<!--1.创建连接池-->
<bean id="dataSource" class="com.alibaba.druid.pool.DruidDataSource">
    <property name="driverClassName" value="${jdbc.driver}"/>
    <property name="url" value="${jdbc.url}"/>
    <property name="username" value="${jdbc.username}"/>
    <property name="password" value="${jdbc.password}"/>
</bean>

<!--2.创建JdbcTemplate,注入连接池-->
<bean id="jdbcTemplate" class="org.springframework.jdbc.core.JdbcTemplate">
    <property name="dataSource" ref="dataSource"/>
</bean>

<!--3.创建dao,注入JdbcTemplate-->
<bean id="accountDao" class="com.itheima.dao.impl.AccountDaoImpl">
    <property name="jdbcTemplate" ref="jdbcTemplate"/>
</bean>

<!--4.创建service,注入dao-->
<bean id="accountService" class="com.itheima.service.impl.AccountServiceImpl">
    <property name="accountDao" ref="accountDao"/>
</bean>
6. 测试
@Test
public void find() {
	ApplicationContext ac = new ClassPathXmlApplicationContext("applicationContext.xml");
	AccountService accountService = (AccountService) ac.getBean("accountService");
	System.out.println(accountService.findAll());
}

@Test
public void delete() {
	ApplicationContext ac = new ClassPathXmlApplicationContext("applicationContext.xml");
	AccountService accountService = (AccountService) ac.getBean("accountService");
	accountService.delete(7);
}


 2148
2148

 被折叠的 条评论
为什么被折叠?
被折叠的 条评论
为什么被折叠?
 到【灌水乐园】发言


