


 本文介绍了如何使用Dubbo框架实现服务提供者、服务消费者以及监控中心的部署与测试流程。包括服务提供者jar生成、部署服务容器、服务部署、服务消费者代码编写与测试等步骤,以及通过Zookeeper实现服务注册中心的替换。最后,文章还演示了添加监控中心以实时监控服务状态的方法。
------------------------------------------------------------通过广播---------------------------------------------
部署开发,需要三部分:服务提供者、服务容器、服务消费者
本人用 eclipse 开发
1、服务提供者jar生成
A、项目截图

B、源码:
|
1
2
3
4
5
|
package
com.alibaba.dubbo.demo;
public
interface
DemoService {
String sayHello(String name);
}
|
|
1
2
3
4
5
6
7
8
9
|
package
com.alibaba.dubbo.demo.provider;
import
com.alibaba.dubbo.demo.DemoService;
public
class
DemoServiceImpl
implements
DemoService{
public
String sayHello(String name) {
return
"Hello "
+ name;
}
}
|
provider.xml
|
1
2
3
4
5
6
7
8
9
10
11
12
13
14
15
16
17
18
19
20
21
22
23
24
25
|
<?
xml
version
=
"1.0"
encoding
=
"UTF-8"
?>
<
beans
xmlns
=
"http://www.springframework.org/schema/beans"
xmlns:xsi
=
"http://www.w3.org/2001/XMLSchema-instance"
xmlns:dubbo
=
"http://code.alibabatech.com/schema/dubbo"
xsi:schemaLocation="http://www.springframework.org/schema/beans
http://www.springframework.org/schema/beans/spring-beans.xsd
http://code.alibabatech.com/schema/dubbo
http://code.alibabatech.com/schema/dubbo/dubbo.xsd">
<!-- 提供方应用信息,用于计算依赖关系 -->
<
dubbo:application
name
=
"hello-world-app"
/>
<!-- 使用multicast广播注册中心暴露服务地址 -->
<
dubbo:registry
address
=
"multicast://224.5.6.7:1234"
/>
<!-- 用dubbo协议在20880端口暴露服务 -->
<
dubbo:protocol
name
=
"dubbo"
port
=
"20880"
/>
<!-- 声明需要暴露的服务接口 -->
<
dubbo:service
interface
=
"com.alibaba.dubbo.demo.DemoService"
ref
=
"demoService"
/>
<!-- 和本地bean一样实现服务 -->
<
bean
id
=
"demoService"
class
=
"com.alibaba.dubbo.demo.provider.DemoServiceImpl"
/>
</
beans
>
|
C、生成jar包
右键项目名称->export->java ->jar file - > 点击下一步
按下图所示,进行选择
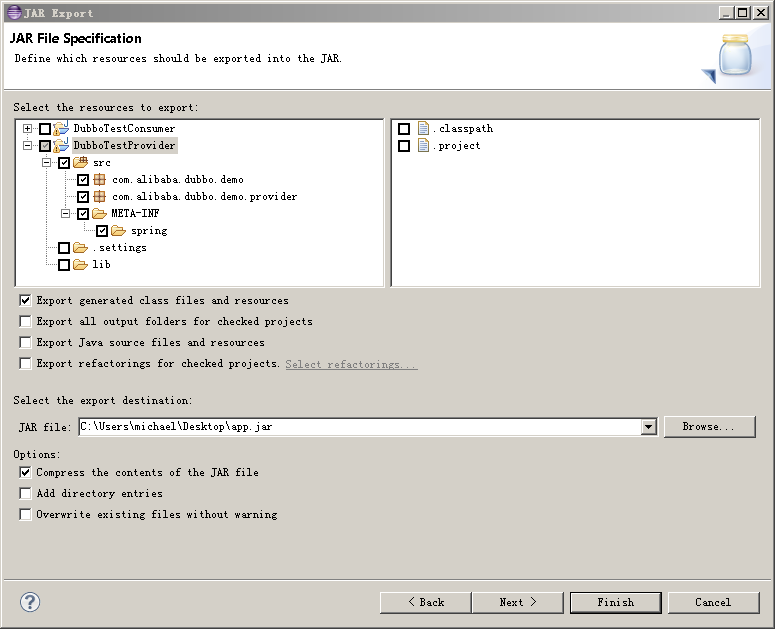
点击finish,jar包导出到路径:C:\Users\michael\Desktop\app.jar
注:jar包叫什么名字,没任何关系
2、部署服务容器:
下载
dubbo-demo-provider-2.5.4-SNAPSHOT-assembly.tar.gz
下载页面
http://alibaba.github.io/dubbo-doc-static/Download-zh.htm
注:可能下载不下来,我是从dubbo的QQ群里下载下来的
解压缩后,容器部署完成
3、部署服务
第2步中解压缩的目录,将第2步中的jar包,放入到 dubbo-demo-provider-2.5.4-SNAPSHOT\conf或者dubbo-demo-provider-2.5.4-SNAPSHOT\lib目录下
进入demo-provider-2.5.4-SNAPSHOT\bin
注:修改bin\start.bat文件,classpath中加入:..\conf\app.jar
双击:start.bat
服务正式启动
4、在eclipse中写消费者程序测试部署的服务
A、项目分布

B、源码
|
1
2
3
4
5
6
7
8
9
10
11
12
13
14
15
16
17
18
19
20
|
import
org.springframework.context.support.ClassPathXmlApplicationContext;
import
com.alibaba.dubbo.demo.DemoService;
public
class
Consumer {
/**
* @param args
*/
public
static
void
main(String[] args) {
ClassPathXmlApplicationContext context =
new
ClassPathXmlApplicationContext(
new
String[] {
"classpath:consumer.xml"
});
context.start();
DemoService demoService = (DemoService) context.getBean(
"demoService"
);
// 获取远程服务代理
String hello = demoService.sayHello(
"world"
);
// 执行远程方法
System.out.println(hello);
// 显示调用结果
}
}
|
|
1
2
3
4
5
|
package
com.alibaba.dubbo.demo;
public
interface
DemoService {
String sayHello(String name);
}
|
consumer.xml
|
1
2
3
4
5
6
7
8
9
10
11
12
13
14
15
16
17
18
19
|
<?
xml
version
=
"1.0"
encoding
=
"UTF-8"
?>
<
beans
xmlns
=
"http://www.springframework.org/schema/beans"
xmlns:xsi
=
"http://www.w3.org/2001/XMLSchema-instance"
xmlns:dubbo
=
"http://code.alibabatech.com/schema/dubbo"
xsi:schemaLocation="http://www.springframework.org/schema/beans
http://www.springframework.org/schema/beans/spring-beans.xsd
http://code.alibabatech.com/schema/dubbo
http://code.alibabatech.com/schema/dubbo/dubbo.xsd">
<!-- 消费方应用名,用于计算依赖关系,不是匹配条件,不要与提供方一样 -->
<
dubbo:application
name
=
"consumer-of-helloworld-app"
/>
<!-- 使用multicast广播注册中心暴露发现服务地址 -->
<
dubbo:registry
address
=
"multicast://224.5.6.7:1234"
/>
<!-- 生成远程服务代理,可以和本地bean一样使用demoService -->
<
dubbo:reference
id
=
"demoService"
interface
=
"com.alibaba.dubbo.demo.DemoService"
/>
</
beans
>
|
C、启动
Consumer类中的main方法
D、OK,完事
---------------------------------------通过zookeeper------------------------------------
1、下载 Zookeeper
下载页面地址:
http://www.apache.org/dist/zookeeper/zookeeper-3.4.6/
注:下面步骤,windows和linux下几乎没什么太大区别
2、解压缩后进入
C:\zookeeper-3.4.6
目录结构如下图

3、进入conf目录
备份zoo_sample.cfg文件,然后将zoo_sample.cfg 更名为zoo.cfg
4、编辑zoo.cfg为以下内容,(其中data目录需改成你真实输出目录)
注:本人此次实验为单机版的zookeeper注册中心,多机版会有很大不同
tickTime=2000
initLimit=10
syncLimit=5
dataDir=/home/dubbo/zookeeper-3.3.3/data
clientPort=2181
5、启动zookeeper
windows双击:bin目录下zkServer.cmd文件
linux下,在bin目录执行zkServer.sh命令
6、telnet 127.0.0.1 2181
OK,zookeeper 启动成功
7、需要修改
服务提供者配置文件
provider.xml
和
服务消费者配置文件
provider.xml
中的
|
1
2
|
<!-- 使用multicast广播注册中心暴露服务地址 -->
<
dubbo:registry
address
=
"multicast://224.5.6.7:1234"
/>
|
修改为
|
1
2
|
<!-- 使用zookeeper注册中心暴露发现服务地址 -->
<
dubbo:registry
address
=
"zookeeper://127.0.0.1:2181"
/>
|
8、eclipse下测试用的DubboTestConsumer项目,需要新加入三个jar包
zkclient-0.1.jar
zookeeper-3.3.3.jar
log4j-1.2.16.jar
9、修改DUBBO_HOME/conf/dubbo.properties为以下内容
|
1
2
3
4
5
6
7
8
9
10
11
12
13
|
dubbo.container=log4j,spring
dubbo.application.name=hello-world-app
dubbo.application.owner=
#dubbo.registry.address=multicast://224.5.6.7:1234
dubbo.registry.address=zookeeper://127.0.0.1:2181
#dubbo.registry.address=redis://127.0.0.1:6379
#dubbo.registry.address=dubbo://127.0.0.1:9090
dubbo.monitor.protocol=registry
dubbo.protocol.name=dubbo
dubbo.protocol.port=20880
dubbo.service.loadbalance=roundrobin
dubbo.log4j.file=logs/dubbo-demo-provider.log
dubbo.log4j.level=WARN
|
10、启动zookeeper
11、启动dubbo provider
12、运行eclipse下的DubboTestConsumer项目
一切OK,心情不错的一天
----------------------------------------------------------------添加监控中心-----------------------------------
紧接上一篇,继续我的dubbo的学习之旅
1、下载监控中心dubbo服务安装包
下载地址:
注:此地址,可能下载不了,我是群共享文件里,下载的
2、解压缩后,编辑conf/dubbo.properties
内容如下:
|
1
2
3
4
5
6
7
8
9
10
11
12
13
14
|
dubbo.container=log4j,spring,registry,jetty
dubbo.application.name=simple-monitor
dubbo.application.owner=
#dubbo.registry.address=multicast://224.5.6.7:1234
dubbo.registry.address=zookeeper://127.0.0.1:2181
#dubbo.registry.address=redis://127.0.0.1:6379
#dubbo.registry.address=dubbo://127.0.0.1:9090
dubbo.protocol.port=7070
dubbo.jetty.port=8080
dubbo.jetty.directory=${user.home}/monitor
dubbo.charts.directory=${dubbo.jetty.directory}/charts
dubbo.statistics.directory=${user.home}/monitor/statistics
dubbo.log4j.file=logs/dubbo-monitor-simple.log
dubbo.log4j.level=WARN
|
3、进入bin目录,双击:start.bat 命令,启动监控服务
4、访问监控服务地址:http://127.0.0.1:8080/
如下图:
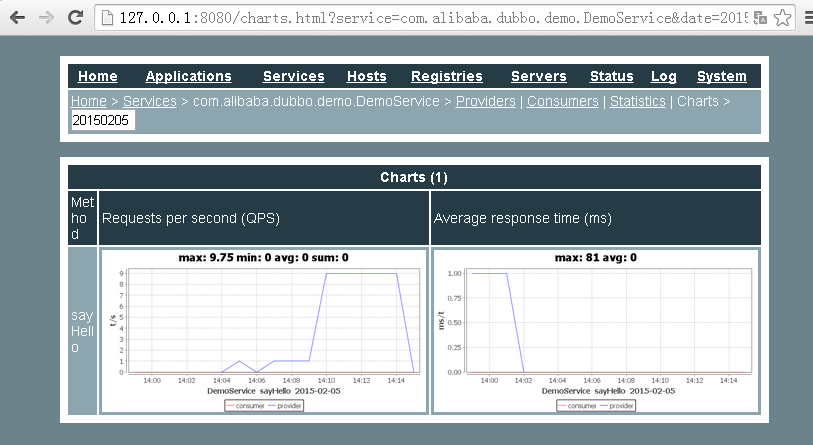
5、一切OK,今天的任务,貌似很简单
-------------------------------------------------------------------------------------例子-------------------------------------开始,先说一句,还是用maven的好
1、由于没用maven,和对dubbo不是很了解的原因,这次,总因为jar包不对,而导致:dubbo客户端程序,启动不起来
所以决定:将原来用过的所有jar包全部去,将dubbo-demo-provider-2.5.4-SNAPSHOT/lib下的所有jar包全部导入项目中
一切就OK了
2、服务消费者代码
|
1
2
3
4
5
6
7
8
9
10
11
12
13
14
15
16
17
18
19
20
21
22
23
24
25
26
27
28
29
30
31
32
33
34
35
36
37
38
39
40
41
42
43
44
45
46
47
48
49
50
51
|
import
java.util.Set;
import
javax.validation.ConstraintViolation;
import
javax.validation.ConstraintViolationException;
import
org.springframework.context.support.ClassPathXmlApplicationContext;
import
com.alibaba.dubbo.demo.ValidationParameter;
import
com.alibaba.dubbo.demo.ValidationService;
import
com.alibaba.dubbo.rpc.RpcException;
public
class
Consumer {
/**
* @param args
* @throws Exception
*/
public
static
void
main(String[] args)
throws
Exception {
ClassPathXmlApplicationContext context =
new
ClassPathXmlApplicationContext(
new
String[] {
"classpath:consumer.xml"
});
context.start();
// DemoService demoService = (DemoService)
// context.getBean("demoService");
// while (true) {
// String hello = demoService.sayHello("world");
// System.out.println(hello);
//
// Thread.sleep(100);
// }
ValidationService validationService = (ValidationService) context.getBean(
"validationService"
);
while
(
true
) {
ValidationParameter parameter =
new
ValidationParameter();
parameter.setAge(
2
);
parameter.setEmail(
"han@qq.com"
);
try
{
String result = validationService.intsert(parameter);
System.out.println(result);
}
catch
(RpcException e) {
// 抛出的是RpcException
ConstraintViolationException ve = (ConstraintViolationException) e.getCause();
// 里面嵌了一个ConstraintViolationException
Set<ConstraintViolation<?>> violations = ve.getConstraintViolations();
// 可以拿到一个验证错误详细信息的集合
System.out.println(violations);
}
}
}
}
|
3、服务消费者配置文件
|
1
2
3
4
5
6
7
8
9
10
11
12
13
14
15
16
17
18
19
20
21
22
23
24
25
26
|
<?
xml
version
=
"1.0"
encoding
=
"UTF-8"
?>
<
beans
xmlns
=
"http://www.springframework.org/schema/beans"
xmlns:xsi
=
"http://www.w3.org/2001/XMLSchema-instance"
xmlns:dubbo
=
"http://code.alibabatech.com/schema/dubbo"
xsi:schemaLocation="http://www.springframework.org/schema/beans
http://www.springframework.org/schema/beans/spring-beans.xsd
http://code.alibabatech.com/schema/dubbo
http://code.alibabatech.com/schema/dubbo/dubbo.xsd">
<!-- 消费方应用名,用于计算依赖关系,不是匹配条件,不要与提供方一样 -->
<
dubbo:application
name
=
"consumer-of-helloworld-app"
/>
<!-- 使用zookeeper注册中心暴露发现服务地址 -->
<
dubbo:registry
address
=
"zookeeper://127.0.0.1:2181"
/>
<!-- 生成远程服务代理,可以和本地bean一样使用demoService -->
<
dubbo:reference
id
=
"demoService"
interface
=
"com.alibaba.dubbo.demo.DemoService"
retries
=
"2"
/>
<!-- 生成远程服务代理,可以和本地bean一样使用demoService -->
<
dubbo:reference
id
=
"validationService"
interface
=
"com.alibaba.dubbo.demo.ValidationService"
retries
=
"2"
validation
=
"true"
/>
</
beans
>
|
注:重点关注一下,带有下面信息的那一行,就OK了,此处表明,是在客户端侧进行参数验证
|
1
|
validation=
"true"
|
4、服务提供者配置文件
|
1
2
3
4
5
6
7
8
9
10
11
12
13
14
15
16
17
18
19
20
21
22
23
24
25
26
27
28
29
30
31
|
<?
xml
version
=
"1.0"
encoding
=
"UTF-8"
?>
<
beans
xmlns
=
"http://www.springframework.org/schema/beans"
xmlns:xsi
=
"http://www.w3.org/2001/XMLSchema-instance"
xmlns:dubbo
=
"http://code.alibabatech.com/schema/dubbo"
xsi:schemaLocation="http://www.springframework.org/schema/beans
http://www.springframework.org/schema/beans/spring-beans.xsd
http://code.alibabatech.com/schema/dubbo
http://code.alibabatech.com/schema/dubbo/dubbo.xsd">
<!-- 提供方应用信息,用于计算依赖关系 -->
<
dubbo:application
name
=
"hello-world"
/>
<!-- 使用zookeeper注册中心暴露发现服务地址 -->
<
dubbo:registry
address
=
"zookeeper://127.0.0.1:2181"
/>
<!-- 用dubbo协议在20880端口暴露服务 -->
<
dubbo:protocol
name
=
"dubbo"
port
=
"20880"
/>
<!-- 声明需要暴露的服务接口 -->
<
dubbo:service
interface
=
"com.alibaba.dubbo.demo.DemoService"
ref
=
"demoService"
/>
<!-- 和本地bean一样实现服务 -->
<
bean
id
=
"demoService"
class
=
"com.alibaba.dubbo.demo.provider.DemoServiceImpl"
/>
<!-- 声明需要暴露的服务接口 -->
<
dubbo:service
interface
=
"com.alibaba.dubbo.demo.ValidationService"
ref
=
"validationService"
/>
<!-- 和本地bean一样实现服务 -->
<
bean
id
=
"validationService"
class
=
"com.alibaba.dubbo.demo.provider.ValidationServiceImpl"
/>
</
beans
>
|
5、服务消费者和提供者共用的类和接口
|
1
2
3
4
5
6
7
8
|
package
com.alibaba.dubbo.demo;
public
interface
ValidationService {
@interface
Intsert {
}
String intsert(ValidationParameter parameter);
}
|
|
1
2
3
4
5
6
7
8
9
10
11
12
13
14
15
16
17
18
19
20
21
22
23
24
25
26
27
28
29
30
31
32
33
34
35
36
37
|
package
com.alibaba.dubbo.demo;
import
java.io.Serializable;
import
javax.validation.constraints.Max;
import
javax.validation.constraints.Min;
import
javax.validation.constraints.Pattern;
public
class
ValidationParameter
implements
Serializable {
private
static
final
long
serialVersionUID = 3469571402386167794L;
@Pattern
(regexp =
"^\\s*\\w+(?:\\.{0,1}[\\w-]+)*@[a-zA-Z0-9]+(?:[-.][a-zA-Z0-9]+)*\\.[a-zA-Z]+\\s*$"
)
private
String email;
@Min
(
18
)
// 最小值
@Max
(
100
)
// 最大值
private
int
age;
public
String getEmail() {
return
email;
}
public
void
setEmail(String email) {
this
.email = email;
}
public
int
getAge() {
return
age;
}
public
void
setAge(
int
age) {
this
.age = age;
}
}
|
6、服务提供者接口实现类
|
1
2
3
4
5
6
7
8
9
10
11
|
package
com.alibaba.dubbo.demo.provider;
import
com.alibaba.dubbo.demo.ValidationParameter;
import
com.alibaba.dubbo.demo.ValidationService;
public
class
ValidationServiceImpl
implements
ValidationService {
@Override
public
String intsert(ValidationParameter parameter) {
return
parameter.getEmail() +
"=="
+ parameter.getAge();
}
}
|
7、运行客户端程序时,控制台会输出以下信息:
|
1
|
[ConstraintViolationImpl{interpolatedMessage=
'最小不能小于18'
, propertyPath=age, rootBeanClass=
class
com.alibaba.dubbo.demo.ValidationParameter, messageTemplate=
'{javax.validation.constraints.Min.message}'
}]
|
8、OK,此时已经可以验证,参数验证已经开始起作用了。


 1899
1899

 被折叠的 条评论
为什么被折叠?
被折叠的 条评论
为什么被折叠?
 到【灌水乐园】发言


