


Android中一般自定义控件可以分为两种:继承控件及组合控件。
自定义步骤:
1.加载xml文件是在构造方法中完成的,通过调用inflate(R.layout.my_layout,this,true),注意第二个和第三个参数;
2.如果需要从资源文件中加载自定义的属性,则必须重写Constructor(Context context, AttributeSet attrs)此构造方法,属性是定义在attrs.xml中的;
3.获取子控件对象,可以在构造方法中获取,也可以重写onFinishInflate()方法来获取,个人建议采用第二种,可以保证控件已经完全加载好了;
4.添加事件可以直接在控件中写,不过考虑到扩展性及复用性,建议对外暴露接口。
自定义要点:在某个XML布局中你想要使用某个定义的属性样式的话是需要引入命名空间的,也就是在布局的根布局添加这一句
xmlns:属性样式名="http://schemas.android.com/apk/res/项目包名"
或者
添加相对路径 xmlns:app="http://schemas.android.com/apk/res-auto"
定义一个属性样式还是比较简单的
比如我写了一个水波百分比控件球形水波百分比控件,我定义了一个属性样式
- 1
- 2
- 3
- 4
- 5
- 6
- 7
- 1
- 2
- 3
- 4
- 5
- 6
- 7
这个属性样式写在res/values/attrs.xml文件里,以 <declare-styleable name="样式名">开头,以</declare-styleable>结尾,可以定义多个样式。
然后布局设置属性样式对应的值
- 1
- 2
- 3
- 4
- 5
- 6
- 7
- 8
- 9
- 1
- 2
- 3
- 4
- 5
- 6
- 7
- 8
- 9
在as里键入app然后按Alt+Enter快捷键就会显示提示信息。这里是因为我命名空间引用的是第二种相对路径的方式
- 1
- 1
如果是第一种方式的话,前缀就要改成属性名,比如命名空间这样写
- 1
- 1
布局里设置就要这样写
- 1
- 2
- 3
- 4
- 5
- 6
- 7
- 8
- 9
- 1
- 2
- 3
- 4
- 5
- 6
- 7
- 8
- 9
与之对应就可以
既然是叫属性样式,那么值肯定是属性,自然有单位格式,我想大家也已经猜到了怎么定义单位格式,使用format指定,name指定属性名。
- 1
- 1
有如下几种单位格式
- 1
- 2
- 3
- 4
- 5
- 6
- 7
- 8
- 9
- 10
- 1
- 2
- 3
- 4
- 5
- 6
- 7
- 8
- 9
- 10
然后在我们自定义view初始化的时候去调用TypedArray类去获取我们定义的属性值
- 1
- 2
- 3
- 4
- 5
- 6
- 7
- 8
- 9
- 10
- 1
- 2
- 3
- 4
- 5
- 6
- 7
- 8
- 9
- 10
这里要注意的是attrs值不能为null,也就是new的时候不要调用 public WaveView(Context context, AttributeSet attrs) {}这个构造方法,只有我们从布局文件中解析出来的控件类才应该走这个有AttributeSet attrs这个参数的构造方法
这里要记得一定要调用这一句a.recycle();否则下次再用到TypedArray这个类的时候会出错。
示例代码(代码比较简单,只是描述一下思路)
自定义控件layout:header.xml

<?xml version="1.0" encoding="utf-8"?>
<RelativeLayout xmlns:android="http://schemas.android.com/apk/res/android"
    android:layout_width="match_parent"
    android:layout_height="wrap_content">
    <ImageButton android:id="@+id/ib_header"
        android:layout_width="wrap_content"
        android:layout_height="wrap_content"
        android:layout_alignParentRight="true"
        android:layout_centerVertical="true"
        android:src="@android:drawable/ic_menu_zoom" />
    <TextView android:id="@+id/tv_header"
        android:layout_width="wrap_content"
        android:layout_height="wrap_content"
        android:layout_centerInParent="true" />

</RelativeLayout>
自定义控件类:Header.java
package com.ivan.app1.widgets;

import com.ivan.app1.R;

import android.content.Context;
import android.content.res.TypedArray;
import android.graphics.Color;
import android.text.TextUtils;
import android.util.AttributeSet;
import android.view.LayoutInflater;
import android.widget.ImageButton;
import android.widget.LinearLayout;
import android.widget.TextView;

/**
 * 自定义标题栏组合控件,内部包含一个TextView和一个ImageButton
 * User: xyh
 * Date: 2015/6/2
 * Time: 9:39
 */
public class Header extends RelativeLayout {

    private TextView mTextView;
    private ImageButton mImageButton;

    private String titleText;
    private int titleTextColor;
    private float titleTextSize;

    public Header(Context context) {
        super(context);
    }

    public Header(Context context, AttributeSet attrs) {
        super(context, attrs);

        //加载视图的布局
        LayoutInflater.from(context).inflate(R.layout.header,this,true);

        //加载自定义的属性
        TypedArray a=context.obtainStyledAttributes(attrs,R.styleable.Header);
        titleText=a.getString(R.styleable.Header_titleText);
        titleTextColor=a.getColor(R.styleable.Header_titleTextColor, Color.WHITE);
        titleTextSize=a.getDimension(R.styleable.Header_titleTextSize,20f);

        //回收资源,这一句必须调用
        a.recycle();
    }

    /**
     * 此方法会在所有的控件都从xml文件中加载完成后调用
     */
    @Override
    protected void onFinishInflate() {
        super.onFinishInflate();

        //获取子控件
        mTextView= (TextView) findViewById(R.id.tv_header);
        mImageButton= (ImageButton) findViewById(R.id.ib_header);

        //将从资源文件中加载的属性设置给子控件
        if (!TextUtils.isEmpty(titleText))
            setPageTitleText(titleText);
        setPageTitleTextColor(titleTextColor);
        setPageTitleTextSize(titleTextSize);

    }

    /**
     * 设置标题文字
     * @param text
     */
    public void setPageTitleText(String text) {
        mTextView.setText(text);
    }

    /**
     * 设置标题文字颜色
     * @param color
     */
    public void setPageTitleTextColor(int color) {
        mTextView.setTextColor(color);
    }

    /**
     * 设置标题文字大小
     * @param size
     */
    public void setPageTitleTextSize(float size) {
        mTextView.setTextSize(size);
    }

    /**
     * 设置按钮点击事件监听器
     * @param listener
     */
    public void setOnHeaderClickListener(OnClickListener listener) {
        mImageButton.setOnClickListener(listener);
    }
}
自定义属性文件:attrs.xml
<?xml version="1.0" encoding="utf-8"?>
<resources>
    <!-- 自定义的属性-->
    <declare-styleable name="Header">
        <attr name="titleTextSize" format="dimension" />
        <attr name="titleTextColor" format="color" />
        <attr name="titleText" format="string"/>
    </declare-styleable>
</resources>
以下是引用方式,activity布局文件:main.xml
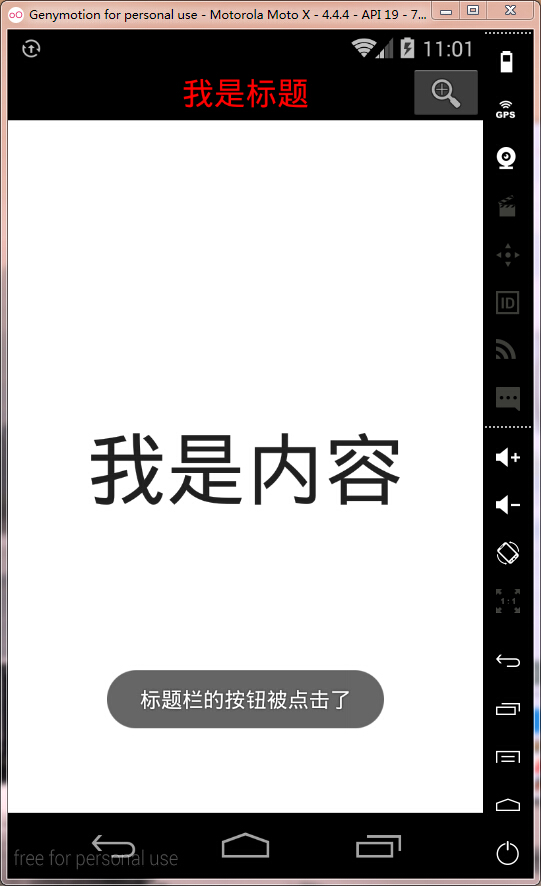
<?xml version="1.0" encoding="utf-8"?>
<LinearLayout xmlns:android="http://schemas.android.com/apk/res/android"
    xmlns:app="http://schemas.android.com/apk/res-auto"
    android:orientation="vertical"
    android:layout_width="match_parent"
    android:layout_height="match_parent">

    <!-- 注意需要加上命名空间 在eclipse开发工具中:使用 xmlns:app="http://schemas.android.com/apk/res/com.ivan.app1.widgets"
         在IntelliJ Idea或者Android Studio中以Gradle构建时,使用 xmlns:app="http://schemas.android.com/apk/res-auto"
    -->

    <!-- 通过包的类的全名来引用自定义视图-->
    <com.ivan.app1.widgets.Header
        android:id="@+id/header"
        android:layout_width="match_parent"
        android:layout_height="48dp"
        android:background="@color/black"
        app:titleText="我是标题"
        app:titleTextColor="#ff0000"
        app:titleTextSize="12sp"/>

    <TextView android:layout_width="match_parent"
        android:layout_height="match_parent"
        android:gravity="center"
        android:text="我是内容"
        android:textSize="60sp"/>
</LinearLayout>
主Activity类:MainActivity.java
package com.ivan.app1;

import com.ivan.app1.widgets.Header;

import android.os.Bundle;
import android.support.v7.app.AppCompatActivity;
import android.view.View;
import android.widget.Toast;

/**
 * User: xyh
 * Date: 2015/6/2
 * Time: 10:30
 */
public class MainActivity extends AppCompatActivity {

    @Override
    public void onCreate(Bundle savedInstanceState) {
        super.onCreate(savedInstanceState);
        setContentView(R.layout.main);

        ((Header)findViewById(R.id.header)).setOnHeaderClickListener(new View.OnClickListener() {
            @Override
            public void onClick(View v) {
                Toast.makeText(getApplicationContext(),"标题栏的按钮被点击了",Toast.LENGTH_LONG).show();
            }
        });
    }
}
运行结果:


 837
837

 被折叠的 条评论
为什么被折叠?
被折叠的 条评论
为什么被折叠?
 到【灌水乐园】发言


