


一、配置代理
前端所使用的发送和接收请求的技术:
- xhr:俗称"小黄人",全称是 “XMLHttpRequest”
- jQuery:通过 $get 和 $post 来进行发送请求
- Axios:基于 promise 的网络请求库(推荐)
- fetch:下一代的 Ajax 技术,采用 Promise 方式处理数据
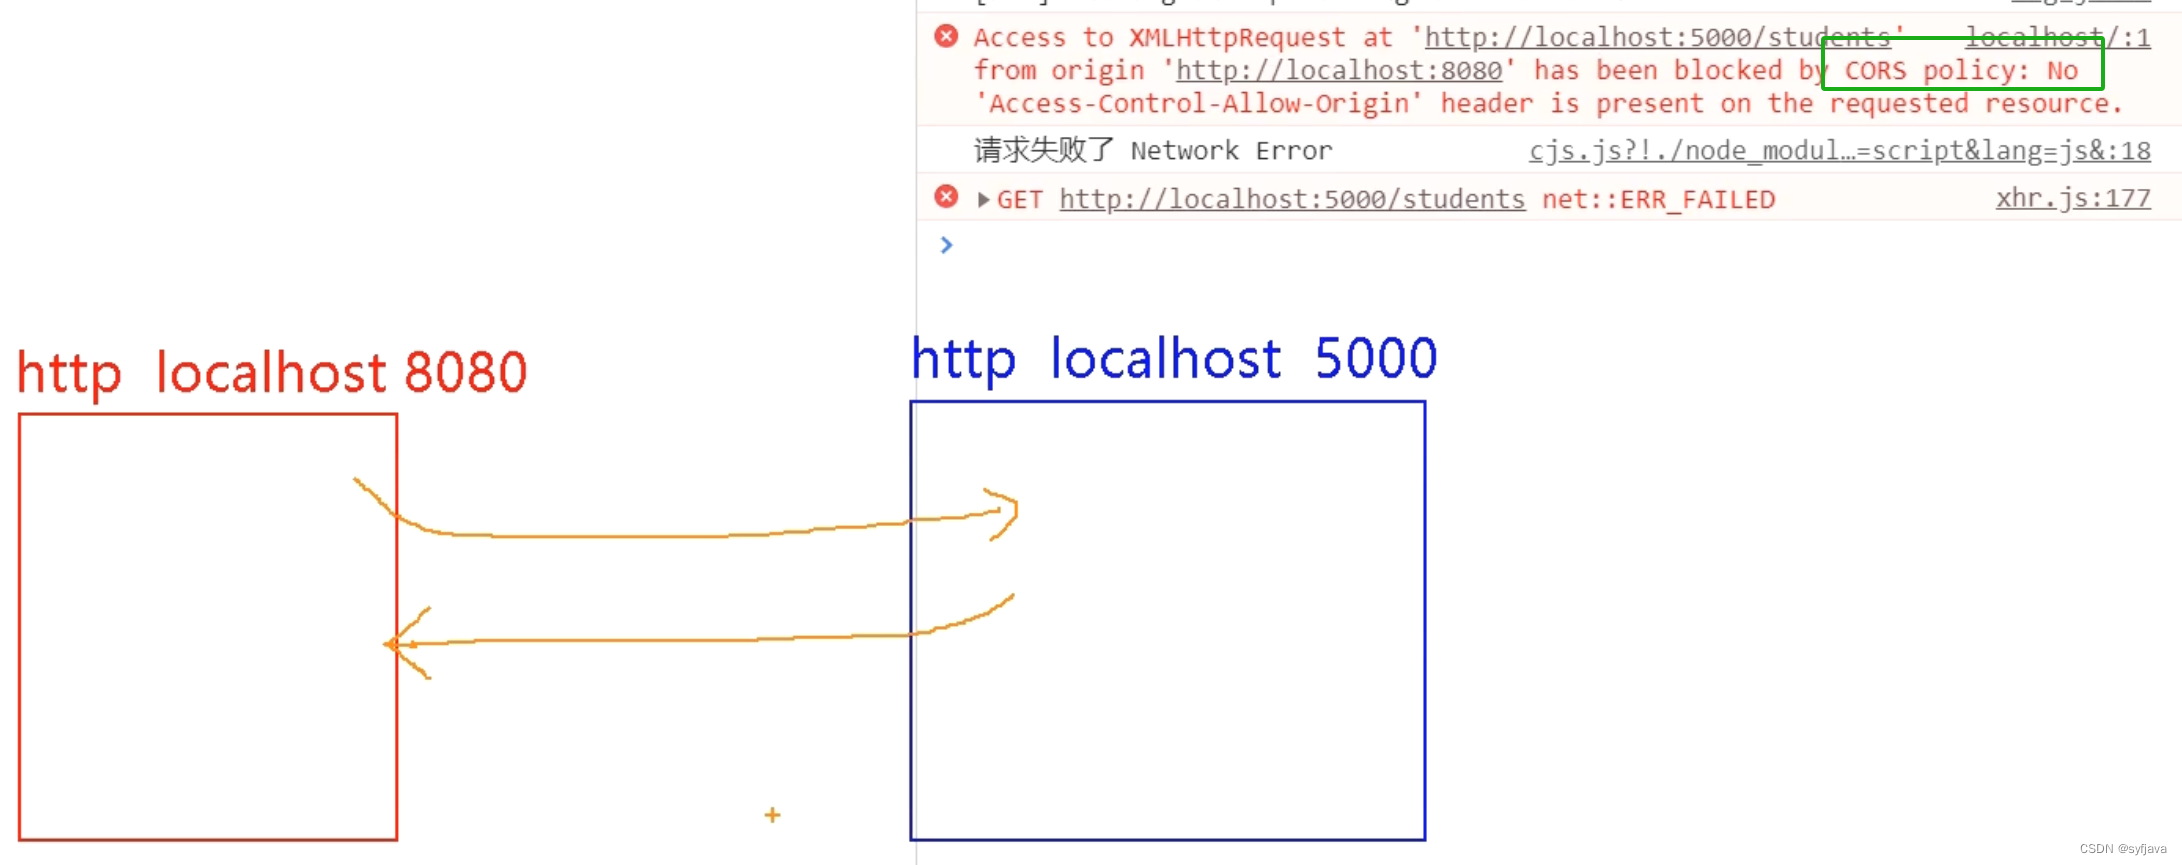
我们安装 axios 并且在 8080端口发送请求到 5000端口服务器,去哪数据会出现下面cros 问题
1- 代码如下:安装axios 并发送get请求
<template>
  <div id="root">
    <button @click="getStudents">获取学生信息</button>
  </div>

</template>

<script>
// 1- 安装 npm i axios 2-引入 axios
import axios from "axios";

export default {
  name: "App",
  methods: {
    getStudents() {
      axios.get("http://localhost:5000/students").then(
        (reponse) => {
          console.log("请求成功", reponse.data);
        },
        (error) => {
          console.log("请求失败", error.message);
        }
      );
    },
  },
};
</script>

<style>
</style>
2-出现跨域问题
跨域问题:即我们违背了 “同源” 原则,也就是以下三个需要保持一致:
- 协议名
- 主机名
- 端口号
解决跨域方法:
cors:在后端配置好(响应头)
jsonp:比较局限,需要前后端共同对接,并且只能处理 get 请求
配置代理服务器
- nginx
- vue-cli
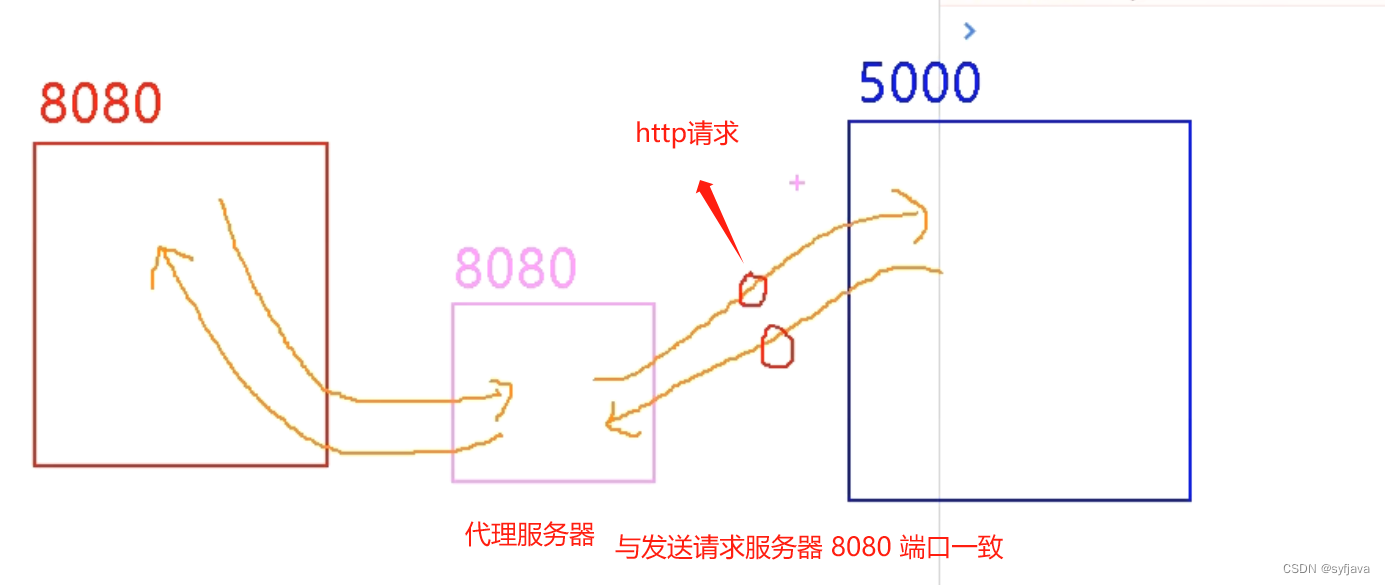
解决办法
1-方式一:
1.优点:配置简单,请求资源时直接发给前端(8080) 即可
2.缺点:不能配置多个代理,不能灵活的控制请求是否走代理
3.工作方式:若按照上述配置代理,当请求了前端不存在的资源时,那么该请求会转发给服务器(优先匹配前端资源)
开启代理,vue.config.js 中配置
const { defineConfig } = require('@vue/cli-service')
module.exports = defineConfig({
  transpileDependencies: true,
  lintOnSave: false,
  //开启代理
  devServer: {
    proxy: 'http://localhost:5000'
    // 该端口号与请求服务器的端口号一致
    // 注意:不是本地主机的端口号 8080,这里应该是 5000
}

})
修改请求端口为8080
getStudents() {
  axios.get('http://localhost:8080/students').then( reponse => {
    console.log('请求成功', reponse.data)
  },
  error => {
    console.log('请求失败', error.message)
  })
}
2-方式二
1.优点:可以配置多个代理,且可以灵活的控制请求是否走代理
2.缺点:配置略微繁琐,请求资源时必须加前缀
const { defineConfig } = require('@vue/cli-service')
module.exports = defineConfig({
  transpileDependencies: true,
  lintOnSave: false,
  //开启代理 方式一
  //   devServer: {
  //     proxy: 'http://localhost:5000'	 // 该端口号与请求服务器的端口号一致  // 注意:不是本地主机的端口号 8080,这里应该是 5000
  // }
  //方式二、
  devServer: {
    proxy: {
      // 设置api为前缀,表示只有以api为前缀的路由才进行配置代理服务器
      '/api': {
        target: 'http://localhost:5000',	// 代理路由的基础路径
        pathRewrite: { '^/api': '' }, // 这一步至关重要,将以api为前缀的请求路径的api置为空
        ws: true, // 用于支持wesocket,为默认值,可不加
        changeOrigin: true, // 用于控制请求头中的host值,添加之后,代理服务器对请求服务器响应的host为请求服务器的端口号,否则为代理服务器的端口号,默认值,可不加
      },
      '/demo': {
        target: 'http://localhost:5001',	// 代理路由的基础路径
        pathRewrite: { '^/demo': '' }, // 这一步至关重要,将以api为前缀的请求路径的api置为空
        ws: true, // 用于支持wesocket,为默认值,可不加
        changeOrigin: true, // 用于控制请求头中的host值,添加之后,代理服务器对请求服务器响应的host为请求服务器的端口号,否则为代理服务器的端口号,默认值,可不加
//changeOrigin设置为true时,服务器收到的请求头中的host为: localhost:5000changeOrigin设置为false时,服务器收到的请求头中的host为: localhost:8080changeOrigin默认值为true
      }
    }
  }
})
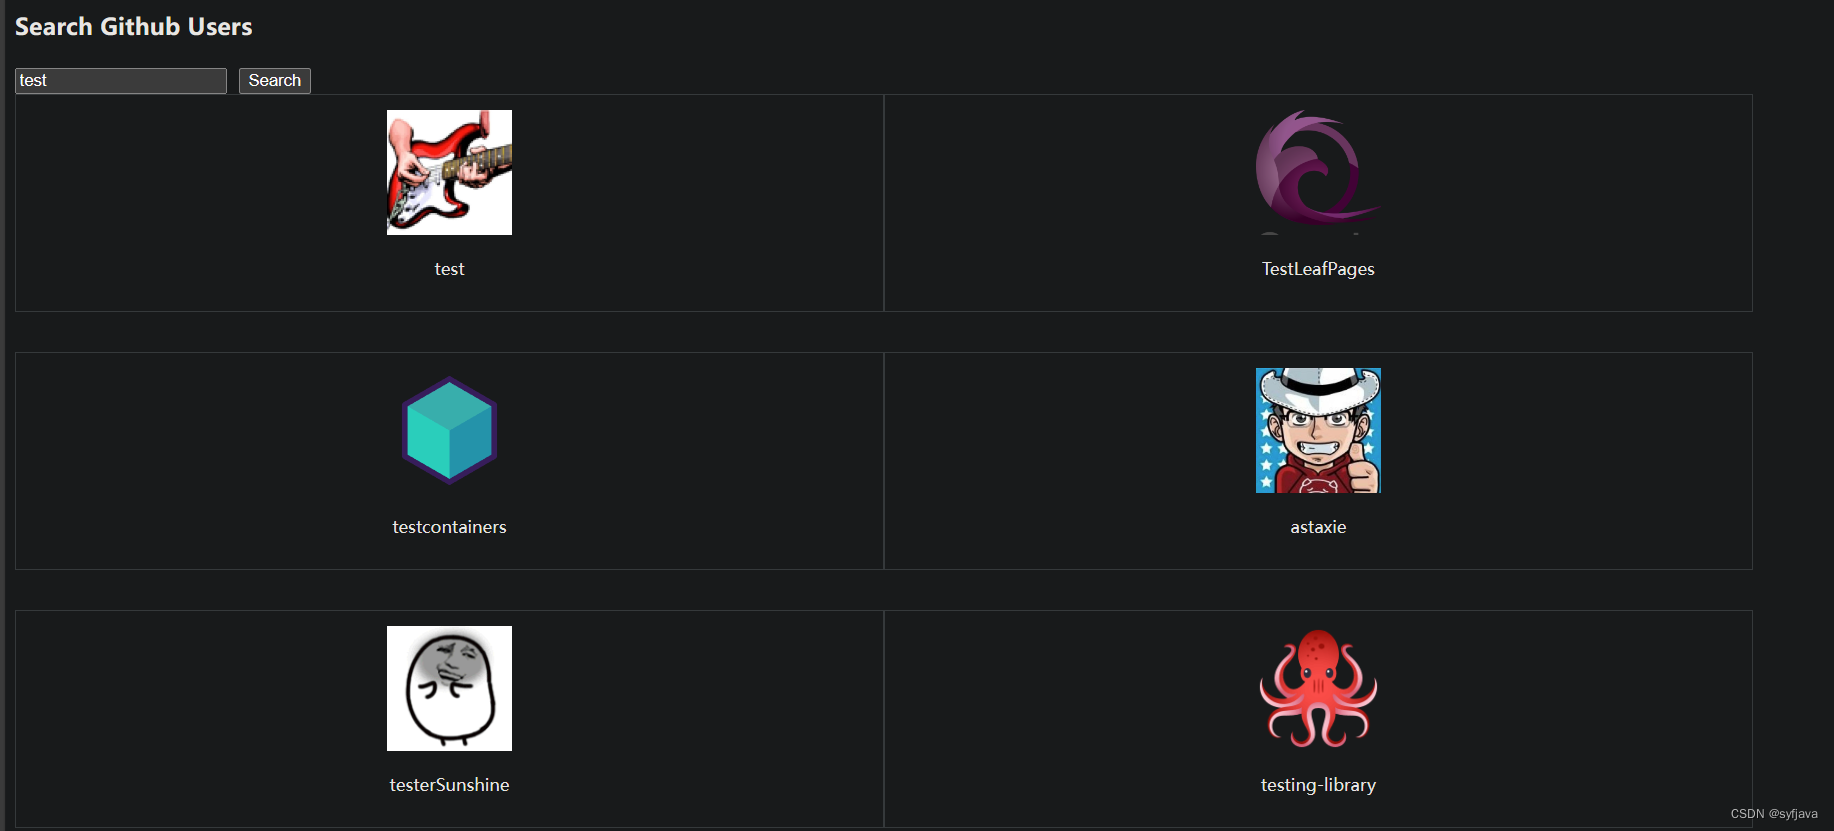
二、github查询案例
功能点击查询,拉去用户数据展示。
main.js 安装事件总线
/*
main.js是整个项目的入口文件
*/

//引入 Vue
import Vue from 'vue'
//引入App组件,他是所有文件的父组件
import App from './App.vue'
Vue.config.productionTip = false


//创建Vue实例,vm
new Vue({
  render: h => h(App),
  beforeCreate(){
    //1-安装全局事件总线
    Vue.prototype.$bus = this
  }
}).$mount('#app')
APP注入组件
<template>
    <div class="container">
      <Search></Search>
     <List></List>
    </div>
</template>

<script>
import Search from './components/Serach.vue';
import List from './components/List.vue';
export default {
  name: "App",
  components:{
    Search,
    List
  }
};
</script>

<style lang="css">

</style>
search组件,掉接口查询用户信息。通过事件总线发送userList给List组件展示。
<template>
<section class="jumbotron">
<h3 class="jumbotron-heading">Search Github Users</h3>
<div>
<input
type="text"
placeholder="enter the name you search"
v-model="keyWord"
/>
<button @click="searchUsers">Search</button>
</div>
</section>
</template>
<script>
import axios from 'axios'
export default {
name: "Search",
data() {
return {
keyWord: "",
};
},
methods: {
searchUsers() {
this.$bus.$emit("getUsers", {
isFirst: false,
isLoading: true,
users: [],
errMsg: "",
});
//模版字符串
axios.get(`https://api.github.com/search/users?q=${this.keyWord}`).then(
(response) => {
console.log("请求成功", response.data.items);
//3- $emit 触发自定义事件 getUsers
this.$bus.$emit("getUsers", {
isLoading: false,
users: response.data.items,
errMsg: "",
});
},
(error) => {
console.log("请求失败", error.message);
this.$bus.$emit("getUsers", {
isLoading: false,
users: [],
errMsg: "search failed",
});
}
);
},
},
};
</script>
<style>
</style>
List组件,绑定事件,接受emit 发送过来数据
<template>
  <div class="row">
    <!--5- 展示用户列表 -->
    <div
      v-show="info.users.length"
      class="card"
      v-for="p in info.users"
      :key="p.login"
    >

      <a :href="p.html_url" target="_blank">
        <img :src="p.avatar_url" style="width: 100px" />
      </a>
      <p class="card-text">{{ p.login }}</p>
    </div>
    <!-- 展示欢迎词 -->
    <h1 v-show="info.isFirst">欢迎使用</h1>
    <!-- 展示加载中 -->
    <h1 v-show="info.isLoading">加载中.......</h1>
    <!-- 展示错误信息 -->
    <h1 v-show="info.errMsg">{{ info.errMsg }}</h1>
  </div>
</template>

<script >
export default {
  name: "List",
  data() {
    return {
      info: {
        isFirst: true, // 是否展示欢迎语
        isLoading: false, // 是否显示正在加载中
        errMsg: "", // 错误信息
        users: [], // 用户列表
      },
    };
  },
  mounted() {
//3-绑定事件
    this.$bus.$on("getUsers", (dataObj) => {
      console.log("我是 List 组件,接受到数据:", dataObj);
      // 4- 使用扩展运算法来达到设置默认值的效果,当 dataObj 与 this.info 有同名的变量就会进行覆盖
      this.info = { ...this.info, ...dataObj };

    });
  },
  beforeDestroyed() {
    this.$bus.$off("getUsers");
  },
};
</script>

<style scoped>
.album {
  min-height: 50rem; /* Can be removed; just added for demo purposes */
  padding-top: 3rem;
  padding-bottom: 3rem;
  background-color: #f7f7f7;
}

.card {
  float: left;
  width: 33.333%;
  padding: 0.75rem;
  margin-bottom: 2rem;
  border: 1px solid #efefef;
  text-align: center;
}

.card > img {
  margin-bottom: 0.75rem;
  border-radius: 100px;
}

.card-text {
  font-size: 85%;
}
</style>
二、vue-resouce 插件库
这个库是 vue 1.0 官方使用的,之后交给了其他团队维护,首选还是axios。
1-先安装插件
npm install vue-resource
2- main.js中引入插件,
//1- 引入插件

import VueResource from 'vue-resource'


//2- 使用插件

Vue.use(VueResource)
3- 上面github搜索案例替换,this.$http.get()。
  methods: {
    searchUsers() {
      this.$bus.$emit("getUsers", {
        isFirst: false,
        isLoading: true,
        users: [],
        errMsg: "",
      });

      //模版字符串
      this.$http.get(`https://api.github.com/search/users?q=${this.keyWord}`).then(
        (response) => {
          console.log("请求成功", response.data.items);
          //3- $emit 触发自定义事件 getUsers
          this.$bus.$emit("getUsers", {
            isLoading: false,
            users: response.data.items,
            errMsg: "",
          });
        },
        (error) => {
          console.log("请求失败", error.message);
          this.$bus.$emit("getUsers", {
            isLoading: false,
            users: [],
            errMsg: "search failed",
          });
        }
      );
    },
  },
三、插槽
作用: 让父组件可以向子组件指定位置插入html结构,也是一种组件间通信的方式了适用于 父组件 ===> 子组件
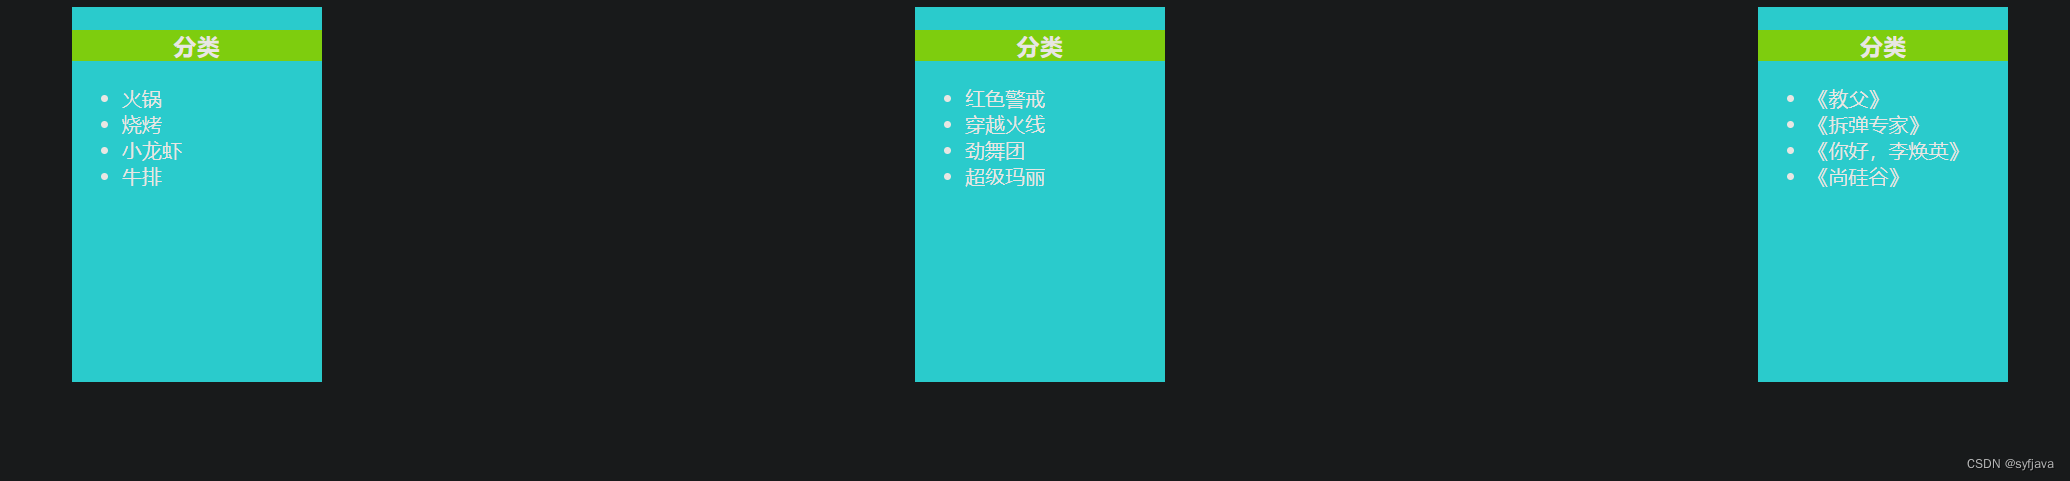
效果一:(组件遍历不同的分类)
APP组件
<template>
  <div class="container">
    <Category :title="美食" :listData="foods" ></Category>
    <Category :title="游戏" :listData="games"></Category>
    <Category :title="电影" :listData="films"></Category>
  </div>
</template>

<script>
import Category from "./components/Category.vue";

export default {
  name: "App",
  data() {
    return {
      foods: ["火锅", "烧烤", "小龙虾", "牛排"],
      games: ["红色警戒", "穿越火线", "劲舞团", "超级玛丽"],
      films: ["《教父》", "《拆弹专家》", "《你好,李焕英》", "《尚硅谷》"],
    };
  },
  components: {
    Category,
  },
};
</script>

<style lang="css">
.container {
  display: flex;
  justify-content: space-around;
}
</style>
Category组件
<template>
    <div class="category">
  <h3>{{title}}分类</h3>
  <ul>
    <li v-for="(item,index) in listData" :key="index">{{item}}</li>
</ul>
</div>

</template>

<script>
export default {
  name:'Category',
  props:['listData','title']

};
</script>

<style>
.category{
    background-color:aqua;
    width: 200px;
    height: 300px;
}
h3{
  text-align: center;
  justify-content: space-around;
  background-color:chartreuse;
}
</style>
效果二: 默认插槽(组件遍历 图片 分类 视屏)
APP组件
<template>
  <div class="container">
    <Category :title="美食" :listData="foods">
      <img src="../public/img/1698224336158.jpg" alt="图片" />
    </Category>
    <Category :title="游戏" :listData="games">
      <ul>
        <li v-for="(g, index) in games" :key="index">{{ g }}</li>
      </ul>
    </Category>
    <Category :title="电影" :listData="films">
      <audio src="../public/video/蓄勢 ~ GEAR UP ~ - 采风乐坊.mp3" controls loop autoplay muted>蓄勢.mp3</audio>
    </Category>
  </div>
</template>

<script>
import Category from "./components/Category.vue";

export default {
  name: "App",
  data() {
    return {
      foods: ["火锅", "烧烤", "小龙虾", "牛排"],
      games: ["红色警戒", "穿越火线", "劲舞团", "超级玛丽"],
      films: ["《教父》", "《拆弹专家》", "《你好,李焕英》", "《尚硅谷》"],
    };
  },
  components: {
    Category
  },
};
</script>

<style lang="css">
.container {
  display: flex;
  justify-content: space-around;
}
audio{
  width: 100%;
}
img{
  width: 100%;
}
</style>
Category
<slot></slot> 标签来接受 AP组件中解析的<category>中的内容
<template>
  <div class="category">
    <h3>{{title}}分类</h3>
    <slot></slot>
  </div>
</template>

<script>
export default {
  name: "Category",
  props: ["title"],
};
</script>

<style>
.category {
  background-color: aqua;
  width: 200px;
  height: 300px;
}
h3 {
  text-align: center;
  justify-content: space-around;
  background-color: chartreuse;
}
</style>
效果三: 具名插槽
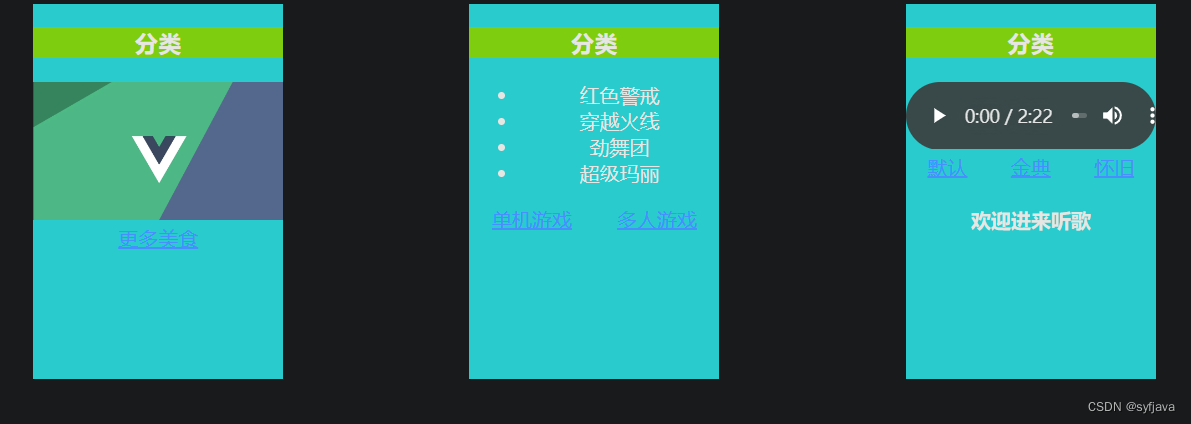
app组件 slot="center" 指的要放入的插槽
<template>
  <div class="container">
    <Category :title="美食" :listData="foods">
      <!-- 1- slot="center" 指的放置插槽的名称  -->
      <img slot="center" src="../public/img/1698224336158.jpg" alt="图片" />
      <div class="foot" slot="footer">
        <a slot="footer" href="http://www.baidu.com">更多美食</a>
      </div>
    </Category>

    <Category :title="游戏" :listData="games">
      <ul slot="center">
        <li v-for="(g, index) in games" :key="index">{{ g }}</li>
      </ul>
      <!-- 1- slot="footer" 指的放置插槽的名称  -->
      <div class="foot" slot="footer">
        <a href="http://www.baidu.com">单机游戏</a>
        <a href="http://www.baidu.com">多人游戏</a>
      </div>
    </Category>

    <Category :title="电影" :listData="films">
      <audio
        slot="center"
        src="../public/video/蓄勢 ~ GEAR UP ~ - 采风乐坊.mp3"
        controls
      >
        蓄勢.mp3
      </audio>
      <!-- 第二种写法 -->
      <!-- <template slot="footer"> -->
      <template v-slot:footer>
        <div class="foot">
          <a href="http://www.baidu.com">默认</a>
          <a href="http://www.baidu.com">金典</a>
          <a href="http://www.baidu.com">怀旧</a>
        </div>
        <h4>欢迎进来听歌</h4>
      </template>
    </Category>
  </div>
</template>

<script>
import Category from "./components/Category.vue";

export default {
  name: "App",
  data() {
    return {
      foods: ["火锅", "烧烤", "小龙虾", "牛排"],
      games: ["红色警戒", "穿越火线", "劲舞团", "超级玛丽"],
      films: ["《教父》", "《拆弹专家》", "《你好,李焕英》", "《尚硅谷》"],
    };
  },
  components: {
    Category,
  },
};
</script>

<style lang="css">
.container,
.foot {
  display: flex;
  justify-content: space-around;
  text-align: center;
}
audio {
  width: 100%;
}
img {
  width: 100%;
}
</style>
Category 组件定义插槽 <slot name="center"> </slot>
<template>
  <div class="category">
    <h3>{{title}}分类</h3>
    <!--2- slot name="" 指定 放到哪个插槽  -->
    <slot name="center"> 不放置数据默认显示本语句</slot>
    <slot name="footer"> 不放置数据默认显示本语句</slot>
  </div>
</template>

<script>
export default {
  name: "Category",
  props: ["title"],
};
</script>

<style>
.category {
  background-color: aqua;
  width: 200px;
  height: 300px;
}
h3 {
  text-align: center;
  justify-content: space-around;
  background-color: chartreuse;
}
</style>
效果四:作用域插槽
category子组件中 定义插槽 绑定数据
<template>
  <div class="category">
    <h3>{{ title }}分类</h3>
    <!--1- 定义插槽,  2- 绑定数据 :foods="foods"  -->
    <slot :foods="foods" :games="games"></slot>
  </div>
</template>

<script>
export default {
  name: "Category",
  props: ["title"],
  data() {
    return {
      games: ["红色警戒", "穿越火线", "劲舞团", "超级玛丽"],
      foods: ["火锅", "烧烤", "小龙虾", "牛排"]
    };
  },
};
</script>

<style>
.category {
  background-color: aqua;
  width: 200px;
  height: 300px;
}
h3 {
  text-align: center;
  justify-content: space-around;
  background-color: chartreuse;
}
</style>
APP组件 定义需要遍历的结构
注意:Vue 2.5 之后将原来的接收 dataObj 的属性名由原来的 scope 改成为 slot-scope,因此这两种方法现阶段都可以使用
同时为了书写方便,我们可以借助解构赋值去除掉前缀 dataObj(如下代码中注释)
<template>
  <div class="container">
    <Category>
      <!-- 2- 定义 slot-scope="dataObj"  遍历数据-->
      <template slot-scope="dataObj">
        <ul>
          <li v-for="(f, index) in dataObj.foods" :key="index">{{ f }}</li>
        </ul>
      </template>
    </Category>
    <Category>
      <template slot-scope="dataObj">
        <ol>
          <li v-for="(g, index) in dataObj.games" :key="index">{{ g }}</li>
        </ol>
      </template>
      <!-- Vue 2.5 之后将原来的接收 dataObj 的属性名由原来的 scope 改成为 slot-scope,因此这两种方法现阶段都可以使用
同时为了书写方便,我们可以借助解构赋值去除掉前缀 dataObj(该 dataObj 为自己定义),如下 -->
      <Category>
        <template slot-scope="{ foods }">
          <ul>
            <li v-for="(f, index) in foods" :key="index">{{ f }}</li>
          </ul>
        </template>
      </Category>
    </Category>
  </div>
</template>

<script>
import Category from "./components/Category.vue";

export default {
  name: "App",

  components: {
    Category,
  },
};
</script>

<style lang="css">
.container,
.foot {
  display: flex;
  justify-content: space-around;
  text-align: center;
}
audio {
  width: 100%;
}
img {
  width: 100%;
}
</style>


 494
494

 被折叠的 条评论
为什么被折叠?
被折叠的 条评论
为什么被折叠?
 到【灌水乐园】发言


