


 本文从源码角度分析Spring Boot配置文件加载原理。Spring Boot的配置文件加载由ConfigFileApplicationListener完成,加载的配置信息最终放入Environment。文中详细介绍了回调链路、环境准备事件及加载配置类的过程,还总结了配置文件加载顺序,最后提出了遗留问题。
SpringBoot 扩展篇:ConfigFileApplicationListener源码解析
-
- 1.概述
- 2. ConfigFileApplicationListener定义
- 3. ConfigFileApplicationListener回调链路
- 4. 环境准备事件 ConfigFileApplicationListener#onApplicationEvent
- 4. 加载配置类
-
- 4.1 Loader相关属性介绍
- 4.2 Loader加载配置文件
-
- FilteredPropertySource#apply
- ConfigFileApplicationListener.Loader#load()
- ConfigFileApplicationListener.Loader#initializeProfiles
- Loader#addLoadedPropertySources
- ConfigFileApplicationListener.Loader#getSearchLocations()
- ConfigFileApplicationListener.Loader#load()
- ConfigFileApplicationListener.Loader#load()
- ConfigFileApplicationListener.Loader#loadForFileExtension
- ConfigFileApplicationListener.Loader#load
- 配置文件加载顺序总结
- 问题:为什么先加入到environment中的propertySource,优先级越高?
- 遗留问题:
1.概述
SpringBoot的配置文件加载由ConfigFileApplicationListener完成的,它会加载application.properties、application.yml等配置文件,还支持用户配置和扩展。本文从源码的角度分析它的原理。
加载完毕的配置信息最终都会放入到Environment中。
2. ConfigFileApplicationListener定义
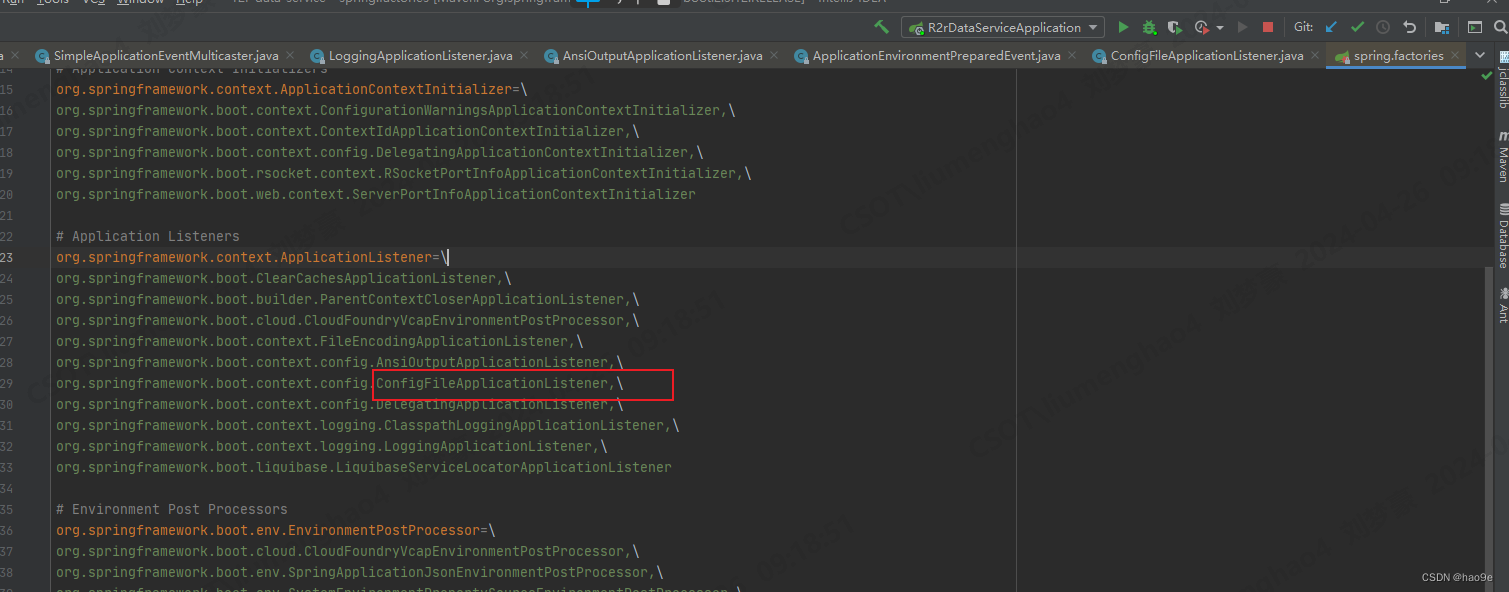
ConfigFileApplicationListener定义在spring.factories中。监听器注册和执行原理参考:SpringBoot 源码解析3:事件监听器
3. ConfigFileApplicationListener回调链路
3.1 SpringApplication#run
public ConfigurableApplicationContext run(String... args) {


	StopWatch stopWatch = new StopWatch();
	stopWatch.start();
	ConfigurableApplicationContext context = null;
	configureHeadlessProperty();
	SpringApplicationRunListeners listeners = getRunListeners(args);
	listeners.starting();
	try {


		ApplicationArguments applicationArguments = new DefaultApplicationArguments(args);
		ConfigurableEnvironment environment = prepareEnvironment(listeners, applicationArguments);
		configureIgnoreBeanInfo(environment);
		Banner printedBanner = printBanner(environment);
		context = createApplicationContext();
		prepareContext(context, environment, listeners, applicationArguments, printedBanner);
		refreshContext(context);
		afterRefresh(context, applicationArguments);
		stopWatch.stop();
		if (this.logStartupInfo) {


			new StartupInfoLogger(this.mainApplicationClass).logStarted(getApplicationLog(), stopWatch);
		}
		listeners.started(context);
		callRunners(context, applicationArguments);
	}
	catch (Throwable ex) {


		handleRunFailure(context, ex, listeners);
		throw new IllegalStateException(ex);
	}

	try {


		listeners.running(context);
	}
	catch (Throwable ex) {


		handleRunFailure(context, ex, null);
		throw new IllegalStateException(ex);
	}
	return context;
}
这是SpringBoot启动最基础的方法,调用了prepareEnvironment。
3.2 SpringApplication#prepareEnvironment
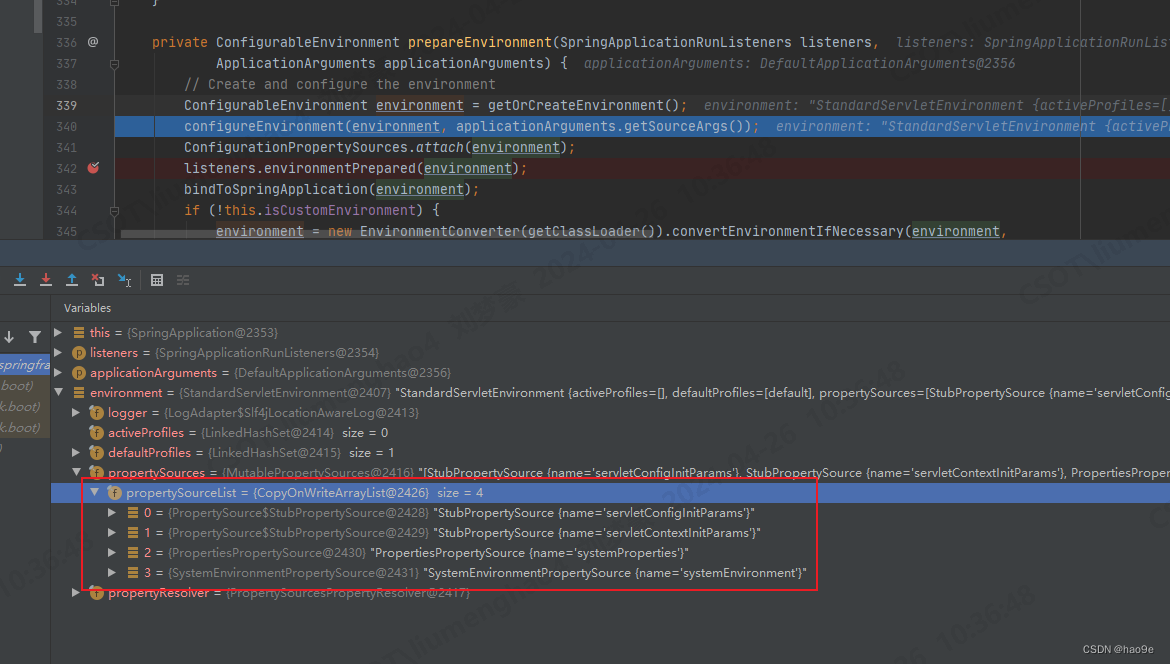
private ConfigurableEnvironment prepareEnvironment(SpringApplicationRunListeners listeners,
		ApplicationArguments applicationArguments) {


	// Create and configure the environment
	// 创建environment对象
	ConfigurableEnvironment environment = getOrCreateEnvironment();
	// 配置环境
	configureEnvironment(environment, applicationArguments.getSourceArgs());
	ConfigurationPropertySources.attach(environment);
	// 发布监听事件
	listeners.environmentPrepared(environment);
	bindToSpringApplication(environment);
	if (!this.isCustomEnvironment) {


		environment = new EnvironmentConverter(getClassLoader()).convertEnvironmentIfNecessary(environment,
				deduceEnvironmentClass());
	}
	ConfigurationPropertySources.attach(environment);
	return environment;
}
-
getOrCreateEnvironment创建StandardServletEnvironment,所有的启动参数和配置文件信息都会保存到environment中。environment中默认创建了4个propertySource,分别用来存放系统属性和servlet属性。
-
configureEnvironment配置环境信息,此时配置文件还没解析。
-
listeners.environmentPrepared,调用监听器ConfigFileApplicationListener解析配置文件。最终回调了ConfigFileApplicationListener#onApplicationEvent,这里是解析文件的核心逻辑。
@Override
public void environmentPrepared(ConfigurableEnvironment environment) {


	this.initialMulticaster
			.multicastEvent(new ApplicationEnvironmentPreparedEvent(this.application, this.args, environment));
}
监听器发布的是ApplicationEnvironmentPreparedEvent类型的事件。
- bindToSpringApplication解析完毕所有的配置文件信息之后,将spring.main.*的环境变量与当前的springApplication对象的属性绑定。比如allowBeanDefinitionOverriding配置就是在这里读取的。
3.3 配置environment
SpringApplication#configureEnvironment
protected void configureEnvironment(ConfigurableEnvironment environment, String[] args) {


	if (this.addConversionService) {


		ConversionService conversionService = ApplicationConversionService.getSharedInstance();
		environment.setConversionService((ConfigurableConversionService) conversionService);
	}
	configurePropertySources(environment, args);
	configureProfiles(environment, args);
}
- 第二个参数args为SpringBoot启动参数。
- configurePropertySources方法会将启动参数解析保存到environment中。
protected void configurePropertySources(ConfigurableEnvironment environment, String[] args) {


	MutablePropertySources sources = environment.getPropertySources();
	if (this.defaultProperties != null && !this.defaultProperties.isEmpty()) {


		sources.addLast(new MapPropertySource("defaultProperties", this.defaultProperties));
	}
	if (this.addCommandLineProperties && args.length > 0) {


		String name = CommandLinePropertySource.COMMAND_LINE_PROPERTY_SOURCE_NAME;
		if (sources.contains(name)) {


			PropertySource<?> source = sources.get(name);
			CompositePropertySource composite = new CompositePropertySource(name);
			composite.addPropertySource(
					new SimpleCommandLinePropertySource("springApplicationCommandLineArgs", args));
			composite.addPropertySource(source);
			sources.replace(name, composite);
		}
		else {


			sources.addFirst(new SimpleCommandLinePropertySource(args));
		}
	}
}
通过addFirst会将启动参数的属性添加到第一个PropertySources,优先级最高。
protected <T> T getProperty(String key, Class<T> targetValueType, boolean resolveNestedPlaceholders) {


	if (this.propertySources != null) {


		for (PropertySource<?> propertySource : this.propertySources) {


			if (logger.isTraceEnabled()) {


				logger.trace("Searching for key '" + key + "' in PropertySource '" +
						propertySource.getName() + "'");
			}
			Object value = propertySource.getProperty(key);
			if (value != null) {


				if (resolveNestedPlaceholders && value instanceof String) {


					value = resolveNestedPlaceholders((String) value);
				}
				logKeyFound(key, propertySource, value);
				return convertValueIfNecessary(value, targetValueType);
			}
 最低0.47元/天 解锁文章


 1880
1880

 被折叠的 条评论
为什么被折叠?
被折叠的 条评论
为什么被折叠?
 到【灌水乐园】发言


