0基础教你搭建SSM框架

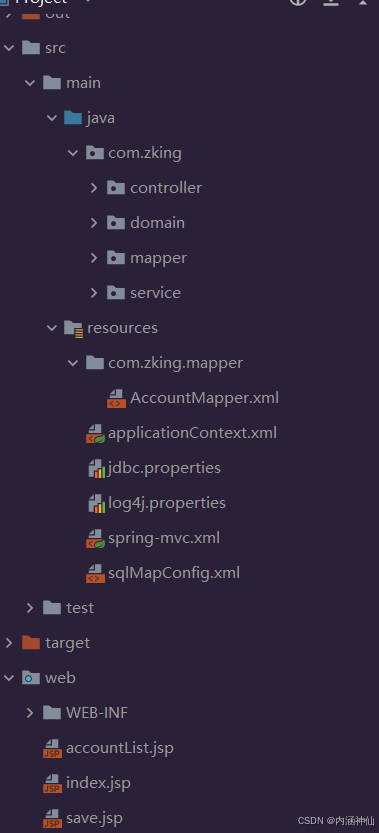
项目结构目录:

1. 导入ssm框架所需坐标 比如spring,springmvc,mybatis

<dependencies>
    <!--spring相关-->
    <dependency>
        <groupId>org.springframework</groupId>
        <artifactId>spring-context</artifactId>
        <version>5.0.5.RELEASE</version>
    </dependency>
    <dependency>
        <groupId>org.aspectj</groupId>
        <artifactId>aspectjweaver</artifactId>
        <version>1.8.4</version>
    </dependency>
    <dependency>
        <groupId>org.springframework</groupId>
        <artifactId>spring-jdbc</artifactId>
        <version>5.0.5.RELEASE</version>
    </dependency>
    <dependency>
        <groupId>org.springframework</groupId>
        <artifactId>spring-tx</artifactId>
        <version>5.0.5.RELEASE</version>
    </dependency>
    <dependency>
        <groupId>org.springframework</groupId>
        <artifactId>spring-test</artifactId>
        <version>5.0.5.RELEASE</version>
    </dependency>
    <dependency>
        <groupId>org.springframework</groupId>
        <artifactId>spring-webmvc</artifactId>
        <version>5.0.5.RELEASE</version>
    </dependency>

    <!--servlet和jsp-->
    <dependency>
        <groupId>javax.servlet</groupId>
        <artifactId>servlet-api</artifactId>
        <version>2.5</version>
    </dependency>
    <dependency>
        <groupId>javax.servlet.jsp</groupId>
        <artifactId>jsp-api</artifactId>
        <version>2.2</version>
    </dependency>

    <!--mybatis相关-->
    <dependency>
        <groupId>org.mybatis</groupId>
        <artifactId>mybatis</artifactId>
        <version>3.4.6</version>
    </dependency>
    <dependency>
        <groupId>org.mybatis</groupId>
        <artifactId>mybatis-spring</artifactId>
        <version>2.0.7</version>
    </dependency>
    <dependency>
        <groupId>mysql</groupId>
        <artifactId>mysql-connector-java</artifactId>
        <version>8.0.29</version>
    </dependency>
    <dependency>
        <groupId>com.mchange</groupId>
        <artifactId>c3p0</artifactId>
        <version>0.9.5.5</version>
    </dependency>
    <dependency>
        <groupId>junit</groupId>
        <artifactId>junit</artifactId>
        <version>4.12</version>
    </dependency>
    <dependency>
        <groupId>jstl</groupId>
        <artifactId>jstl</artifactId>
        <version>1.2</version>
    </dependency>
</dependencies>

2. 来配置一下spring和springmvc的配置文件

spring的配置文件: applicationContext.xml

<?xml version="1.0" encoding="UTF-8"?>
<beans xmlns="http://www.springframework.org/schema/beans"
       xmlns:xsi="http://www.w3.org/2001/XMLSchema-instance"
       xmlns:context="http://www.springframework.org/schema/context"
       xmlns:aop="http://www.springframework.org/schema/aop"
       xmlns:tx="http://www.springframework.org/schema/tx"
       xsi:schemaLocation="
       http://www.springframework.org/schema/beans
       http://www.springframework.org/schema/beans/spring-beans.xsd
       http://www.springframework.org/schema/context
       http://www.springframework.org/schema/context/spring-context.xsd
       http://www.springframework.org/schema/aop
       http://www.springframework.org/schema/aop/spring-aop.xsd
       http://www.springframework.org/schema/tx
       http://www.springframework.org/schema/tx/spring-tx.xsd
">
<!--        配置组件扫描-->
    <context:component-scan base-package="com.zking">
<!--        排除controller的扫描-->
        <context:exclude-filter type="annotation" expression="org.springframework.stereotype.Controller"/>
    </context:component-scan>

<!--    加载properties-->
    <context:property-placeholder location="classpath:jdbc.properties"/>
<!--    配置数据源-->
    <bean id="dataSource" class="com.mchange.v2.c3p0.ComboPooledDataSource">
        <property  name="driverClass" value="${jdbc.driver}"/>
        <property name="jdbcUrl" value="${jdbc.url}"/>
        <property name="user" value="${jdbc.username}"/>
        <property name="password" value="${jdbc.password}"/>
    </bean>
<!--    配置mybatis的sqlSessionFactory-->
    <bean id="sqlSessionFactory" class="org.mybatis.spring.SqlSessionFactoryBean">
        <property name="dataSource" ref="dataSource"/>
<!--        加载mybatis核心文件-->
        <property name="configLocation" value="classpath:sqlMapConfig.xml"/>
    </bean>

<!--    配置扫描mapper所在的包  为mapper创建实现类 -->
    <bean class="org.mybatis.spring.mapper.MapperScannerConfigurer">
        <property name="basePackage" value="com.zking.mapper"></property>
    </bean>
<!--    声明式事务控制-->
<!--    配置平台事务管理器-->
    <bean id="transactionManager" class="org.springframework.jdbc.datasource.DataSourceTransactionManager">
        <property name="dataSource" ref="dataSource"/>
    </bean>

<!--    配置事务增强-->
    <tx:advice id="txAdvice">
        <tx:attributes>
            <tx:method name="*"/>
        </tx:attributes>
    </tx:advice>

<!--    事务aop的织入-->
    <aop:config>
        <aop:advisor advice-ref="txAdvice" pointcut="execution(* com.zking.service.impl.*.*(..))"></aop:advisor>
    </aop:config>
</beans>

springmvc的配置文件:

<?xml version="1.0" encoding="UTF-8"?>
<beans xmlns="http://www.springframework.org/schema/beans"
       xmlns:xsi="http://www.w3.org/2001/XMLSchema-instance"
       xmlns:mvc="http://www.springframework.org/schema/mvc"
       xmlns:context="http://www.springframework.org/schema/context"
       xsi:schemaLocation="
       http://www.springframework.org/schema/beans
       http://www.springframework.org/schema/beans/spring-beans.xsd
              http://www.springframework.org/schema/mvc
       http://www.springframework.org/schema/mvc/spring-mvc.xsd
              http://www.springframework.org/schema/context
       http://www.springframework.org/schema/context/spring-context.xsd
">
<!--    配置组件扫描-->
    <context:component-scan base-package="com.zking.controller"/>
<!--    配置mvc注解驱动-->
    <mvc:annotation-driven/>

<!--    配置内部资源视图扫描器-->
    <bean class="org.springframework.web.servlet.view.InternalResourceViewResolver">
        <property name="suffix" value=".jsp"/>
        <property name="prefix" value="/"/>
    </bean>

<!--    配置静态资源访问器-->
    <mvc:default-servlet-handler/>


</beans>

3.下面就是mybatis的配置文件了

这是核心配置文件:我这里用spring整合了mybatis所以配置文件中不用写什么代码

<?xml version="1.0" encoding="UTF-8" ?>
<!DOCTYPE configuration
        PUBLIC "-//mybatis.org//DTD Config 3.0//EN"
        "http://mybatis.org/dtd/mybatis-3-config.dtd">
<configuration>
    <!--加载properties文件-->
<!--    <properties resource="jdbc.properties"></properties>-->
<!--    定义别名-->
    <typeAliases>
        <typeAlias type="com.zking.domain.Account" alias="account"></typeAlias>
<!--        <package name="com.zking.domain"/>-->
    </typeAliases>
<!--    <environments default="jdbc">-->
<!--        <environment id="jdbc">-->
<!--            <transactionManager type="JDBC"></transactionManager>-->
<!--            <dataSource type="POOLED">-->
<!--                <property name="driver" value="${jdbc.driver}"/>-->
<!--                <property name="url" value="${jdbc.url}"/>-->
<!--                <property name="username" value="${jdbc.username}"/>-->
<!--                <property name="password" value="${jdbc.password}"/>-->
<!--            </dataSource>-->
<!--        </environment>-->
<!--    </environments>-->

<!--    <mappers>-->
<!--        <mapper resource="com/zking/mapper/AccountMapper.xml"></mapper>-->
<!--    </mappers>-->
</configuration>

这是mybatis的映射文件它也可以省略,它可以使用注解代替

<?xml version="1.0" encoding="UTF-8" ?>
<!DOCTYPE mapper PUBLIC "-//mybatis.org//DTD Mapper 3.0//EN" "http://mybatis.org/dtd/mybatis-3-mapper.dtd">
<mapper namespace="com.zking.mapper.AccountMapper">
    <select id="findAll" resultType="account">
        select * from account
    </select>
    <insert id="save" parameterType="account">
        insert into account values(#{id},#{name},#{money})
    </insert>
</mapper>

4.下面就是实体类了:

public class Account implements Serializable {
    private Integer id;
    private String name;
    private String money;
    //由于set和get代码太多而且大家都知道所以我就不写了

5.业务层代码:

public interface AccountService {
    /**
     * 保存账户数据
     * @param account
     */
    void save(Account account) throws IOException;

    /**
     * 查询账户数据
     * @return
     */
    List<Account> findAll() throws IOException;
}

业务层实现:

@Service("accountService")
public class AccountServiceImpl implements AccountService {
    @Autowired
    private AccountMapper accountMapper;
    @Override
    public void save(Account account) {
        accountMapper.save(account);
    }

    @Override
    public List<Account> findAll() {
        return accountMapper.findAll();
    }
}

6.mapper层代码:

public interface AccountMapper {

    void save(Account account);

    List<Account> findAll();
}

7. controller层代码:

@Controller
@RequestMapping("/account")
public class AccountController {
    @Autowired
    private AccountService accountService;
//    保存
    @RequestMapping(value = "/save",produces = "text/html;charset=UTF-8")
    @ResponseBody
    public String save(Account account) {
       accountService.save(account);
        return "保存成功";
    }
    //查询功能
    @RequestMapping("/findAll")
    public ModelAndView findAll(){
        List<Account> accounts=null;
        ModelAndView modelAndView=new ModelAndView();
        accounts = accountService.findAll();
        modelAndView.addObject("accounts",accounts);
        modelAndView.setViewName("accountList");
        return modelAndView;
    }
}

8.最后两个前端页面代码:

绑定数据的:我这里写的就是一个简单的表格,因为时间的原因就没用js了直接使用的c标签

<html>
<head>
    <title>Title</title>
</head>
<body style="text-align:center;">
<h1>展示账户数据</h1>
<table border="1" content="auto" align="center">
    <thead>
    <tr>
        <td>编号</td>
        <td>姓名</td>
        <td>金额</td>
    </tr>
    </thead>
    <tbody>
    <c:forEach items="${accounts}" var="a">
    <tr>
        <td>${a.id}</td>
        <td>${a.name}</td>
        <td>${a.money}</td>
    </tr>
    </c:forEach>
    </tbody>
</table>
</body>
</html>

下面就是一个简单的增加页面

<html>
<head>
    <title>Title</title>
</head>
<body>
    <h1>添加账户信息表单</h1>
<form name="accountForm" action="${pageContext.request.contextPath}/account/save" method="post">
    账户名称:<input type="text" name="name"><br/>
    账户金额:<input type="text" name="money"><br/>
    <input type="submit" value="保存"><br/>
</form>
</body>
</html>

eclipse简单搭建SSM框架 1、基本概念: 1.1、Spring: 是个开源框架 轻量级java开发框架(2003年兴起) 使用基本的javaBean完成原来EJB的事情 不限于服务器开发,任何应用都可以使用 1.1.1、核心功能:如下图 Core模块:构建应用的核心,主要提供了依赖注入的特性,其中一个最抽象的接口为BeanFactory,实现该结构的具体类可以通过读取一些bean的元数据例如xml文件和注解的形式配... 阅读详情

相关推荐

毕设项目SSM框架搭建笔记

在毕业设计项目中第一次使用SSM框架,在网上搜了许多资料,阅读了许多博客,磕磕碰碰总算是成功了,由此记录,以便以后查看。 工程目录结构: 以下是配置文件举例: pom.xml: <project xmlns="http://maven.apache.org/POM/4.0.0" xmlns:xsi="http://www.w3.org/2001/XMLSchema-instance" x...

qq_42164863的博客 2880

手把手教你搭建SSM框架(Eclipse版)

SSM(Spring+SpringMVC+MyBatis)框架的Web项目,SSM三大框架整合

IT学长 1万+

使用Maven搭建SSM框架 IDEA

使用Maven搭建SSM框架,并测试使用 使用Maven搭建SSM框架(IDEA) 1. 创建Maven工程 2. 使用自己安装的Maven 3. 加入Maven依赖jar <properties> <project.build.sourceEncoding>UTF-8</project.build.sourceEncoding> <maven.compiler.source>1.7</maven.compiler.source&gt

weixin_44215175的博客 1838

SSM框架搭建--超简单详细干净

SSM框架搭建--超简单详细干净,新手必看。

he123456lei的博客 9253

手把手教你用运放和基准源,把±10V信号变成ADC能吃的0-4V(附完整计算过程)

本文详细介绍了如何利用OP07运放和REF5040基准源设计工业级信号调理电路,将±10V传感器信号转换为0-4V ADC可接受范围。通过七步流程,包括需求分析、元器件选型、电路设计、理论计算、PCB布局、实测验证与性能优化,帮助工程师解决信号不匹配问题,提升系统精度与稳定性。

weixin_28731223的博客 468

PCIe扫盲(三)

需要特别注意的是,PCIe的Spec中明确规定只有Root有权限发起配置请求(Originate Configuration Requests),也就是说PCIe系统里面的其他设备是不允许去配置其他设备的配置空间的,即peer-to-peer的配置请求是不允许的。当配置请求进行BDF路由的时候,正是依靠这些信息来确定要找的设备的。前面的文章还介绍过,Root和Switch的每一个端口中都包含一个P2P桥,并且知道桥的配置空间头(Configuration Space Header)是Type1型的。

Liuqz2009的专栏 2406

快速搭建一个简单的SSM框架

1.准备工作 mysql数据库 idea工具 说明:本次是搭建一个SSM框架,首先要确保电脑配置好1.8以上的JDK(因为1.8以下的jdk某些东西不支持),mysql数据库直接使用不方便可以安装一个可视化工具(如:SQLyog,Navicat)我这里用的是SQLyog,建造的项目我们用maven来管理。详细步骤如下所示步骤 2.详细步骤 2.1新建项目 (1) file -> new -> Project (2) 选择maven项目 ...

SSL 的博客 7083

从零到一:RF-DETR如何通过神经架构搜索重塑实时目标检测的边界

RF-DETR通过创新的权重共享神经架构搜索(NAS)机制,重新定义了实时目标检测的技术边界。这项技术在COCO等基准测试中表现卓越,成为首个AP超过60的实时检测器,同时保持跨领域稳定性和高效推理速度。RF-DETR的动态架构调整能力使其能够适应从嵌入式设备到云端服务器的各种硬件环境,为工业质检、自动驾驶等场景提供灵活解决方案。

weixin_29061531的博客 470

SSM框架介绍与搭建

1.ssm简介 ssm实际上是三种框架的集成,它们分别是Spring,SpringMVC以及mybatis。笔者的个人见解更愿意认为ssm是一个优秀的平台,在这个平台上开发者可以更有效率的实现CRUD,制定诸多事务以及进行成本更小的维护等操作。 Spring是非常经典的java bean容器,它可以非常有效率的实现对java bean(也包括分离出的DAO和Service)的管理。 以往笔者...

weixin_38808487的博客 1万+

Sonatype nexus3 数据迁移及升级3.71+(迁移到H2数据库)

nexus3旧版本OrientDB升级H2,及整体迁移nexus3数据到其它服务器。

葫芦娃 5557

vasp算表面吸附流程_VASP表面吸附计算实例分析

本文主要为了记录在学习Vasp计算过程中如何设置INCAR中的一些参数,并不着重讲解其含义,详见可自行到vasp官网查阅。其次关于建模部分也不做细致讨论,一般结构可从Materials Studio里自带的晶体数据库导出,或从三大数据库网站上下载:1、Materaials Project网址:https://materialsproject.org/(强烈推荐,邮箱注册即可使用)2、CCDC网址:...

weixin_39617669的博客 2241

手把手教你搭建优雅的ssm框架(完整)

直接开始搭建,使用的是idea工具! 新建一个maven项目 加入框架支持 点开目录后,你会发现里面缺少目录,我们自己创建一下。 在pom.xml中添加依赖 这些依赖必不可少,后面可以根据需求自己添加! <dependencies> <!--SpringMVC的jar包--> <dependency> ...

做梦的咸鱼 1万+

PCL 均匀采样【2026最新版】

根据输入点云数据创建一个微小的三维立方体集合,然后计算每个三维立方体的重心;由于该重心点不一定是原始点云中的点,直接用该点来表示立方体内所有的点会丢失原始点云的细小特征;所以使用k最近邻搜索寻找距离重心点最近的原始点来代替重心点。

点云侠的博客 41万+

【ssm框架】从0开始搭建ssm框架(idea版本)

SSM(Spring+SpringMVC+MyBatis)框架集由Spring、MyBatis两个开源框架整合而(SpringMVC是Spring中的部分内容),常作为数据源较简单的web项目的框架。

我有满天星辰的博客 9130

YOLO11改进策略【独家融合改进】| EfficientViMBlock + LGAG + DySample

通过学习采样来学习上采样DySample。

Limiiiing的博客 364

C#实战:YOLOv5+海康工业相机上位机开发全攻略(从图像采集到检测落地)

工业场景下AI质检系统的开发需要综合考虑硬件适配性、算法性能和稳定性。本文针对新能源电池极片缺陷检测场景,提出基于海康工业相机+YOLOv5+C#的技术方案,涵盖以下关键点: 工业级技术选型:选择支持全局快门的海康相机、OpenCvSharp图像处理、YOLOv5s轻量化模型,确保在无GPU工控机上稳定运行。 开发流程优化: 海康SDK集成:详细说明DLL配置和常见报错解决方案 YOLOv5模型导出:强调batch=1、opset12等工业适配参数 相机采集封装:提供线程安全的C#封装类,支持触发采集模式

这里只有干货:从 Modbus 通信到 MES 对接,从 YOLO 训练到工控机部署,带你搞定工业软件开发全流程。 1197

IDEA搭建SSM框架的详细教程

IDEA 搭建简单 ssm 框架最详细最简单教程

程序定制,毕设辅导、论文写作、技术指导! 2323

精雕软件(JDpaint) 5.5 绿色版

精雕软件(JDpaint) 5.5 绿色版精雕软件(JDpaint) 5.5 绿色版精雕软件(JDpaint) 5.5 绿色版

从零搭建SSM框架

SSM(Spring+SpringMVC+MyBatis)框架集由Spring、MyBatis两个开源框架整合而(SpringMVC是Spring中的部分内容),常作为数据源较简单的web项目的框架。 SSM的三层架构形式如下图: Server.服务器版本: Apache Tomcat/8.5.86 maven:3.9 jdk:1.8 SSM框架:spring+mybatis+springmvc springMVC:视图层,界面层,负责接收请求,显示处理结果; spring:业务层,管理service、da

2301_78125917的博客 1314

jre9下载 jdk9

(Java SE Runtime Environment 9.0) 9.0u175 官方最新版 【x86|x64】

pscad IEEE标准系统搭建说明

pscad IEEE标准系统搭建说明,包含典型的IEEE 9节点、14节点、30节点、39节点和118节点系统。内含标准测试系统的原始数据和潮流结果。

基于Maven搭建SSM框架

一、简介所谓SSM,即是Spring+SpringMVC+MyBatis三个开源框架的整合,是目前流行的作为WEB项目搭建的框架选择。这篇文章是自己动手搭建并将过程记录,以便加深印象和方便以后查阅。二、环境1.操作系统:windows 102.IDE版本:Eclipse Luna Release (4.4.0)3.JDK版本:jdk1.7.0_604.tomcat版本:apache-tomcat-...

张小烦的博客 5334

深度学习工具包 DeepLearningToolbox

深度学习工具包Deprecation notice.-----This toolbox is outdated and no longer maintained.There are much better tools available for deep learning than this toolbox, e.g. [Theano](http://deeplearning.net/software/theano/), [torch](http://torch.ch/) or [tensorflow](http://www.tensorflow.org/)I would suggest you use one of the tools mentioned above rather than use this toolbox.Best, Rasmus.DeepLearnToolbox================A Matlab toolbox for Deep Learning.Deep Learning is a new subfield of machine learning that focuses on learning deep hierarchical models of data.It is inspired by the human brain's apparent deep (layered, hierarchical) architecture.A good overview of the theory of Deep Learning theory is[Learning Deep Architectures for AI](http://www.iro.umontreal.ca/~bengioy/papers/ftml_book.pdf)For a more informal introduction, see the following videos by Geoffrey Hinton and Andrew Ng.* [The Next Generation of Neural Networks](http://www.youtube.com/watch?v=AyzOUbkUf3M) (Hinton, 2007)* [Recent Developments in Deep Learning](http://www.youtube.com/watch?v=VdIURAu1-aU) (Hinton, 2010)* [Unsupervised Feature Learning and Deep Learning](http://www.youtube.com/watch?v=ZmNOAtZIgIk) (Ng, 2011)If you use this toolbox in your research please cite [Prediction as a candidate for learning deep hierarchical models of data](http://www2.imm.dtu.dk/pubdb/views/publication_details.php?id=6284)```@MASTERSTHESIS\{IMM2012-06284, author = "R. B. Palm", title = "Prediction as a candidate for learning deep hierarchical models of data", year = "2012",}```Contact: rasmusbergpalm at gmail dot comDirectories included in the toolbox-----------------------------------`NN/` - A library for Feedforward Backpropagation Neural Networks`CNN/` - A library for Convolutional Neural Networks`DBN/` - A library for Deep Belief Networks`SAE/` - A library for Stacked Auto-Encoders`CAE/` - A library for Convolutional Auto-Encoders`util/` - Utility functions used by the libraries`data/` - Data used by the examples`tests/` - unit tests to verify toolbox is workingFor references on each library check REFS.mdSetup-----1. Download.2. addpath(genpath('DeepLearnToolbox'));Example: Deep Belief Network---------------------```matlabfunction test_example_DBNload mnist_uint8;train_x = double(train_x) / 255;test_x = double(test_x) / 255;train_y = double(train_y);test_y = double(test_y);%% ex1 train a 100 hidden unit RBM and visualize its weightsrand('state',0)dbn.sizes = [100];opts.numepochs = 1;opts.batchsize = 100;opts.momentum = 0;opts.alpha = 1;dbn = dbnsetup(dbn, train_x, opts);dbn = dbntrain(dbn, train_x, opts);figure; visualize(dbn.rbm{1}.W'); % Visualize the RBM weights%% ex2 train a 100-100 hidden unit DBN and use its weights to initialize a NNrand('state',0)%train dbndbn.sizes = [100 100];opts.numepochs = 1;opts.batchsize = 100;opts.momentum = 0;opts.alpha = 1;dbn = dbnsetup(dbn, train_x, opts);dbn = dbntrain(dbn, train_x, opts);%unfold dbn to nnnn = dbnunfoldtonn(dbn, 10);nn.activation_function = 'sigm';%train nnopts.numepochs = 1;opts.batchsize = 100;nn = nntrain(nn, train_x, train_y, opts);[er, bad] = nntest(nn, test_x, test_y);assert(er < 0.10, 'Too big error');```Example: Stacked Auto-Encoders---------------------```matlabfunction test_example_SAEload mnist_uint8;train_x = double(train_x)/255;test_x = double(test_x)/255;train_y = double(train_y);test_y = double(test_y);%% ex1 train a 100 hidden unit SDAE and use it to initialize a FFNN% Setup and train a stacked denoising autoencoder (SDAE)rand('state',0)sae = saesetup([784 100]);sae.ae{1}.activation_function = 'sigm';sae.ae{1}.learningRate = 1;sae.ae{1}.inputZeroMaskedFraction = 0.5;opts.numepochs = 1;opts.batchsize = 100;sae = saetrain(sae, train_x, opts);visualize(sae.ae{1}.W{1}(:,2:end)')% Use the SDAE to initialize a FFNNnn = nnsetup([784 100 10]);nn.activation_function = 'sigm';nn.learningRate = 1;nn.W{1} = sae.ae{1}.W{1};% Train the FFNNopts.numepochs = 1;opts.batchsize = 100;nn = nntrain(nn, train_x, train_y, opts);[er, bad] = nntest(nn, test_x, test_y);assert(er < 0.16, 'Too big error');```Example: Convolutional Neural Nets---------------------```matlabfunction test_example_CNNload mnist_uint8;train_x = double(reshape(train_x',28,28,60000))/255;test_x = double(reshape(test_x',28,28,10000))/255;train_y = double(train_y');test_y = double(test_y');%% ex1 Train a 6c-2s-12c-2s Convolutional neural network %will run 1 epoch in about 200 second and get around 11% error. %With 100 epochs you'll get around 1.2% errorrand('state',0)cnn.layers = { struct('type', 'i') %input layer struct('type', 'c', 'outputmaps', 6, 'kernelsize', 5) %convolution layer struct('type', 's', 'scale', 2) %sub sampling layer struct('type', 'c', 'outputmaps', 12, 'kernelsize', 5) %convolution layer struct('type', 's', 'scale', 2) %subsampling layer};cnn = cnnsetup(cnn, train_x, train_y);opts.alpha = 1;opts.batchsize = 50;opts.numepochs = 1;cnn = cnntrain(cnn, train_x, train_y, opts);[er, bad] = cnntest(cnn, test_x, test_y);%plot mean squared errorfigure; plot(cnn.rL);assert(er<0.12, 'Too big error');```Example: Neural Networks---------------------```matlabfunction test_example_NNload mnist_uint8;train_x = double(train_x) / 255;test_x = double(test_x) / 255;train_y = double(train_y);test_y = double(test_y);% normalize[train_x, mu, sigma] = zscore(train_x);test_x = normalize(test_x, mu, sigma);%% ex1 vanilla neural netrand('state',0)nn = nnsetup([784 100 10]);opts.numepochs = 1; % Number of full sweeps through dataopts.batchsize = 100; % Take a mean gradient step over this many samples[nn, L] = nntrain(nn, train_x, train_y, opts);[er, bad] = nntest(nn, test_x, test_y);assert(er < 0.08, 'Too big error');%% ex2 neural net with L2 weight decayrand('state',0)nn = nnsetup([784 100 10]);nn.weightPenaltyL2 = 1e-4; % L2 weight decayopts.numepochs = 1; % Number of full sweeps through dataopts.batchsize = 100; % Take a mean gradient step over this many samplesnn = nntrain(nn, train_x, train_y, opts);[er, bad] = nntest(nn, test_x, test_y);assert(er < 0.1, 'Too big error');%% ex3 neural net with dropoutrand('state',0)nn = nnsetup([784 100 10]);nn.dropoutFraction = 0.5; % Dropout fraction opts.numepochs = 1; % Number of full sweeps through dataopts.batchsize = 100; % Take a mean gradient step over this many samplesnn = nntrain(nn, train_x, train_y, opts);[er, bad] = nntest(nn, test_x, test_y);assert(er < 0.1, 'Too big error');%% ex4 neural net with sigmoid activation functionrand('state',0)nn = nnsetup([784 100 10]);nn.activation_function = 'sigm'; % Sigmoid activation functionnn.learningRate = 1; % Sigm require a lower learning rateopts.numepochs = 1; % Number of full sweeps through dataopts.batchsize = 100; % Take a mean gradient step over this many samplesnn = nntrain(nn, train_x, train_y, opts);[er, bad] = nntest(nn, test_x, test_y);assert(er < 0.1, 'Too big error');%% ex5 plotting functionalityrand('state',0)nn = nnsetup([784 20 10]);opts.numepochs = 5; % Number of full sweeps through datann.output = 'softmax'; % use softmax outputopts.batchsize = 1000; % Take a mean gradient step over this many samplesopts.plot = 1; % enable plottingnn = nntrain(nn, train_x, train_y, opts);[er, bad] = nntest(nn, test_x, test_y);assert(er < 0.1, 'Too big error');%% ex6 neural net with sigmoid activation and plotting of validation and training error% split training data into training and validation datavx = train_x(1:10000,:);tx = train_x(10001:end,:);vy = train_y(1:10000,:);ty = train_y(10001:end,:);rand('state',0)nn = nnsetup([784 20 10]); nn.output = 'softmax'; % use softmax outputopts.numepochs = 5; % Number of full sweeps through dataopts.batchsize = 1000; % Take a mean gradient step over this many samplesopts.plot = 1; % enable plottingnn = nntrain(nn, tx, ty, opts, vx, vy); % nntrain takes validation set as last two arguments (optionally)[er, bad] = nntest(nn, test_x, test_y);assert(er < 0.1, 'Too big error');```[![Bitdeli Badge](https://d2weczhvl823v0.cloudfront.net/rasmusbergpalm/deeplearntoolbox/trend.png)](https://bitdeli.com/free "Bitdeli Badge")

SSM框架搭建Web项目

SSM框架搭建Web项目 上一篇文章:SpringMVC搭建一个Web项目 本文可在上一篇文章基础上配置,这里我所使用的环境是jdk1.8和Tomcat9.0.12。 SSM(Spring+SpringMVC+MyBatis)框架集由Spring、MyBatis两个开源框架整合而成(SpringMVC是Spring中的部分内容)。常作为数据源较简单的web项目的框架。 1.基础概念 Spring ...

weixin_43611145的博客 4220

手把手教你搭建SSM框架,简单有效理解SSM框架

引言:一个好的项目必须有一个好的框架支持,今天我们来讲一下Java中一个很重要的框架——SSM框架。所谓SSM框架就是Spring+SpringMVC+MyBatis的整合。 1.基本概念 1.1、Spring概念 1.2、SpringMVC概念 1.3、MyBatis 2.开发步骤 2.1、maven项目创建 maven项目的创建是基础,一个好的maven项目直接决定了项目开发的效率。 File——>New——>Mave Project 选择项目的路径,并Next 以下配置,点击Fi

qq_52344261的博客 3194

IDEA 详细SSM框架的搭建

IDEA 搭建SSM框架 搭建SSM框架最后的目录结构 一.步骤 1.Maven -----> Create from archetype (注:Project SDK 选择本地安装版本) ----> maven-archetype-webapp ----> Next 2.点击Next进入该页面,填写GroupId、ArtifactId(groupId一般是域名的反写,也作...

xxh_1229的博客 8322

SSM框架搭建步骤

https://www.cnblogs.com/xuyiqing/p/9569459.html 1.需要用到的jar包:由于很多的jar包不好下载,我直接上传到百度网盘: 关于SSM框架:以前的博客有介绍过 Spring框架:https://www.cnblogs.com/xuyiqing/category/1164340.html SpringMVC框架:https://ww...

香烟达人的博客 1万+

搭建SSM框架

SSM即Spring、SpringMVC、MyBatis框架技术的简称。是一套经典的企业级Web开发框架。

2301_78714573的博客 1541

Java-SSM基础框架搭建(内含视频教学)

我 QQ:1755497577(备注:博客) B站:code_ant(java相关培训视频) 简述 今天主要讲诉一下ssm框架的搭建过程,由于springboot的广泛使用,很多人都忘记了怎么搭建ssm项目,这里做一个温习。 demo地址:https://github.com/LiJinHongPassion/ssmdemo2 目的 温习ssm框架 学习ssm框架,从而加深对sp...

qq_37513473的博客 1万+

SSM框架搭建

ssm框架搭建

weixin_53898747的博客 1987
上一篇: Spring之依赖注入和setter注入
内涵神仙
博客等级 码龄5年 19粉丝 27原创
评论
成就一亿技术人!
拼手气红包6.0元
还能输入1000个字符
 
 条评论被折叠 查看
添加红包

请填写红包祝福语或标题

个

红包个数最小为10个

元

红包金额最低5元

当前余额3.43元 前往充值 >
需支付:10.00元
成就一亿技术人!
领取后你会自动成为博主和红包主的粉丝 规则
hope_wisdom
发出的红包
实付元
使用余额支付
点击重新获取
扫码支付
钱包余额 0

抵扣说明:

1.余额是钱包充值的虚拟货币,按照1:1的比例进行支付金额的抵扣。
2.余额无法直接购买下载,可以购买VIP、付费专栏及课程。

余额充值