 YOLOv13核心技术解析与应用指南


一、本文介绍
本文将系统地介绍YOLOv13的使用教程,包括网络结构的分析与优化、开发环境的配置、数据集的准备、模型训练和推理过程、结果的评估与验证、模型的导出以及实际部署,文中还配有手绘的网络结构图,帮助大家更直观地理解YOLOv13。
YOLOv13简单介绍:YOLOv13来源于清华大学、北京理工大学、香港科技大学(广州)、西安交通大学,相对于YOLOv12主要有三点创新:
1、引入了 HyperACE(Hypergraph-based Adaptive Correlation Enhancement)机制,用于捕捉全局高阶多对多语义关系,
2、提出 FullPAD(Full-Pipeline Aggregation-and-Distribution)架构,将增强特征贯穿于 backbone、neck、head 全流程,
3、采用 depthwise separable convolution 构建轻量模块,减少模型复杂度。
官方代码地址:官方代码地址点击此处即可跳转
官方论文地址:官方论文地址点击此处即可跳转
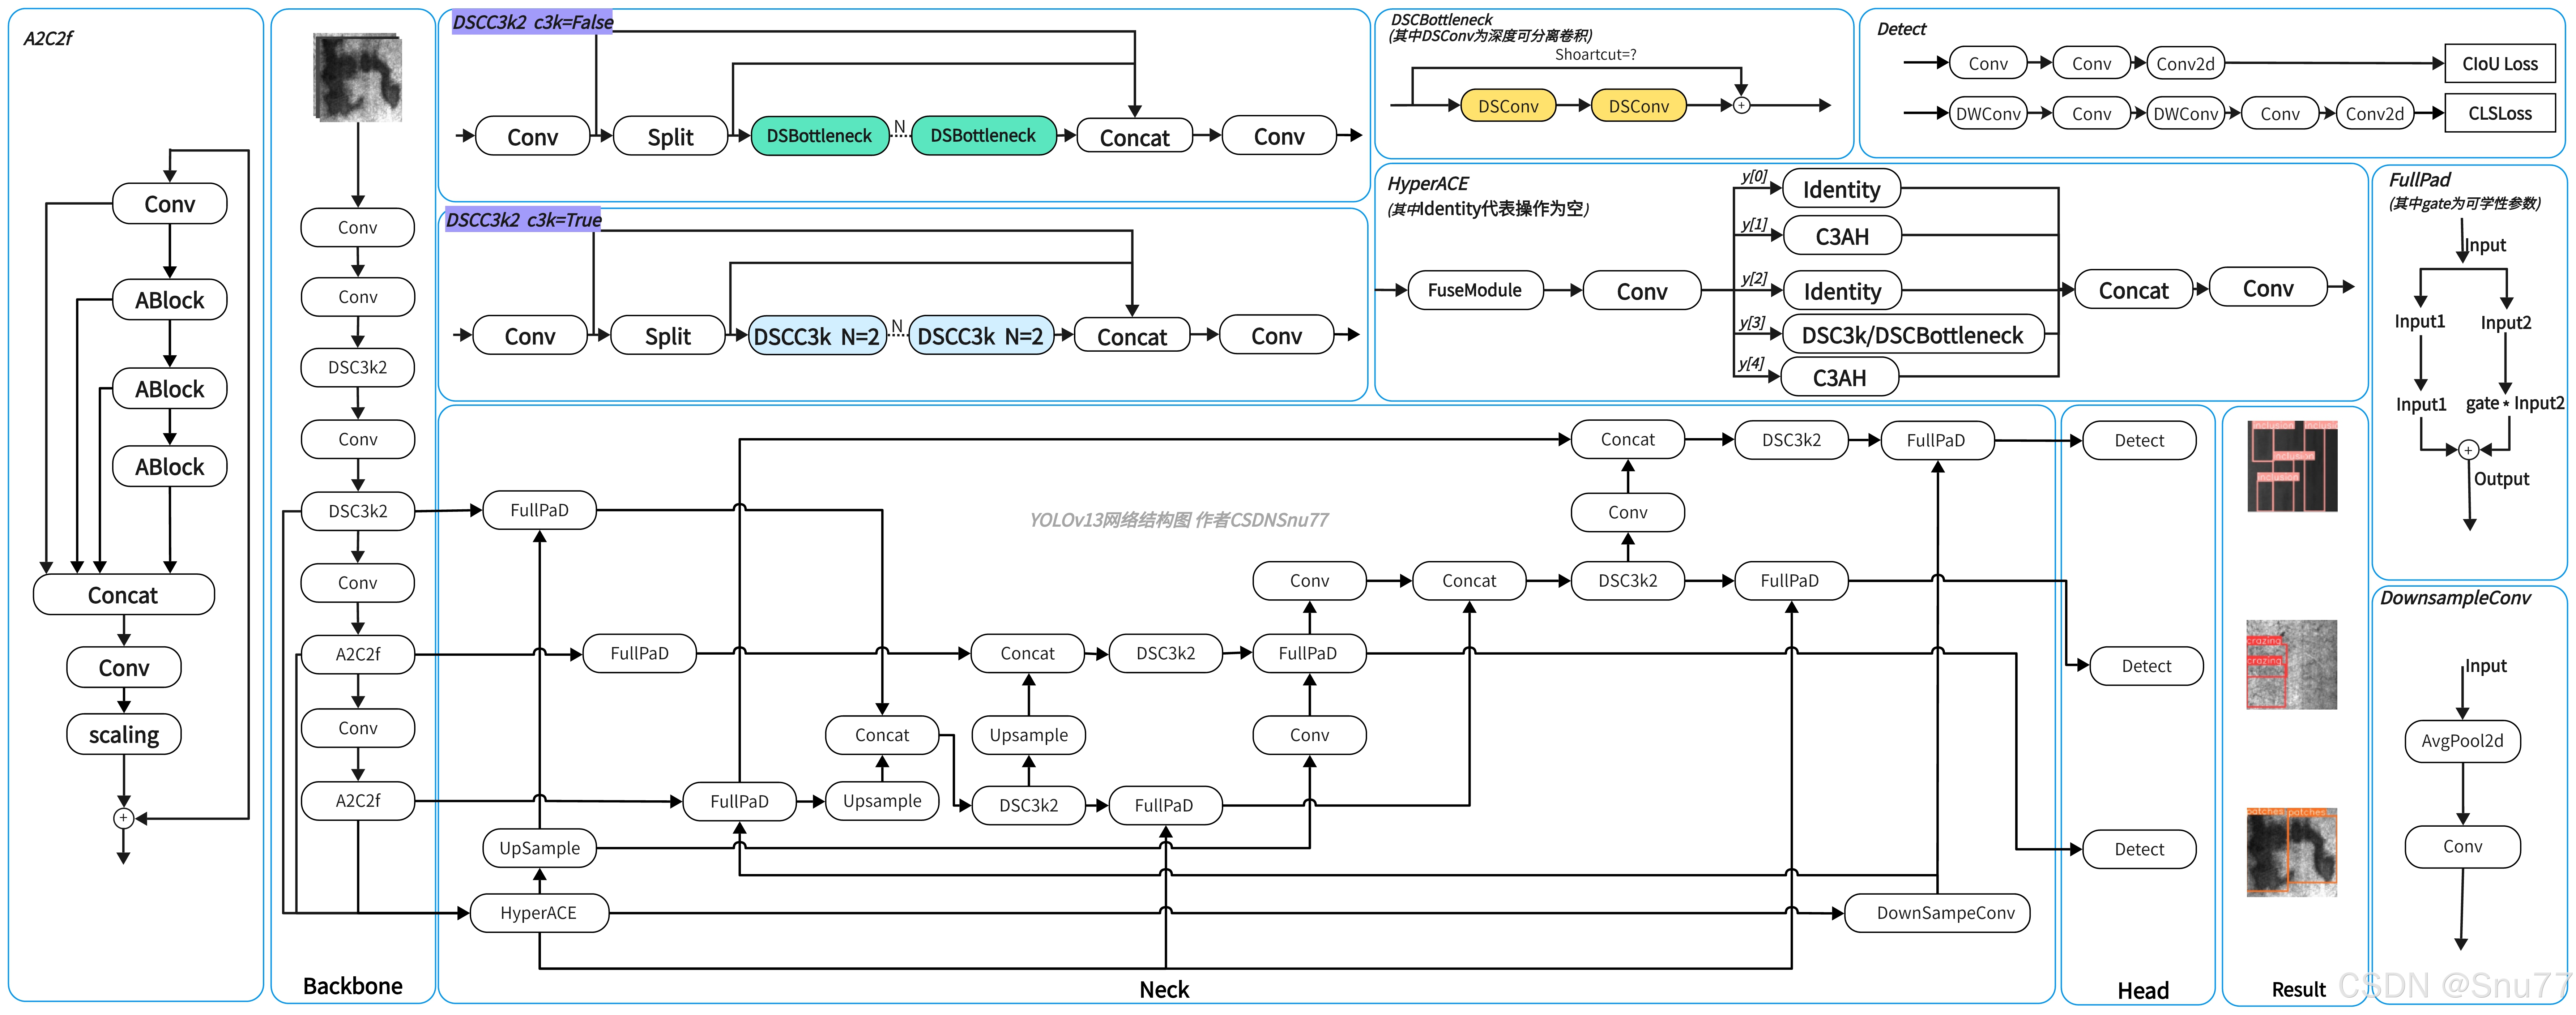
YOLOv13手绘网络结构图,图片较大如果文章展示不清楚可点击此处链接跳转原图地址:点击此处
目录
二、YOLOv13原理解析
在前面我们总结了YOLOv13的主要创新点为三点:
1、引入了 HyperACE(Hypergraph-based Adaptive Correlation Enhancement)机制,用于捕捉全局高阶多对多语义关系,
2、提出 FullPAD(Full-Pipeline Aggregation-and-Distribution)架构,将增强特征贯穿于 backbone、neck、head 全流程,
3、采用 depthwise separable convolution 构建轻量模块,减少模型复杂度。
2.2章节会针对这三点进行分别解析。
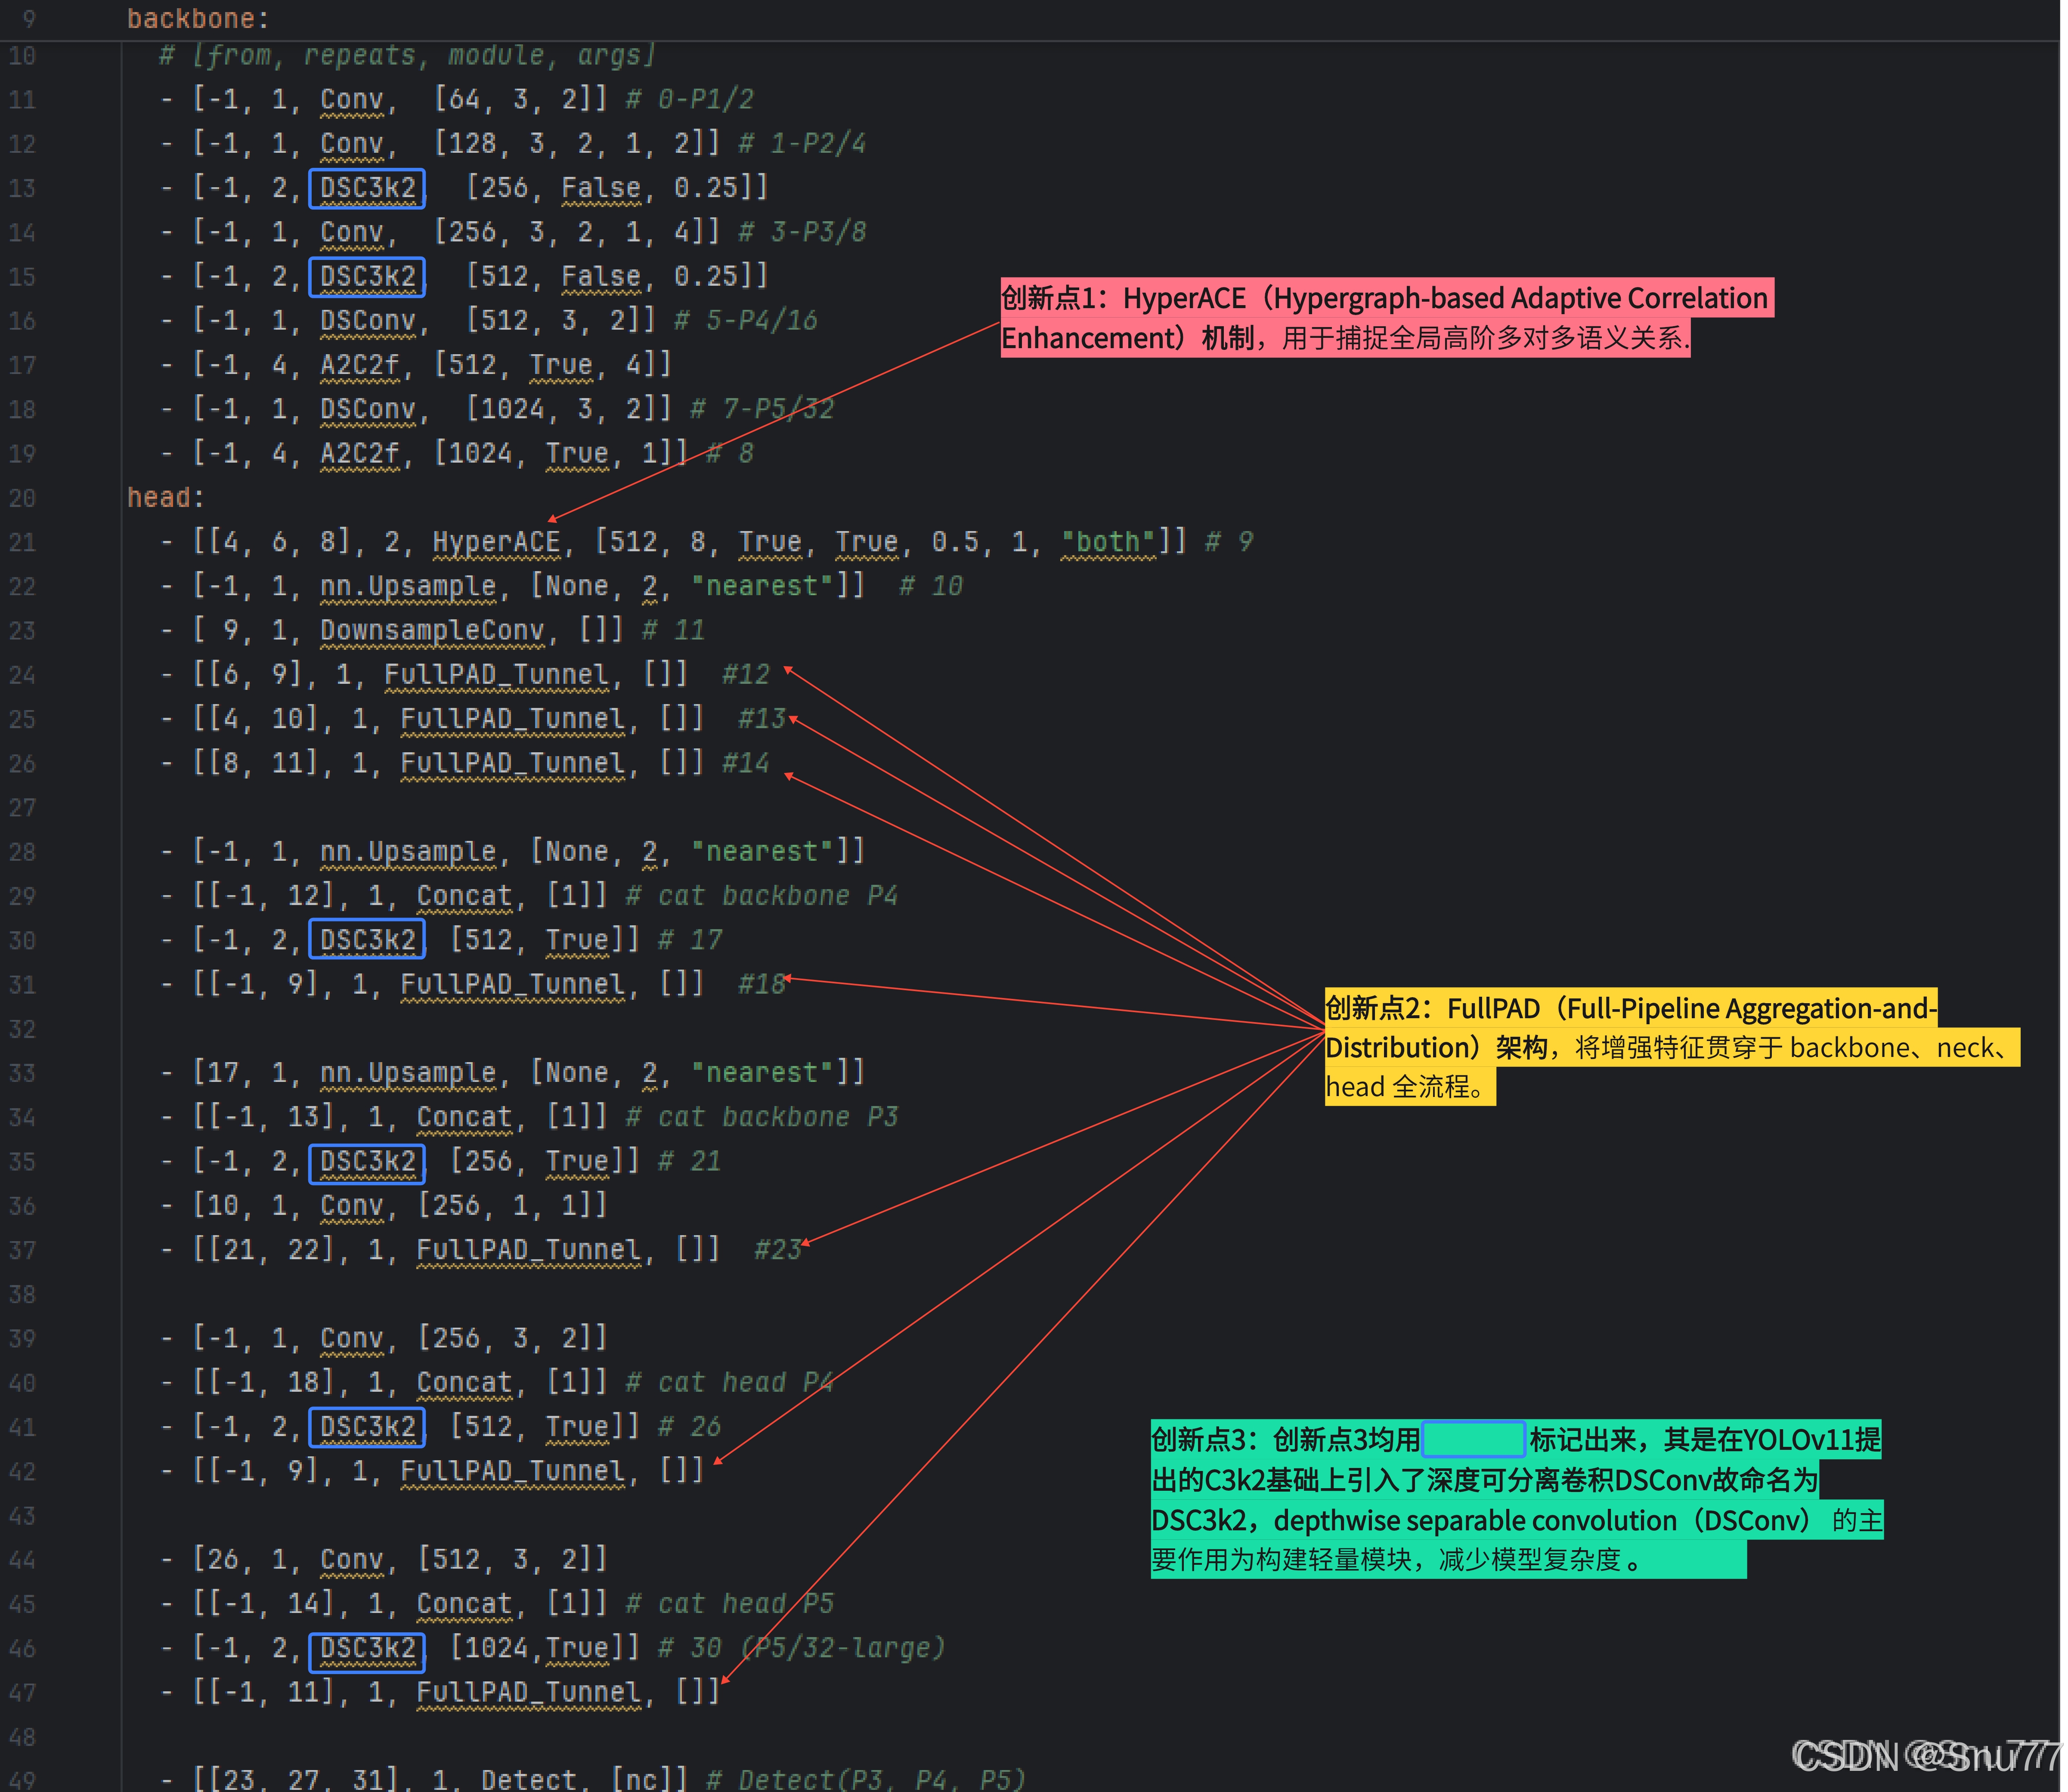
2.1 YOLOv13的yaml文件和创新点对应解析
下图是YOLOv13的yaml文件图,其中和YOLOv13创新点对应的部分我均已在图片中标出。
2.2 YOLOv13主要创新点解析
2.2.1 HyperACE机制
HyperACE核心代码.class HyperACE(nn.Module): def __init__(self, c1, c2, n=1, num_hyperedges=8, dsc3k=True, shortcut=False, e1=0.5, e2=1, context="both", channel_adjust=True): super().__init__() self.c = int(c2 * e1) self.cv1 = Conv(c1, 3 * self.c, 1, 1) self.cv2 = Conv((4 + n) * self.c, c2, 1) self.m = nn.ModuleList( DSC3k(self.c, self.c, 2, shortcut, k1=3, k2=7) if dsc3k else DSBottleneck(self.c, self.c, shortcut=shortcut) for _ in range(n) ) self.fuse = FuseModule(c1, channel_adjust) self.branch1 = C3AH(self.c, self.c, e2, num_hyperedges, context) self.branch2 = C3AH(self.c, self.c, e2, num_hyperedges, context) def forward(self, X): x = self.fuse(X) y = list(self.cv1(x).chunk(3, 1)) out1 = self.branch1(y[1]) out2 = self.branch2(y[1]) y.extend(m(y[-1]) for m in self.m) y[1] = out1 y.append(out2) return self.cv2(torch.cat(y, 1))
HyperACE 是 YOLOv13 提出的核心模块,旨在解决以往 YOLO 模型只能建模“局部 pairwise 关联”的问题,扩展为能建模全局高阶多对多语义关系(multi-to-multi high-order correlations)| 这样做的坏处是会增加计算开支。
它通过引入超图计算、自适应高阶建模、分支融合,实现更强大的特征增强和表达能力,提升目标检测在复杂场景下的准确性。
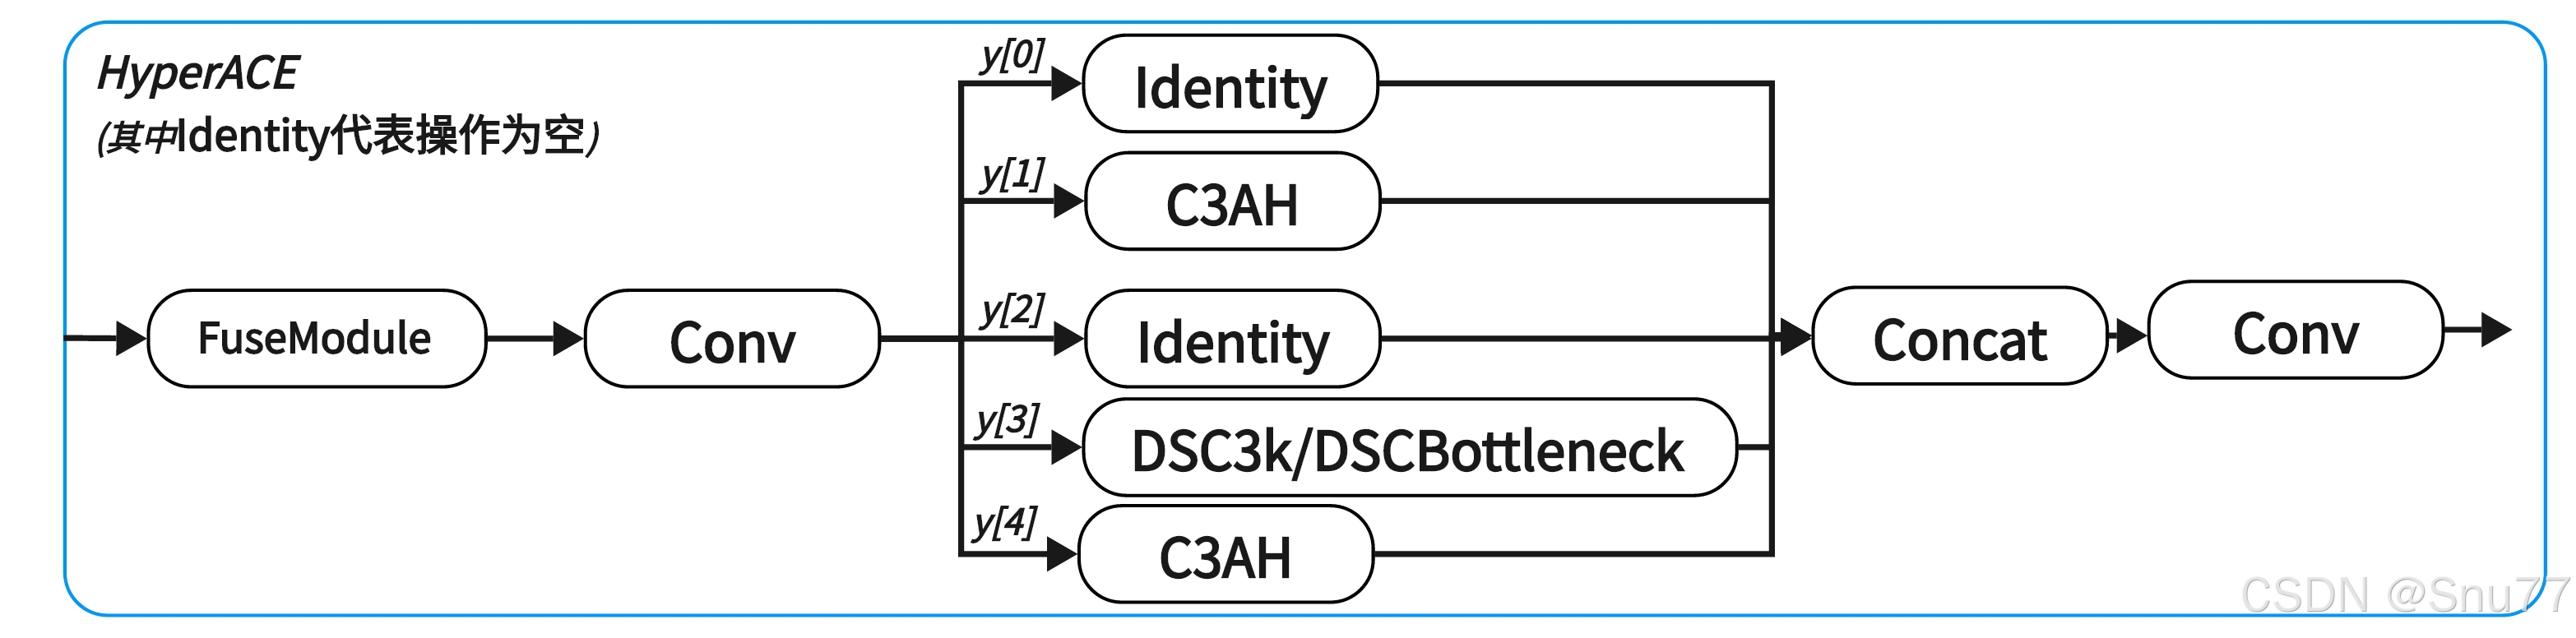
HyperACE 模块包含 三大处理分支,共同处理融合后的特征:
从上面表格可以看到HyperACE主要的结构就是CSAH和DSC3k/DSBottleneck模块,下面继续分别解析。
分支 模块 功能 高阶建模分支1 C3AH自适应超图建模,全局高阶语义增强 高阶建模分支2 C3AH与上分支结构一致但独立参数,增强多样性 低阶建模分支 DSC3k或DSBottleneck局部空间建模,补充低阶特征 Shortcut 通道 残差直连(图片上的Identity操作) 保留原始信息,便于梯度传播
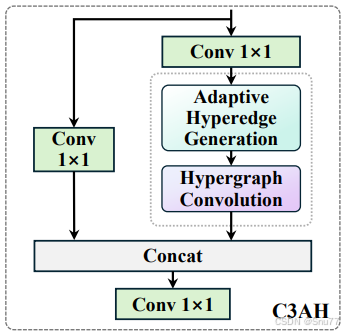
C3AH高阶建模分支,高阶建模分支1和高阶建模分支2的为一区别是参数不一样增加建模多样性。C3AH 将 CSP 架构与自适应超图注意力机制相融合,实现在轻量条件下建模全局高阶语义关系。上面提到了CSP结构, 我们先简单介绍一下什么是CSP架构:将特征图分成两部分,一部分不经过主干模块直接跳连,另一部分经过主干模块处理,然后两部分再融合(其实可以理解为残差结构的扩展,我们所谓C2f、C3、C3k2都是CSP架构下的衍生品)。 CSAH上的虚线标记的地方是一个整体( AdaHGComputation ),又细分为两个模块
class AdaHGConv(nn.Module):
    def __init__(self, embed_dim, num_hyperedges=16, num_heads=4, dropout=0.1, context="both"):
        super().__init__()
        self.edge_generator = AdaHyperedgeGen(embed_dim, num_hyperedges, num_heads, dropout, context)
        self.edge_proj = nn.Sequential(
            nn.Linear(embed_dim, embed_dim ),
            nn.GELU()
        )
        self.node_proj = nn.Sequential(
            nn.Linear(embed_dim, embed_dim ),
            nn.GELU()
        )

    def forward(self, X):
        A = self.edge_generator(X)

        He = torch.bmm(A.transpose(1, 2), X)
        He = self.edge_proj(He)

        X_new = torch.bmm(A, He)
        X_new = self.node_proj(X_new)

        return X_new + X

class AdaHGComputation(nn.Module):
    def __init__(self, embed_dim, num_hyperedges=16, num_heads=8, dropout=0.1, context="both"):
        super().__init__()
        self.embed_dim = embed_dim
        self.hgnn = AdaHGConv(
            embed_dim=embed_dim,
            num_hyperedges=num_hyperedges,
            num_heads=num_heads,
            dropout=dropout,
            context=context
        )

    def forward(self, x):
        B, C, H, W = x.shape
        tokens = x.flatten(2).transpose(1, 2)
        tokens = self.hgnn(tokens)
        x_out = tokens.transpose(1, 2).view(B, C, H, W)
        return x_out
- AdaHyperedgeGen:根据上下文自适应生成超边
- AdaHGConv:高阶超图卷积(顶点→超边→顶点)
AdaHyperedgeGen和AdaHGConv核心代码
class AdaHyperedgeGen(nn.Module):
    def __init__(self, node_dim, num_hyperedges, num_heads=4, dropout=0.1, context="both"):
        super().__init__()
        self.num_heads = num_heads
        self.num_hyperedges = num_hyperedges
        self.head_dim = node_dim // num_heads
        self.context = context

        self.prototype_base = nn.Parameter(torch.Tensor(num_hyperedges, node_dim))
        nn.init.xavier_uniform_(self.prototype_base)
        if context in ("mean", "max"):
            self.context_net = nn.Linear(node_dim, num_hyperedges * node_dim)
        elif context == "both":
            self.context_net = nn.Linear(2*node_dim, num_hyperedges * node_dim)
        else:
            raise ValueError(
                f"Unsupported context '{context}'. "
                "Expected one of: 'mean', 'max', 'both'."
            )

        self.pre_head_proj = nn.Linear(node_dim, node_dim)

        self.dropout = nn.Dropout(dropout)
        self.scaling = math.sqrt(self.head_dim)

    def forward(self, X):
        B, N, D = X.shape
        if self.context == "mean":
            context_cat = X.mean(dim=1)
        elif self.context == "max":
            context_cat, _ = X.max(dim=1)
        else:
            avg_context = X.mean(dim=1)
            max_context, _ = X.max(dim=1)
            context_cat = torch.cat([avg_context, max_context], dim=-1)
        prototype_offsets = self.context_net(context_cat).view(B, self.num_hyperedges, D)
        prototypes = self.prototype_base.unsqueeze(0) + prototype_offsets

        X_proj = self.pre_head_proj(X)
        X_heads = X_proj.view(B, N, self.num_heads, self.head_dim).transpose(1, 2)
        proto_heads = prototypes.view(B, self.num_hyperedges, self.num_heads, self.head_dim).permute(0, 2, 1, 3)

        X_heads_flat = X_heads.reshape(B * self.num_heads, N, self.head_dim)
        proto_heads_flat = proto_heads.reshape(B * self.num_heads, self.num_hyperedges, self.head_dim).transpose(1, 2)

        logits = torch.bmm(X_heads_flat, proto_heads_flat) / self.scaling
        logits = logits.view(B, self.num_heads, N, self.num_hyperedges).mean(dim=1)

        logits = self.dropout(logits)

        return F.softmax(logits, dim=1)


class AdaHGConv(nn.Module):
    def __init__(self, embed_dim, num_hyperedges=16, num_heads=4, dropout=0.1, context="both"):
        super().__init__()
        self.edge_generator = AdaHyperedgeGen(embed_dim, num_hyperedges, num_heads, dropout, context)
        self.edge_proj = nn.Sequential(
            nn.Linear(embed_dim, embed_dim ),
            nn.GELU()
        )
        self.node_proj = nn.Sequential(
            nn.Linear(embed_dim, embed_dim ),
            nn.GELU()
        )

    def forward(self, X):
        A = self.edge_generator(X)

        He = torch.bmm(A.transpose(1, 2), X)
        He = self.edge_proj(He)

        X_new = torch.bmm(A, He)
        X_new = self.node_proj(X_new)

        return X_new + X
下面我们来逐个深入分析 两个核心的高阶建模组件:
开始之前简单介绍两个概念(节点和超边):节点是图像中的位置特征,超边是可学习的语义组中心(两个节点之间的线);通过动态学习每个节
 最低0.47元/天 解锁文章


 1万+
1万+


 到【灌水乐园】发言


