


参考教程:
Google Colab 免费GPU服务器使用教程
https://blog.youkuaiyun.com/cocoaqin/article/details/79184540
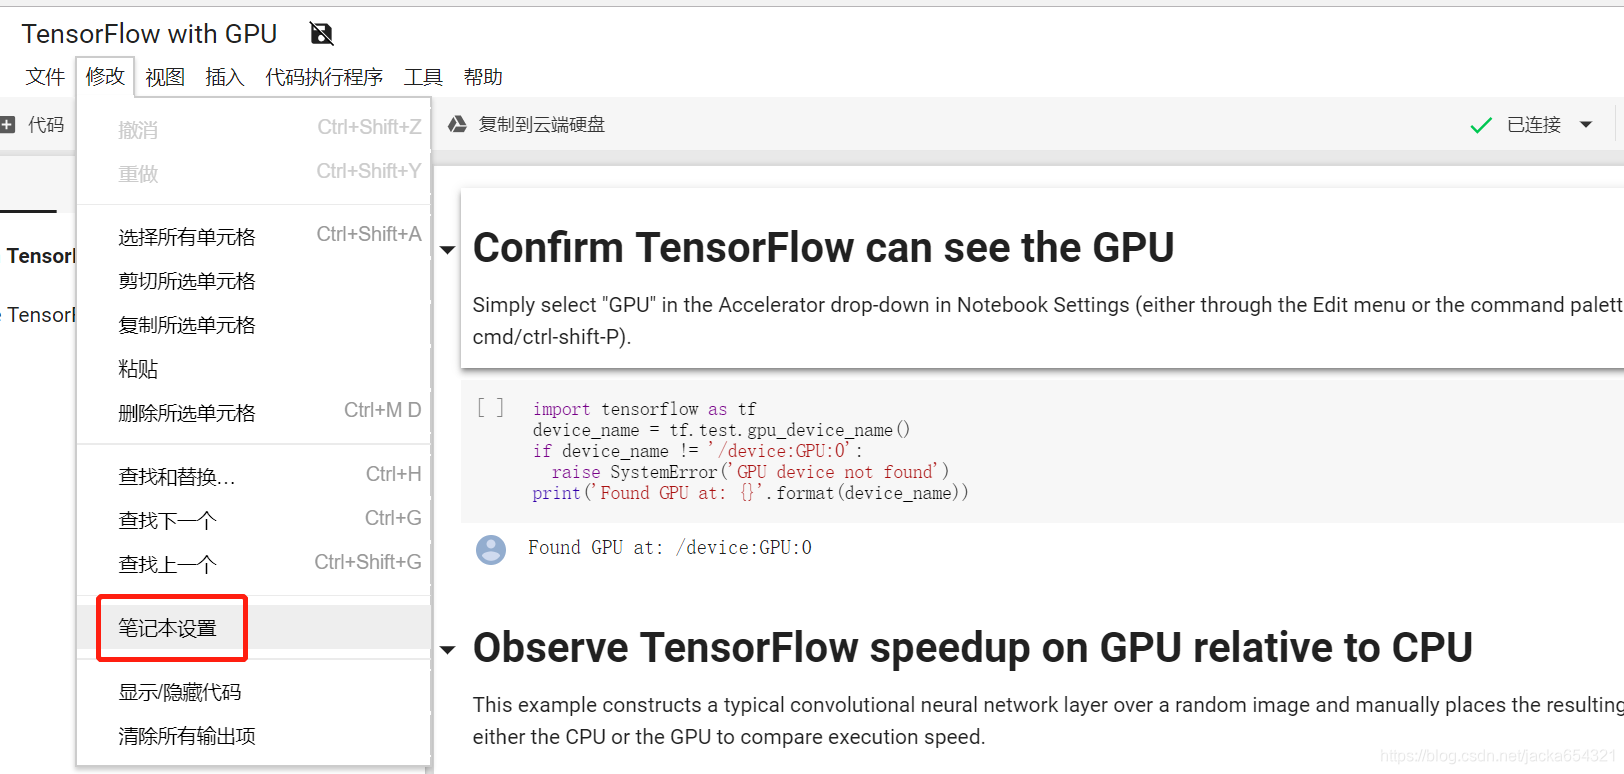
Colab简介
Colab的使用界面类似jupyter notebook。运行于虚拟机(VM)上。虚拟机配置K80 GPU,12G内存,39G硬盘空间。缺点是最多只能运行12小时,时间一到就会清空VM上所有数据。这包括我们安装的软件,包括我们下载的数据,存放的计算结果。
Colaboratory 是免费的 Jupyter 笔记本环境,不需要进行任何设置就可以使用,并且完全在云端运行。
https://colab.research.google.com/notebooks/welcome.ipynb?authuser=0#scrollTo=-Rh3-Vt9Nev9
支持 GPU 的 TensorFlow,简单设置即可:
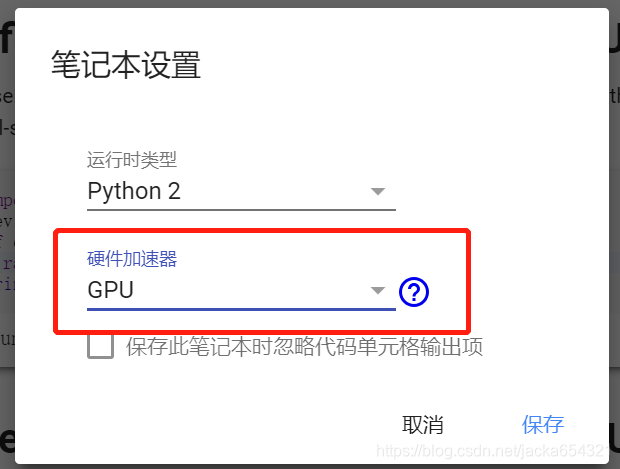
目前Colab只提供Tesla K80 GPU,你同时可以利用下面的指令来查看:
from tensorflow.python.client import device_lib
device_lib.list_local_devices()
能显示出你的所有使用的硬件;
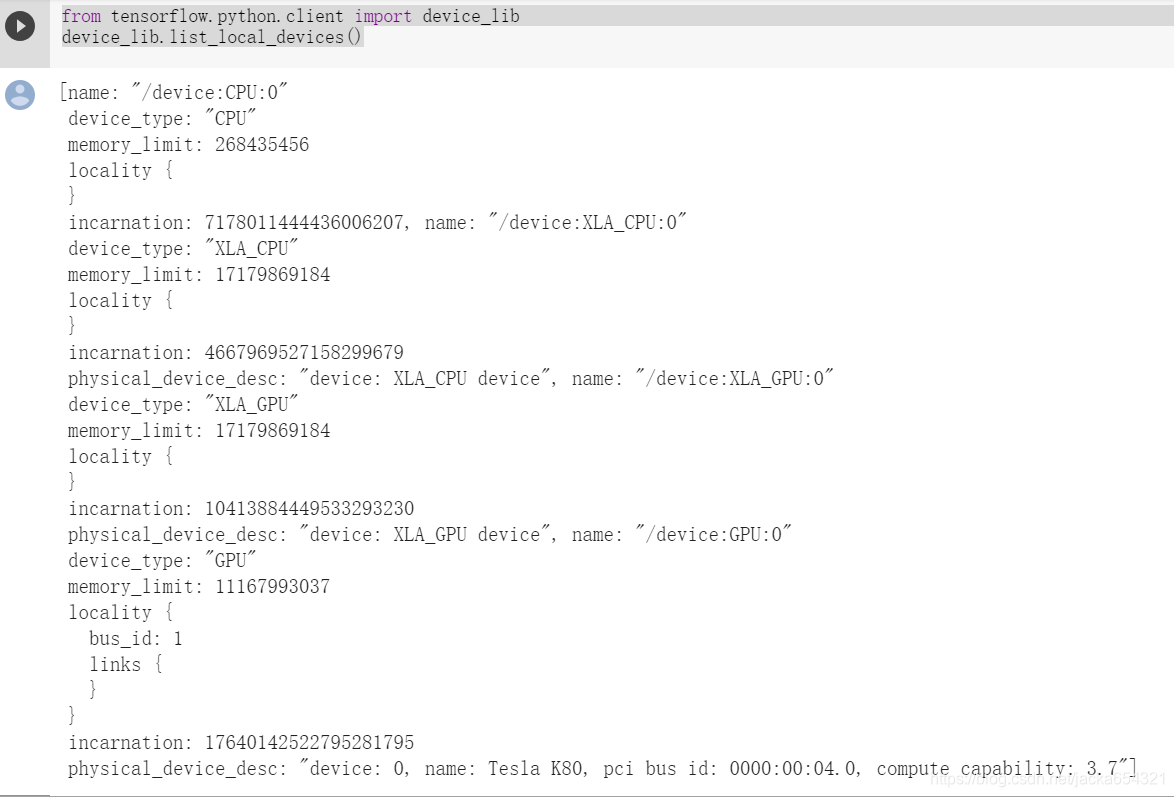
运行中的信息显示
我们还需要查看内存信息或者CPU信息,可以使用下面的命令:
内存:!cat /proc/meminfo
处理器:!cat /proc/cpuinfo
!ls /proc
#CPU信息
!cat /proc/cpuinfo
#内存
!cat /proc/meminfo
#版本
!cat /proc/version
#设备
!cat /proc/devices
#空间
!df
挂载google本地云盘
Mounting Google Drive locally
from google.colab import drive
drive.mount('/content/gdrive')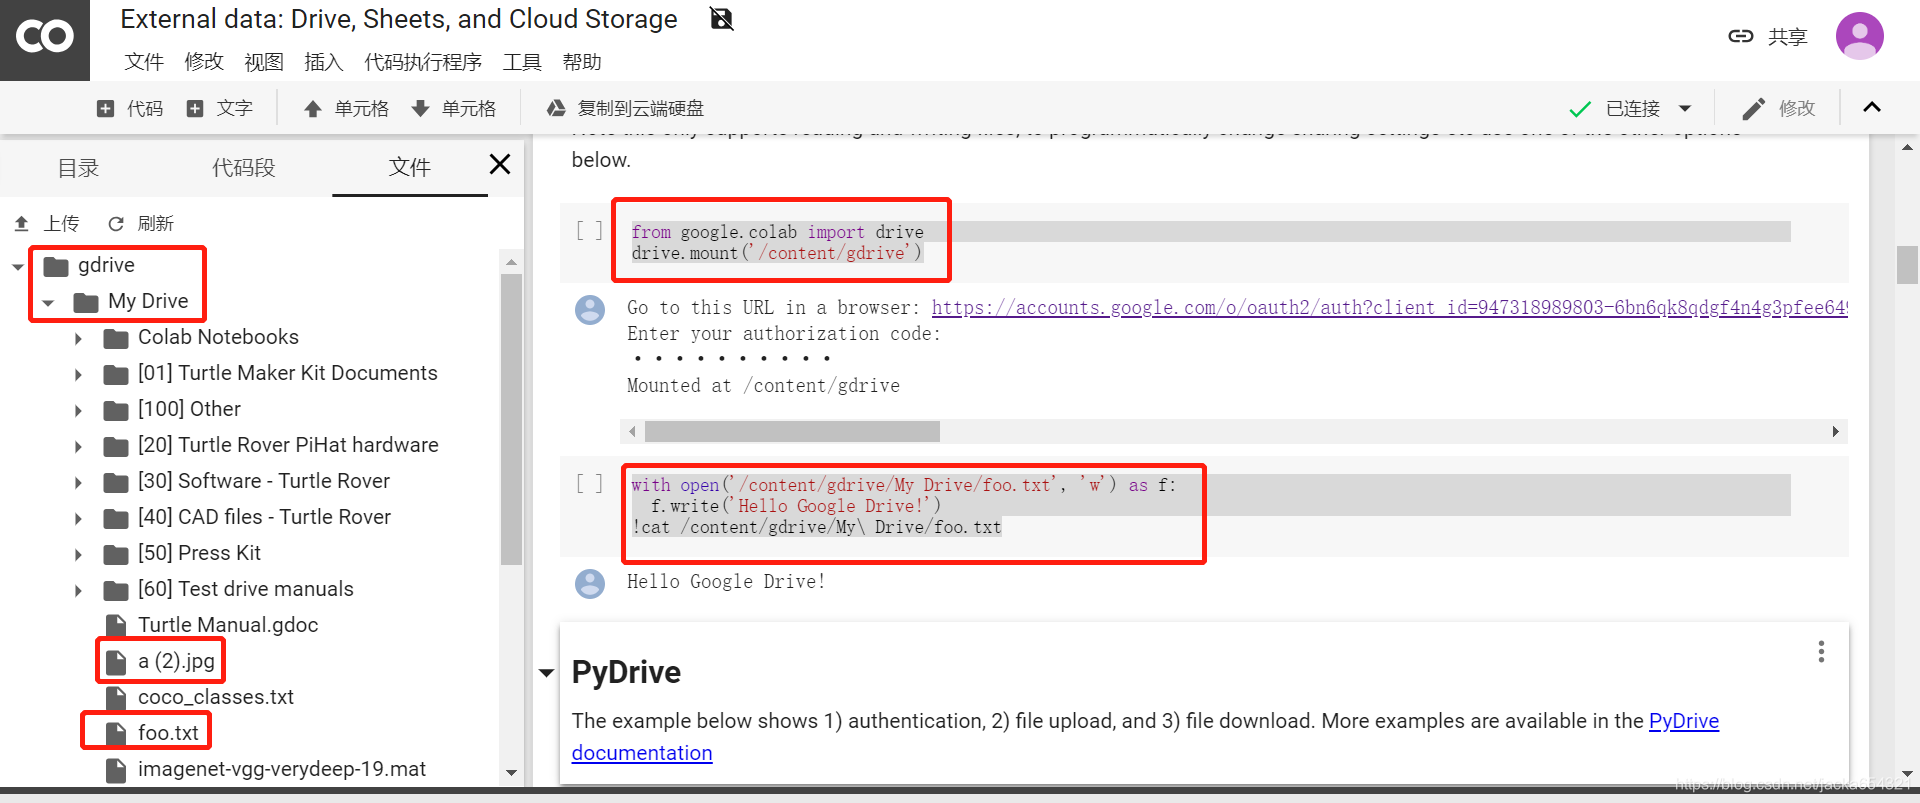
切换工作路径
在colab环境中,我们挂载Google drive的位置是 /content/drive/ 。
colab中的notebook和py文件默认都是以 /content/ 作为工作目录,需要执行一下命令手动切换工作目录,例如:
import os

path = "/content/drive/colab-notebook/lesson1-week2/assignment2"
os.chdir(path)
os.listdir(path)
测试:
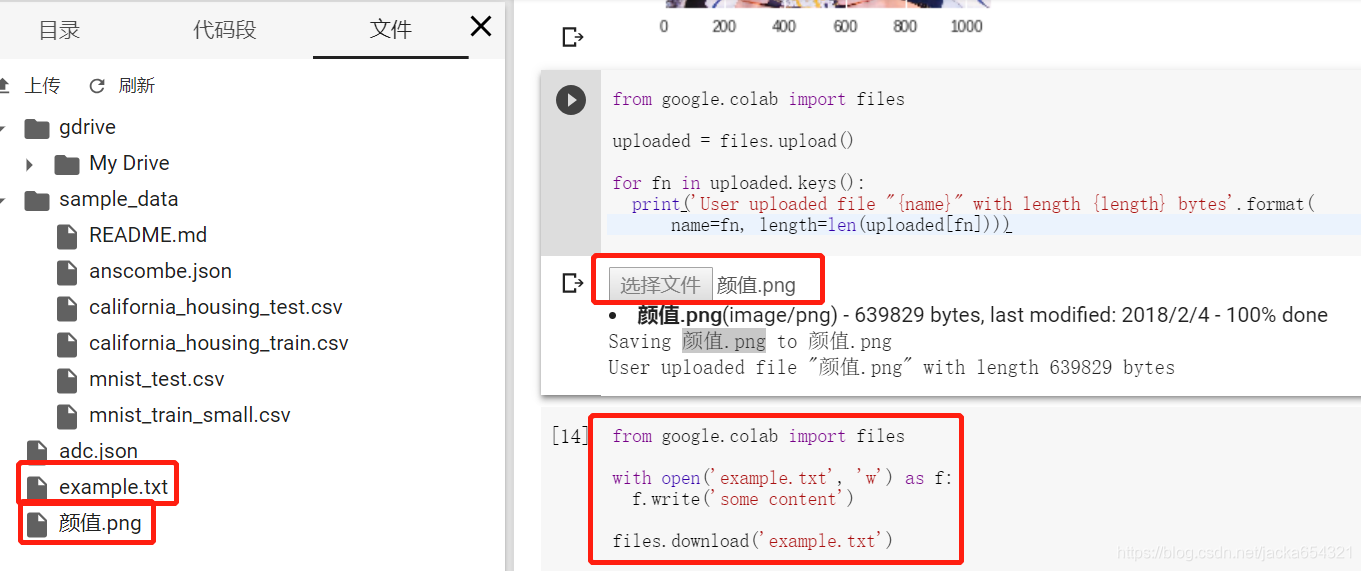
上传图片:
from google.colab import files

uploaded = files.upload()

for fn in uploaded.keys():
  print('User uploaded file "{name}" with length {length} bytes'.format(
      name=fn, length=len(uploaded[fn])))
新建文件、下载文件:
from google.colab import files

with open('example.txt', 'w') as f:
  f.write('some content')

files.download('example.txt')
1.使用gfile读图片,decode输出是Tensor,eval后是ndarray
import matplotlib.pyplot as plt
import tensorflow as tf
import numpy as np
from google.colab import files

print(tf.__version__)

#with open('/content/gdrive/My Drive/a(2).jpg', 'r') as f:
#  f.write('Hello Google Drive!')

image_raw = tf.gfile.FastGFile('gdrive/My Drive/a (2).jpg','rb').read()   #bytes
#image_raw = tf.gfile.FastGFile('颜值.png','rb').read()
img = tf.image.decode_jpeg(image_raw)  #Tensor
#img2 = tf.image.convert_image_dtype(img, dtype = tf.uint8)

with tf.Session() as sess:
    print(type(image_raw)) # bytes
    print(type(img)) # Tensor
    #print(type(img2))

    print(type(img.eval())) # ndarray !!!
    print(img.eval().shape)
    print(img.eval().dtype)

#    print(type(img2.eval()))
#    print(img2.eval().shape)
#    print(img2.eval().dtype)
    plt.figure(1)
    plt.imshow(img.eval())
    plt.show()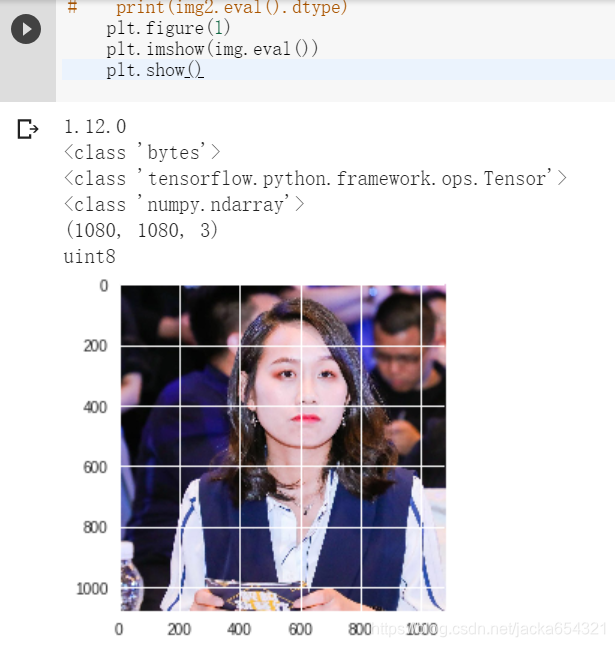
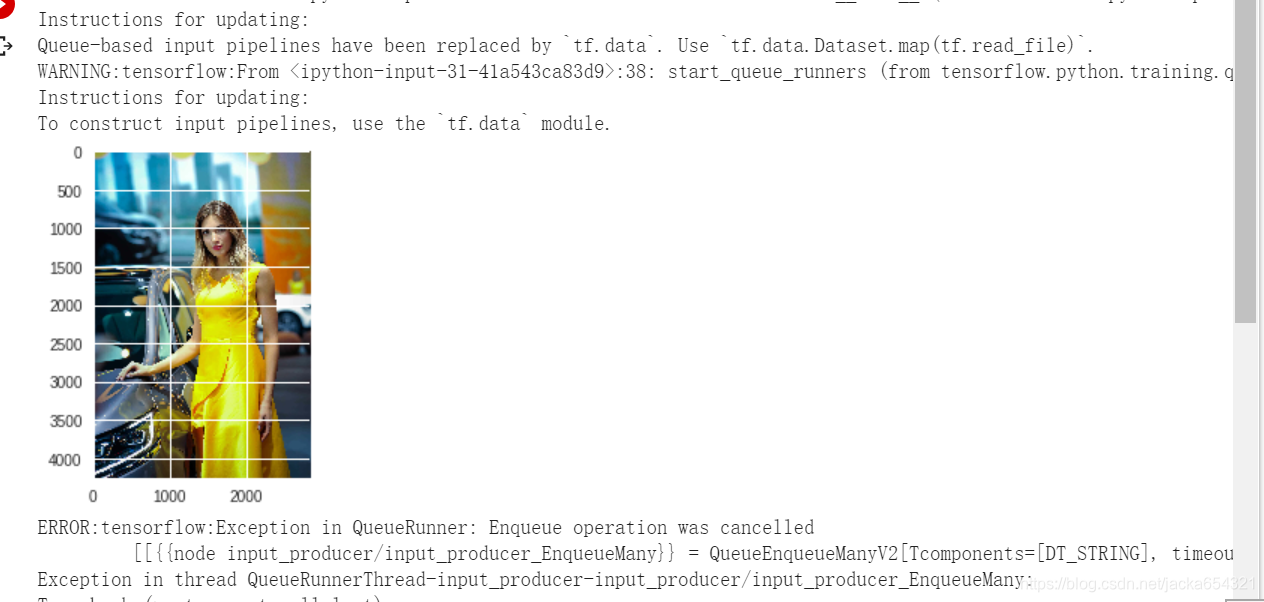
2.使用WholeFileReader输入queue,decode输出是Tensor,eval后是ndarray
import tensorflow as tf
import os
import matplotlib.pyplot as plt

def file_name(file_dir):   #来自http://blog.youkuaiyun.com/lsq2902101015/article/details/51305825
    for root, dirs, files in os.walk(file_dir):  #模块os中的walk()函数遍历文件夹下所有的文件
        print(root) #当前目录路径
        print(dirs) #当前路径下所有子目录
        print(files) #当前路径下所有非目录子文件

def file_name2(file_dir):   #特定类型的文件
    L=[]
    for root, dirs, files in os.walk(file_dir):
        for file in files:
            if os.path.splitext(file)[1] == '.jpg':
                L.append(os.path.join(root, file))
    return L

path = file_name2('test')


#以下参考http://blog.youkuaiyun.com/buptgshengod/article/details/72956846 (十图详解TensorFlow数据读取机制)
#以及http://blog.youkuaiyun.com/uestc_c2_403/article/details/74435286

#path2 = tf.train.match_filenames_once(path)
file_queue = tf.train.string_input_producer(path, shuffle=True, num_epochs=2) #创建输入队列
image_reader = tf.WholeFileReader()
key, image = image_reader.read(file_queue)
image = tf.image.decode_jpeg(image)

with tf.Session() as sess:
#    coord = tf.train.Coordinator() #协同启动的线程
#    threads = tf.train.start_queue_runners(sess=sess, coord=coord) #启动线程运行队列
#    coord.request_stop() #停止所有的线程
#    coord.join(threads)

    tf.local_variables_initializer().run()
    threads = tf.train.start_queue_runners(sess=sess)

    #print (type(image))
    #print (type(image.eval()))
    #print(image.eval().shape)
    for _ in path+path:
        plt.figure
        plt.imshow(image.eval())
        plt.show()
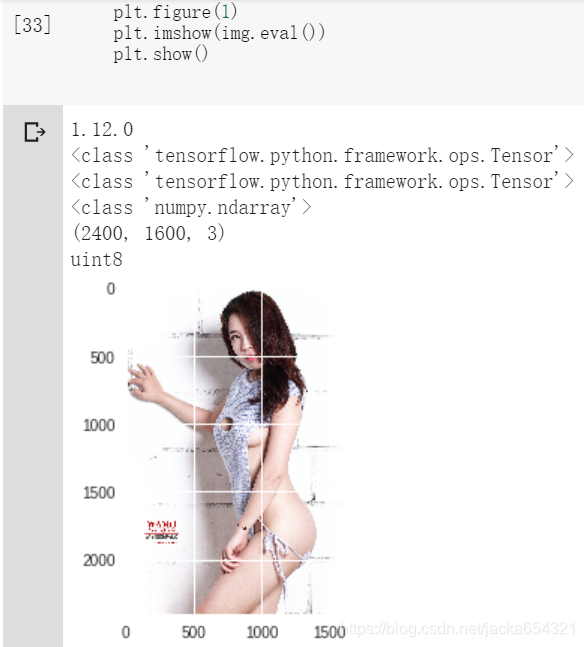
3.使用read_file,decode输出是Tensor,eval后是ndarray
import matplotlib.pyplot as plt
import tensorflow as tf
import numpy as np

print(tf.__version__)

image_value = tf.read_file('test/a.jpg')
img = tf.image.decode_jpeg(image_value, channels=3)

with tf.Session() as sess:
    print(type(image_value)) # bytes
    print(type(img)) # Tensor
    #print(type(img2))

    print(type(img.eval())) # ndarray !!!
    print(img.eval().shape)
    print(img.eval().dtype)

#    print(type(img2.eval()))
#    print(img2.eval().shape)
#    print(img2.eval().dtype)
    plt.figure(1)
    plt.imshow(img.eval())
    plt.show()
训练数据放到谷歌云盘上,
注意 数据路径,与在本地路径,有所差异:
!cd  gdrive
!ls gdrive/'My Drive'/Cats_vs_Dogs-master/data
!pwd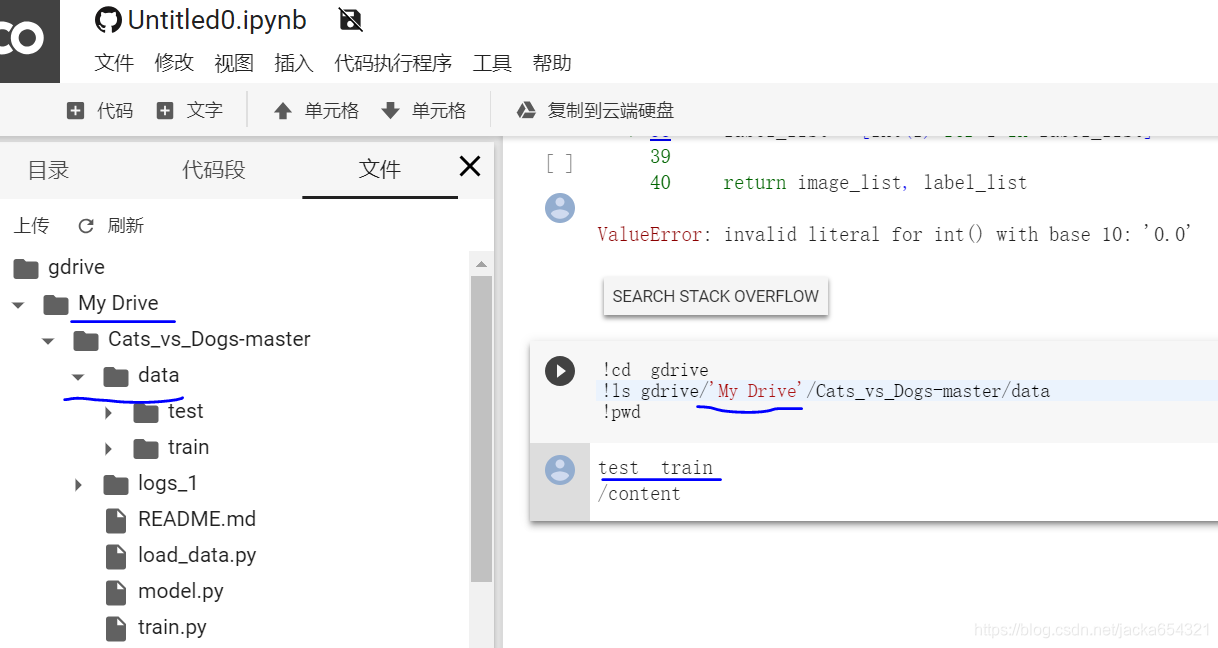
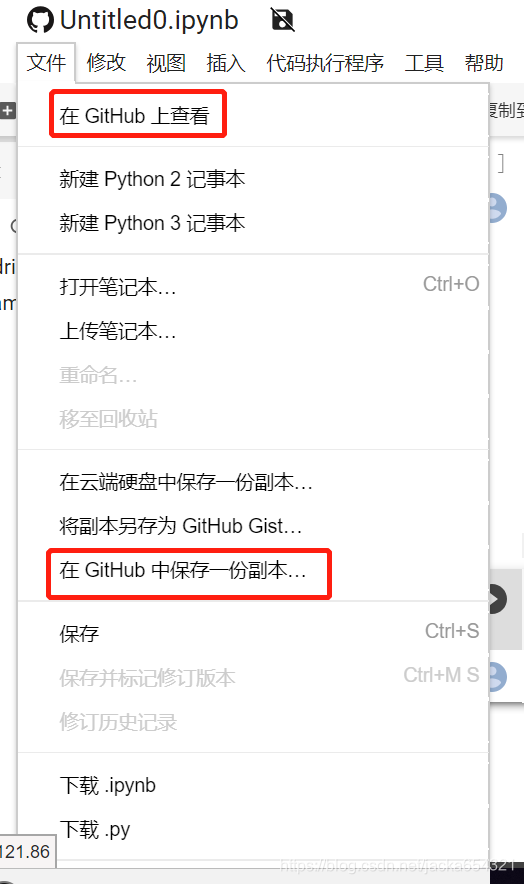
GitHub
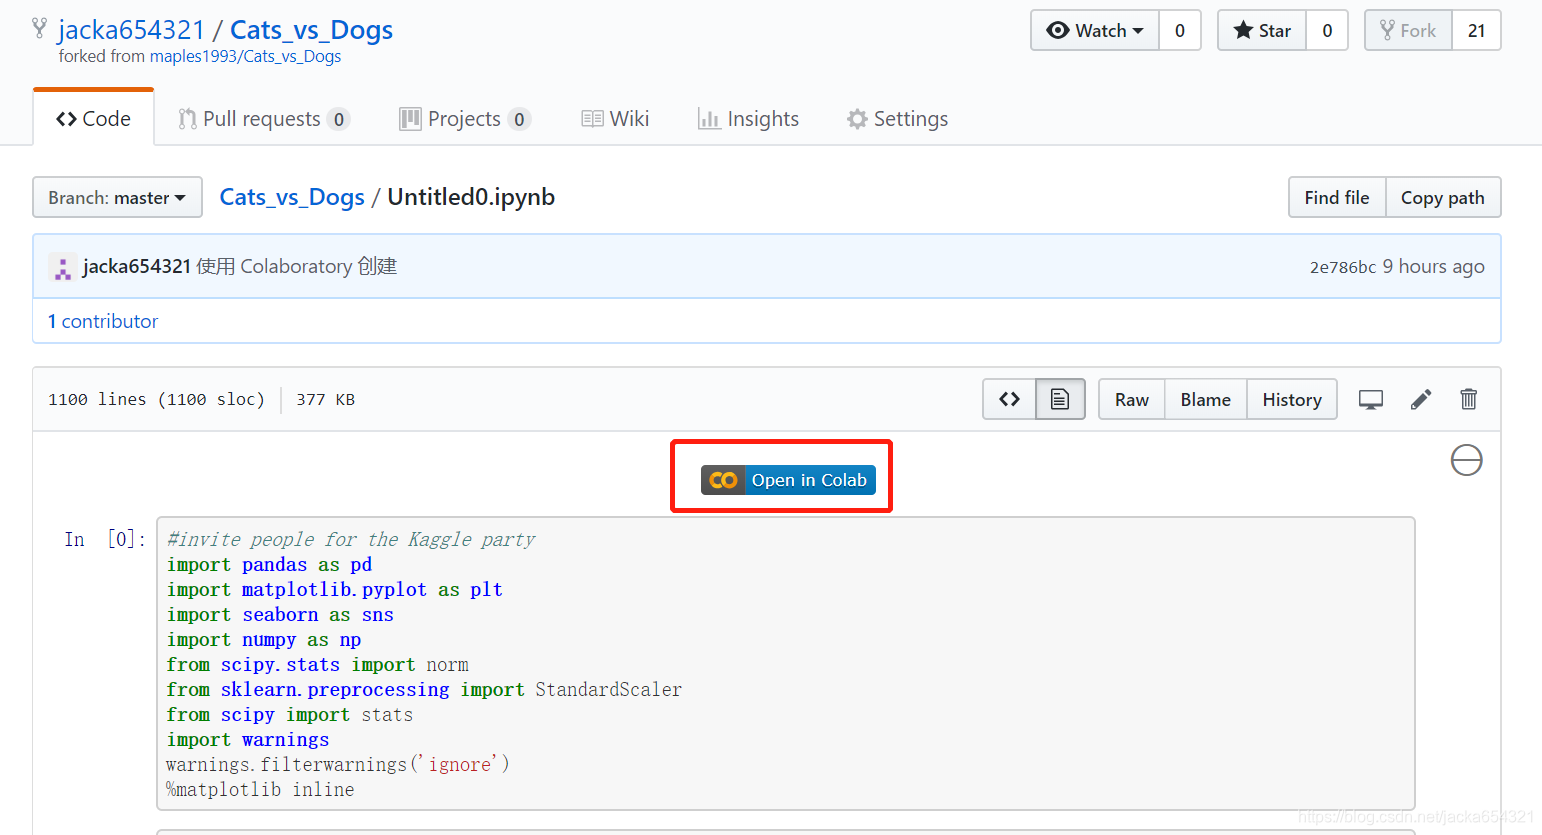
您可以通过依次转到“文件”>“在 GitHub 中保存一份副本…”,保存一个 Colab 笔记本副本
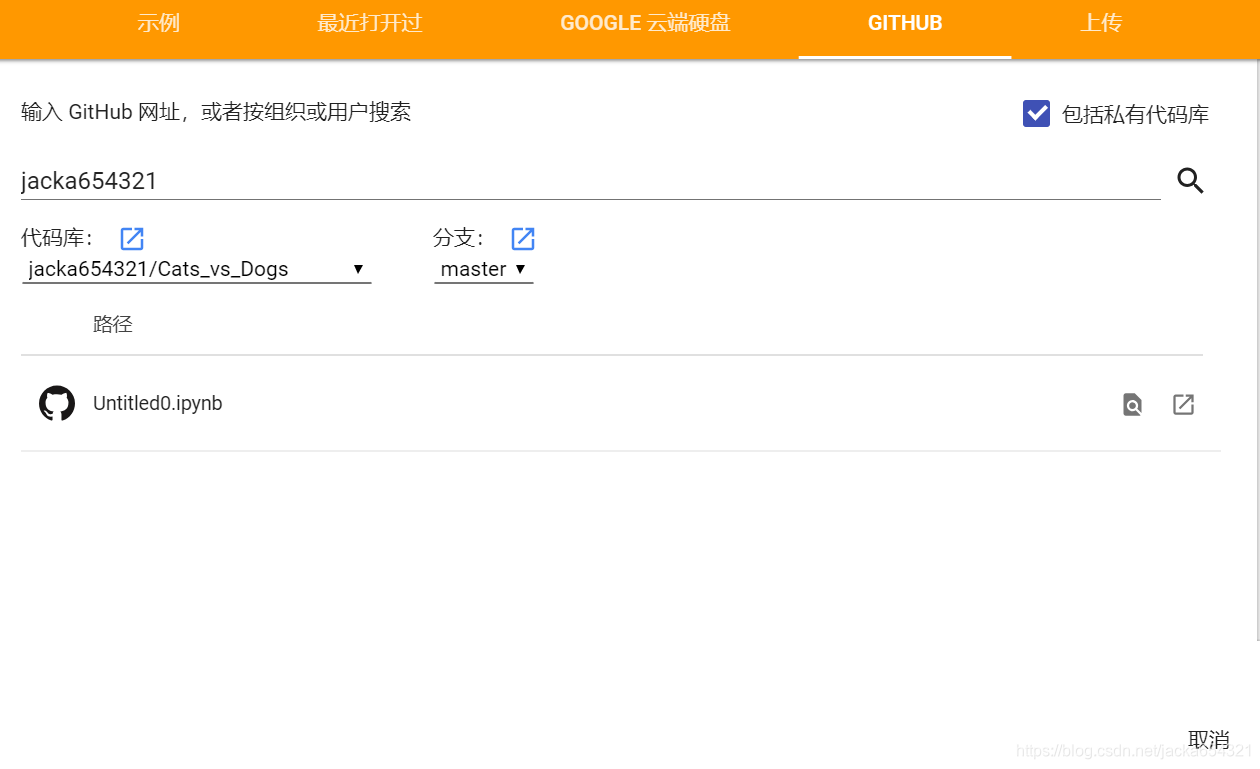
只需在 colab.research.google.com/github/ 后面加上路径,即可在 GitHub 上加载任何 .ipynb。例如,colab.research.google.com/github/tensorflow/models/blob/master/samples/core/get_started/_index.ipynb 将在 GitHub 上加载此 .ipynb。
下载GitHub到Colab:
!git clone https://github.com/wxs/keras-mnist-tutorial.git 'TerenceDrive/Colab Notebooks/keras-mnist-tutorial'
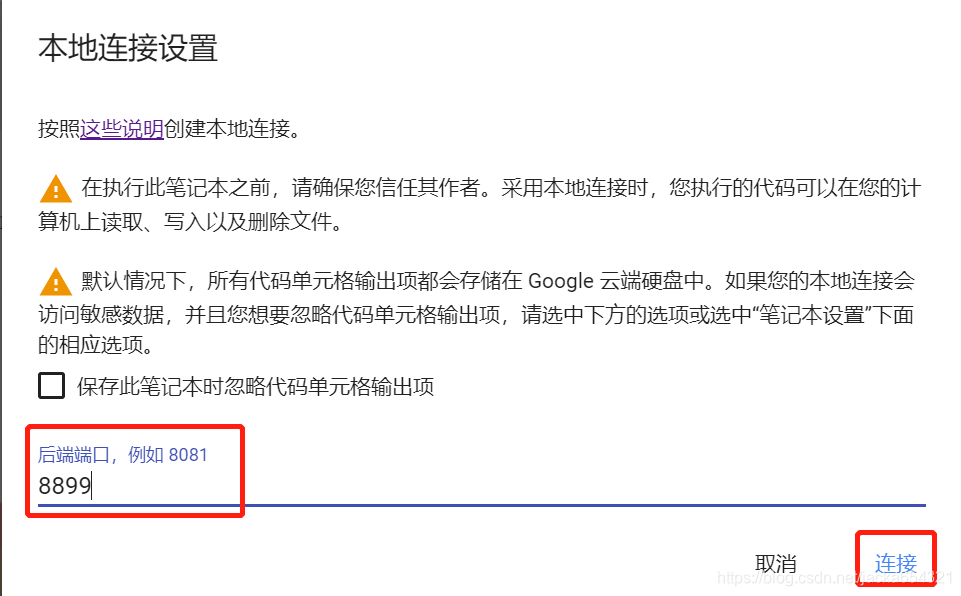
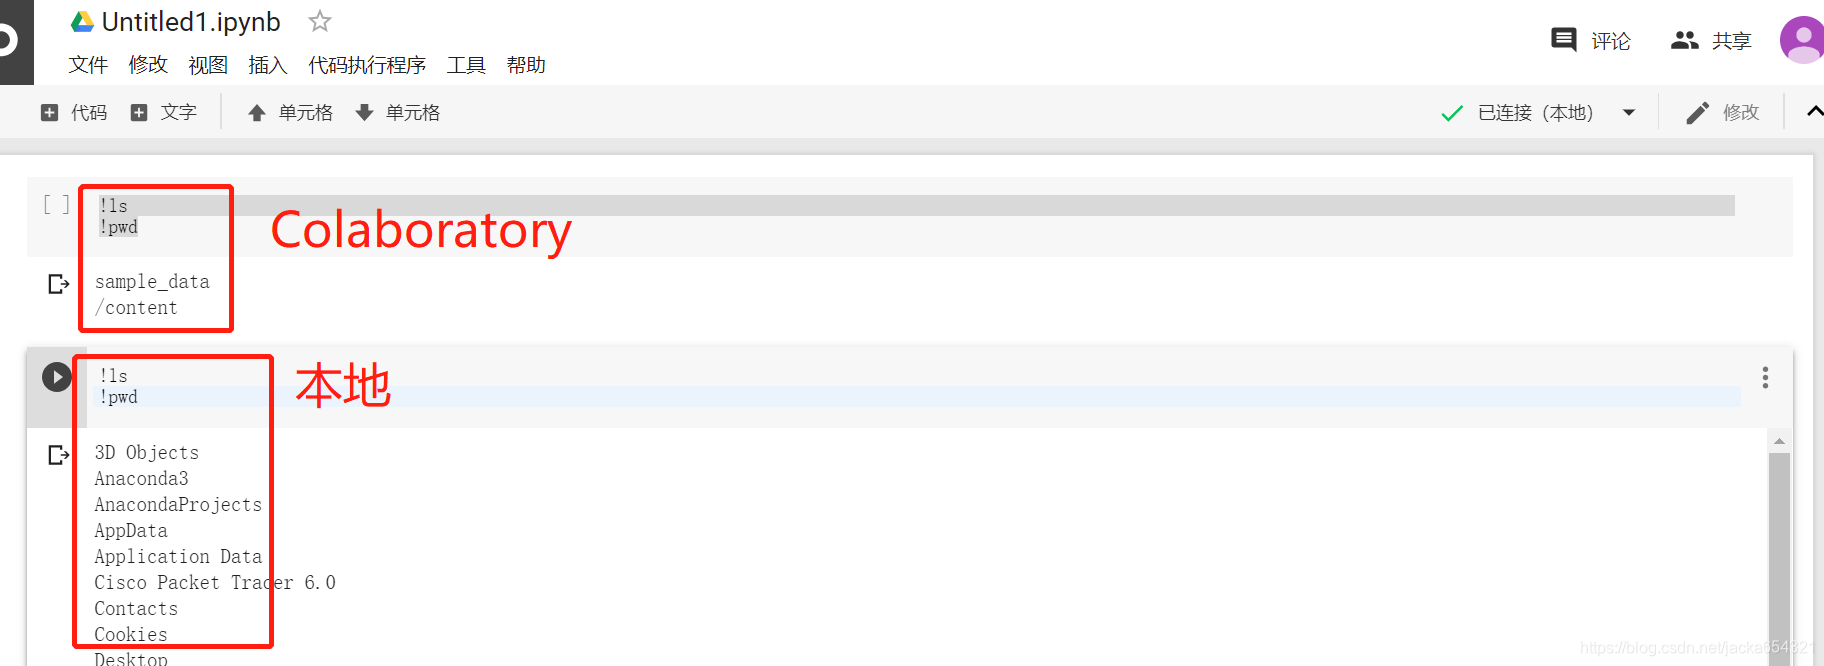
本地运行时支持
Colab 支持连接本地计算机上的 Jupyter 运行;这样一来,您就可以在本地硬件上执行代码并访问本地文件系统。
参考链接:
https://research.google.com/colaboratory/local-runtimes.html
1、打开本地Jupyter;
2、安装并启用jupyter_http_over_ws 扩展程序;(一次性)
pip install jupyter_http_over_ws
jupyter serverextension enable --py jupyter_http_over_ws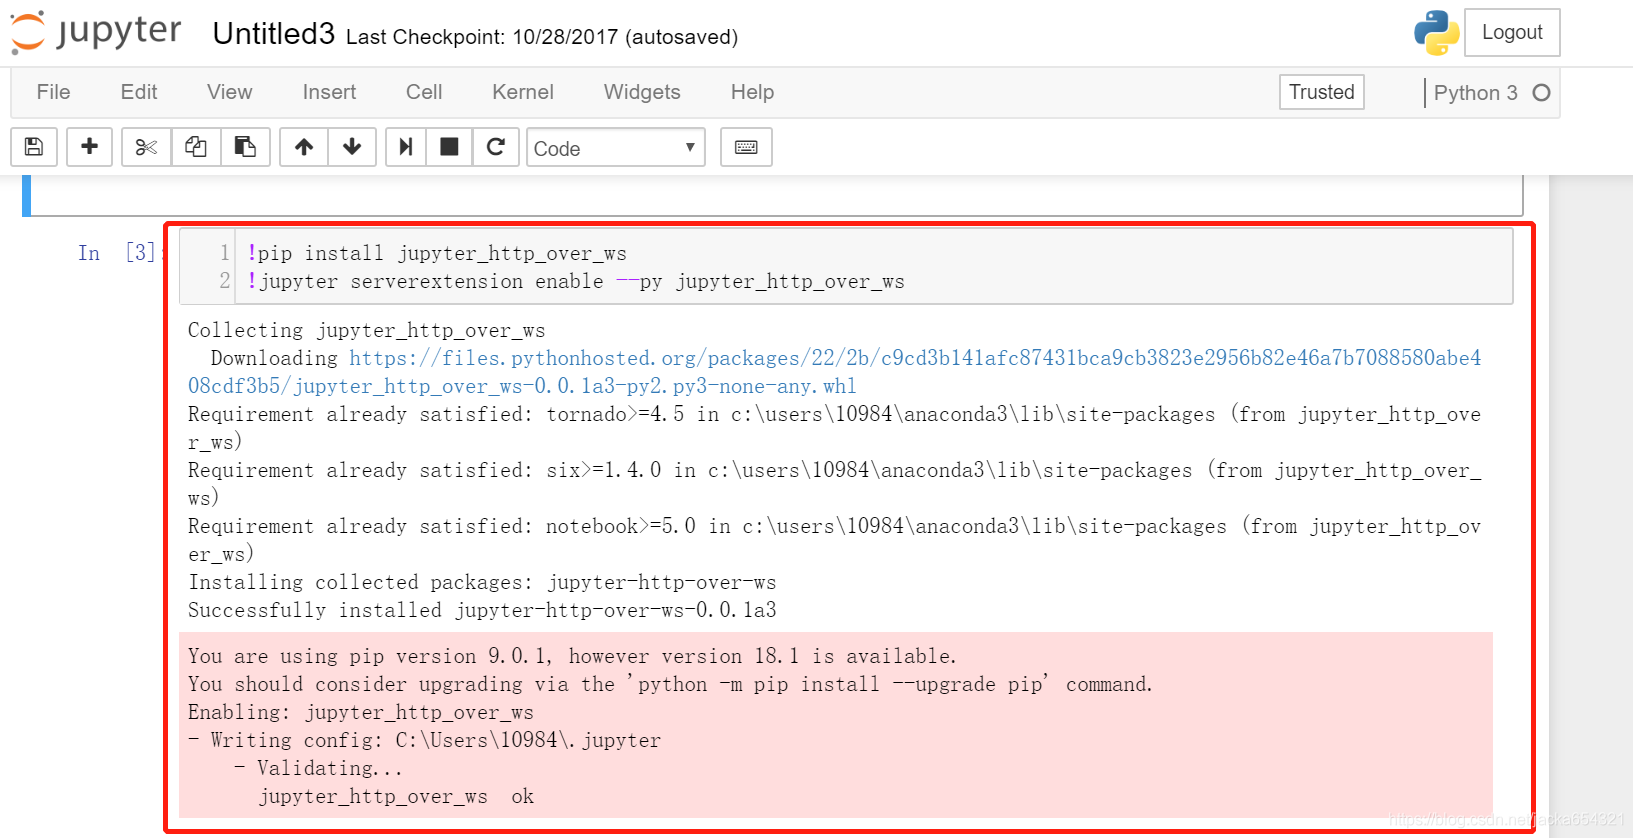
3、打开Anaconda Prompt,输入命令:
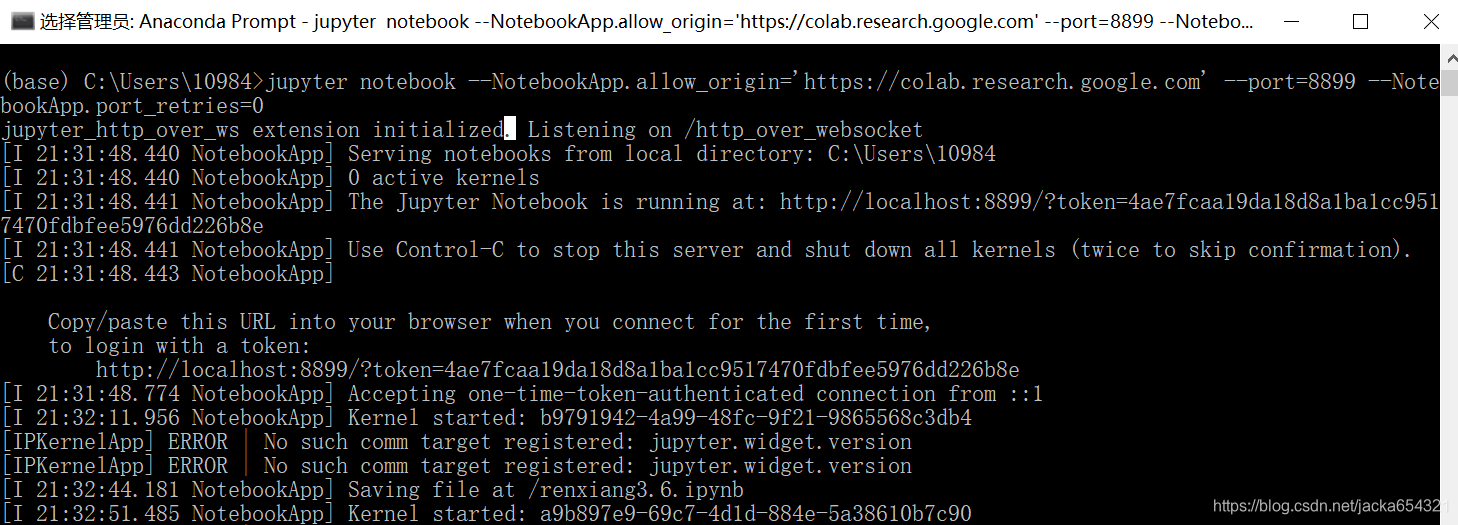
jupyter notebook --NotebookApp.allow_origin='https://colab.research.google.com' --port=8899 --NotebookApp.port_retries=0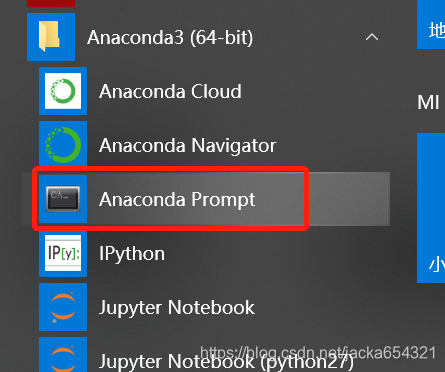
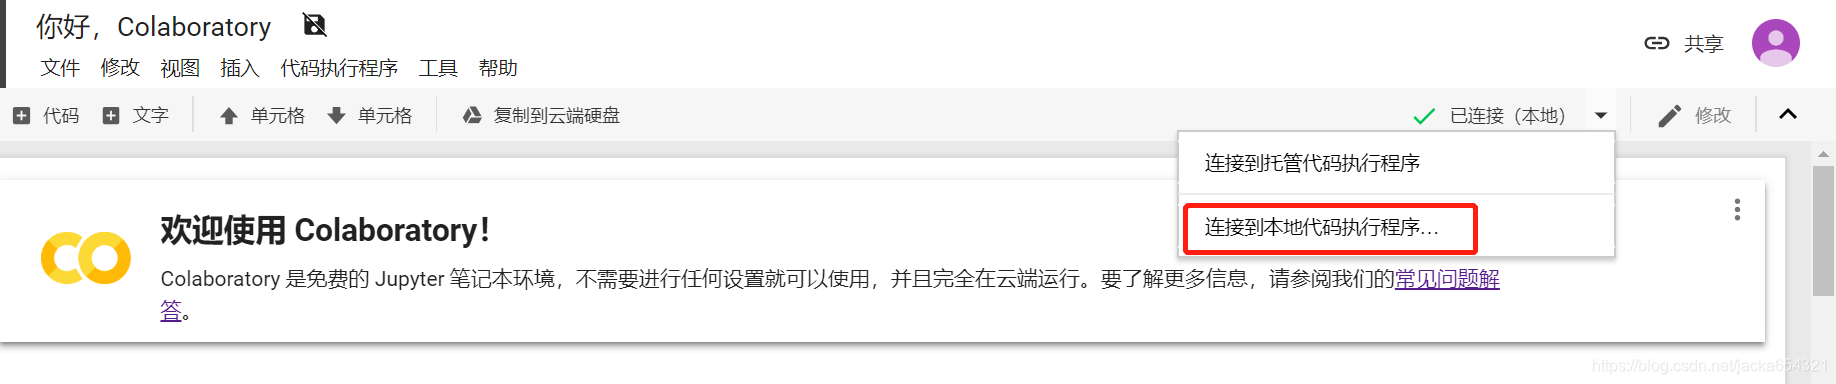
4、在 Colaboratory 中,点击“连接”按钮,然后选择“连接到本地运行时…”。在随即显示的对话框中输入上一步中的端口,然后点击“连接”按钮。

本地浏览器窗口:

可以尝试在Google Colab上的GPU训练ai challenger 场景分类:
TensorFlow全流程样板代码:以ai challenger 场景分类和slim预训练模型为例
https://blog.youkuaiyun.com/Wayne2019/article/details/78210172
https://blog.youkuaiyun.com/wayne2019/article/list/4?t=1
TensorFLow 读取图片1:初探四种从文件读取的方式
https://blog.youkuaiyun.com/Wayne2019/article/details/77884478
有精力还可以再玩玩:
【视频教程】Google Colaboratory 初学者动手数据分析
使用免费GPU深度学习平台colab玩转Kaggle比赛
https://blog.youkuaiyun.com/hohomi77/article/details/81261804
免费GPU计算平台-Floyd使用教程
https://blog.youkuaiyun.com/as472780551/article/details/78587395
Colab提供了免费TPU,机器之心帮你试了试


 5784
5784

 被折叠的 条评论
为什么被折叠?
被折叠的 条评论
为什么被折叠?
 到【灌水乐园】发言


