


 本文深入解析ArrayBlockingQueue的实现原理,包括其构造方法、添加、获取及移除元素的方法等,帮助读者理解如何使用这一有界阻塞队列。
ArrayBlockingQueue是一个由数组支持的有界阻塞队列。此队列按 FIFO(先进先出)原则对元素进行排序。队列的头部是在队列中存在时间最长的元素。队列的尾部是在队列中存在时间最短的元素。新元素插入到队列的尾部,队列获取操作则是从队列头部开始获得元素。
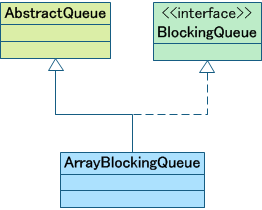
ArrayBlockingQueue继承自 AbstractQueue并实现 BlockingQueue接口。
ArrayBlockingQueue是一个典型的“有界缓存区”,固定大小的数组在其中保持生产者插入的元素和使用者提取的元素。一旦创建了这样的缓存区,就不能再增加其容量。试图向已满队列中放入元素会导致操作受阻塞,试图从空队列中提取元素将导致类似阻塞。
ArrayBlockingQueue支持对等待的生产者线程和使用者线程进行排序的可选公平策略。默认情况下,不保证是这种排序。然而,通过将公平性 (fairness) 设置为 true 而构造的队列允许按照 FIFO 顺序访问线程。公平性通常会降低吞吐量,但也减少了可变性和避免了“不平衡性”。 公平性通过创建 ArrayBlockingQueue实例时指定。
1.成员变量
/** 队列数组实现 */
private final E[] items;
/** 已取出元素索引,用于下一个元素的 take, poll or remove */
private int takeIndex;
/** 已插入元素索引,用于下一个元素的 put, offer, or add */
private int putIndex;
/** 队列中项目数 */
private int count;
/** 保护所有访问的主锁 */
private final ReentrantLock lock;
/** Condition 实例,用于等待中 take */
private final Condition notEmpty;
/** Condition 实例,用于等待中 put*/
private final Condition notFull;
之前我们已经学习了锁相关的知识,所以几个成员变量不难理解。
1)其中E[] items;是数组式的队列实现;
2)takeIndex 用于记录 take操作的次数;
3)putIndex 用于记录 put操作的次数;
4)count 用于记录队列中元素数目;
5)ReentrantLock lock 是用于控制访问的主锁;
6)Condition notEmpty 获取操作时的条;
7)Condition notFull 插入操作时的条件;
2.构造方法
ArrayBlockingQueue的构造方法有3个。
1)最简单的构造方法:
//指定队列大小
public ArrayBlockingQueue(int capacity) {
	this(capacity, false);
}
此种构造方法最为简单也最为常用,在创建 ArrayBlockingQueue实例时只需指定其大小即可。
BlockingQueue<Object> q = new ArrayBlockingQueue<Object>(10);2)增加访问策略的构造方法,除了指定队列大小外还可指定队列的访问策略:
//指定队列大小、访问策略
public ArrayBlockingQueue(int capacity, boolean fair) {
	if (capacity <= 0)
		throw new IllegalArgumentException();
	this.items = (E[]) new Object[capacity];
	lock = new ReentrantLock(fair);
	notEmpty = lock.newCondition();
	notFull = lock.newCondition();
}
fair如果为 true,则按照 FIFO 顺序访问插入或移除时受阻塞线程的队列;如果为 false,则访问顺序是不确定的。
构造方法中首先初始化了 items数组,然后根据fair创建 ReentrantLock实例,最后返回 notEmpty与 notFull两个 Condition实例,分别用于等待中的获取与添加操作。
3)带初始元素的构造方法:
//指定队列大小、访问策略、初始元素
public ArrayBlockingQueue(int capacity, boolean fair, Collection<? extends E> c) {
	this(capacity, fair);
	if (capacity < c.size())
		throw new IllegalArgumentException();

	for (Iterator<? extends E> it = c.iterator(); it.hasNext();)
		add(it.next());
}
除了可以指定容量和访问策略外,还可以包含给定 collection 的元素,并以 collection 迭代器的遍历顺序添加元素。
代码也可以观察到,在实例化队列之后还使用了add方法将 collection 中的元素按原有顺序添加到实例中。
3.添加元素
1)add方法
ArrayBlockingQueue的add方法调用的是父类方法,而父类 add方法则调用的是 offer方法,以下是add方法的源代码:
public boolean add(E e) {
	//调用父类add方法
	return super.add(e);
}
2)offer方法
offer方法将指定的元素插入到此队列的尾部(如果立即可行且不会超过该队列的容量),在成功时返回 true,如果此队列已满,则返回 false。此方法通常要优于 add(E) 方法,后者可能无法插入元素,而只是抛出一个异常。
/**
 * 将指定的元素插入到此队列的尾部(如果立即可行且不会超过该队列的容量),
 * 在成功时返回 true,如果此队列已满,则返回 false。
 * 此方法通常要优于 add(E) 方法,后者可能无法插入元素,而只是抛出一个异常。
 */
public boolean offer(E e) {
	//判断e是否为null
	if (e == null)
		throw new NullPointerException();
	final ReentrantLock lock = this.lock;
	//获取锁
	lock.lock();
	try {
		//判断队列是否已满
		if (count == items.length)
			return false;
		else {
			//如果未满则插入
			insert(e);
			return true;
		}
	} finally {
		//释放锁
		lock.unlock();
	}
}
因为 add方法在队列已满时会抛出异常,所以 offer方法一般优于 add方法使用。
首先,判断要添加的元素是否为 null,如果为null则抛出空指针异常。
接着,创建一个 ReentrantLock实例,ReentrantLock是可重入锁实现。更详细介绍参考http://286.iteye.com/blog/2296191
然后,获取锁。
最后,判断队列是否已满,如果已满则返回 false;如果未满则调用insert方法插入元素,返回true。
所有操作完成后释放锁。
offer方法的处理流程可以参照以下流程图:
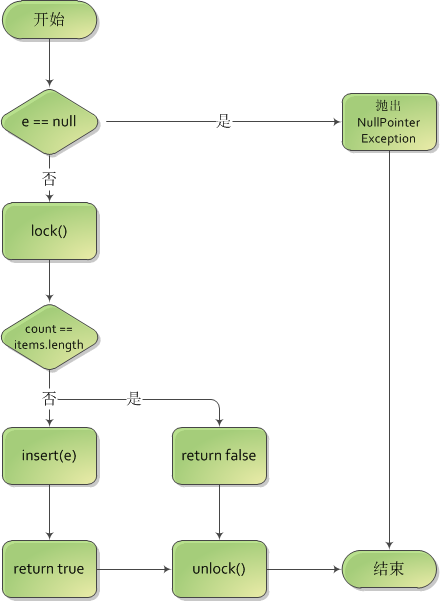
从代码中就可以看到,offer方法利用了ReentrantLock来实现队列阻塞的功能,所以多线程操作相同队列时会排队等待。
offer的另一个重载方法是 offer(E e, long timeout, TimeUnit unit),此重载方法将指定的元素插入此队列的尾部,如果该队列已满,则在到达指定的等待时间之前等待可用的空间。其源代码为:
/**
 * 将指定的元素插入此队列的尾部,如果该队列已满,则在到达指定的等待时间之前等待可用的空间。
 */
public boolean offer(E e, long timeout, TimeUnit unit) throws InterruptedException {

	if (e == null)
		throw new NullPointerException();
	long nanos = unit.toNanos(timeout);
	final ReentrantLock lock = this.lock;
	lock.lockInterruptibly();
	try {
		for (;;) {
			if (count != items.length) {
				insert(e);
				return true;
			}
			if (nanos <= 0)
				return false;
			try {
				nanos = notFull.awaitNanos(nanos);
			} catch (InterruptedException ie) {
				notFull.signal(); // propagate to non-interrupted thread
				throw ie;
			}
		}
	} finally {
		lock.unlock();
	}
}
与普通offer方法不同之处在于:offer(E e, long timeout, TimeUnit unit)方法利用循环在指定时间内不断去尝试添加元素,如果成功则返回true,如果指定时间已到则退出返回 false。
3)insert方法
insert方法在当前位置(putIndex)插入元素。
/**
 * 在当前位置(putIndex)插入元素(在获得锁的情况下调用)
 */
private void insert(E x) {
	//设置 putIndex位置 items数组元素为x
	items[putIndex] = x;
	//返回putIndex新值,如果已满则返回0,未满则+1
	putIndex = inc(putIndex);
	//增加元素数量
	++count;
	//唤醒获取线程
	notEmpty.signal();
}
因为 ArrayBlockingQueue内部队列实现为数组items,而 putIndex则记录了队列中已添加元素的位置,所以新添加的元素就直接被添加到数组的指定位置。随后修改 putIndex值,如果队列未满则+1,如果已满则从0重新开始。最后唤醒 notEmpty中的一个线程。
4)put方法
将指定的元素插入此队列的尾部,如果该队列已满,则等待可用的空间。
以下是put方法的源代码:
/**
 * 将指定的元素插入此队列的尾部,如果该队列已满,则等待可用的空间
 */
public void put(E e) throws InterruptedException {
	//判断e是否为null
	if (e == null)
		throw new NullPointerException();
	final E[] items = this.items;
	final ReentrantLock lock = this.lock;
	//获取中断锁
	lock.lockInterruptibly();
	try {
		try {
			//利用循环判断队列是否已满
			while (count == items.length)
				//如果已满则调用await方法阻塞等待
				notFull.await();
		} catch (InterruptedException ie) {
			notFull.signal(); // propagate to non-interrupted thread
			throw ie;
		}
		//队列未满则插入
		insert(e);
	} finally {
		//释放锁
		lock.unlock();
	}
}
put方法与其他方法类似,其中会循环判断队列是否已满,如果已满则阻塞 notFull,如果未满则调用 insert方法添加元素。因为其中运用了循环判断队列是否有位置添加新元素,如果队列已满则产生阻塞等待,直至可以添加元素为止。
将本文开始时的例子修改一下,去掉消费者,只留下生产者,这样当队列满了之后没有消费者去消费产品,生产者就不会再向队列中插入了:
class Producer implements Runnable {
	private final ArrayBlockingQueue<Integer> queue;
	private int i;

	Producer(ArrayBlockingQueue<Integer> q) {
		queue = q;
	}

	public void run() {
		try {
			while (true) {
				int p=produce();
				queue.put(p);// 将产品放入缓冲队列
				System.out.println("插入成功:"+p);
			}
		} catch (InterruptedException e) {
			e.printStackTrace();
		}
	}

	int produce() {
		return i++;// 生产产品
	}
}

public class Runner {
	public static void main(String[] args) {
		ArrayBlockingQueue<Integer> q = new ArrayBlockingQueue<Integer>(10);
		Producer p = new Producer(q);
		new Thread(p).start();
	}
}
//结果:
插入成功:0
插入成功:1
插入成功:2
插入成功:3
插入成功:4
插入成功:5
插入成功:6
插入成功:7
插入成功:8
插入成功:9
此时程序并不会退出,而是阻塞在那里等待队列有位置插入。
4.获取元素
1)peek方法
获取但不移除此队列的头;如果此队列为空,则返回 null。以下是peek方法的源代码:
/**
 * 获取但不移除此队列的头;如果此队列为空,则返回 null
 */
public E peek() {
	final ReentrantLock lock = this.lock;
	//获取锁
	lock.lock();
	try {
		//判断队列中是否有元素,如果没有则返回null,如果存在则返回该元素
		return (count == 0) ? null : items[takeIndex];
	} finally {
		//释放锁
		lock.unlock();
	}
}
peek代码比较简单,首先判断队列是否有元素,即count==0,如果为空则返回null,非空则返回相应元素。
2)poll方法
获取并移除此队列的头,如果此队列为空,则返回 null。以下是poll方法的源代码:
/**
 * 获取并移除此队列的头,如果此队列为空,则返回 null
 */
public E poll() {
	final ReentrantLock lock = this.lock;
	//获取锁
	lock.lock();
	try {
		//判断是否存在元素
		if (count == 0)
			return null;
		//调用extract方法返回元素
		E x = extract();
		return x;
	} finally {
		//释放锁
		lock.unlock();
	}
}
poll方法调用的是 extract()方法来获取头元素。
3)extract方法
以下是extract()方法的源代码:
/**
 * 从 takeIndex位置获取元素(在获得锁的情况下调用)
 */
private E extract() {
	final E[] items = this.items;
	//获取元素
	E x = items[takeIndex];
	//移除原位置元素
	items[takeIndex] = null;
	//计算 takeIndex新值
	takeIndex = inc(takeIndex);
	--count;
	//唤醒添加线程
	notFull.signal();
	return x;
}
4)take方法
获取并移除此队列的头部,在元素变得可用之前一直等待(如果有必要)。
/**
 * 获取并移除此队列的头部,在元素变得可用之前一直等待(如果有必要)
 */
public E take() throws InterruptedException {
	final ReentrantLock lock = this.lock;
	// 获取中断锁
	lock.lockInterruptibly();
	try {
		try {
			// 如果队列未空则阻塞等待,直到有元素为止
			while (count == 0)
				notEmpty.await();
		} catch (InterruptedException ie) {
			notEmpty.signal(); // 唤醒获取线程
			throw ie;
		}
		// 调用extract方法返回元素
		E x = extract();
		return x;
	} finally {
		// 释放锁
		lock.unlock();
	}
}
与put方法类似,take方法也是利用循环阻塞的方式来获取元素,如果没有元素则等待,直至获取元素为止。
与put方法的例子类似,生产者只生产5个产品,消费完这5个产品后,消费者就不得不等待队列有元素可取:
class Producer implements Runnable {
	private final ArrayBlockingQueue<Integer> queue;
	private int i;

	Producer(ArrayBlockingQueue<Integer> q) {
		queue = q;
	}

	public void run() {
		try {
			for (int i = 0; i < 5; i++) {
				int p = produce();
				queue.put(p);// 将产品放入缓冲队列
				System.out.println("插入成功:" + p);
			}
		} catch (InterruptedException e) {
			e.printStackTrace();
		}
	}

	int produce() {
		return i++;// 生产产品
	}
}

class Consumer implements Runnable {
	private final ArrayBlockingQueue<Integer> queue;

	Consumer(ArrayBlockingQueue<Integer> q) {
		queue = q;
	}

	public void run() {
		try {
			while (true) {
				int p = queue.take();
				System.out.println("获取成功:" + p);
			}
		} catch (InterruptedException e) {
			e.printStackTrace();
		}
	}

	void consume(Object x) {
		System.out.println("消费:" + x);// 消费产品
	}
}

public class Runner {
	public static void main(String[] args) {
		ArrayBlockingQueue<Integer> q = new ArrayBlockingQueue<Integer>(10);// 或其他实现
		Producer p = new Producer(q);
		Consumer c1 = new Consumer(q);
		Consumer c2 = new Consumer(q);
		new Thread(p).start();
		new Thread(c1).start();
		new Thread(c2).start();
	}
}
//结果:
插入成功:0
插入成功:1
插入成功:2
插入成功:3
插入成功:4
获取成功:0
获取成功:1
获取成功:2
获取成功:3
获取成功:4
之后程序也是会阻塞在那里。
5.移除元素
1)remove方法
remove方法从此队列中移除指定元素的单个实例(如果存在)。更确切地讲,如果此队列包含一个或多个满足 o.equals(e) 的元素 e,则移除该元素。如果此队列包含指定的元素(或者此队列由于调用而发生更改),则返回 true。
/**
 * 从此队列中移除指定元素的单个实例(如果存在)
 */
public boolean remove(Object o) {
	//判断要移除元素是否为空
	if (o == null)
		return false;
	final E[] items = this.items;
	final ReentrantLock lock = this.lock;
	//获取锁
	lock.lock();
	try {
		int i = takeIndex;
		int k = 0;
		for (;;) {
			//判断队列是否含有元素
			if (k++ >= count)
				return false;
			//比较
			if (o.equals(items[i])) {
				//移除
				removeAt(i);
				return true;
			}
			//返回i新值,以便下次循环使用
			i = inc(i);
		}

	} finally {
		//释放锁
		lock.unlock();
	}
}
remove方法其中利用循环来不断判断该元素的位置,如果找到则调用 removeAt方法移除指定位置的数组元素。
以下是一个移除的小例子:
ArrayBlockingQueue<Integer> q = new ArrayBlockingQueue<Integer>(10);
// 添加10个元素
for (int i = 0; i < 10; i++) {
	q.add(i);
}
// 移除值为 1,3,5,7,9 的这五个元素
q.remove(1);
q.remove(3);
q.remove(5);
q.remove(7);
q.remove(9);
//又移除了一次 9
q.remove(9);
for (Integer i : q) {
	System.out.println(i);
}
//结果:
0
2
4
6
8
从结果可以看出,从队列中正确的移除了我们指定的元素,在最后即使指定已经不存在的元素值,remove方法也之后返回false。
2)drainTo方法
drainTo方法用于移除此队列中所有可用的元素,并将它们添加到给定 collection 中。此操作可能比反复轮询此队列更有效。在试图向 collection c 中添加元素没有成功时,可能导致在抛出相关异常时,元素会同时在两个 collection 中出现,或者在其中一个 collection 中出现,也可能在两个 collection 中都不出现。如果试图将一个队列放入自身队列中,则会导致 IllegalArgumentException 异常。此外,如果正在进行此操作时修改指定的 collection,则此操作行为是不确定的。
以下是 drainTo方法的源代码:
public int drainTo(Collection<? super E> c) {
	//如果指定 collection为 null 抛出异常
    if (c == null)
        throw new NullPointerException();
    //如果指定 collection 是此队列,或者此队列元素的某些属性不允许将其添加到指定 collection 抛出异常
    if (c == this)
        throw new IllegalArgumentException();
    final E[] items = this.items;
    final ReentrantLock lock = this.lock;
    //获取锁
    lock.lock();
    try {
    	//take操作的位置
        int i = takeIndex;
        int n = 0;
        //元素数量
        int max = count;
        //利用循环不断取出元素添加到c中
        while (n < max) {
            c.add(items[i]);
            items[i] = null;
            i = inc(i);
            ++n;
        }
        //添加完成后初始化必要值,唤醒添加线程
        if (n > 0) {
            count = 0;
            putIndex = 0;
            takeIndex = 0;
            notFull.signalAll();
        }
        //返回添加元素数量
        return n;
    } finally {
    	//释放锁
        lock.unlock();
    }
}
代码中并没有添加失败的相关处理,所以结果如上所说并不一定完整。以下是相关实例:
ArrayBlockingQueue<Integer> q = new ArrayBlockingQueue<Integer>(10);
List<Integer> list = new ArrayList<Integer>();
// 添加10个元素
for (int i = 0; i < 10; i++) {
	q.add(i);
	list.add(i + 10);
}
//将q中的元素添加到 list中
q.drainTo(list);
for (Integer i : list) {
	System.out.println(i);
}
//结果:
10
11
12
13
14
15
16
17
18
19
0
1
2
3
4
5
6
7
8
9
需要值得注意的是 drainTo方法是将队列中的元素按顺序添加到指定 Collection中,别弄反了。
drainTo(Collection<? super E> c, int maxElements)用法类似,只不过指定了移除元素数。
3)clear方法
移除此队列中的所有元素。在此调用返回之后,队列将为空。
/**
 * 移除此队列中的所有元素。在此调用返回之后,队列将为空
 */
public void clear() {
	final E[] items = this.items;
	final ReentrantLock lock = this.lock;
	//获取锁
	lock.lock();
	try {
		int i = takeIndex;
		int k = count;
		//将数组元素置为null
		while (k-- > 0) {
			items[i] = null;
			i = inc(i);
		}
		//初始化其他参数
		count = 0;
		putIndex = 0;
		takeIndex = 0;
		//唤醒添加线程
		notFull.signalAll();
	} finally {
		//释放锁
		lock.unlock();
	}
}
clear方法比较简单,就是利用循环清除数组中的元素,然后将相关参数置为初始值。
ArrayBlockingQueue还有一些其他方法,这些方法相对简单这里就不细说了。


 315
315

 被折叠的 条评论
为什么被折叠?
被折叠的 条评论
为什么被折叠?
 到【灌水乐园】发言


