


一、安装Oracle11g
1、拉取镜像
# 拉取镜像
docker pull registry.cn-hangzhou.aliyuncs.com/helowin/oracle_11g

#修改别名
docker tag registry.cn-hangzhou.aliyuncs.com/helowin/oracle_11g:latest   oracle_11g:11g

#去掉旧名字镜像
docker rmi -f registry.cn-hangzhou.aliyuncs.com/helowin/oracle_11g:latest
2、运行 Oracle 镜像实例
#运行实例
docker run -d -p 1521:1521 --name oracle_11g oracle_11g:11g

#进入容器
docker exec -it oracle_11g bash
3、切换root用户
#用户名/密码
root/helowin
4、修改配置文件
vi /etc/profile
在文本最后追加并保存
export ORACLE_HOME=/home/oracle/app/oracle/product/11.2.0/dbhome_2
export ORACLE_SID=helowin
export PATH=$ORACLE_HOME/bin:$PATH
5、创建软连接
使用 root用户
ln -s $ORACLE_HOME/bin/sqlplus /usr/bin/6、切换回oracle用户
su - oracle7、登录sqlplus并修改sys、system用户密码
#使用root用户登录sqlplus
sqlplus /nolog

# 用dba的身份进行登录
sql > conn /as sysdba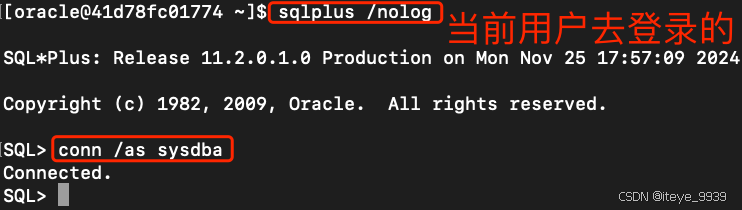
#修改用户system密码为system;修改用户sys的密码为sys;
alter user system identified by system;

alter user sys identified by sys; 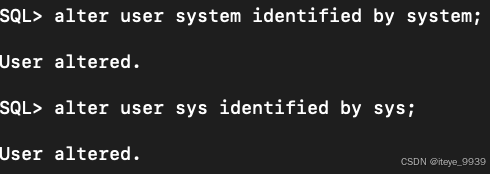
8、修改oracle密码有效限制
# 不执行,默认是 180 天密码过期
alter profile default limit password_life_time unlimited;
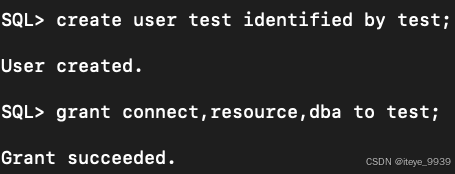
9、创建新用户,给新用户授权
#创建新用户
create user test identified by test;

#给新用户授权
grant connect,resource,dba to test;


 8万+
8万+

 被折叠的 条评论
为什么被折叠?
被折叠的 条评论
为什么被折叠?
 到【灌水乐园】发言


