


 本文介绍如何使用阿里健康检测模块nginx_upstream_check_module来监控Nginx后端节点的状态,包括模块的下载、安装配置步骤及nginx.conf中的健康检查配置样例。
随着业务增长,nginx上负载均衡器的后端节点部署越来越多,需要对后端节点的运行状态进行监控,故引入阿里的健康检测模块nginx_upstream_check_module,通过它可以用来检测后端 realserver 的健康状态。
一、下载
1、nginx
http://nginx.org/download/nginx-1.9.2.tar.gz
2、nginx_upstream_check_module
http://github.com/yaoweibin/nginx_upstream_check_module
二、安装配置
1、文件列表信息
[root@iZ233438q9fZ upload]# ll
drwxr-xr-x 6 ftpuser ftp       4096 Aug 19 10:04 nginx_upstream_check_module
drwxr-xr-x 8    1001 1001      4096 Jun 16  2015 nginx-1.9.2.tar.gz
2、解压
[root@iZ233438q9fZ upload]# tar -zxvf nginx-1.9.2.tar.gz
[root@iZ233438q9fZ upload]# cd nginx-1.9.2
3、nginx补丁安装
[root@iZ233438q9fZ nginx-1.9.2]# patch -p0 < /var/ftp/upload/nginx_upstream_check_module/check_1.9.2+.patch
patching file src/http/modules/ngx_http_upstream_hash_module.c
patching file src/http/modules/ngx_http_upstream_ip_hash_module.c
patching file src/http/modules/ngx_http_upstream_least_conn_module.c
patching file src/http/ngx_http_upstream_round_robin.c
patching file src/http/ngx_http_upstream_round_robin.h
4、编译配置
[root@iZ233438q9fZ nginx-1.9.2]# ./configure --add-module=/var/ftp/upload/nginx_upstream_check_module --prefix=/usr/local/server/nginx
[root@iZ233438q9fZ nginx-1.9.2]# make && make install
三、nginx.conf健康检查配置样例
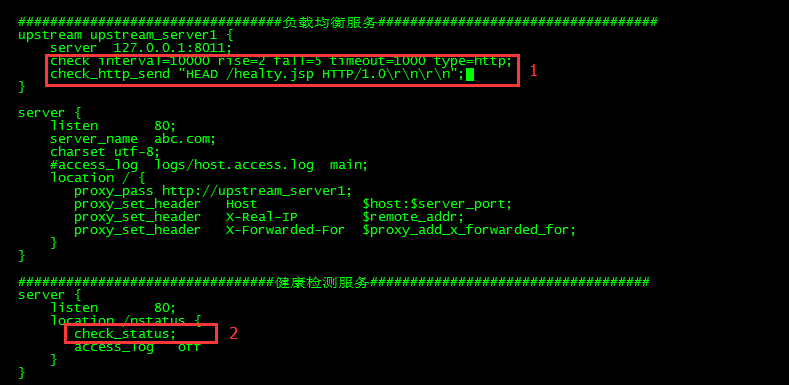
参数说明:
- check_status:[html|csv|json],默认html
- check_http_send:指定检测的http访问地址,默认/
- type:[tcp|http|ssl_hello|mysql|ajp],默认tcp
- interval:向后端发送的健康检查包的间隔,单位(毫秒)
- fall(fall_count): 如果连续失败次数达到fall_count,服务器就被认为是down。
- rise(rise_count): 如果连续成功次数达到rise_count,服务器就被认为是up。
- timeout: 后端健康请求的超时时间。
PS:如果一直显示失败,请检查项目根目录中是否有index.jsp或index.html


 1万+
1万+

 被折叠的 条评论
为什么被折叠?
被折叠的 条评论
为什么被折叠?
 到【灌水乐园】发言


