


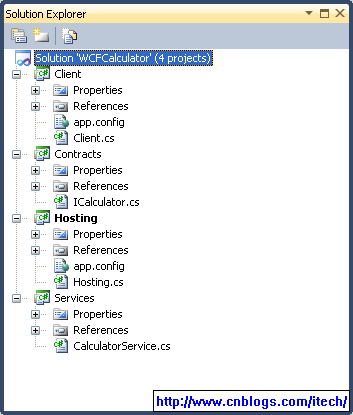
一 实例结构
1)solution如下:
2)dependency如下:
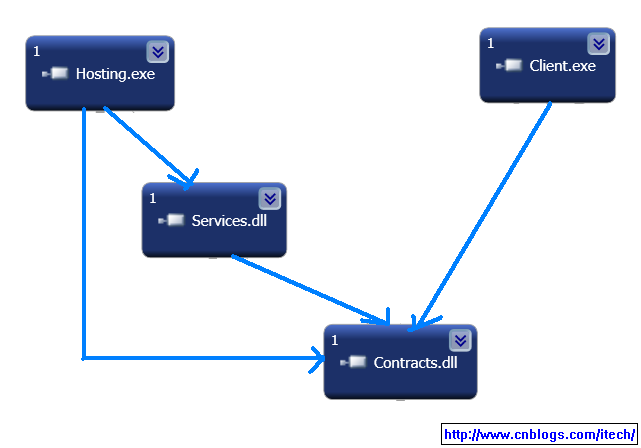
* Contracts 其实就是interface,用来实现service和client的松耦合;
* Services 是真正的对contracts实现;
* Hosting 用来宿主 services,是其能够被client访问;
* client 用来访问wcf service;
二 contracts
ICalculator.cs文件如下:
using System.ServiceModel;
namespace Artech.WcfServices.Contracts
{
[ServiceContract(Name="CalculatorService", Namespace="http://www.artech.com/")]
public interface ICalculator
{
[OperationContract]
double Add(double x, double y);
[OperationContract]
double Subtract(double x, double y);
[OperationContract]
double Multiply(double x, double y);
[OperationContract]
double Divide(double x, double y);
}
}
三 services
CalculatorService.cs文件如下:
using Artech.WcfServices.Contracts;
namespace Artech.WcfServices.Services
{
public class CalculatorService : ICalculator
{
public double Add(double x, double y)
{
return x + y;
}
public double Subtract(double x, double y)
{
return x - y;
}
public double Multiply(double x, double y)
{
return x * y;
}
public double Divide(double x, double y)
{
return x / y;
}
}
}
四 hosting
app.config文件如下:
<?xml version="1.0" encoding="utf-8" ?>
<configuration>
<system.serviceModel>
<behaviors>
<serviceBehaviors>
<behavior name="metadataBehavior">
<serviceMetadata httpGetEnabled="true" httpGetUrl="http://localhost:8888/calculatorservice/metadata" />
</behavior>
</serviceBehaviors>
</behaviors>
<services>
<service behaviorConfiguration="metadataBehavior" name="Artech.WcfServices.Services.CalculatorService">
<endpoint address="http://localhost:8888/calculatorservice" binding="wsHttpBinding" contract="Artech.WcfServices.Contracts.ICalculator" />
</service>
</services>
</system.serviceModel>
</configuration>
Hosting.cs文件如下:
using System;
using System.ServiceModel;
using Artech.WcfServices.Contracts;
using Artech.WcfServices.Services;
namespace Artech.WcfServices.Hosting
{
class Program
{
static void Main(string[] args)
{
using (ServiceHost host = new ServiceHost(typeof(CalculatorService)))
{
host.Opened += delegate
{
Console.WriteLine("CalculaorService已经启动,按任意键终止服务!");
};
host.Open();
Console.Read();
}
}
}
}
五 client
app.config文件如下:
<?xml version="1.0" encoding="utf-8" ?>
<configuration>
<system.serviceModel>
<client>
<endpoint address="http://localhost:8888/calculatorservice" binding="wsHttpBinding"
contract="Artech.WcfServices.Contracts.ICalculator" name="calculatorservice" />
</client>
</system.serviceModel>
</configuration>
<configuration>
<system.serviceModel>
<client>
<endpoint address="http://localhost:8888/calculatorservice" binding="wsHttpBinding"
contract="Artech.WcfServices.Contracts.ICalculator" name="calculatorservice" />
</client>
</system.serviceModel>
</configuration>
client.cs文件如下:
using System;
using System.ServiceModel;
using Artech.WcfServices.Contracts;
namespace Artech.WcfServices.Client
{
class Program
{
static void Main(string[] args)
{
using (ChannelFactory<ICalculator> channelFactory = new ChannelFactory<ICalculator>("calculatorservice"))
{
ICalculator proxy = channelFactory.CreateChannel();
using (proxy as IDisposable)
{
Console.WriteLine("x + y = {2} when x = {0} and y = {1}", 1, 2, proxy.Add(1, 2));
Console.WriteLine("x - y = {2} when x = {0} and y = {1}", 1, 2, proxy.Subtract(1, 2));
Console.WriteLine("x * y = {2} when x = {0} and y = {1}", 1, 2, proxy.Multiply(1, 2));
Console.WriteLine("x / y = {2} when x = {0} and y = {1}", 1, 2, proxy.Divide(1, 2));
}
}
Console.ReadLine();
}
}
}
参考:http://www.cnblogs.com/artech/archive/2007/02/26/656901.html


 1399
1399

 被折叠的 条评论
为什么被折叠?
被折叠的 条评论
为什么被折叠?
 到【灌水乐园】发言


