


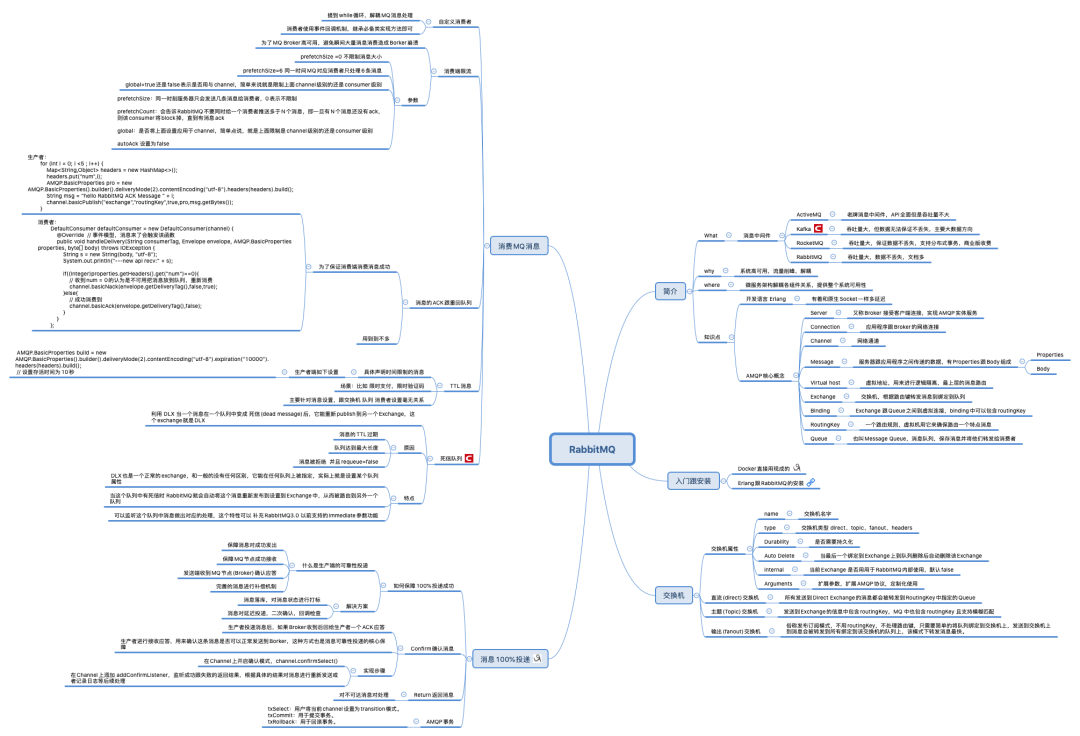
 本文围绕RabbitMQ消息队列展开,介绍其可解决异步处理、应用解耦、流量削峰和日志处理等问题,讲解了RabbitMQ的安装与配置,通过实战展示了多种队列模式,如简单队列、工作队列等,还提及MQ的持久化、消息确认机制、延迟队列和死信处理,最后给出SpringBoot Topic Demo。
❝高清思维导图已同步Git:https://github.com/SoWhat1412/xmindfile
❞
1. 消息队列解决了什么问题
消息中间件是目前比较流行的一个中间件,其中RabbitMQ更是占有一定的市场份额,主要用来做异步处理、应用解耦、流量削峰、日志处理等等方面。
1. 异步处理
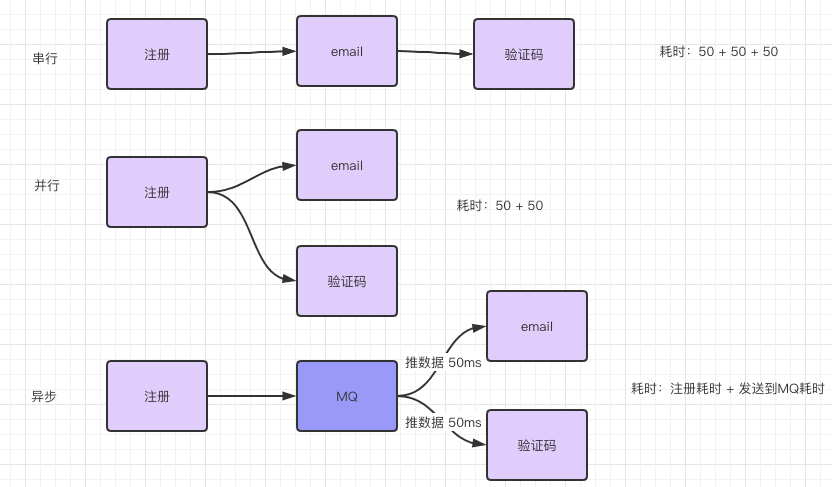
一个用户登陆网址注册,然后系统发短信跟邮件告知注册成功,一般有三种解决方法。
串行到依次执行,问题是用户注册后就可以使用了,没必要等验证码跟邮件。
注册成功后,邮件跟验证码用并行等方式执行,问题是邮件跟验证码是非重要的任务,系统注册还要等这俩完成么?
基于异步MQ的处理,用户注册成功后直接把信息异步发送到MQ中,然后邮件系统跟验证码系统主动去拉取数据。
2. 应用解耦
比如我们有一个订单系统,还要一个库存系统,用户下订单了就要调用下库存系统来处理,直接调用到话库存系统出现问题咋办呢?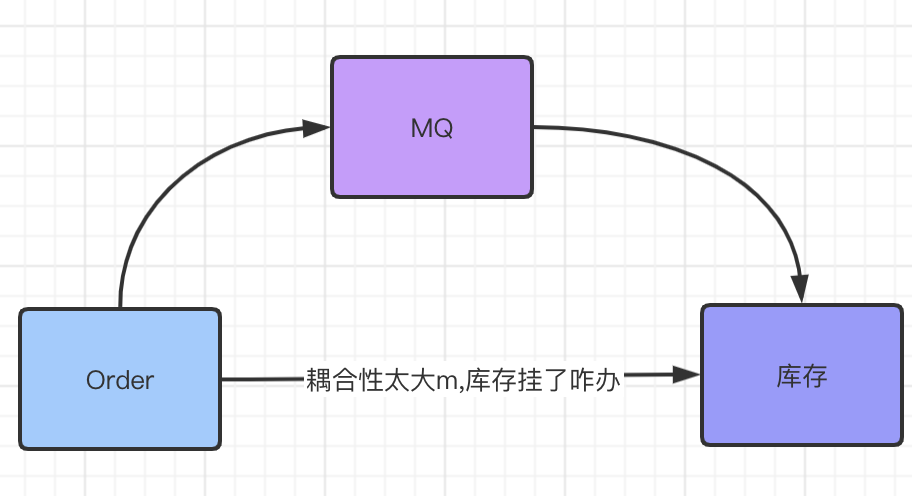
3. 流量削峰
举办一个 秒杀活动,如何较好到设计?服务层直接接受瞬间搞密度访问绝对不可以起码要加入一个MQ。
4. 日志处理
用户通过WebUI访问发送请求到时候后端如何接受跟处理呢一般?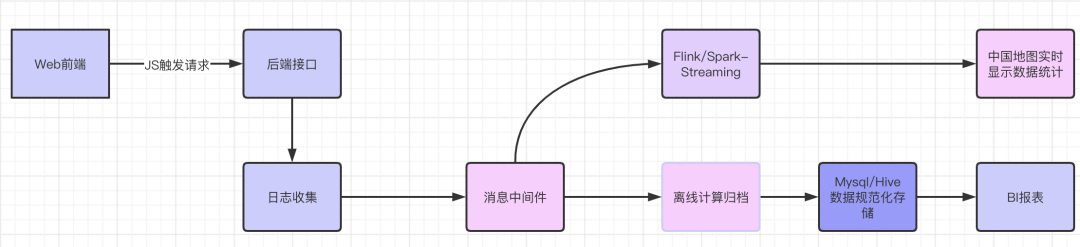
2. RabbitMQ 安装跟配置
官网:https://www.rabbitmq.com/download.html
开发语言:https://www.erlang.org/
正式到安装跟允许需要Erlang跟RabbitMQ俩版本之间相互兼容!我这里图省事直接用Docker 拉取镜像了。下载: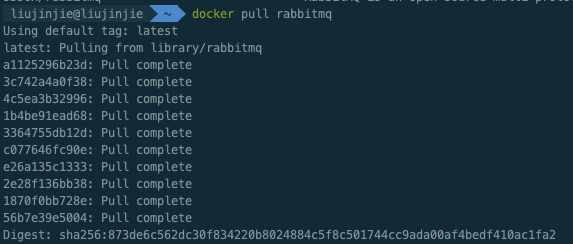 开启:管理页面 默认账号:guest 默认密码:guest 。Docker启动时候可以指定账号密码对外端口以及
docker run -d --hostname my-rabbit --name rabbit -e RABBITMQ_DEFAULT_USER=admin -e RABBITMQ_DEFAULT_PASS=admin -p 15672:15672 -p 5672:5672 -p 25672:25672 -p 61613:61613 -p 1883:1883 rabbitmq:management
启动: 用户添加:
用户添加: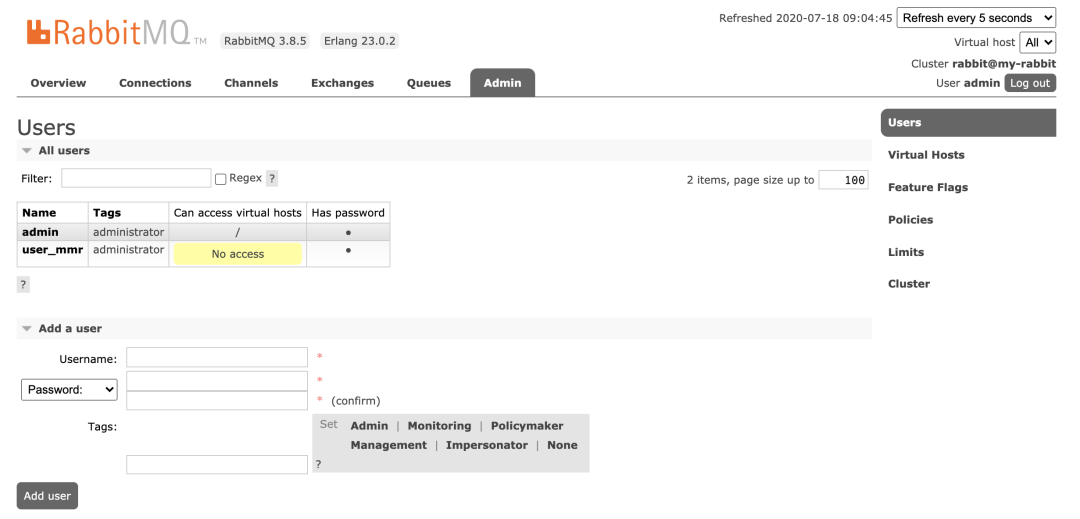 vitrual hosts 相当于mysql中的DB。创建一个virtual hosts,一般以/ 开头。
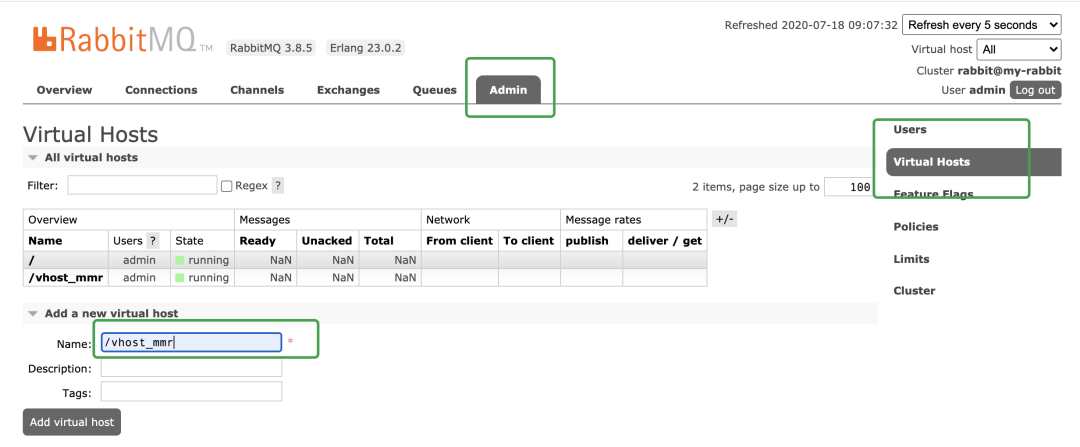 对用户进行授权,点击/vhost_mmr,
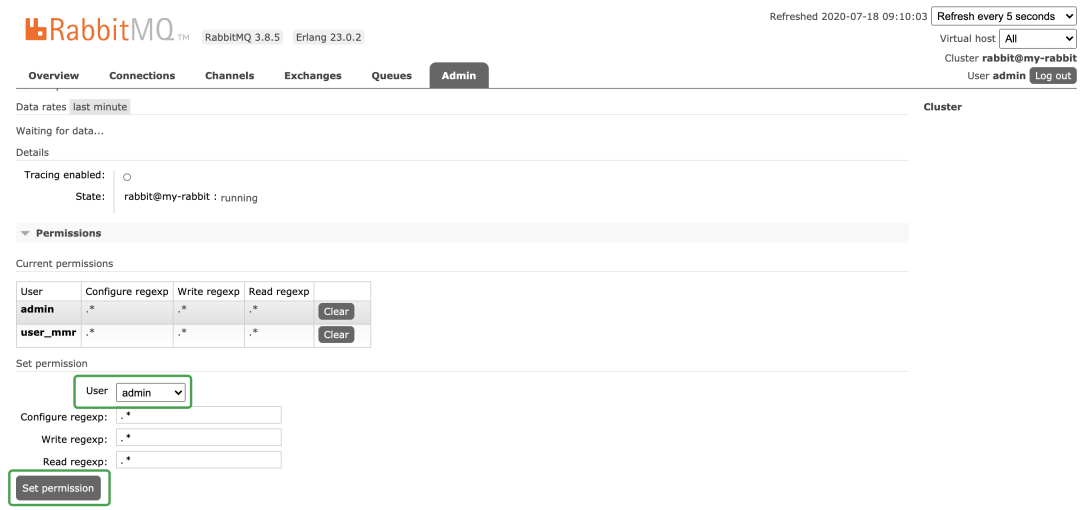 至于WebUI多点点即可了解。
3. 实战
RabbitMQ 官网支持任务模式:https://www.rabbitmq.com/getstarted.htm
l创建Maven项目导入必要依赖:
    <dependencies>
        <dependency>
            <groupId>com.rabbitmq</groupId>
            <artifactId>amqp-client</artifactId>
            <version>4.0.2</version>
        </dependency>

        <dependency>
            <groupId>org.slf4j</groupId>
            <artifactId>slf4j-api</artifactId>
            <version>1.7.10</version>
        </dependency>

        <dependency>
            <groupId>org.slf4j</groupId>
            <artifactId>slf4j-log4j12</artifactId>
            <version>1.7.5</version>
        </dependency>

        <dependency>
            <groupId>log4j</groupId>
            <artifactId>log4j</artifactId>
            <version>1.2.17</version>
        </dependency>

        <dependency>
            <groupId>junit</groupId>
            <artifactId>junit</artifactId>
            <version>4.11</version>
        </dependency>
    </dependencies>
0. 获取MQ连接
package com.sowhat.mq.util;

import com.rabbitmq.client.Connection;
import com.rabbitmq.client.ConnectionFactory;

import java.io.IOException;
import java.util.concurrent.TimeoutException;

public class ConnectionUtils {
    /**
     * 连接器
     * @return
     * @throws IOException
     * @throws TimeoutException
     */
    public static Connection getConnection() throws IOException, TimeoutException {
        ConnectionFactory factory = new ConnectionFactory();
        factory.setHost("127.0.0.1");
        factory.setPort(5672);
        factory.setVirtualHost("/vhost_mmr");
        factory.setUsername("user_mmr");
        factory.setPassword("sowhat");
        Connection connection = factory.newConnection();
        return connection;
    }
}
1. 简单队列
 P:Producer 消息的生产者
中间:Queue消息队列
C:Consumer 消息的消费者
P:Producer 消息的生产者
中间:Queue消息队列
C:Consumer 消息的消费者
package com.sowhat.mq.simple;

import com.rabbitmq.client.AMQP;
import com.rabbitmq.client.Channel;
import com.rabbitmq.client.Connection;
import com.sowhat.mq.util.ConnectionUtils;

import java.io.IOException;
import java.util.concurrent.TimeoutException;

public class Send {
    public static final String QUEUE_NAME = "test_simple_queue";

    public static void main(String[] args) throws IOException, TimeoutException {
        // 获取一个连接
        Connection connection = ConnectionUtils.getConnection();
        // 从连接获取一个通道
        Channel channel = connection.createChannel();
        // 创建队列声明
        AMQP.Queue.DeclareOk declareOk = channel.queueDeclare(QUEUE_NAME, false, false, false, null);

        String msg = "hello Simple";
        // exchange,队列,参数,消息字节体
        channel.basicPublish("", QUEUE_NAME, null, msg.getBytes());

        System.out.println("--send msg:" + msg);

        channel.close();

        connection.close();

    }
}
---
package com.sowhat.mq.simple;

import com.rabbitmq.client.*;
import com.sowhat.mq.util.ConnectionUtils;

import java.io.IOException;
import java.util.concurrent.TimeoutException;

/**
 * 消费者获取消息
 */
public class Recv {
    public static void main(String[] args) throws IOException, TimeoutException, InterruptedException {
        newApi();
        oldApi();
    }

    private static void newApi() throws IOException, TimeoutException {
        // 创建连接
        Connection connection = ConnectionUtils.getConnection();
        // 创建频道
        Channel channel = connection.createChannel();
        // 队列声明  队列名,是否持久化,是否独占模式,无消息后是否自动删除,消息携带参数
        channel.queueDeclare(Send.QUEUE_NAME,false,false,false,null);
        // 定义消费者
        DefaultConsumer defaultConsumer = new DefaultConsumer(channel) {
            @Override  // 事件模型,消息来了会触发该函数
            public void handleDelivery(String consumerTag, Envelope envelope, AMQP.BasicProperties properties, byte[] body) throws IOException {
                String s = new String(body, "utf-8");
                System.out.println("---new api recv:" + s);
            }
        };
        // 监听队列
        channel.basicConsume(Send.QUEUE_NAME,true,defaultConsumer);
    }

    // 老方法 消费者 MQ 在3。4以下 用次方法,
    private static void oldApi() throws IOException, TimeoutException, InterruptedException {
        // 创建连接
        Connection connection = ConnectionUtils.getConnection();
        // 创建频道
        Channel channel = connection.createChannel();
        // 定义队列消费者
        QueueingConsumer consumer = new QueueingConsumer(channel);
        //监听队列
        channel.basicConsume(Send.QUEUE_NAME, true, consumer);
        while (true) {
            // 发货体
            QueueingConsumer.Delivery delivery = consumer.nextDelivery();
            byte[] body = delivery.getBody();
            String s = new String(body);
            System.out.println("---Recv:" + s);
        }
    }
}
右上角有可以设置页面刷新频率,然后可以在UI界面直接手动消费掉,如下图: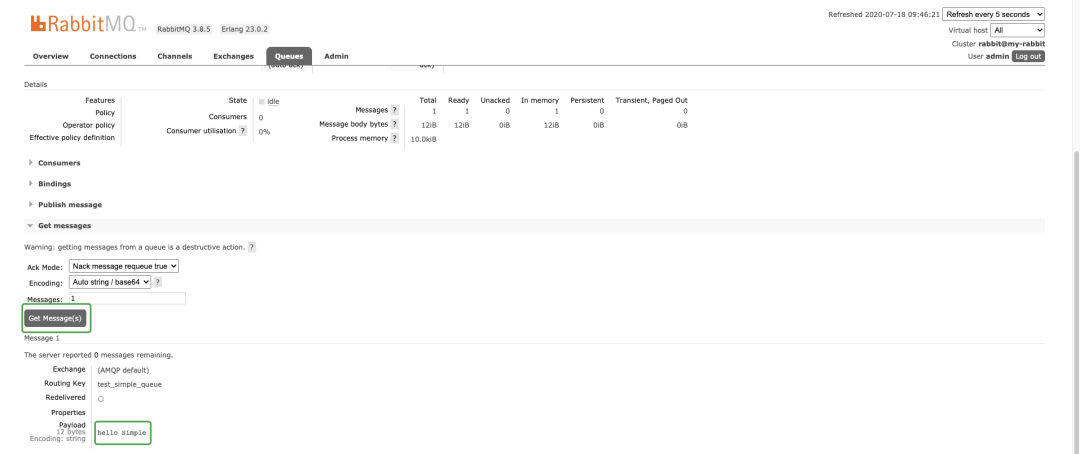
简单队列的不足:耦合性过高,生产者一一对应消费者,如果有多个消费者想消费队列中信息就无法实现了。
2. WorkQueue 工作队列
Simple队列中只能一一对应的生产消费,实际开发中生产者发消息很简单,而消费者要跟业务结合,消费者接受到消息后要处理从而会耗时。「可能会出现队列中出现消息积压」。所以如果多个消费者可以加速消费。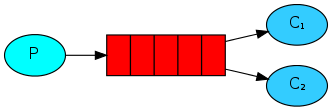
1. round robin 轮询分发
代码编程一个生产者两个消费者:
package com.sowhat.mq.work;

import com.rabbitmq.client.AMQP;
import com.rabbitmq.client.Channel;
import com.rabbitmq.client.Connection;
import com.sowhat.mq.util.ConnectionUtils;

import java.io.IOException;
import java.util.concurrent.TimeoutException;

public class Send {
    public static final String  QUEUE_NAME = "test_work_queue";
    public static void main(String[] args) throws IOException, TimeoutException, InterruptedException {
        // 获取连接
        Connection connection = ConnectionUtils.getConnection();
        // 获取 channel
        Channel channel = connection.createChannel();
        // 声明队列
        AMQP.Queue.DeclareOk declareOk = channel.queueDeclare(QUEUE_NAME, false, false, false, null);
        for (int i = 0; i <50 ; i++) {
            String msg = "hello-" + i;
            System.out.println("WQ send " + msg);
            channel.basicPublish("",QUEUE_NAME,null,msg.getBytes());
            Thread.sleep(i*20);
        }
        channel.close();
        connection.close();
    }
}

---
package com.sowhat.mq.work;

import com.rabbitmq.client.*;
import com.sowhat.mq.util.ConnectionUtils;

import java.io.IOException;
import java.util.concurrent.TimeoutException;

public class Recv1 {
    public static void main(String[] args) throws IOException, TimeoutException {
        // 获取连接
        Connection connection = ConnectionUtils.getConnection();
        // 获取通道
        Channel channel = connection.createChannel();
        // 声明队列
        channel.queueDeclare(Send.QUEUE_NAME, false, false, false, null);
        //定义消费者
        DefaultConsumer consumer = new DefaultConsumer(channel) {

            @Override // 事件触发机制
            public void handleDelivery(String consumerTag, Envelope envelope, AMQP.BasicProperties properties, byte[] body) throws IOException {
                String s = new String(body, "utf-8");
                System.out.println("【1】:" + s);
                try {
                    Thread.sleep(2000);
                } catch (InterruptedException e) {
                    e.printStackTrace();
                } finally {
                    System.out.println("【1】 done");
                }
            }
        };
        boolean autoAck = true;
        channel.basicConsume(Send.QUEUE_NAME, autoAck, consumer);
    }
}
---
package com.sowhat.mq.work;

import com.rabbitmq.client.*;
import com.sowhat.mq.util.ConnectionUtils;

import java.io.IOException;
import java.util.concurrent.TimeoutException;

public class Recv2 {
    public static void main(String[] args) throws IOException, TimeoutException {
        // 获取连接
        Connection connection = ConnectionUtils.getConnection();
        // 获取通道
        Channel channel = connection.createChannel();
        // 声明队列
        channel.queueDeclare(Send.QUEUE_NAME, false, false, false, null);
        //定义消费者
        DefaultConsumer consumer = new DefaultConsumer(channel) {

            @Override // 事件触发机制
            public void handleDelivery(String consumerTag, Envelope envelope, AMQP.BasicProperties properties, byte[] body) throws IOException {
                String s = new String(body, "utf-8");
                System.out.println("【2】:" + s);
                try {
                    Thread.sleep(1000 );
                } catch (InterruptedException e) {
                    e.printStackTrace();
                } finally {
                    System.out.println("【2】 done");
                }
            }
        };
        boolean autoAck = true;
        channel.basicConsume(Send.QUEUE_NAME, autoAck, consumer);
    }
}
现象:消费者1 跟消费者2 处理的数据量完全一样的个数:消费者1:处理偶数
消费者2:处理奇数
这种方式叫轮询分发(round-robin)结果就是不管两个消费者谁忙,「数据总是你一个我一个」,MQ 给两个消费发数据的时候是不知道消费者性能的,默认就是雨露均沾。此时 autoAck = true。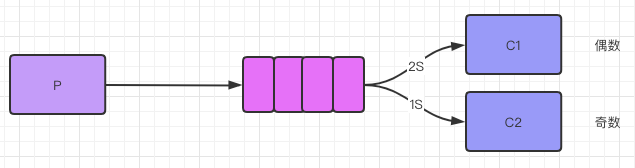
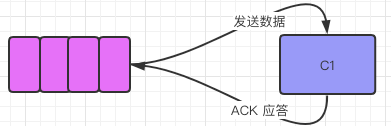
2. 公平分发 fair dipatch
如果要实现公平分发,要让消费者消费完毕一条数据后就告知MQ,再让MQ发数据即可。自动应答要关闭!
package com.sowhat.mq.work;

import com.rabbitmq.client.AMQP;
import com.rabbitmq.client.Channel;
import com.rabbitmq.client.Connection;
import com.sowhat.mq.util.ConnectionUtils;

import java.io.IOException;
import java.util.concurrent.TimeoutException;

public class Send {
    public static final String  QUEUE_NAME = "test_work_queue";
    public static void main(String[] args) throws IOException, TimeoutException, InterruptedException {
        // 获取连接
        Connection connection = ConnectionUtils.getConnection();
        // 获取 channel
        Channel channel = connection.createChannel();
        // s声明队列
        AMQP.Queue.DeclareOk declareOk = channel.queueDeclare(QUEUE_NAME, false, false, false, null);

        // 每个消费者发送确认消息之前,消息队列不发送下一个消息到消费者,一次只发送一个消息
        // 从而限制一次性发送给消费者到消息不得超过1个。
        int perfetchCount = 1;
        channel.basicQos(perfetchCount);

        for (int i = 0; i <50 ; i++) {
            String msg = "hello-" + i;
            System.out.println("WQ send " + msg);
            channel.basicPublish("",QUEUE_NAME,null,msg.getBytes());
            Thread.sleep(i*20);
        }
        channel.close();
        connection.close();
    }
}
---
package com.sowhat.mq.work;

import com.rabbitmq.client.*;
import com.sowhat.mq.util.ConnectionUtils;

import java.io.IOException;
import java.util.concurrent.TimeoutException;

public class Recv1 {
    public static void main(String[] args) throws IOException, TimeoutException {
        // 获取连接
        Connection connection = ConnectionUtils.getConnection();
        // 获取通道
        final Channel channel = connection.createChannel();
        // 声明队列
        channel.queueDeclare(Send.QUEUE_NAME, false, false, false, null);
        // 保证一次只分发一个
        channel.basicQos(1);
        //定义消费者
        DefaultConsumer consumer = new DefaultConsumer(channel) {

            @Override // 事件触发机制
            public void handleDelivery(String consumerTag, Envelope envelope, AMQP.BasicProperties properties, byte[] body) throws IOException {
                String s = new String(body, "utf-8");
                System.out.println("【1】:" + s);
                try {
                    Thread.sleep(2000);
                } catch (InterruptedException e) {
                    e.printStackTrace();
                } finally {
                    System.out.println("【1】 done");
                    // 手动回执
                    channel.basicAck(envelope.getDeliveryTag(),false);
                }
            }
        };
        // 自动应答
        boolean autoAck = false;
        channel.basicConsume(Send.QUEUE_NAME, autoAck, consumer);
    }
}
---
package com.sowhat.mq.work;

import com.rabbitmq.client.*;
import com.sowhat.mq.util.ConnectionUtils;

import java.io.IOException;
import java.util.concurrent.TimeoutException;

public class Recv2 {
    public static void main(String[] args) throws IOException, TimeoutException {
        // 获取连接
        Connection connection = ConnectionUtils.getConnection();
        // 获取通道
        final Channel channel = connection.createChannel();
        // 声明队列
        channel.queueDeclare(Send.QUEUE_NAME, false, false, false, null);
        // 保证一次只分发一个
        channel.basicQos(1);
        //定义消费者
        DefaultConsumer consumer = new DefaultConsumer(channel) {

            @Override // 事件触发机制
            public void handleDelivery(String consumerTag, Envelope envelope, AMQP.BasicProperties properties, byte[] body) throws IOException {
                String s = new String(body, "utf-8");
                System.out.println("【2】:" + s);
                try {
                    Thread.sleep(1000);
                } catch (InterruptedException e) {
                    e.printStackTrace();
                } finally {
                    System.out.println("【2】 done");
                    // 手动回执
                    channel.basicAck(envelope.getDeliveryTag(),false);
                }
            }
        };
        // 自动应答
        boolean autoAck = false;
        channel.basicConsume(Send.QUEUE_NAME, autoAck, consumer);
    }
}
结果:实现了公平分发,消费者2 是消费者1消费数量的2倍。
3. publish/subscribe 发布订阅模式
类似公众号的订阅跟发布,无需指定routingKey:
解读:
一个生产者多个消费者
每一个消费者都有一个自己的队列
生产者没有把消息直接发送到队列而是发送到了
交换机转化器(exchange)。每一个队列都要绑定到交换机上。
生产者发送的消息经过交换机到达队列,从而实现一个消息被多个消费者消费。
生产者:
package com.sowhat.mq.ps;

import com.rabbitmq.client.Channel;
import com.rabbitmq.client.Connection;
import com.sowhat.mq.util.ConnectionUtils;

import java.io.IOException;
import java.util.concurrent.TimeoutException;

public class Send {
    public static final String EXCHANGE_NAME = "test_exchange_fanout";
    public static void main(String[] args) throws IOException, TimeoutException {
        Connection connection = ConnectionUtils.getConnection();
        Channel channel = connection.createChannel();

        //声明交换机
        channel.exchangeDeclare(EXCHANGE_NAME,"fanout");// 分发= fanout

        // 发送消息
        String msg = "hello ps ";

        channel.basicPublish(EXCHANGE_NAME,"",null,msg.getBytes());
        System.out.println("Send:" + msg);

        channel.close();
        connection.close();
    }
}
消息哪儿去了?丢失了,在RabbitMQ中只有队列有存储能力,「因为这个时候队列还没有绑定到交换机 所以消息丢失了」。消费者:
package com.sowhat.mq.ps;

import com.rabbitmq.client.*;
import com.sowhat.mq.util.ConnectionUtils;

import java.io.IOException;
import java.util.concurrent.TimeoutException;

public class Recv1 {
    public static final String  QUEUE_NAME = "test_queue_fanout_email";
    public static final String EXCHANGE_NAME = "test_exchange_fanout";
    public static void main(String[] args) throws IOException, TimeoutException {
        Connection connection = ConnectionUtils.getConnection();
        final Channel channel = connection.createChannel();
        // 队列声明
        channel.queueDeclare(QUEUE_NAME,false,false,false,null);
        // 绑定队列到交换机转发器
        channel.queueBind(QUEUE_NAME,EXCHANGE_NAME,"" );

        // 保证一次只分发一个
        channel.basicQos(1);
        //定义消费者
        DefaultConsumer consumer = new DefaultConsumer(channel) {

            @Override // 事件触发机制
            public void handleDelivery(String consumerTag, Envelope envelope, AMQP.BasicProperties properties, byte[] body) throws IOException {
                String s = new String(body, "utf-8");
                System.out.println("【1】:" + s);
                try {
                    Thread.sleep(2000);
                } catch (InterruptedException e) {
                    e.printStackTrace();
                } finally {
                    System.out.println("【1】 done");
                    // 手动回执
                    channel.basicAck(envelope.getDeliveryTag(),false);
                }
            }
        };
        // 自动应答
        boolean autoAck = false;
        channel.basicConsume(QUEUE_NAME, autoAck, consumer);
    }
}
---
package com.sowhat.mq.ps;

import com.rabbitmq.client.*;
import com.sowhat.mq.util.ConnectionUtils;

import java.io.IOException;
import java.util.concurrent.TimeoutException;

public class Recv2 {
    public static final String  QUEUE_NAME = "test_queue_fanout_sms";
    public static final String EXCHANGE_NAME = "test_exchange_fanout";
    public static void main(String[] args) throws IOException, TimeoutException {
        Connection connection = ConnectionUtils.getConnection();
        final Channel channel = connection.createChannel();
        // 队列声明
        channel.queueDeclare(QUEUE_NAME,false,false,false,null);
        // 绑定队列到交换机转发器
        channel.queueBind(QUEUE_NAME,EXCHANGE_NAME,"" );
        // 保证一次只分发一个
        channel.basicQos(1);
        //定义消费者
        DefaultConsumer consumer = new DefaultConsumer(channel) {
            @Override // 事件触发机制
            public void handleDelivery(String consumerTag, Envelope envelope, AMQP.BasicProperties properties, byte[] body) throws IOException {
                String s = new String(body, "utf-8");
                System.out.println("【2】:" + s);
                try {
                    Thread.sleep(1000);
                } catch (InterruptedException e) {
                    e.printStackTrace();
                } finally {
                    System.out.println("【2】 done");
                    // 手动回执
                    channel.basicAck(envelope.getDeliveryTag(),false);
                }
            }
        };
        // 自动应答
        boolean autoAck = false;
        channel.basicConsume(QUEUE_NAME, autoAck, consumer);
    }
}
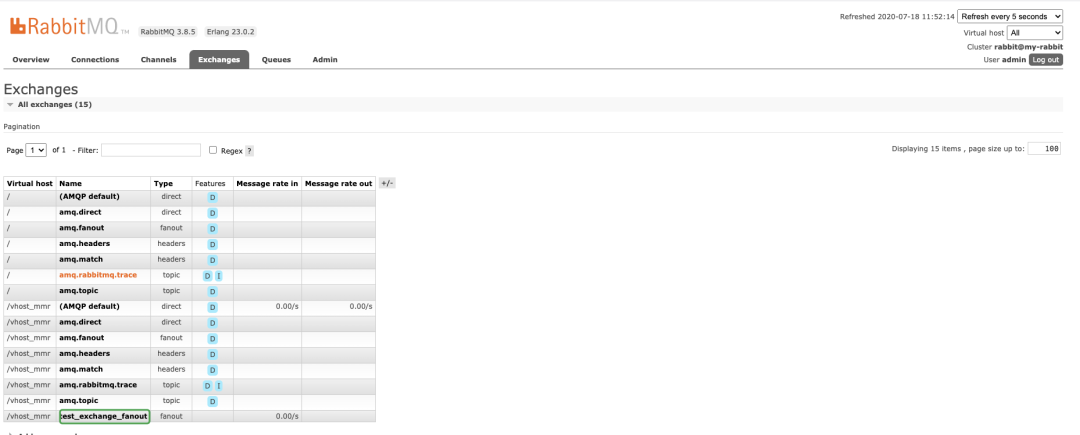
 「同时还可以自己手动的添加一个队列监控到该exchange」
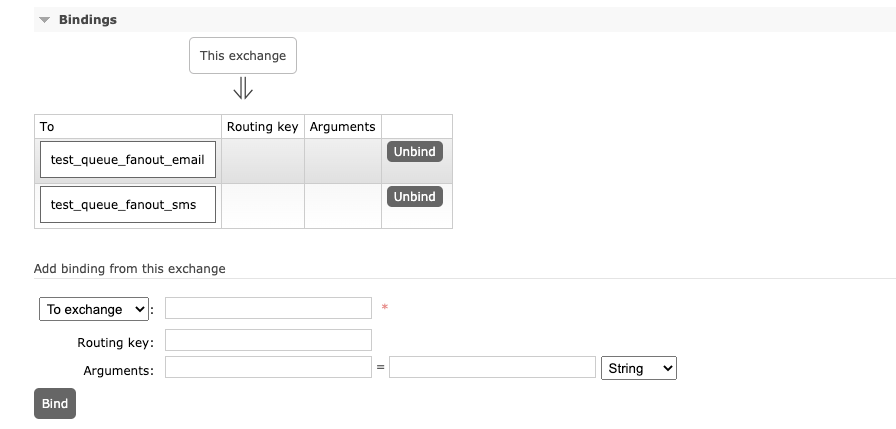
4. routing 路由选择 通配符模式
Exchange(交换机,转发器):「一方面接受生产者消息,另一方面是向队列推送消息」。匿名转发用 "" 表示,比如前面到简单队列跟WorkQueue。fanout:不处理路由键。「不需要指定routingKey」,我们只需要把队列绑定到交换机, 「消息就会被发送到所有到队列中」。direct:处理路由键,「需要指定routingKey」,此时生产者发送数据到时候会指定key,任务队列也会指定key,只有key一样消息才会被传送到队列中。如下图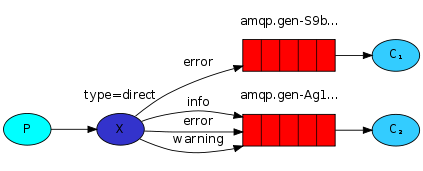
package com.sowhat.mq.routing;

import com.rabbitmq.client.Channel;
import com.rabbitmq.client.Connection;
import com.sowhat.mq.util.ConnectionUtils;

import java.io.IOException;
import java.util.concurrent.TimeoutException;

public class Send {
    public static final String  EXCHANGE_NAME = "test_exchange_direct";
    public static void main(String[] args) throws IOException, TimeoutException {
        Connection connection = ConnectionUtils.getConnection();
        Channel channel = connection.createChannel();
        // exchange
        channel.exchangeDeclare(EXCHANGE_NAME,"direct");

        String msg = "hello info!";

        // 可以指定类型
        String routingKey = "info";
        channel.basicPublish(EXCHANGE_NAME,routingKey,null,msg.getBytes());
        System.out.println("Send : " + msg);
        channel.close();
        connection.close();
    }
}
---
package com.sowhat.mq.routing;

import com.rabbitmq.client.*;
import com.sowhat.mq.util.ConnectionUtils;

import java.io.IOException;
import java.util.concurrent.TimeoutException;

public class Recv1 {
    public static final String  EXCHANGE_NAME = "test_exchange_direct";
    public static final String QUEUE_NAME = "test_queue_direct_1";
    public static void main(String[] args) throws IOException, TimeoutException {
        Connection connection = ConnectionUtils.getConnection();
        final Channel channel = connection.createChannel();

        channel.queueDeclare(QUEUE_NAME,false,false,false,null);
        channel.basicQos(1);

        channel.queueBind(QUEUE_NAME,EXCHANGE_NAME,"error");

        //定义消费者
        DefaultConsumer consumer = new DefaultConsumer(channel) {

            @Override // 事件触发机制
            public void handleDelivery(String consumerTag, Envelope envelope, AMQP.BasicProperties properties, byte[] body) throws IOException {
                String s = new String(body, "utf-8");
                System.out.println("【1】:" + s);
                try {
                    Thread.sleep(2000);
                } catch (InterruptedException e) {
                    e.printStackTrace();
                } finally {
                    System.out.println("【1】 done");
                    // 手动回执
                    channel.basicAck(envelope.getDeliveryTag(),false);
                }
            }
        };
        // 自动应答
        boolean autoAck = false;
        channel.basicConsume(QUEUE_NAME, autoAck, consumer);
    }
}
---
package com.sowhat.mq.routing;

import com.rabbitmq.client.*;
import com.sowhat.mq.util.ConnectionUtils;

import java.io.IOException;
import java.util.concurrent.TimeoutException;

public class Recv2 {
    public static final String EXCHANGE_NAME = "test_exchange_direct";
    public static final String QUEUE_NAME = "test_queue_direct_2";

    public static void main(String[] args) throws IOException, TimeoutException {
        Connection connection = ConnectionUtils.getConnection();
        final Channel channel = connection.createChannel();

        channel.queueDeclare(QUEUE_NAME, false, false, false, null);
        channel.basicQos(1);

        // 绑定种类似 Key
        channel.queueBind(QUEUE_NAME, EXCHANGE_NAME, "error");
        channel.queueBind(QUEUE_NAME, EXCHANGE_NAME, "info");
        channel.queueBind(QUEUE_NAME, EXCHANGE_NAME, "warning");

        //定义消费者
        DefaultConsumer consumer = new DefaultConsumer(channel) {
            @Override // 事件触发机制
            public void handleDelivery(String consumerTag, Envelope envelope, AMQP.BasicProperties properties, byte[] body) throws IOException {
                String s = new String(body, "utf-8");
                System.out.println("【2】:" + s);
                try {
                    Thread.sleep(1000);
                } catch (InterruptedException e) {
                    e.printStackTrace();
                } finally {
                    System.out.println("【2】 done");
                    // 手动回执
                    channel.basicAck(envelope.getDeliveryTag(), false);
                }
            }
        };
        // 自动应答
        boolean autoAck = false;
        channel.basicConsume(QUEUE_NAME, autoAck, consumer);

    }
}
WebUI: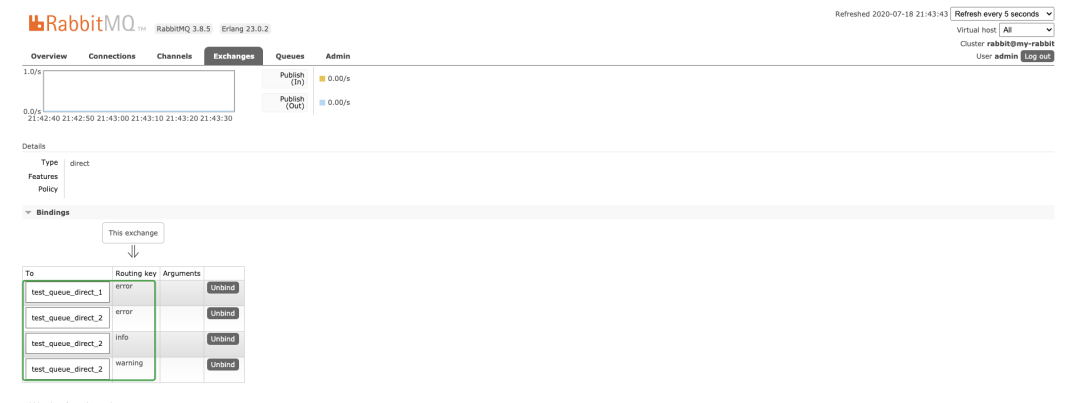
缺点:路由key必须要明确,无法实现规则性模糊匹配。
5. Topics 主题
将路由键跟某个模式匹配,# 表示匹配 >=1个字符, *表示匹配一个。生产者会带routingKey,但是消费者的MQ会带模糊routingKey。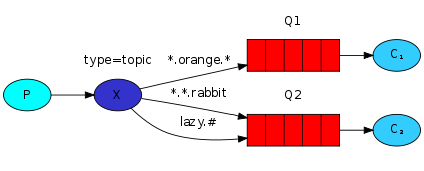 商品:发布、删除、修改、查询。
package com.sowhat.mq.topic;

import com.rabbitmq.client.Channel;
import com.rabbitmq.client.Connection;
import com.sowhat.mq.util.ConnectionUtils;

import java.io.IOException;
import java.util.concurrent.TimeoutException;

public class Send {
    public static final String EXCHANGE_NAME = "test_exchange_topic";

    public static void main(String[] args) throws IOException, TimeoutException {
        Connection connection = ConnectionUtils.getConnection();
        Channel channel = connection.createChannel();
        // exchange
        channel.exchangeDeclare(EXCHANGE_NAME, "topic");

        String msg = "商品!";

        // 可以指定类型
        String routingKey = "goods.find";
        channel.basicPublish(EXCHANGE_NAME, routingKey, null, msg.getBytes());
        System.out.println("Send : " + msg);
        channel.close();
        connection.close();
    }
}
---
package com.sowhat.mq.topic;

import com.rabbitmq.client.*;
import com.sowhat.mq.util.ConnectionUtils;

import java.io.IOException;
import java.util.concurrent.TimeoutException;

public class Recv1 {
    public static final String  EXCHANGE_NAME = "test_exchange_topic";
    public static final String QUEUE_NAME = "test_queue_topic_1";
    public static void main(String[] args) throws IOException, TimeoutException {
        Connection connection = ConnectionUtils.getConnection();
        final Channel channel = connection.createChannel();

        channel.queueDeclare(QUEUE_NAME,false,false,false,null);
        channel.basicQos(1);

        channel.queueBind(QUEUE_NAME,EXCHANGE_NAME,"goods.add");

        //定义消费者
        DefaultConsumer consumer = new DefaultConsumer(channel) {

            @Override // 事件触发机制
            public void handleDelivery(String consumerTag, Envelope envelope, AMQP.BasicProperties properties, byte[] body) throws IOException {
                String s = new String(body, "utf-8");
                System.out.println("【1】:" + s);
                try {
                    Thread.sleep(2000);
                } catch (InterruptedException e) {
                    e.printStackTrace();
                } finally {
                    System.out.println("【1】 done");
                    // 手动回执
                    channel.basicAck(envelope.getDeliveryTag(),false);
                }
            }
        };
        // 自动应答
        boolean autoAck = false;
        channel.basicConsume(QUEUE_NAME, autoAck, consumer);
    }
}
---
package com.sowhat.mq.topic;

import com.rabbitmq.client.*;
import com.sowhat.mq.util.ConnectionUtils;

import java.io.IOException;
import java.util.concurrent.TimeoutException;

public class Recv2 {
    public static final String EXCHANGE_NAME = "test_exchange_topic";
    public static final String QUEUE_NAME = "test_queue_topic_2";

    public static void main(String[] args) throws IOException, TimeoutException {
        Connection connection = ConnectionUtils.getConnection();
        final Channel channel = connection.createChannel();

        channel.queueDeclare(QUEUE_NAME, false, false, false, null);
        channel.basicQos(1);
        // 此乃重点
        channel.queueBind(QUEUE_NAME, EXCHANGE_NAME, "goods.#");

        //定义消费者
        DefaultConsumer consumer = new DefaultConsumer(channel) {
            @Override // 事件触发机制
            public void handleDelivery(String consumerTag, Envelope envelope, AMQP.BasicProperties properties, byte[] body) throws IOException {
                String s = new String(body, "utf-8");
                System.out.println("【2】:" + s);
                try {
                    Thread.sleep(1000);
                } catch (InterruptedException e) {
                    e.printStackTrace();
                } finally {
                    System.out.println("【2】 done");
                    // 手动回执
                    channel.basicAck(envelope.getDeliveryTag(), false);
                }
            }
        };
        // 自动应答
        boolean autoAck = false;
        channel.basicConsume(QUEUE_NAME, autoAck, consumer);
    }
}
6. MQ的持久化跟非持久化
因为消息在内存中,如果MQ挂了那么消息也丢失了,所以应该考虑MQ的持久化。MQ是支持持久化的,
// 声明队列
channel.queueDeclare(Send.QUEUE_NAME, false, false, false, null);
    /**
     * Declare a queue
     * @see com.rabbitmq.client.AMQP.Queue.Declare
     * @see com.rabbitmq.client.AMQP.Queue.DeclareOk
     * @param queue the name of the queue
     * @param durable true if we are declaring a durable queue (the queue will survive a server restart)
     * @param exclusive true if we are declaring an exclusive queue (restricted to this connection)
     * @param autoDelete true if we are declaring an autodelete queue (server will delete it when no longer in use)
     * @param arguments other properties (construction arguments) for the queue
     * @return a declaration-confirm method to indicate the queue was successfully declared
     * @throws java.io.IOException if an error is encountered
     */
    Queue.DeclareOk queueDeclare(String queue, boolean durable, boolean exclusive, boolean autoDelete,
                                 Map<String, Object> arguments) throws IOException;
boolean durable就是表明是否可以持久化,如果我们将程序中的durable = false改为true是不可以的!因为我们已经定义过的test_work_queue,这个queue已声明为未持久化的。结论:MQ 不允许修改一个已经存在的队列参数。
7. 消费者端手动跟自动确认消息
        // 自动应答
        boolean autoAck = false;
        channel.basicConsume(Send.QUEUE_NAME, autoAck, consumer);
当MQ发送数据个消费者后,消费者要对收到对信息应答给MQ。
如果autoAck = true 表示「自动确认模式」,一旦MQ把消息分发给消费者就会把消息从内存中删除。如果消费者收到消息但是还没有消费完而MQ中数据已删除则会导致丢失了正在处理对消息。
如果autoAck = false表示「手动确认模式」,如果有个消费者挂了,MQ因为没有收到回执信息可以把该信息再发送给其他对消费者。
MQ支持消息应答(Message acknowledgement),消费者发送一个消息应答告诉MQ这个消息已经被消费了,MQ才从内存中删除。消息应答模式「默认为 false」。
8. RabbitMQ生产者端消息确认机制(事务 + confirm)
在RabbitMQ中我们可以通过持久化来解决MQ服务器异常的数据丢失问题,但是「生产者如何确保数据发送到MQ了」?默认情况下生产者也是不知道的。如何解决 呢?
1. AMQP事务
第一种方式AMQP实现了事务机制,类似mysql的事务机制。txSelect:用户将当前channel设置为transition模式。txCommit:用于提交事务。txRollback:用于回滚事务。
以上都是对生产者对操作。
package com.sowhat.mq.tx;

import com.rabbitmq.client.Channel;
import com.rabbitmq.client.Connection;
import com.sowhat.mq.util.ConnectionUtils;

import java.io.IOException;
import java.util.concurrent.TimeoutException;

public class TxSend {
    public static final String QUEUE_NAME = "test_queue_tx";

    public static void main(String[] args) throws IOException, TimeoutException {
        Connection connection = ConnectionUtils.getConnection();
        Channel channel = connection.createChannel();
        channel.queueDeclare(QUEUE_NAME, false, false, false, null);

        String msg = "hello tx message";

        try {
            //开启事务模式
            channel.txSelect();
            channel.basicPublish("", QUEUE_NAME, null, msg.getBytes());
            int x = 1 / 0;

            // 提交事务
            channel.txCommit();
        } catch (IOException e) {
            // 回滚
            channel.txRollback();
            System.out.println("send message rollback");
        } finally {
            channel.close();
            connection.close();
        }
    }
}
---
package com.sowhat.mq.tx;

import com.rabbitmq.client.*;
import com.sowhat.mq.util.ConnectionUtils;

import java.io.IOException;
import java.util.concurrent.TimeoutException;

public class TxRecv {
    public static final String QUEUE_NAME = "test_queue_tx";

    public static void main(String[] args) throws IOException, TimeoutException {
        Connection connection = ConnectionUtils.getConnection();
        Channel channel = connection.createChannel();

        channel.queueDeclare(QUEUE_NAME, false, false, false, null);

        String s = channel.basicConsume(QUEUE_NAME, true, new DefaultConsumer(channel) {
            @Override
            public void handleDelivery(String consumerTag, Envelope envelope, AMQP.BasicProperties properties, byte[] body) throws IOException {
                System.out.println("recv[tx] msg:" + new String(body, "utf-8"));
            }
        });
        channel.close();
        connection.close();
    }
}
缺点就是大量对请求尝试然后失败然后回滚,会降低MQ的吞吐量。
2. Confirm模式。
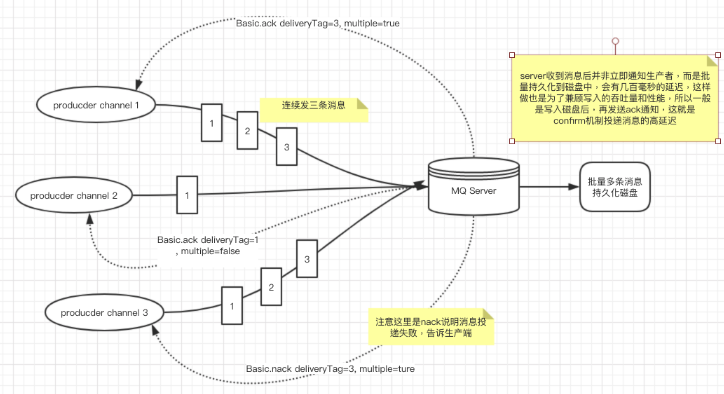
「生产者端confirm实现原理」生产者将信道设置为confirm模式,一旦信道进入了confirm模式,所以该信道上发布的信息都会被派一个唯一的ID(从1开始),一旦消息被投递到所有的匹配队列后,Broker就回发送一个确认给生产者(包含消息唯一ID),这就使得生产者知道消息已经正确到达目的队列了,如果消息跟队列是可持久化的,那么确认消息会在消息写入到磁盘后才发出。broker回传给生产者到确认消息中deliver-tag域包含了确认消息到序列号,此外broker也可以设置basic.ack的multiple域,表示这个序列号之前所以信息都已经得到处理。
Confirm模式最大的好处在于是异步的。第一条消息发送后不用一直等待回复后才发第二条消息。
开启confirm模式:channel.confimSelect()编程模式:
1. 普通的发送一个消息后就 waitForConfirms()
package com.sowhat.confirm;

import com.rabbitmq.client.Channel;
import com.rabbitmq.client.Connection;
import com.sowhat.mq.util.ConnectionUtils;

import java.io.IOException;
import java.util.concurrent.TimeoutException;

public class Send1 {
    public static final String QUEUE_NAME = "test_queue_confirm1";

    public static void main(String[] args) throws IOException, TimeoutException, InterruptedException {
        Connection connection = ConnectionUtils.getConnection();
        Channel channel = connection.createChannel();
        channel.queueDeclare(QUEUE_NAME, false, false, false, null);

        // 将channel模式设置为 confirm模式,注意设置这个不能设置为事务模式。
        channel.confirmSelect();

        String msg = "hello confirm message";
        channel.basicPublish("", QUEUE_NAME, null, msg.getBytes());
        if (!channel.waitForConfirms()) {
            System.out.println("消息发送失败");
        } else {
            System.out.println("消息发送OK");
        }
        channel.close();
        connection.close();
    }
}
---
package com.sowhat.confirm;

import com.rabbitmq.client.*;
import com.sowhat.mq.util.ConnectionUtils;

import java.io.IOException;
import java.util.concurrent.TimeoutException;

public class Recv {
    public static final String QUEUE_NAME = "test_queue_confirm1";

    public static void main(String[] args) throws IOException, TimeoutException {
        Connection connection = ConnectionUtils.getConnection();
        Channel channel = connection.createChannel();

        channel.queueDeclare(QUEUE_NAME, false, false, false, null);

        String s = channel.basicConsume(QUEUE_NAME, true, new DefaultConsumer(channel) {
            @Override
            public void handleDelivery(String consumerTag, Envelope envelope, AMQP.BasicProperties properties, byte[] body) throws IOException {
                System.out.println("recv[tx] msg:" + new String(body, "utf-8"));
            }
        });
    }
}
2. 批量的发一批数据 waitForConfirms()
package com.sowhat.confirm;

import com.rabbitmq.client.Channel;
import com.rabbitmq.client.Connection;
import com.sowhat.mq.util.ConnectionUtils;

import java.io.IOException;
import java.util.concurrent.TimeoutException;

public class Send2 {
    public static final String QUEUE_NAME = "test_queue_confirm1";

    public static void main(String[] args) throws IOException, TimeoutException, InterruptedException {
        Connection connection = ConnectionUtils.getConnection();
        Channel channel = connection.createChannel();
        channel.queueDeclare(QUEUE_NAME, false, false, false, null);

        // 将channel模式设置为 confirm模式,注意设置这个不能设置为事务模式。
        channel.confirmSelect();

        String msg = "hello confirm message";
        // 批量发送
        for (int i = 0; i < 10; i++) {
            channel.basicPublish("", QUEUE_NAME, null, msg.getBytes());
        }
        // 确认
        if (!channel.waitForConfirms()) {
            System.out.println("消息发送失败");
        } else {
            System.out.println("消息发送OK");
        }
        channel.close();
        connection.close();
    }
}
---
接受信息跟上面一样
3. 异步confirm模式,提供一个回调方法。
Channel对象提供的ConfirmListener()回调方法只包含deliveryTag(包含当前发出消息序号),我们需要自己为每一个Channel维护一个unconfirm的消息序号集合,每publish一条数据,集合中元素加1,每回调一次handleAck方法,unconfirm集合删掉响应的一条(multiple=false)或多条(multiple=true)记录,从运行效率来看,unconfirm集合最好采用有序集合SortedSet存储结构。
package com.sowhat.mq.confirm;

import com.rabbitmq.client.*;
import com.sowhat.mq.util.ConnectionUtils;

import java.io.IOException;
import java.util.Collections;
import java.util.SortedSet;
import java.util.TreeSet;
import java.util.concurrent.TimeoutException;

public class Send3 {
    public static final String QUEUE_NAME = "test_queue_confirm3";

    public static void main(String[] args) throws IOException, TimeoutException, InterruptedException {
        Connection connection = ConnectionUtils.getConnection();
        Channel channel = connection.createChannel();
        channel.queueDeclare(QUEUE_NAME, false, false, false, null);

        //生产者调用confirmSelect
        channel.confirmSelect();

        // 存放未确认消息
        final SortedSet<Long> confirmSet = Collections.synchronizedSortedSet(new TreeSet<Long>());

       // 添加监听通道
        channel.addConfirmListener(new ConfirmListener() {
            // 回执有问题的
            public void handleAck(long deliveryTag, boolean multiple) throws IOException {
                if (multiple) {
                    System.out.println("--handleNack---multiple");
                    confirmSet.headSet(deliveryTag + 1).clear();
                } else {
                    System.out.println("--handleNack-- multiple false");
                    confirmSet.remove(deliveryTag);
                }
            }

            // 没有问题的handleAck
            public void handleNack(long deliveryTag, boolean multiple) throws IOException {
                if (multiple) {
                    System.out.println("--handleAck---multiple");
                    confirmSet.headSet(deliveryTag + 1).clear();
                } else {
                    System.out.println("--handleAck--multiple false");
                    confirmSet.remove(deliveryTag);
                }
            }
        });

        // 一般情况下是先开启 消费者,指定好 exchange跟routingkey,如果生产者等routingkey 就会触发这个return 方法
        channel.addReturnListener(new ReturnListener() {
            public void handleReturn(int replyCode, String replyText, String exchange, String routingKey, AMQP.BasicProperties properties, byte[] body) throws IOException {
                System.out.println("---- handle return----");
                System.out.println("replyCode:" + replyCode );
                System.out.println("replyText:" +replyText );
                System.out.println("exchange:" + exchange);
                System.out.println("routingKey:" + routingKey);
                System.out.println("properties:" + properties);
                System.out.println("body:" + new String(body));
            }
        });

        String msgStr = "sssss";
        while(true){
            long nextPublishSeqNo = channel.getNextPublishSeqNo();
            channel.basicPublish("",QUEUE_NAME,null,msgStr.getBytes());
            confirmSet.add(nextPublishSeqNo);
            Thread.sleep(1000);
        }
    }
}
总结:AMQP模式相对来说没Confirm模式性能好些,推荐使用后者。
9. RabbitMQ延迟队列 跟死信
淘宝订单付款,验证码等限时类型服务。
        Map<String,Object> headers =  new HashMap<String,Object>();
        headers.put("my1","111");
        headers.put("my2","222");
        AMQP.BasicProperties build = new AMQP.BasicProperties().builder().deliveryMode(2).contentEncoding("utf-8").expiration("10000").headers(headers).build();
死信的处理:
10. SpringBoot Tpoic Demo
需求图: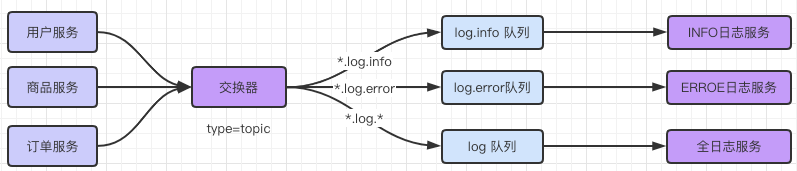 新建SpringBoot 项目添加如下依赖:
       <dependency>
            <groupId>org.springframework.boot</groupId>
            <artifactId>spring-boot-starter-amqp</artifactId>
        </dependency>
1. 生产者
application.yml
spring:
  rabbitmq:
    host: 127.0.0.1
    username: admin
    password: admin
测试用例:
package com.sowhat.mqpublisher;

import org.junit.jupiter.api.Test;
import org.springframework.amqp.core.AmqpTemplate;
import org.springframework.beans.factory.annotation.Autowired;
import org.springframework.boot.test.context.SpringBootTest;

@SpringBootTest
class MqpublisherApplicationTests {
    @Autowired
    private AmqpTemplate amqpTemplate;

    @Test
    void userInfo() {
        /**
         * exchange,routingKey,message
         */
        this.amqpTemplate.convertAndSend("log.topic","user.log.error","Users...");
    }
}
2. 消费者
application.xml
spring:
  rabbitmq:
    host: 127.0.0.1
    username: admin
    password: admin

# 自定义配置
mq:
  config:
    exchange_name: log.topic
    # 配置队列名称
    queue_name:
        info: log.info
        error: log.error
        logs: log.logs
三个不同的消费者:
package com.sowhat.mqconsumer.service;

import org.springframework.amqp.core.ExchangeTypes;
import org.springframework.amqp.rabbit.annotation.Exchange;
import org.springframework.amqp.rabbit.annotation.Queue;
import org.springframework.amqp.rabbit.annotation.QueueBinding;
import org.springframework.amqp.rabbit.annotation.RabbitListener;
import org.springframework.stereotype.Service;

/**
 * @QueueBinding value属性:用于绑定一个队列。@Queue去查找一个名字为value属性中的值得队列,如果没有则创建,如果有则返回
 * type = ExchangeTypes.TOPIC 指定交换器类型。默认的direct交换器
 */
@Service
public class ErrorReceiverService {

    /**
      * 把一个方法跟一个队列进行绑定,收到消息后绑定给msg
     */
    @RabbitListener(bindings = @QueueBinding(
            value = @Queue(value = "${mq.config.queue_name.error}"),
            exchange = @Exchange(value = "${mq.config.exchange_name}", type = ExchangeTypes.TOPIC),
            key = "*.log.error"
        )
    )
    public void process(String msg) {
        System.out.println(msg + " Logs...........");
    }
}
---
package com.sowhat.mqconsumer.service;

import org.springframework.amqp.core.ExchangeTypes;
import org.springframework.amqp.rabbit.annotation.Exchange;
import org.springframework.amqp.rabbit.annotation.Queue;
import org.springframework.amqp.rabbit.annotation.QueueBinding;
import org.springframework.amqp.rabbit.annotation.RabbitListener;
import org.springframework.stereotype.Service;

/**
 * @QueueBinding value属性:用于绑定一个队列。
 * @Queue去查找一个名字为value属性中的值得队列,如果没有则创建,如果有则返回
 */
@Service
public class InfoReceiverService {

    /**
     * 添加一个能够处理消息的方法
     */
    @RabbitListener(bindings = @QueueBinding(
            value = @Queue(value ="${mq.config.queue_name.info}"),
            exchange = @Exchange(value = "${mq.config.exchange_name}",type = ExchangeTypes.TOPIC),
            key = "*.log.info"
    ))
    public void process(String msg){
        System.out.println(msg+" Info...........");

    }
}
--
package com.sowhat.mqconsumer.service;

import org.springframework.amqp.core.ExchangeTypes;
import org.springframework.amqp.rabbit.annotation.Exchange;
import org.springframework.amqp.rabbit.annotation.Queue;
import org.springframework.amqp.rabbit.annotation.QueueBinding;
import org.springframework.amqp.rabbit.annotation.RabbitListener;
import org.springframework.stereotype.Service;

/**
 * @QueueBinding value属性:用于绑定一个队列。
 * @Queue去查找一个名字为value属性中的值得队列,如果没有则创建,如果有则返回
 */
@Service
public class LogsReceiverService {

    /**
     * 添加一个能够处理消息的方法
     */
    @RabbitListener(bindings = @QueueBinding(
            value = @Queue(value ="${mq.config.queue_name.logs}"),
            exchange = @Exchange(value = "${mq.config.exchange_name}",type = ExchangeTypes.TOPIC),
            key = "*.log.*"
    ))
    public void process(String msg){
        System.out.println(msg+" Error...........");
    }
}
详细安装跟代码看参考下载:
总结
如果需要指定模式一般是在消费者端设置,灵活性调节。
| 模式 | 生产者Queue | 生产者exchange | 生产者routingKey | 消费者exchange | 消费者queue | routingKey |
|---|---|---|---|---|---|---|
| Simple(简单模式少用) | 指定 | 不指定 | 不指定 | 不指定 | 指定 | 不指定 |
| WorkQueue(多个消费者少用) | 指定 | 不指定 | 不指定 | 不指定 | 指定 | 不指定 |
| fanout(publish/subscribe模式) | 不指定 | 指定 | 不指定 | 指定 | 指定 | 不指定 |
| direct(路由模式) | 不指定 | 指定 | 指定 | 指定 | 指定 | 消费者routingKey精确指定多个 |
| topic(主题模糊匹配) | 不指定 | 指定 | 指定 | 指定 | 指定 | 消费者routingKey可以进行模糊匹配 |
长按关注,学习Java


 983
983

 被折叠的 条评论
为什么被折叠?
被折叠的 条评论
为什么被折叠?
 到【灌水乐园】发言


