


1.分布式配置中心应用场景
往往,我们使用配置文件管理一些配置信息,比如application.yml。
单体应用架构,配置信息的管理、维护并不会显得特别麻烦,手动操作就可以,因为就一个工程;
微服务架构,因为我们的分布式集群环境中可能有很多个微服务,我们不可能一个一个去修改配置然后重启生效,在一定场景下我们还需要在运行期间动态调整配置信息,比如:根据各个微服务的负载情况,动态调整数据源连接池大小,我们希望配置内容发生变化的时候,微服务可以自动更新。
场景总结如下:
1)集中配置管理,一个微服务架构中可能有成百上千个微服务,所以集中配置管理是很重要的(一次修改、到处生效)。
2)不同环境不同配置,比如数据源配置在不同环境(开发dev,测试test,生产prod)中是不同的。
3)运行期间可动态调整。例如,可根据各个微服务的负载情况,动态调整数据源连接池大小等配置修改后可自动更新。
4)如配置内容发生变化,微服务可以自动更新配置那么,我们就需要对配置文件进行集中式管理,这也是分布式配置中心的作用。
2.Spring Cloud Config简介
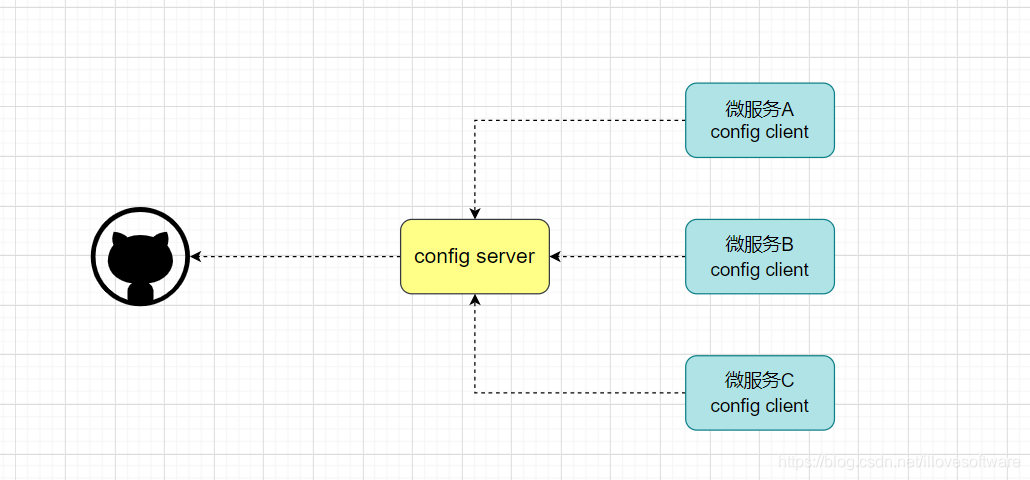
Spring Cloud Config是一个分布式配置管理方案,包含了 Server端和 Client端两个部分。
Server 端:提供配置文件的存储、以接口的形式将配置文件的内容提供出去,通过使用
@EnableConfigServer注解在 Spring boot 应用中非常简单的嵌入。
Client 端:通过接口获取配置数据并初始化自己的应用。
3.Config分布式配置应用
说明:Config Server是集中式的配置服务,用于集中管理应用程序各个环境下的配置。 默认使用Git存储配置文件内容,也可以SVN。
比如,我们要对“静态化微服务或者商品微服务”的application.yml进行管理(区分开发环境(dev)、测试环境(test)、生产环境(prod))
1)登录GitHub,创建项目yang-config
2)上传yml配置文件,命名规则如下:
{application}-{profile}.yml 或者 {application}-{profile}.properties
其中,application为应用名称,profile指的是环境(用于区分开发环境,测试环境、生产环境等)。
示例:yang-service-page-dev.yml、yang-service-page-test.yml、yang-service-page-
Prod.yml
3)构建Config Server统一配置中心
新建SpringBoot工程,引入依赖坐标(需要注册自己到Eureka)
| <?xml version="1.0" encoding="UTF-8"?> <project xmlns="http://maven.apache.org/POM/4.0.0" xmlns:xsi="http://www.w3.org/2001/XMLSchema-instance" xsi:schemaLocation="http://maven.apache.org/POM/4.0.0 http://maven.apache.org/xsd/maven-4.0.0.xsd"> <parent> <artifactId>yang-parent</artifactId> <groupId>com.yang</groupId> <version>1.0-SNAPSHOT</version> </parent> <modelVersion>4.0.0</modelVersion> <artifactId>yang-cloud-config</artifactId> <dependencies> <!--eureka client 客户端依赖引入--> <dependency> <groupId>org.springframework.cloud</groupId> <artifactId>spring-cloud-starter-netflix-eureka-client</artifactId> </dependency> <!--config配置中心服务端--> <dependency> <groupId>org.springframework.cloud</groupId> <artifactId>spring-cloud-config-server</artifactId> </dependency> </dependencies> </project |
配置启动类,使用注解@EnableConfigServer开启配置中心服务器功能
| package com.yang.config; import org.springframework.boot.SpringApplication; import org.springframework.boot.autoconfigure.SpringBootApplication; import org.springframework.cloud.client.discovery.EnableDiscoveryClient; import org.springframework.cloud.config.server.EnableConfigServer; import java.io.ObjectInputFilter; @SpringBootApplication @EnableConfigServer // 开启配置服务器功能 @EnableDiscoveryClient public class ConfigApplication { public static void main(String[] args) { SpringApplication.run(ConfigApplication.class, args); } } |
application.yml配置
| server: port: 9400 #注册到Eureka服务中心 eureka: client: service-url: defaultZone: http://YangCloudEurekaServerA:9200/eureka,http://YangCloudEurekaServerB:9201/e ureka instance: prefer-ip-address: true instance-id: ${spring.cloud.client.ip- address}:${spring.application.name}:${server.port}:@project.version@ spring: application: name: yang-service-config cloud: config: server: git: uri: https://github.com/jetwu-do/yang-config.git #配置git服务地址 username: jetwu-do #配置git用户名 password: wu7787879 #配置git密码 search-paths: - yang-config # 读取分支 label: master |
测试(依自己配的为主)
http://127.0.0.1:9600/master/application-dev.yml
master:分支名称
application-dev.yml:文件名称
4)构建Client客户端(在已有页面静态化微服务基础上)
案例实现:在yang-service-page微服务中动态获取config server的配置信息
已有工程中添加依赖坐标
| <dependency> <groupId>org.springframework.cloud</groupId> <artifactId>spring-cloud-config-client</artifactId> </dependency> |
application.yml修改为bootstrap.yml配置文件
bootstrap.yml是系统级别的,优先级比application.yml高,应用启动时会检查这个配置文件,在这个配置文件中指定配置中心的服务地址,会自动拉取所有应用配置并且启用。
(主要是把与统一配置中心连接的配置信息放到bootstrap.yml)
注意:需要统一读取的配置信息,从配置中心获取
bootstrap.yml(部分)
| server: port: 9100 # 后期该微服务多实例,端口从9100递增(10个以内) Spring: application: name: yang-service-page datasource: driver-class-name: com.mysql.jdbc.Driver url: jdbc:mysql://localhost:3306/yang? useUnicode=true&characterEncoding=utf8&serverTimezone=UTC username: root password: wu7787879 cloud: config: #config客户端配置,和ConfigServer通信,并告知ConfigServer希望获取的配置信息在哪个文 件中 name: application profile: dev #后缀名称 label: master #分支名称 uri: http://localhost:9400 #ConfigServer配置中心地址 |
ConfigController
| package com.yang.page.controller; import org.springframework.beans.factory.annotation.Value; import org.springframework.web.bind.annotation.RequestMapping; import org.springframework.web.bind.annotation.RestController; @RestController @RequestMapping("/config") public class ConfigClientController { @Value("${mysql.user}") private String mysqlUser; @Value("${person.name}") private String personName; @RequestMapping("/remote") public String findRemoteConfig() { return mysqlUser + " " + personName; } } |
测试:
http://127.0.0.1:9100/config/remote
4.Config配置手动刷新
不用重启微服务,只需要手动的做一些其他的操作(访问一个地址/refresh)刷新,之后再访问即可。
此时,客户端取到了配置中心的值,但当我们修改GitHub上面的值时,服务端(Config Server)能实时获取最新的值,但客户端(Config Client)读的是缓存,无法实时获取最新值。Spring Cloud已 经为我们解决了这个问题,那就是客户端使用post去触发refresh,获取最新数据。
1.Client客户端添加依赖springboot-starter-actuator(已添加)
2.Client客户端bootstrap.yml中添加配置(暴露通信端点)
| management: endpoints: web: exposure: include: refresh #也可以暴露所有的端口 management: endpoints: web: exposure: include: "*" |
2.1.Client客户端使用到配置信息的类上添加@RefreshScope
| package com.yang.page.controller; import org.springframework.beans.factory.annotation.Value; import org.springframework.cloud.context.config.annotation.RefreshScope; import org.springframework.web.bind.annotation.RequestMapping; import org.springframework.web.bind.annotation.RestController; @RestController @RequestMapping("/config") @RefreshScope //手动刷新 public class ConfigClientController { @Value("${mysql.user}") private String mysqlUser; @Value("${person.name}") private String personName; @RequestMapping("/remote") public String findRemoteConfig() { return mysqlUser + " " + personName; } } |
2.2.手动向Client客户端发起POST请求,http://localhost:9100/actuator/refresh,刷新配置信息
注意:手动刷新方式避免了服务重启
思考:可否使用广播机制,一次通知,处处生效,方便大范围配置自动刷新?
5.Config配置自动更新
实现一次通知,处处生效
在微服务架构中,我们可以结合消息总线(Bus)实现分布式配置的自动更新(Spring Cloud
Config + Spring Cloud Bus)
消息总线Bus
所谓消息总线Bus,即我们经常会使用MQ消息代理构建一个共用的Topic,通过这个Topic连接各个微服务实例,MQ广播的消息会被所有在注册中心的微服务实例监听和消费。换言之就是通过一个主题连接各个微服务,打通脉络。
Spring Cloud Bus(基于MQ的,支持RabbitMq/Kafka) 是Spring Cloud中的消息总线方案,Spring Cloud Config + Spring Cloud Bus 结合可以实现配置信息的自动更新。
Spring Cloud Config + Spring Cloud Bus 实现自动刷新
MQ消息代理,我们还选择使用RabbitMQ,ConfigServer和ConfigClient都添加都消息总线的支持以及与RabbitMq的连接信息。
1.Config Server服务端和客户端添加消息总线支持
| <dependency> <groupId>org.springframework.cloud</groupId> <artifactId>spring-cloud-starter-bus-amqp</artifactId> </dependency> |
2.Config Server和客户端添加配置
| spring: rabbitmq: host: 192.169.200.128 port: 5672 username: guest password: guest |
2.1.Config Server微服务暴露端口
| management: endpoints: web: exposure: include: bus-refresh #建议暴露所有的端口 management: endpoints: web: exposure: include: "*" |
2.2.重启各个服务,更改配置之后,向配置中心服务端发送post请求,各个客户端配置即可自动刷新
http://127.0.0.1:9400/actuator/bus-refresh
2.3.Config Client测试
http://localhost:9100/config/remote
在广播模式下实现了一次请求,处处更新,如果我只想定向更新呢?
在发起刷新请求的时候http://localhost:9006/actuator/bus-refresh/yang-service-page:9100
即为最后面跟上要定向刷新的实例的 服务名:端口号即可。


 167万+
167万+


 到【灌水乐园】发言


