


http://sandsprite.com/CodeStuff/add_function.html
Adding New Functions to Compiled CodeTools used:
Note: Also check out the CaveWriter tool I made for an alternative method to applying these patchs that might be a bit easier. (Screenshot) This tut is just a quick fun example of what you might do with your new found RCE skills on a bored and rainy day. Seriously though, there are times when you need to tweak a compiled app of which you do not have the source for. This trainer will walk you through an example application and show you one such example. Source and binaries are provided in the download package so you can directly walk along and see what I am talking about and follow along with me both in the source and in a debugger. First lets describe a problem. We have an App that has a function that takes one numeric argument. We need to alter this number at times but the program provides no way to do so. So this source is a mock up of this situation, and shows us an answer. In the simplest of terms, our main app has a function call with one numeric argument. void main(void){
int c = 0;
normal(c);
}
The function "normal()" is also quite simple and just displays the value passed to it. __stdcall int normal(int c){
printf("I am normal and I see %x/n",c);
printf("Press any key to continue...");
getche();
}
Your goal should you choose to accept it, is to implement a way so that you can interactivly change the value passed to normal() at run time. If we look at the asm that calls the function normal() we might see something like this: .text:004010BA _main proc near .text:004010BA .text:004010BA varC = dword ptr -4 .text:004010BA .text:004010BA push ebp .text:004010BB mov ebp, esp .text:004010BD push ecx .text:004010BE mov [ebp+varC], 0 ;initialize variable .text:004010C5 mov eax, [ebp+varC] ;place it in eax register .text:004010C8 push eax ;push onto stack as arg .text:004010C9 call normal ;call function normal() .text:004010CE xor eax, eax .text:004010D0 mov esp, ebp .text:004010D2 pop ebp .text:004010D3 retn .text:004010D3 _main endpSo what is the easiest way we can insert a binary patch to the compiled executable to interactively edit this argument value? After thinking about some ways to do this I decided the easiest way to write an external dll that will provide a basic UI (in this case a console window) which I will then call from a small asm stub I patch into the binary. These tricks are not new, I remember reading a tut on this kinda stuff a while back. I just wanted to try it myself so thought I would write this as I went to help others along. So here is our basic outline
Changing the import table sounds like more fun so lets do that :) So first thing we do is create a sample app and debug all the code to get ourselves started. Check out the source for details (Note if you recompile the apps, offsets will likely change. I have included an original copy of the exe for you to experiment with if you want to make the mods yourself as we go) If you look at the main app, you will see the basic layout. At the bottom you also see some inline asm tests you can try to get an overview of what we are ultimately going for. After our UI function is created and debugged, we house it in a stdcall dll and export it. With that done, our DLL is now made, and we need to add it to the import table of our compiled target. For this we use a very cool program named iidKing. You should be able to figure it out by just playing with it, basically you just enter the dll name to add and the dll function to import and hit a button couldn抰 be much simpler :) After iidKing says happy things to you, fire up LordPE again and check the import table just to double check the results. You can also load the exe up in your debugger and look at the executable modules loaded to double check that its really there. Below is how the import table now looks in LordPE: 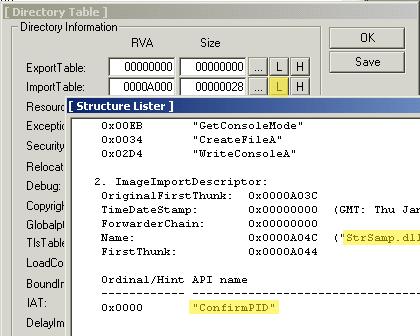 IIDKing also generates a file that will give you the offset of the new function you added and how to call it in asm. ConfirmPID: call dword ptr [40A044] Ok Cool, now our UI function is in place and ready to be called in an easy to use way. Now we need to get execution there. Lets take a look at some example asm code of what will need to happen for this to all work: void main(void){
int c = 0;
__asm{
mov c,2 ;set initial val for arg
mov ebx, c
push ebx ;push arg on stack
jmp hack ;was call normal
back:
mov c, eax
jmp done
hack:
call ConfirmPID ;call our dll function
push eax ;put return value on stack
call normal ;call original function
jmp back ;resume execution as normal
done:
}
}
Lets explain the above layout. While the majority of our new code is housed in our DLL, we are still going to have to write some stub in asm to get us to it. First, we need to hijack execution just before the real function call. In the disasm of the main function we saw the call we are interested in. In hiew this looks like 004010C9: E8 BC FF FF FF call .00040108AWe can see we have 5 bytes to play with (more if we have to but then we would have to execute the other overwritten instructions somewhere else) This raises a question if we hijack execution here...where are we going to send it? We need a place for our new instructions to sit in the file. Here comes the concept of "caves" Basically we just need a section in the binary file that is mapped with execution privileges in memory and has a spot where there is no code yet. To find a suitable cave, lets check out its section tables. Below is another screen shot of LordPE:  This screen shot is showing you allot. So let me explain. First, look at the Back most window that lists all the PE sections. The windows on top are further describing the .text section. From these windows, we can see that the .text section starts at raw file offset 1000h, and is 5000h bytes long. The button on the middle form breaks down the flags value and brings up the topmost screen that shows what flags are set. As we can see, it is an executable section. Looking at the main section table again, we see that the next PE section, .rdata starts at raw file offset 6000h, this is right after the .text section ends. The intresting thing to note, is that the virtual size (the size in memory) of the .text section is not quite using up the entire 5000h bytes that are laid out for it in the file. This means that there is a slight gap between the two sections in the file. Lets check out the file in a hexeditor: Remember .text started at 1000h and its raw size is 5000h bytes long,
This means its spans the raw file offset from 1000h to 6000h
Also note that its virtual size (size mapped into memory) is
only 4E5Eh, which means that there is some unused space as shown
below
Offset 0 1 2 3 4 5 6 7 8 9 A B C D E F
00005E50 C0 74 06 0F B6 45 0B C9 C3 83 C8 FF C9 C3 00 00 纓..E.擅內擅..
00005E60 00 00 00 00 00 00 00 00 00 00 00 00 00 00 00 00 ................
00005E70 00 00 00 00 00 00 00 00 00 00 00 00 00 00 00 00 ................
00005E80 00 00 00 00 00 00 00 00 00 00 00 00 00 00 00 00 ................
00005E90 00 00 00 00 00 00 00 00 00 00 00 00 00 00 00 00 ................
00005EA0 00 00 00 00 00 00 00 00 00 00 00 00 00 00 00 00 ................
00005EB0 00 00 00 00 00 00 00 00 00 00 00 00 00 00 00 00 ................
00005EC0 00 00 00 00 00 00 00 00 00 00 00 00 00 00 00 00 ................
00005ED0 00 00 00 00 00 00 00 00 00 00 00 00 00 00 00 00 ................
00005EE0 00 00 00 00 00 00 00 00 00 00 00 00 00 00 00 00 ................
00005EF0 00 00 00 00 00 00 00 00 00 00 00 00 00 00 00 00 ................
00005F00 00 00 00 00 00 00 00 00 00 00 00 00 00 00 00 00 ................
00005F10 00 00 00 00 00 00 00 00 00 00 00 00 00 00 00 00 ................
00005F20 00 00 00 00 00 00 00 00 00 00 00 00 00 00 00 00 ................
00005F30 00 00 00 00 00 00 00 00 00 00 00 00 00 00 00 00 ................
00005F40 00 00 00 00 00 00 00 00 00 00 00 00 00 00 00 00 ................
00005F50 00 00 00 00 00 00 00 00 00 00 00 00 00 00 00 00 ................
00005F60 00 00 00 00 00 00 00 00 00 00 00 00 00 00 00 00 ................
00005F70 00 00 00 00 00 00 00 00 00 00 00 00 00 00 00 00 ................
00005F80 00 00 00 00 00 00 00 00 00 00 00 00 00 00 00 00 ................
00005F90 00 00 00 00 00 00 00 00 00 00 00 00 00 00 00 00 ................
00005FA0 00 00 00 00 00 00 00 00 00 00 00 00 00 00 00 00 ................
00005FB0 00 00 00 00 00 00 00 00 00 00 00 00 00 00 00 00 ................
00005FC0 00 00 00 00 00 00 00 00 00 00 00 00 00 00 00 00 ................
00005FD0 00 00 00 00 00 00 00 00 00 00 00 00 00 00 00 00 ................
00005FE0 00 00 00 00 00 00 00 00 00 00 00 00 00 00 00 00 ................
00005FF0 00 00 00 00 00 00 00 00 00 00 00 00 00 00 00 00 ................
00006000 7A 67 00 00 B2 65 00 00 D0 65 00 00 E2 65 00 00 zg..瞖..衑..鈋..
Yup..thats a nice pad for us and more than enough room for us to add in our small asm stub. This extra space is totally unused, and not loaded into memory. Next we need to assure that whatever instructions we place in there, will be loaded into memory. We do this by altering the .text section attributes in the PE header with LordPE. Right now the virtual size of this section is only 4E5E, because that is all the compiler needed. We need a little more, so lets change the virtual size of the .text section all the way up to 4FFF which is the max size we can use seeing how the entire raw size is only 5000. Once that is done, we now have a suitable place to store our patch code. Next comes the actual patching :) Above we already listed where in the disassembly the actual function call occurs 004010C9: E8 BC FF FF FF call .00040108AAt this point, the argument is already on the stack and stuff is ready to happen....we just need other stuff to happen. As shown in our inline asm code above, at this point we now the program to call our new dll function, call the original function with our modified data and resume execution. Before any of this can happen, we need to transfer the execution to our base asm stub. For this we need to patch the original function call to instead jump right to our new code. For this example, I choose to start my asm stub at raw file offset 5E70h. To get execution there all we have to do is replace that original function call with a jump to our new code as such .004010C9: E9 A2 4D 00 00 jmp .000405E70 ;this was the call normal()One thing to pay close attention to when you are patching like this is how many bytes the instructions take. In both the original call, and our new jump, the instructions take a total of 5 bytes. This is very important. If our jmp had taken more bytes than what we were replacing, we would have been overwriting other instructions which we would have had to make up for in our asm stub. Also if you have to overwrite other instructions..make sure you overwrite them entirely and dont leave some stray bytes that will totally change the meaning of the next instructions. (NOP out loose ends danielson) Ok, so now instead of our function call, we will be redirected to our stub location. Now we need to enter the actual asm stub. Here is what it all looks like when you put it all together using HIEW. .004010C5: 8B45FC mov eax,[ebp][-0004] .004010C8: 50 push eax .004010C9: E9A24D0000 jmp .000405E70 ;this was the call to normal() .004010CE: 33C0 xor eax,eax .004010D0: 8BE5 mov esp,ebp .00405E70: FF1544A04000 call d,[00040A044] ;address from iidKing for dll fx .00405E76: 50 push eax ;return value from our dll .00405E77: E80EB2FFFF call .00040108A ;original "normal()" function .00405E7C: E94DB2FFFF jmp .0004010CE ;jmp back to next instructionThe normal function took one int arg, which is already on the stack for us. Our dll function takes the same int arg, and just gives us a chance to change it by popping up its own console if one was not already present. This gives us a dirty simple UI to interact with the user. With all the changes now made, all we have to do is run it in Olly and see if we screwed anything up ;) Trace along with the example or just double click and pray :P Turns out all our hard work paid off and works just as expected. I have included all source code used in this tut in the package. Note that if you recompile offsets will likely change. If you want to try to make the mods yourself, I have included an original unaltered exe as well as an altered one so you can step through it all in the debugger to watch it all in action. This is the simplest case scenario of hacking in the ability to interactively alter a function with one numeric argument. Anyway..enjoy...it was fun and I thought it would make a good trainer :) -dzzie <dzzie at yahoo.com> |

 1009


 扫一扫


 被折叠的 条评论
为什么被折叠?
 到【灌水乐园】发言


