 快速解包Storm蠕虫


 本文介绍了一种快速解包Storm蠕虫所使用的加载器的方法,即使恶意代码被加载到堆上并进行了重定位。文章详细说明了如何找到原始入口点、如何转储真实代码以及如何修复已转储的可执行文件。
Storm Worm attackers have been using many different packers, and even if their primary goal isn't to protect against reverse engineering, they have introduced various techniques to slow down analysis. Today's main trick is the execution of code onto the heap. This prevents process dumpers from working, because they dump to disk only the code loader (the actual process you are executing), and not the malicious code.
This is by no means a new technique, but I haven't seen many tutorials about unpacking packers that load code onto the heap. In the example you are about to view, the attackers' implementation is flawed, and it allows unpacking in a very short time. For obvious reasons, I'm not going to discuss the flaws, but I will show you how to unpack the file quickly.
Finding the Original Entry Point
The packer loader is rather linear, so finding the "jump" to the entry point is fairly trivial. Because it's all linear, simply scroll down through the code, until you find suspicious code like this:
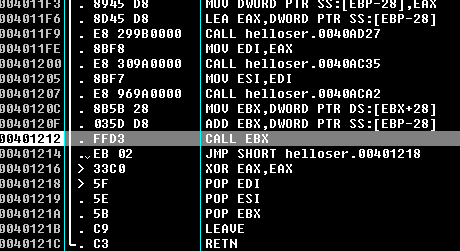
We can put a breakpoint there and then execute the malware. By looking at the content of EBX, we see an address that is below the process image space. In my case, the address was 0x332DC8, and this is obviously not inside our executable image.
The loader allocated memory, then moved the code to be executed onto the heap, applied relocation, and then emulated the Windows loader to load the imports. (Emulate sounds exciting, but it's basically just doing the Windows PE loader job, and every packer does that.) The relocation is applied because the file never knows exactly where it will be executed from, since the code is executed onto the heap.
Dumping the real code
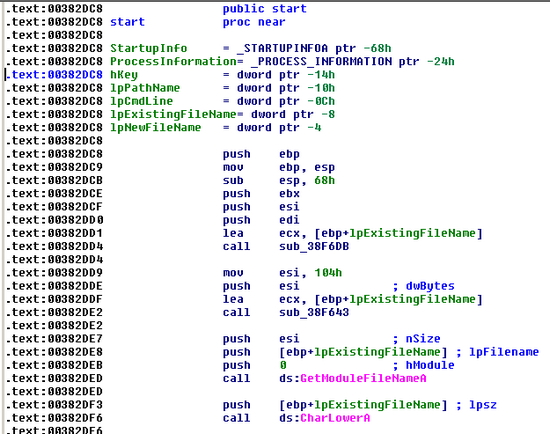
Because the executed code isn't within the process, standard memory dumpers won't dump the interesting bit, just the malware loader. Standard memory dumpers simply read the process memory and dump from ImageBase to ImageBase+SizeOfImage. In order to dump this one, you can use LordPE and use Dump Memory Region.
Just select the memory region corresponding to the original entry point address. In my case, since our address was 0x382DC8, the best memory region to dump is the one starting at 0x380000:

After a quick look at our dump with a hex editor, we realize that we have complete headers of the original unpacked file. Pretty much as we saw in my last blog, we have different headers in memory, one PE file for the malware, and one PE file for the "packed" loader.
Fixing the dumped executable
Since we have the original headers, we don't have to bother recreating them from scratch. We simply need to update them, since they are still in their original state, which means that the Raw Address of every section is not matching its Virtual Address equivalent. Indeed, when you dump a PE file from memory, the Raw information of every section must be updated so that it matches its virtual counterpart.
We also need to fix the import table. The packer loader updated the imports with Windows function addresses; therefore, our dump has hardcoded pointers to Windows functions. The file can still run, but the import table isn't really valid. We don't even have to use Import Reconstructor for this; we can do it statically with LordPE too.
The reason we can do it statically is because of the way the imports are working. If you are interested, I invite you to read about FirstThunk and OriginalFirstThunk in your favorite PE file format documentation.
So, open LordPE, go into Options, and check/uncheck as shown on the next picture. Basically you just have to uncheck the option for Wipe Relocation, and check FixDump (this is the Raw = Virtual fixing thing). You can see the settings here:

Also, don't forget to update the ImageBase of your file. By default it was 0x400000, but we have seen that the file was relocated. In my case, it was loaded at 0x380000, so I changed the ImageBase to 0x380000.
At this point, our file is totally unpacked. Imports were reconstructed (because we had all the needed information), the sections were realigned, and everything was nicely fixed. As you can see below, the file can now be analyzed in IDA with no problem:
Because of its design flaws, this packer was definitely very easy to unpack, probably a lot more so than the authors initially thought. Hopefuly, this blog gives you some hints on how to unpack packers that move the code and Import Address Table onto the heap.
Security Researcher: Nicolas Brulez


 1936
1936

 被折叠的 条评论
为什么被折叠?
被折叠的 条评论
为什么被折叠?
 到【灌水乐园】发言


