


 本文详细介绍了在Web应用中如何使用Spring框架,包括配置文件的区别、创建IOC容器的最佳时机、访问IOC容器的方法以及加载配置文件的策略。通过示例代码展示了如何在JavaWeb工程中实现Spring框架的应用。
在Web应用中如何使用Spring框架?
在回答这个问题之前,让我们先回顾一下在非Web中使用Spring框架的方式:
package xyz.huning.spring4.helloworld;

import org.springframework.context.ApplicationContext;
import org.springframework.context.support.ClassPathXmlApplicationContext;

public class Main {
	public static void main(String[] args) {
		// 1. 创建Spring的IOC容器
		//    ApplicationContext代表IOC容器,ClassPathXmlApplicationContext:从 类路径下加载配置文件
		ApplicationContext context = new ClassPathXmlApplicationContext("helloworld.xml");
		// 2. 从IOC容器中获取bean
		Helloworld helloworld = context.getBean("helloWorld", Helloworld.class);
		helloworld.say();
		// 3. 关闭IOC容器
		((ClassPathXmlApplicationContext)context).close();
	}
}
不错,我们是通过new一个ApplicationContext的对象,让后加载配置文件来完成的。那么,在Web应有中我们又该如何实现呢?要回答这个问题,我们需要弄清楚一下一个问题:
1) Spring 的配置文件有什么不同?
2) 用什么方式创建IOC容器?
3) 在什么时候创建IOC容器?
4) 在 Web 应用的其他组件中如何来访问 IOC 容器?
5) 如何加载Spring配置文件?
Spring 的配置文件有什么不同?
因为配置文件中是对bean的配置,并不涉及IOC容器在哪里使用。因此,在Web应用中的配置文件和非Web应用中没有区别。
用什么方式创建IOC容器?
非 WEB 应用在 main 方法中直接创建,即在程序启动的时候创建。那么Web应用也应该在程序启动的时候创建,那Web应用是在什么时候启动程序的呢?
显然是在WEB 应用被服务器加载时启动的,因此,应该在 Web 应用被服务器加载时就创建 IOC 容器。查看ServletAPI后,发现在 ServletContextListener接口的
contextInitialized(ServletContextEvent evt) 方法中创建 IOC 容器是最佳时机。
在 Web 应用的其他组件中如何来访问 IOC 容器?
考虑到Web容器中存在四中作用域:applIcation(整个应用,对应servlet中ServletContext),session(会话,对应servlet中HttpSession),request(一次请求,对应servlet中HttpServletRequest)和page(当前页面)。
为了在所有范围内访问到IOC容器,在 ServletContextListener接口的contextInitialized(ServletContextEvent evt) 方法中创建 IOC 容器后, 可以把其放在ServletContext(即 application 域)的一个属性中。
如何加载Spring配置文件?
如果使用ClassPathXmlApplicationContext来创建IOC容器,则Spring配置文件放置于Classpath类路径中即可。为了增加应用的灵活性,可以利用web.xml中的初始化参数“context-param”来传入配置文件名称。然后使用
ServletContext接口的getInitParameter(String arg)来获取。以此来达到可配置的效果。
示例(源代码见附件)
1. 创建JavaWeb工程xyz.huning.web.spring4.custom
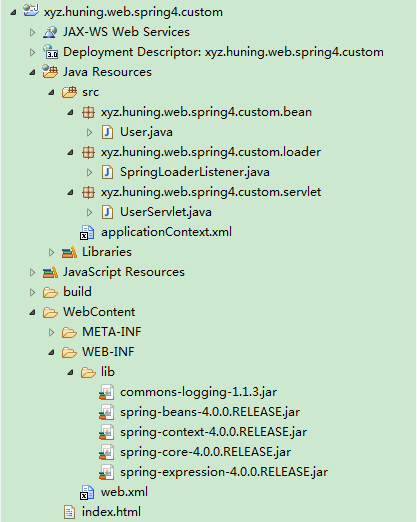
2. 添加模型类
package xyz.huning.web.spring4.custom.bean;

public class User {

	private int id;

	private String username;

	private String password;

	public int getId() {
		return id;
	}

	public void setId(int id) {
		this.id = id;
	}

	public String getUsername() {
		return username;
	}

	public void setUsername(String username) {
		this.username = username;
	}

	public String getPassword() {
		return password;
	}

	public void setPassword(String password) {
		this.password = password;
	}

	@Override
	public String toString() {
		return "User [id=" + id + ", username=" + username + ", password="
				+ password + "]";
	}
}
3. 配置模型bean
<?xml version="1.0" encoding="UTF-8"?>
<beans xmlns="http://www.springframework.org/schema/beans"
	xmlns:xsi="http://www.w3.org/2001/XMLSchema-instance"
	xsi:schemaLocation="http://www.springframework.org/schema/beans http://www.springframework.org/schema/beans/spring-beans.xsd">

	<bean id="user1" class="xyz.huning.web.spring4.custom.bean.User">
		<property name="id" value="1"></property>
		<property name="username" value="BluceLi"></property>
		<property name="password" value="123456"></property>
	</bean>

</beans>
4. 添加ServletContextListener
package xyz.huning.web.spring4.custom.loader;

import javax.servlet.ServletContext;
import javax.servlet.ServletContextEvent;
import javax.servlet.ServletContextListener;

import org.springframework.context.ApplicationContext;
import org.springframework.context.support.ClassPathXmlApplicationContext;

public class SpringLoaderListener implements ServletContextListener {

	public static final String APPLICATION_CONTEXT = "xyz.huning.web.spring4.custom.loader.ctx";

	private ServletContext servletContext;

	@Override
	public void contextDestroyed(ServletContextEvent evt) {
		servletContext = evt.getServletContext();
		ClassPathXmlApplicationContext ctx = (ClassPathXmlApplicationContext)servletContext.getAttribute(APPLICATION_CONTEXT);
		ctx.close();
	}

	@Override
	public void contextInitialized(ServletContextEvent evt) {
		servletContext = evt.getServletContext();
		String springCfgFile = servletContext.getInitParameter("springCfgFile");

		ApplicationContext ctx = new ClassPathXmlApplicationContext(springCfgFile);
		servletContext.setAttribute(APPLICATION_CONTEXT, ctx);
	}
}
5. 添加测试Servlet
package xyz.huning.web.spring4.custom.servlet;

import java.io.IOException;
import java.io.PrintWriter;

import javax.servlet.ServletException;
import javax.servlet.http.HttpServlet;
import javax.servlet.http.HttpServletRequest;
import javax.servlet.http.HttpServletResponse;

import org.springframework.context.ApplicationContext;

import xyz.huning.web.spring4.custom.bean.User;
import xyz.huning.web.spring4.custom.loader.SpringLoaderListener;

public class UserServlet extends HttpServlet {

	private static final long serialVersionUID = -8200917637630894695L;

	@Override
	protected void doGet(HttpServletRequest request, HttpServletResponse response) throws ServletException, IOException {
		ApplicationContext ctx = (ApplicationContext)getServletContext().getAttribute(SpringLoaderListener.APPLICATION_CONTEXT);
		User user1 = ctx.getBean("user1", User.class);

		PrintWriter pw = new PrintWriter(response.getOutputStream());
		pw.print(user1);

		pw.flush();
		pw.close();
	}
}
6. 添加web.xml并配置
<?xml version="1.0" encoding="UTF-8"?>
<web-app xmlns:xsi="http://www.w3.org/2001/XMLSchema-instance"
	xmlns="http://java.sun.com/xml/ns/javaee" xmlns:web="http://java.sun.com/xml/ns/javaee/web-app_2_5.xsd"
	xsi:schemaLocation="http://java.sun.com/xml/ns/javaee http://java.sun.com/xml/ns/javaee/web-app_3_0.xsd"
	id="WebApp_ID" version="3.0">

	<context-param>
		<param-name>springCfgFile</param-name>
		<param-value>applicationContext.xml</param-value>
	</context-param>

	<listener>
		<listener-class>xyz.huning.web.spring4.custom.loader.SpringLoaderListener</listener-class>
	</listener>

	<servlet>
		<servlet-name>userServlet</servlet-name>
		<servlet-class>xyz.huning.web.spring4.custom.servlet.UserServlet</servlet-class>
	</servlet>

	<servlet-mapping>
		<servlet-name>userServlet</servlet-name>
		<url-pattern>/userServlet</url-pattern>
	</servlet-mapping>

	<welcome-file-list>
		<welcome-file>index.html</welcome-file>
	</welcome-file-list>

</web-app>
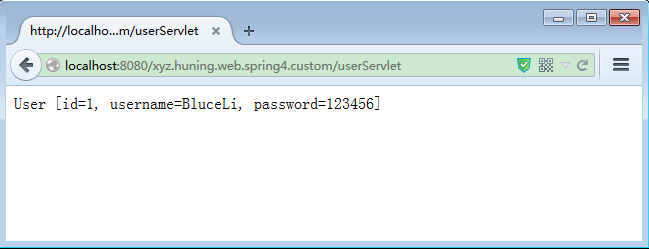
7. 配置tomcat添加目标工程后启动
8. 在浏览器中输入地址:http://localhost:8080/xyz.huning.web.spring4.custom/userServlet
9. 查看返回结果


 被折叠的 条评论
为什么被折叠?
被折叠的 条评论
为什么被折叠?
 到【灌水乐园】发言


