


 本文以虚拟机安装的CentOS 7为实验机器,介绍了Nginx的安装过程,包括所需依赖环境(如gcc、PCRE、zlib、OpenSSL)的安装,以及Nginx的下载、环境变量添加和管理命令。还着重讲解了反向代理和负载均衡的配置,通过修改配置文件、新增映射等步骤实现按权重的轮询负载均衡。
一、安装
本文使用虚拟机安装的centos7作为实验机器来安装nginx。
安装所需依赖环境
- gcc编译器:
安装 nginx 需要先将官网下载的源码进行编译,编译依赖 gcc 环境,如果没有 gcc 环境,则需要安装
yum install gcc-c++-
PCRE pcre-devel:
PCRE(Perl Compatible Regular Expressions) 是一个Perl库,包括 perl 兼容的正则表达式库。nginx 的 http 模块使用 pcre 来解析正则表达式,所以需要在 linux 上安装 pcre 库,pcre-devel 是使用 pcre 开发的一个二次开发库。
yum install -y pcre pcre-devel- zlib:
gzip模块需要zlib库,zlib 库提供了很多种压缩和解压缩的方式, nginx 使用 zlib 对 http 包的内容进行 gzip。
yum install -y zlib zlib-devel- OpenSSL:
OpenSSL 是一个强大的安全套接字层密码库,囊括主要的密码算法、常用的密钥和证书封装管理功能及 SSL 协议,并提供丰富的应用程序供测试或其它目的使用。nginx 不仅支持 http 协议,还支持 https(即在ssl协议上传输http),所以需要在 Centos 安装 OpenSSL 库。
yum install -y openssl openssl-devel安装nginx
- 浏览nginx官网:https://nginx.org/en/download.html,下载tar.gz格式的stable版本nginx。
# 解压
tar -zxvf nginx-1.16.0.tar.gz

# 重命名
mv nginx-1.16.0 nginx
cd nginx

# 配置
./configure --with-http_ssl_module --with-http_gzip_static_module

# 编译安装
make
make install
到目前为止nginx已经被安装到了/usr/local/nginx目录下了。
- 添加环境变量
vim ~/.bash_profile

# 做如下修改:
export NG_HOME=/usr/local/nginx
PATH=$PATH:$NG_HOME

# 使环境变量生效
source ~/.bash_profile
nginx管理命令
# 启动
nginx

# 修改配置文件后重新加载配置文件
nginx -s reload

# 暴力停止
nginx -s stop

# 优雅停止
nginx -s quit

# 查看服务是否已启动
ps -e | grep nginx

# 开机自启
systemctl enable nginx.service
二、反向代理和负责均衡配置
下面着重看下反向代理怎么配置。反向代理,即nginx相关端口接收到http请求后转发到后端Tomcat等服务器,Tomcat等服务器处理完返回结果到niginx,再由nginx返回给用户。
- 修改/usr/local/nginx/conf目录下主配置文件:nginx.conf
#user  nobody;
worker_processes  auto;

error_log  /usr/local/nginx/logs/error.log warn;

pid        /usr/local/nginx/logs/nginx.pid;

worker_rlimit_nofile 655350;

events {
    multi_accept on;
    use epoll;
    worker_connections  1024;
}


http {
    include       mime.types;
    default_type  application/octet-stream;
    charset  utf-8;

    log_format  main    '$time_local $status $bytes_sent $request_time - $remote_addr - $upstream_addr - $server_addr '
                        '$host "$request" "$http_referer" "$http_user_agent" "$gzip_ratio" "$http_x_forwarded_for"';

    access_log  /usr/local/nginx/logs/access.log  main;

    server_names_hash_bucket_size 256;
    client_header_buffer_size 256k;
    large_client_header_buffers 4 256k;
    client_max_body_size          50m;
    client_header_timeout         300s;
    client_body_timeout           300s;
    send_timeout                  300s;
    sendfile        on;
    tcp_nopush                    on;
    keepalive_timeout             600;
    tcp_nodelay                   on;
    server_tokens                 off;
    limit_conn_zone $binary_remote_addr zone=perip:10m;
    limit_conn_zone $server_name zone=perserver:10m;

    gzip  on;
    gzip_min_length   1k;
    gzip_comp_level   4;
    gzip_buffers 4 16k;
    gzip_types text/plain application/x-javascript text/css application/xml text/javascript application/javascript application/json application/x-json;
    gzip_http_version 1.1;
    gzip_vary    off;
    gzip_disable "MSIE [1-6]\.(?!.*SV1)";
    fastcgi_buffers 32 8k;
    fastcgi_buffer_size  8K;

    map $http_upgrade $connection_upgrade {
        default upgrade;
        '' close;
    }


    include /usr/local/nginx/conf.d/*.conf;
}
保证配置文件内的目录和文件都是存在的
- 在/usr/local/nginx/conf.d文件加下新增两个配置文件:hycapp.conf和hyc_upstream.conf
# hycapp.conf
server {
    listen       80;
    server_name  app.hyc.com;
    ssi on;

    error_page 403 404 http://app.hyc.com/404.html;
    error_page 500 502 503 504    http://app.hyc.com/404.html;

    location / {
        if ($http_origin ~ (hyc)\.com(:\d+)?$) {
            add_header Access-Control-Allow-Origin $http_origin;
            add_header Access-Control-Allow-Credentials true;
        }
        proxy_pass            http://app.hyc.com/;
        proxy_set_header      Host app.hyc.com;
        proxy_set_header      X-Real-IP $remote_addr;
        proxy_set_header      X-Forwarded-For $proxy_add_x_forwarded_for;
        proxy_send_timeout 90;
        proxy_read_timeout 90;
        proxy_buffer_size 4k;
        client_max_body_size 10m;
    }
}


# hyc_upstream.conf
# 此处要跟proxy_pass配置的域名一直即:app.hyc.com;
upstream app.hyc.com {
   # server即后端APP服务器的IP和Port,默认按weight进行轮询负载均衡
   server 192.168.115.128:8080 max_fails=3 fail_timeout=30s weight=1;
   server 192.168.115.128:8081 max_fails=3 fail_timeout=30s weight=2;
}- 修改/ect/hosts文件,新增如下映射
192.168.115.128 app.hyc.com- 运行nginx -s reload重新加载配置文件
- 编写springboot示例工程,HelloController,并分别配置server.port属性为8080和8081,分别打成jar包并启动
package com.hyc.controller;

import org.springframework.beans.factory.annotation.Autowired;
import org.springframework.core.env.Environment;
import org.springframework.web.bind.annotation.GetMapping;
import org.springframework.web.bind.annotation.RestController;

@RestController
public class HelloController {
	@Autowired
	private Environment env;

	@GetMapping("/hello")
	public String hello() {
		String port = env.getProperty("server.port");
		return "Hello At: " + port;
	}
}server.port=8080server.port=8081- 测试
浏览器访问:http://app.hyc.com/hello
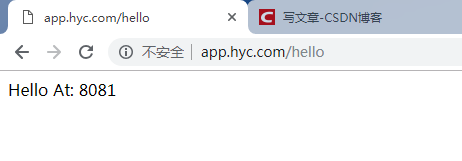
多次访问这个URL会发现,1/3的情况是Hello At:8080,2/3的情况是Hello At:8081,即按权重的轮询负载均衡已经按照我们的预想起到了作用。


 1489
1489

 被折叠的 条评论
为什么被折叠?
被折叠的 条评论
为什么被折叠?
 到【灌水乐园】发言


