


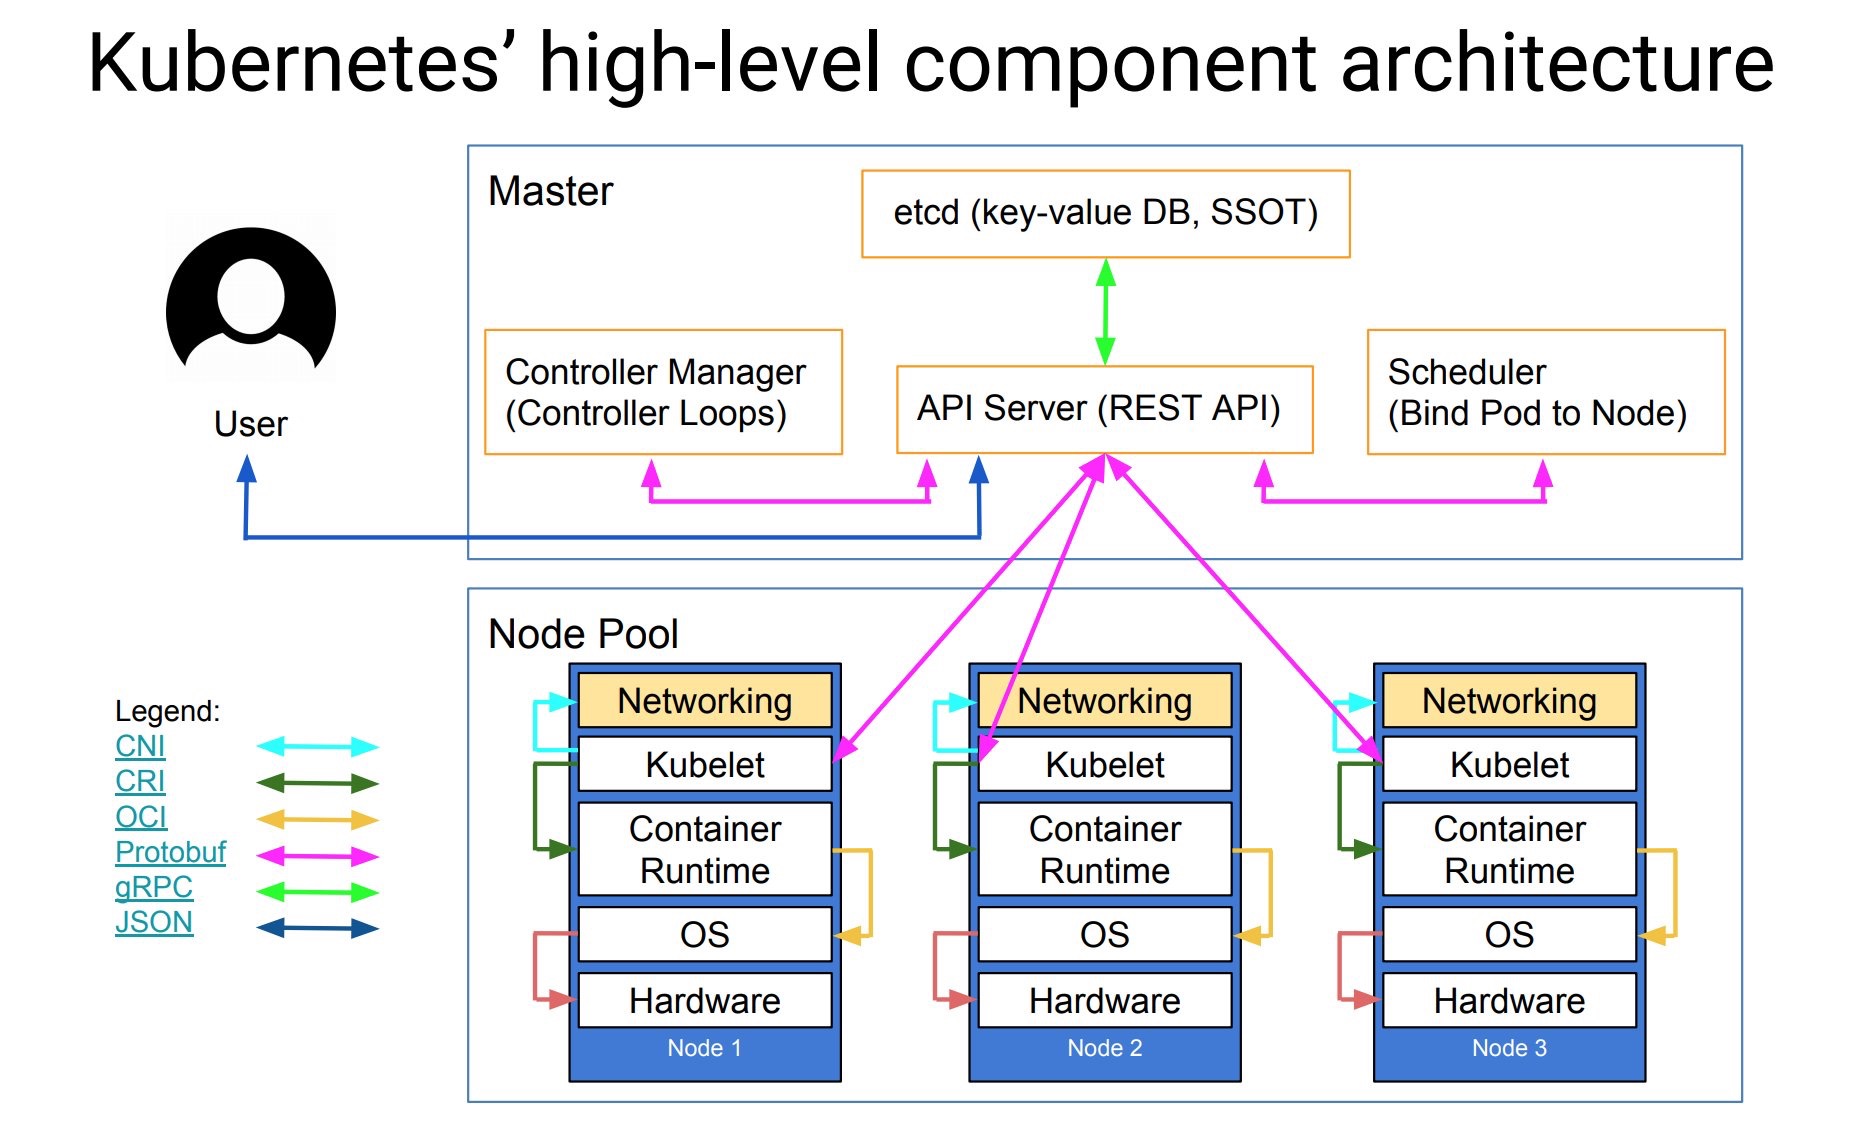
1. Kubeadm介绍
kubeadm 是官方提供的工具,用于快速安装一个最小运行的 Cluster,因此安装过程中不会安装相关的 addons,同时也不会安装相关的网络组件,主要我们自己调用 kubectl apply 命令进行安装兼容 CNI 标准的组件,例如 flannel。参考文档:
- Using kubeadm to Create a Cluster 介绍了使用 kubeadm 建立一个集群的主要步骤
- Overview of kubeadm 详细介绍了工具的使用细节
通过 kubeadm 工具安装 Cluster,有点类似于 Ceph 的安装方式。
在k8s 1.9.x 版本中,kubeadm整体特性已经为Beta版本,预计在2018年将会General Availability (GA)。
关于安装过程中的镜像问题:
kubeadm 中默认的镜像源是 Google Could的地址,因此在国内安装如果不能翻墙的话,可以参考一下文档:Running kubeadm without an internet connection, HA 方式可以参考 [kubeadm-highavailiability 1.7.x],离线安装过程中需要的镜像列表:
IMAGE NAME V1.8 RELEASE BRANCH VERSION V1.9 RELEASE BRANCH VERSION k8s.gcr.io/kube-apiserver-${ARCH} v1.8.x v1.9.x k8s.gcr.io/kube-controller-manager-${ARCH} v1.8.x v1.9.x k8s.gcr.io/kube-scheduler-${ARCH} v1.8.x v1.9.x k8s.gcr.io/kube-proxy-${ARCH} v1.8.x v1.9.x k8s.gcr.io/etcd-${ARCH} 3.0.17 3.1.10 k8s.gcr.io/pause-${ARCH} 3.0 3.0 k8s.gcr.io/k8s-dns-sidecar-${ARCH} 1.14.5 1.14.7 k8s.gcr.io/k8s-dns-kube-dns-${ARCH} 1.14.5 1.14.7 k8s.gcr.io/k8s-dns-dnsmasq-nanny-${ARCH} 1.14.5 1.14.7 如果在阿里云上安装,也可以采用阿里云提供的镜像,可能镜像同步会有滞后:阿里云快速部署Kubernetes - VPC环境 阿里云 kubernetes yum 仓库镜像
本地安装K8S可以通过 Minikube 与 Kubeadm,Minikube 使用虚拟机的方式,非常方便,但是只能安装单节点的集群,对于最新的 K8S 版本支持有点滞后,因此如果使用最新版本的话 Kubeadm 更加方便。
2. 准备工作
使用 VMWare Fusion 安装 Centos7 虚拟机两台,网络采用NAT方式,网段为 172.16.132.0/24
172.16.132.10 master node1
172.16.132.11 node2
**required ports **
Master node(s)
| PROTOCOL | DIRECTION | PORT RANGE | PURPOSE |
|---|---|---|---|
| TCP | Inbound | 6443* | Kubernetes API server |
| TCP | Inbound | 2379-2380 | etcd server client API |
| TCP | Inbound | 10250 | Kubelet API |
| TCP | Inbound | 10251 | kube-scheduler |
| TCP | Inbound | 10252 | kube-controller-manager |
| TCP | Inbound | 10255 | Read-only Kubelet API |
Worker node(s) kubernetes 简介: kubelet 和 pod
| PROTOCOL | DIRECTION | PORT RANGE | PURPOSE |
|---|---|---|---|
| TCP | Inbound | 10250 | Kubelet API |
| TCP | Inbound | 10255 | Read-only Kubelet API http://xxx:10255/pods or /spec/ or /stats |
| TCP | Inbound | 4194 | cAdvisor, 配置成0,则禁用 |
| TCP | Inbound | 10248 | localhost healthz endpoint |
| TCP | Inbound | 30000-32767 | NodePort Services |
在 Master 主机上设置相关指令:
# 设置时区
$ timedatectl list-timezones
$ timedatectl set-timezone Asia/Shanghai

# 安装 lsb 工具
$ yum install redhat-lsb -y
$ lsb_release -a
LSB Version:    :core-4.1-amd64:core-4.1-noarch:cxx-4.1-amd64:cxx-4.1-noarch:desktop-4.1-amd64:desktop-4.1-noarch:languages-4.1-amd64:languages-4.1-noarch:printing-4.1-amd64:printing-4.1-noarch
Distributor ID: CentOS
Description:    CentOS Linux release 7.4.1708 (Core)
Release:    7.4.1708
Codename:   Core

# 配置静态IP地址
$ vim /etc/sysconfig/network-scripts/ifcfg-ens33
TYPE="Ethernet"
BOOTPROTO="static"   # 修改 dhcp -> static
IPADDR=172.16.132.10
GATEWAY=172.16.132.2
NETMASK=255.255.255.0
DNS1=172.16.132.2
DEFROUTE="yes"
PEERDNS="yes"
PEERROUTES="yes"
IPV4_FAILURE_FATAL="no"
NAME="ens33"
UUID="018249e8-2e66-41ec-8974-032e1ca47244"
DEVICE="ens33"
ONBOOT="yes"


# 重启网卡生效
$ systemctl restart network

# 设置DNS
$ vim /etc/resolv.conf
# Generated by NetworkManager
nameserver 172.16.132.2      # vmware 虚拟机

# 关闭防火墙
$ systemctl status firewalld
$ systemctl stop firewalld
$ systemctl disable firewalld
Removed symlink /etc/systemd/system/multi-user.target.wants/firewalld.service.
Removed symlink /etc/systemd/system/dbus-org.fedoraproject.FirewallD1.service.

# 从Mac机器上添加证书
$ ssh-copy-id root@172.16.132.10
The authenticity of host '172.16.132.10 (172.16.132.10)' can't be established.
ECDSA key fingerprint is SHA256:4vwrFA2u0DwO8G0jCN+rqp3A3ZVf1oTIDb+LNG9M334.
Are you sure you want to continue connecting (yes/no)? yes
/usr/local/bin/ssh-copy-id: INFO: attempting to log in with the new key(s), to filter out any that are already installed
/usr/local/bin/ssh-copy-id: INFO: 1 key(s) remain to be installed -- if you are prompted now it is to install the new keys
root@172.16.132.10's password:

Number of key(s) added:        1

Now try logging into the machine, with:   "ssh 'root@172.16.132.10'"
and check to make sure that only the key(s) you wanted were added.


# 禁用 selinux
$ setenforce 0
$ vim /etc/selinux/config
SELINUX=disabled

$ cat /etc/hosts
172.16.132.10 node1
172.16.132.11 node2
需要禁用 IPv6,防止后续的操作碰到IPv6的地址:
$ ifconfig -a | grep inet6
        inet6 fe80::211:aff:fe6a:9de4  prefixlen 64  scopeid 0x20
        inet6 ::1  prefixlen 128  scopeid 0x10[host]

# add /etc/sysctl.conf
$ cat /etc/sysctl.conf
net.ipv6.conf.all.disable_ipv6 = 1
net.ipv6.conf.default.disable_ipv6 = 1

$ sysctl -p
3. 安装 Docker
使用Centos 7中自带docker版本
$ yum install -y docker
$ systemctl enable docker && systemctl start docker

$ docker version
Client:
 Version:         1.12.6
 API version:     1.24
 Package version: docker-1.12.6-68.gitec8512b.el7.centos.x86_64
 Go version:      go1.8.3
 Git commit:      ec8512b/1.12.6
 Built:           Mon Dec 11 16:08:42 2017
 OS/Arch:         linux/amd64


$ docker info
Containers: 0
 Running: 0
 Paused: 0
 Stopped: 0
Images: 0
Server Version: 1.12.6
Storage Driver: devicemapper
 Pool Name: docker-8:3-34809708-pool
 Pool Blocksize: 65.54 kB
 Base Device Size: 10.74 GB
 Backing Filesystem: xfs
 Data file: /dev/loop0
 Metadata file: /dev/loop1
 Data Space Used: 11.8 MB
 Data Space Total: 107.4 GB
 Data Space Available: 14.57 GB
 Metadata Space Used: 581.6 kB
 Metadata Space Total: 2.147 GB
 Metadata Space Available: 2.147 GB
 Thin Pool Minimum Free Space: 10.74 GB
 Udev Sync Supported: true
 Deferred Removal Enabled: true
 Deferred Deletion Enabled: true
 Deferred Deleted Device Count: 0
 Data loop file: /var/lib/docker/devicemapper/devicemapper/data
 WARNING: Usage of loopback devices is strongly discouraged for production use. Use `--storage-opt dm.thinpooldev` to specify a custom block storage device.
 Metadata loop file: /var/lib/docker/devicemapper/devicemapper/metadata
 Library Version: 1.02.140-RHEL7 (2017-05-03)
Logging Driver: journald
Cgroup Driver: systemd     # 默认为systemd,不需要单独设置,否则在/etc/docker/daemon.json中设置
Plugins:
 Volume: local
 Network: host bridge overlay null
Swarm: inactive
Runtimes: docker-runc runc
Default Runtime: docker-runc
Security Options: seccomp selinux
Kernel Version: 3.10.0-693.el7.x86_64
Operating System: CentOS Linux 7 (Core)
OSType: linux
Architecture: x86_64
Number of Docker Hooks: 3
CPUs: 1
Total Memory: 976.3 MiB
Name: master
ID: W4NY:E6NL:NV37:46ME:GYTH:Q3P7:VQKC:ONYH:YOIR:4TRK:6CAO:XBRB
Docker Root Dir: /var/lib/docker
Debug Mode (client): false
Debug Mode (server): false
Registry: https://index.docker.io/v1/
Insecure Registries:
 127.0.0.0/8
Registries: docker.io (secure)
On each of your machines, install Docker. Version v1.12 is recommended, but v1.11, v1.13 and 17.03 are known to work as well. Versions 17.06+ might work, but have not yet been tested and verified by the Kubernetes node team.
https://kubernetes.io/docs/setup/independent/install-kubeadm/
可选: 安装 Docker CE版本 一般用于最新版本验证
$ yum install -y yum-utils device-mapper-persistent-data lvm2

# 添加 repo
$ yum-config-manager \
    --add-repo \
    https://download.docker.com/linux/centos/docker-ce.repo

$ yum list docker-ce.x86_64  --showduplicates |sort -r
 * updates: mirrors.163.com
Loading mirror speeds from cached hostfile
Loaded plugins: fastestmirror, langpacks
 * extras: mirrors.aliyun.com
docker-ce.x86_64            17.12.0.ce-1.el7.centos             docker-ce-stable
docker-ce.x86_64            17.09.1.ce-1.el7.centos             docker-ce-stable
docker-ce.x86_64            17.09.0.ce-1.el7.centos             docker-ce-stable
docker-ce.x86_64            17.06.2.ce-1.el7.centos             docker-ce-stable
docker-ce.x86_64            17.06.1.ce-1.el7.centos             docker-ce-stable
docker-ce.x86_64            17.06.0.ce-1.el7.centos             docker-ce-stable
docker-ce.x86_64            17.03.2.ce-1.el7.centos             docker-ce-stable
docker-ce.x86_64            17.03.1.ce-1.el7.centos             docker-ce-stable
docker-ce.x86_64            17.03.0.ce-1.el7.centos             docker-ce-stable
 * base: mirrors.aliyun.com
Available Packages

# 安装 docker-ce-17.03.2 或者 使用 centos 默认支持的版本
# $ yum makecache fast
#$ yum install -y --setopt=obsoletes=0 \
#  docker-ce-17.03.2.ce-1.el7.centos \
#  docker-ce-selinux-17.03.2.ce-1.el7.centos


# docker  1.12.6 中,不需要设置该参数 cmd 中已经包含
# 使用系统默认支持的方法
# Note: Make sure that the cgroup driver used by kubelet is the same as the one used by Docker. # To ensure compatability you can either update Docker, like so:
$ mkdir -p /etc/docker/
$ cat << EOF > /etc/docker/daemon.json
{
  "exec-opts": ["native.cgroupdriver=systemd"]
}
EOF

$ cat <<EOF >  /etc/sysctl.d/k8s.conf
net.bridge.bridge-nf-call-ip6tables = 1
net.bridge.bridge-nf-call-iptables = 1
EOF
sysctl --system
4. 安装 kubeadm 和 kubelet
设置官方 Repo
$ cat <<EOF > /etc/yum.repos.d/kubernetes.repo
[kubernetes]
name=Kubernetes
baseurl=https://packages.cloud.google.com/yum/repos/kubernetes-el7-x86_64
enabled=1
gpgcheck=1
repo_gpgcheck=1
gpgkey=https://packages.cloud.google.com/yum/doc/yum-key.gpg https://packages.cloud.google.com/yum/doc/rpm-package-key.gpg
EOF
setenforce 0

$ yum install -y kubelet kubeadm kubectl
安装 kubelete 和 kubeadm
安装 kubeadm/kubectl/kubernetes-cni 三个主要程序,安装两个依赖包kubernetes-cni 和 socat
由于 socat 安装不需要翻墙,如果翻墙了还可能存在安装的问题,建议先安装 socat 后再翻墙
$ yum install -y socat
以下过程需要科学上网
$ yum install -y kubelet kubeadm kubectl
Loaded plugins: fastestmirror, langpacks
Loading mirror speeds from cached hostfile
 * base: mirrors.aliyun.com
 * extras: mirrors.aliyun.com
 * updates: mirrors.163.com
Resolving Dependencies
--> Running transaction check
---> Package kubeadm.x86_64 0:1.9.1-0 will be installed
--> Processing Dependency: kubernetes-cni for package: kubeadm-1.9.1-0.x86_64
---> Package kubectl.x86_64 0:1.9.1-0 will be installed
---> Package kubelet.x86_64 0:1.9.1-0 will be installed
--> Processing Dependency: socat for package: kubelet-1.9.1-0.x86_64
--> Running transaction check
---> Package kubernetes-cni.x86_64 0:0.6.0-0 will be installed
---> Package socat.x86_64 0:1.7.3.2-2.el7 will be installed
--> Finished Dependency Resolution

Dependencies Resolved

 Package   Arch       Version    Repository       Size
=========================================================
Installing:
 kubeadm  x86_64     1.9.1-0     kubernetes          16 M
 kubectl  x86_64     1.9.1-0     kubernetes          8.9 M
 kubelet  x86_64     1.9.1-0     kubernetes          17 M
Installing for dependencies:
 kubernetes-cni  x86_64   0.6.0-0        kubernetes        8.6 M
 socat           x86_64   1.7.3.2-2.el7  base             290 k

Transaction Summary
=========================================================
Install  3 Packages (+2 Dependent packages)

Total size: 51 M
Installed size: 274 M
Downloading packages:
warning: /var/cache/yum/x86_64/7/kubernetes/packages/cec192f6a1a3a90321f0458d336dd56ccbe78f2a47b33bfd6e8fd78151fa3326-kubelet-1.9.1-0.x86_64.rpm: Header V4 RSA/SHA1 Signature, key ID 3e1ba8d5: NOKEY
Retrieving key from https://packages.cloud.google.com/yum/doc/yum-key.gpg
Importing GPG key 0xA7317B0F:
 Userid     : "Google Cloud Packages Automatic Signing Key <gc-team@google.com>"
 Fingerprint: d0bc 747f d8ca f711 7500 d6fa 3746 c208 a731 7b0f
 From       : https://packages.cloud.google.com/yum/doc/yum-key.gpg
Retrieving key from https://packages.cloud.google.com/yum/doc/rpm-package-key.gpg
Importing GPG key 0x3E1BA8D5:
 Userid     : "Google Cloud Packages RPM Signing Key <gc-team@google.com>"
 Fingerprint: 3749 e1ba 95a8 6ce0 5454 6ed2 f09c 394c 3e1b a8d5
 From       : https://packages.cloud.google.com/yum/doc/rpm-package-key.gpg
Running transaction check
Running transaction test
Transaction test succeeded
Running transaction
  Installing : kubectl-1.9.1-0.x86_64                                 1/5
  Installing : socat-1.7.3.2-2.el7.x86_64                             2/5
  Installing : kubernetes-cni-0.6.0-0.x86_64                          3/5
  Installing : kubelet-1.9.1-0.x86_64                                 4/5
  Installing : kubeadm-1.9.1-0.x86_64                                 5/5

  Verifying  : kubelet-1.9.1-0.x86_64                                 1/5
  Verifying  : kubernetes-cni-0.6.0-0.x86_64                          2/5
  Verifying  : socat-1.7.3.2-2.el7.x86_64                             3/5
  Verifying  : kubeadm-1.9.1-0.x86_64                                 4/5
  Verifying  : kubectl-1.9.1-0.x86_64                                 5/5

Installed:
  kubeadm.x86_64 0:1.9.1-0
  kubectl.x86_64 0:1.9.1-0
  kubelet.x86_64 0:1.9.1-0

Dependency Installed:
  kubernetes-cni.x86_64 0:0.6.0-0
  socat.x86_64 0:1.7.3.2-2.el7

Complete!
使用 kubeadm验证一下版本信息:
$ kubeadm version
kubeadm version: &version.Info{Major:"1", Minor:"9", GitVersion:"v1.9.1", GitCommit:"3a1c9449a956b6026f075fa3134ff92f7d55f812", GitTreeState:"clean", BuildDate:"2018-01-04T11:40:06Z", GoVersion:"go1.9.2", Compiler:"gc", Platform:"linux/amd64"}

$ systemctl enable kubelet
Created symlink from /etc/systemd/system/multi-user.target.wants/kubelet.service to /etc/systemd/system/kubelet.service

# RHEL/CentOS 7 have reported issues with traffic being routed incorrectly due to iptables being bypassed
$ cat <<EOF >  /etc/sysctl.d/k8s.conf
# 不开启 IPv6,因此注释掉
# net.bridge.bridge-nf-call-ip6tables = 1
net.bridge.bridge-nf-call-iptables = 1
EOF

# 配置生效
$ sysctl --system
由于还未采用kubeam进行集群初始化,因此现在启动 kubelet 服务会报错,可以使用命令 systemctl status kubelet 和 tail -f /var/log/messages查看,目前为止可以忽略报错信息,大致错误如下:
 .....
 error: unable to load client CA file /etc/kubernetes/pki/ca.crt: open /etc/kubernetes/pki/ca.crt: no such file or directory**
 .....
设置 Kubelete Swap 选项
Kubernetes 1.8开始要求关闭系统的Swap,如果不关闭,默认配置下kubelet将无法启动。可以通过kubelet的启动参数--fail-swap-on=false更改这个限制。
全局关闭:
关闭系统的Swap方法如下:swapoff -a修改 /etc/fstab 文件,注释掉 SWAP 的自动挂载,使用
free -m确认swap已经关闭。 > swappiness参数调整,修改/etc/sysctl.d/k8s.conf添加下面一行:vm.swappiness=0执行
sysctl -p /etc/sysctl.d/k8s.conf使修改生效。
因为测试主机上还运行其他服务,关闭swap可能会对其他服务产生影响,所以这里修改kubelet的启动参数 --fail-swap-on=false 去掉这个限制。修改 /etc/systemd/system/kubelet.service.d/10-kubeadm.conf,加入:
Environment="KUBELET_EXTRA_ARGS=--fail-swap-on=false"

$ systemctl daemon-reload
kubelete 的配置文件全部内容如下:
$ cat /etc/systemd/system/kubelet.service.d/10-kubeadm.conf
[Service]
Environment="KUBELET_KUBECONFIG_ARGS=--bootstrap-kubeconfig=/etc/kubernetes/bootstrap-kubelet.conf --kubeconfig=/etc/kubernetes/kubelet.conf"
Environment="KUBELET_SYSTEM_PODS_ARGS=--pod-manifest-path=/etc/kubernetes/manifests --allow-privileged=true"
Environment="KUBELET_NETWORK_ARGS=--network-plugin=cni --cni-conf-dir=/etc/cni/net.d --cni-bin-dir=/opt/cni/bin"
Environment="KUBELET_DNS_ARGS=--cluster-dns=10.96.0.10 --cluster-domain=cluster.local"
Environment="KUBELET_AUTHZ_ARGS=--authorization-mode=Webhook --client-ca-file=/etc/kubernetes/pki/ca.crt"
Environment="KUBELET_CADVISOR_ARGS=--cadvisor-port=0"
Environment="KUBELET_CGROUP_ARGS=--cgroup-driver=systemd"
Environment="KUBELET_CERTIFICATE_ARGS=--rotate-certificates=true --cert-dir=/var/lib/kubelet/pki"
# add for this time ==================================
Environment="KUBELET_EXTRA_ARGS=--fail-swap-on=false"
ExecStart=
ExecStart=/usr/bin/kubelet $KUBELET_KUBECONFIG_ARGS $KUBELET_SYSTEM_PODS_ARGS $KUBELET_NETWORK_ARGS $KUBELET_DNS_ARGS $KUBELET_AUTHZ_ARGS $KUBELET_CADVISOR_ARGS $KUBELET_CGROUP_ARGS $KUBELET_CERTIFICATE_ARGS $KUBELET_EXTRA_ARGS
启动 Kubelete 服务
$ systemctl daemon-reload
$ systemctl start kubelet
以上操作完成后,可以使用 Vmware 的 Take Snapshot 创建一个快照,然后关闭虚拟机使用 Create Full Clone 功能将我们安装虚拟机 Clone 成 Node 节点,然后根据需要修改IP地址等信息即可;在阿里云的环境中我们一般是将这个具备了一定环境的系统保存为镜像,以后扩容的时候可以方便使用,不再需要从头安装。
5. 初始化集群
Kubernetes 1.8开始要求关闭系统的Swap,如果不关闭,默认配置下kubelet将无法启动,本安装过程中我们会采用先忽略后面再设置的方法,所以采用参数 --ignore-preflight-errors=Swap 忽略这个错误。对于 POD Network 我们采用 Flannel,Flannel 默认设置的网段为 10.244.0.0./16,因此我们在 init 命令中使用 --pod-network-cidr=10.244.0.0/16 来指定。当然 kubeadm init 命令行中的参数也可以使用配置文件来配置,参见 Configureation file 章节。
init 过程中需要科学上网,(不需要翻墙安装方式见本文的第一章节)如果顺利的话,则可以看到以下输出:
$ kubeadm init   --kubernetes-version=v1.9.1   --pod-network-cidr=10.244.0.0/16   --apiserver-advertise-address=172.16.132.10 --ignore-preflight-errors=Swap > install.log 2>&1 # 安装的信息
[init] Using Kubernetes version: v1.9.1
[init] Using Authorization modes: [Node RBAC]
[preflight] Running pre-flight checks.
    [WARNING Swap]: running with swap on is not supported. Please disable swap
    [WARNING FileExisting-crictl]: crictl not found in system path
[preflight] Starting the kubelet service
[certificates] Generated ca certificate and key.
[certificates] Generated apiserver certificate and key.
[certificates] apiserver serving cert is signed for DNS names [node1 kubernetes kubernetes.default kubernetes.default.svc kubernetes.default.svc.cluster.local] and IPs [10.96.0.1 172.16.132.10]
[certificates] Generated apiserver-kubelet-client certificate and key.
[certificates] Generated sa key and public key.
[certificates] Generated front-proxy-ca certificate and key.
[certificates] Generated front-proxy-client certificate and key.
[certificates] Valid certificates and keys now exist in "/etc/kubernetes/pki"
[kubeconfig] Wrote KubeConfig file to disk: "admin.conf"
[kubeconfig] Wrote KubeConfig file to disk: "kubelet.conf"
[kubeconfig] Wrote KubeConfig file to disk: "controller-manager.conf"
[kubeconfig] Wrote KubeConfig file to disk: "scheduler.conf"
[controlplane] Wrote Static Pod manifest for component kube-apiserver to "/etc/kubernetes/manifests/kube-apiserver.yaml"
[controlplane] Wrote Static Pod manifest for component kube-controller-manager to "/etc/kubernetes/manifests/kube-controller-manager.yaml"
[controlplane] Wrote Static Pod manifest for component kube-scheduler to "/etc/kubernetes/manifests/kube-scheduler.yaml"
[etcd] Wrote Static Pod manifest for a local etcd instance to "/etc/kubernetes/manifests/etcd.yaml"
[init] Waiting for the kubelet to boot up the control plane as Static Pods from directory "/etc/kubernetes/manifests".
[init] This might take a minute or longer if the control plane images have to be pulled.

[apiclient] All control plane components are healthy after 31.501968 seconds
[uploadconfig] Storing the configuration used in ConfigMap "kubeadm-config" in the "kube-system" Namespace
[markmaster] Will mark node node1 as master by adding a label and a taint
[markmaster] Master node1 tainted and labelled with key/value: node-role.kubernetes.io/master=""
[bootstraptoken] Using token: 047b97.bf92a2b4e89d9e0b
[bootstraptoken] Configured RBAC rules to allow Node Bootstrap tokens to post CSRs in order for nodes to get long term certificate credentials
[bootstraptoken] Configured RBAC rules to allow the csrapprover controller automatically approve CSRs from a Node Bootstrap Token
[bootstraptoken] Configured RBAC rules to allow certificate rotation for all node client certificates in the cluster
[bootstraptoken] Creating the "cluster-info" ConfigMap in the "kube-public" namespace
[addons] Applied essential addon: kube-dns
[addons] Applied essential addon: kube-proxy

Your Kubernetes master has initialized successfully!

To start using your cluster, you need to run the following as a regular user:

  mkdir -p $HOME/.kube
  sudo cp -i /etc/kubernetes/admin.conf $HOME/.kube/config
  sudo chown $(id -u):$(id -g) $HOME/.kube/config

You should now deploy a pod network to the cluster.
Run "kubectl apply -f [podnetwork].yaml" with one of the options listed at:
  https://kubernetes.io/docs/concepts/cluster-administration/addons/

You can now join any number of machines by running the following on each node
as root:

  kubeadm join --token 047b97.bf92a2b4e89d9e0b 172.16.132.10:6443 --discovery-token-ca-cert-hash sha256:f24acbcecbfa71ca8cae8367d4ad807d472107a8fca0280ff0624f503b7f93f9

$  docker images
REPOSITORY                                               TAG                 IMAGE ID            CREATED             SIZE
gcr.io/google_containers/kube-apiserver-amd64            v1.9.1              e313a3e9d78d        10 days ago         210.4 MB
gcr.io/google_containers/kube-scheduler-amd64            v1.9.1              677911f7ae8f        10 days ago         62.7 MB
gcr.io/google_containers/kube-controller-manager-amd64   v1.9.1              4978f9a64966        10 days ago         137.8 MB
gcr.io/google_containers/kube-proxy-amd64                v1.9.1              e470f20528f9        10 days ago         109.1 MB
gcr.io/google_containers/etcd-amd64                      3.1.10              1406502a6459        4 months ago        192.7 MB
gcr.io/google_containers/pause-amd64                     3.0                 99e59f495ffa        20 months ago       746.9 kB
安装中遇到的两个问题解释:
    [WARNING Swap]: running with swap on is not supported. Please disable swap
     ---- 我们前面已经通过 kubelet 的命令行来指定
    [WARNING FileExisting-crictl]: crictl not found in system path
    ----  crictl 工具是go开发的工具包,需要单独安装,但是安装成功后也遇到了不能解决的问题,因此可以忽略这个错误
如果按照过程中遇到了其他问题,可以使用 kubeadm reset进行清除。
设置用户的 kubectl 环境
# 如果为 root 用户
$ export KUBECONFIG=/etc/kubernetes/admin.conf

# 如果是非root用户
$ mkdir -p $HOME/.kube
$ cp -i /etc/kubernetes/admin.conf $HOME/.kube/config
$ chown $(id -u):$(id -g) $HOME/.kube/config


 # 设置 kubectl补全
 $ kubectl completion bash > ~/.kube/completion.bash.inc
 $ cat ~/.bash_profile
 .....
 source ~/.kube/completion.bash.inc
 .....

 $ source ~/.bash_profile
获取集群的状态
$ kubectl get cs
NAME                 STATUS    MESSAGE              ERROR
scheduler            Healthy   ok
controller-manager   Healthy   ok
etcd-0               Healthy   {"health": "true"}

$ kubectl get pods --all-namespaces -o wide
默认情况下 Master 节点不进行 Pod 调度,为了方便测试,我们可以通过以下命令让 Master 参与调度:
$ kubectl taint nodes --all node-role.kubernetes.io/master-
更多问题排查参见:Troubleshooting kubeadm
6. 安装 Pod Network
The network must be deployed before any applications. Also, kube-dns, an internal helper service, will not start up before a network is installed. kubeadm only supports Container Network Interface (CNI) based networks (and does not support kubenet).
— From https://kubernetes.io/docs/setup/independent/create-cluster-kubeadm/
本文选择 Flannel 作为 Pod Network,默认网段已经通过 init 参数 --pod-network-cidr=10.244.0.0/16指定。由于 kube-flannel.yml 中以 DaemonSet 方式运行的,能够保证每个新加如 Node 自动运行 Flannel, 因此只需要在 Master 节点上运行即可。
$ mkdir -p ~/k8s/
$ cd ~/k8s
$ wget https://raw.githubusercontent.com/coreos/flannel/master/Documentation/kube-flannel.yml
$ kubectl apply -f  kube-flannel.yml
clusterrole "flannel" created
clusterrolebinding "flannel" created
serviceaccount "flannel" created
configmap "kube-flannel-cfg" created
daemonset "kube-flannel-ds" created
安装完成后会创建 cni0 与 flannel.1 两个设备:
6: flannel.1: <BROADCAST,MULTICAST,UP,LOWER_UP> mtu 1450 qdisc noqueue state UNKNOWN
    link/ether 9e:a4:0e:29:5c:cf brd ff:ff:ff:ff:ff:ff
    inet 10.244.0.0/32 scope global flannel.1
       valid_lft forever preferred_lft forever
    inet6 fe80::9ca4:eff:fe29:5ccf/64 scope link
       valid_lft forever preferred_lft forever

7: cni0: <BROADCAST,MULTICAST,UP,LOWER_UP> mtu 1450 qdisc noqueue state UP qlen 1000
    link/ether 0a:58:0a:f4:00:01 brd ff:ff:ff:ff:ff:ff
    inet 10.244.0.1/24 scope global cni0
       valid_lft forever preferred_lft forever
    inet6 fe80::c83d:76ff:fe49:6232/64 scope link
       valid_lft forever preferred_lft forever


$ brctl show
bridge name bridge id       STP enabled interfaces
cni0        8000.0a580af40001   no      veth7f53d148
docker0     8000.0242eed2f41f   no
virbr0      8000.52540096686f   yes     virbr0-nic
如果过程中遇到问题可以使用以下命令清除设置的相关网络设备与运行时候的配置文件:
$ ifconfig cni0 down
$ ip link delete cni0
$ ifconfig flannel.1 down
$ ip link delete flannel.1
$ rm -rf /var/lib/cni/
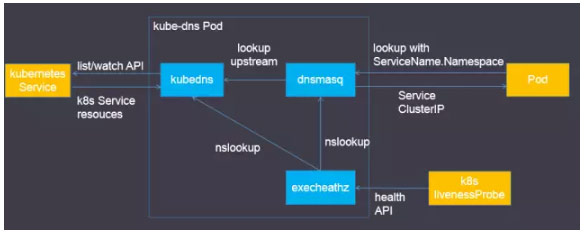
测试 dns 和 nginx
# curl 工具,不需要翻墙
$ kubectl run curl --image=radial/busyboxplus:curl -i --tty
$ nslookup kubernetes.default
Server:    10.96.0.10
Address 1: 10.96.0.10 kube-dns.kube-system.svc.cluster.local

Name:      kubernetes.default
Address 1: 10.96.0.1 kubernetes.default.svc.cluster.local


$ cat nginx-deployment.yaml
apiVersion: apps/v1beta2 # for versions before 1.8.0 use apps/v1beta1
kind: Deployment
metadata:
  name: nginx-deployment
spec:
  selector:
    matchLabels:
      app: nginx
  replicas: 2 # tells deployment to run 2 pods matching the template
  template: # create pods using pod definition in this template
    metadata:
      # unlike pod-nginx.yaml, the name is not included in the meta data as a unique name is
      # generated from the deployment name
      labels:
        app: nginx
    spec:
      containers:
      - name: nginx
        image: nginx:1.7.9
        ports:
        - containerPort: 80

$ kubectl apply -f nginx-deployment.yaml
# 导出服务
$ kubectl expose deployment nginx-deployment --port=80 --target-port=80
7. 初始化Nodes
和 master node 上一样设置 kubele 相关参数(KUBELET_EXTRA_ARGS=--fail-swap-on=false);
保持科学上网:
$ kubeadm join --token 047b97.bf92a2b4e89d9e0b 172.16.132.10:6443 --discovery-token-ca-cert-hash sha256:f24acbcecbfa71ca8cae8367d4ad807d472107a8fca0280ff0624f503b7f93f9 --ignore-preflight-errors=Swap

[preflight] Running pre-flight checks.
    [WARNING FileExisting-crictl]: crictl not found in system path
[discovery] Trying to connect to API Server "172.16.132.10:6443"
[discovery] Created cluster-info discovery client, requesting info from "https://172.16.132.10:6443"
[discovery] Requesting info from "https://172.16.132.10:6443" again to validate TLS against the pinned public key
[discovery] Cluster info signature and contents are valid and TLS certificate validates against pinned roots, will use API Server "172.16.132.10:6443"
[discovery] Successfully established connection with API Server "172.16.132.10:6443"

This node has joined the cluster:
* Certificate signing request was sent to master and a response
  was received.
* The Kubelet was informed of the new secure connection details.

Run 'kubectl get nodes' on the master to see this node join the cluster.
在 Master 节点上参看 Node 状态:
# join 的过程,需要下载镜像等准备工作,需要一定时间
$ kubectl get nodes
在 Master 节点上产生证书并Copy Config到Node节点上:
$ ssh-keygen   # 一路回车
$ ssh-copy-id root@172.16.132.11

# copy 配置文件到 node2上
$ scp /etc/kubernetes/admin.conf root@172.16.132.11:/root/.kube/config
移除 Node
$ kubectl drain node2 --delete-local-data --force --ignore-daemonsets
$ kubectl delete node node2

# 清理
$ kubeadm reset
$ ifconfig cni0 down
$ ip link delete cni0
$ ifconfig flannel.1 down
$ ip link delete flannel.1
$ rm -rf /var/lib/cni/
8. 安装 Addons
DashBoard
$ wget https://raw.githubusercontent.com/kubernetes/dashboard/v1.8.1/src/deploy/recommended/kubernetes-dashboard.yaml

spec:
  type: NodePort  # add to nodeport
  ports:
    - port: 8443
      targetPort: 8443
  selector:
    k8s-app: kubernetes-dashboard

$ kubectl create -f kubernetes-dashboard.yaml

$ cat kubernetes-dashboard-admin.rbac.yaml
---
apiVersion: v1
kind: ServiceAccount
metadata:
  labels:
    k8s-app: kubernetes-dashboard
  name: kubernetes-dashboard-admin
  namespace: kube-system

---
apiVersion: rbac.authorization.k8s.io/v1beta1
kind: ClusterRoleBinding
metadata:
  name: kubernetes-dashboard-admin
  labels:
    k8s-app: kubernetes-dashboard
roleRef:
  apiGroup: rbac.authorization.k8s.io
  kind: ClusterRole
  name: cluster-admin
subjects:
- kind: ServiceAccount
  name: kubernetes-dashboard-admin
  namespace: kube-system

# kubernetes-dashboard.yaml文件中的ServiceAccount kubernetes-dashboard只有相对较小的权限,因此
# 创建一个kubernetes-dashboard-admin的ServiceAccount并授予集群admin的权限

$ kubectl create -f kubernetes-dashboard-admin.rbac.yaml
serviceaccount "kubernetes-dashboard-admin" created
clusterrolebinding "kubernetes-dashboard-admin" created

$ kubectl -n kube-system get secret | grep kubernetes-dashboard-admin
kubernetes-dashboard-admin-token-tszj5           kubernetes.io/service-account-token   3         20s

$ kubectl describe -n kube-system secret/kubernetes-dashboard-admin-token-tszj5
kubectl describe -n kube-system secret/kubernetes-dashboard-admin-token-tszj5
Name:         kubernetes-dashboard-admin-token-tszj5
Namespace:    kube-system
Labels:       <none>
Annotations:  kubernetes.io/service-account.name=kubernetes-dashboard-admin
              kubernetes.io/service-account.uid=dd1a582a-f9cd-11e7-85ec-000c2975be81

Type:  kubernetes.io/service-account-token

Data
====
ca.crt:     1025 bytes
namespace:  11 bytes
token:      eyJhbGciOiJSUzI1NiIsInR5cCI6IkpXVCJ9.eyJpc3MiOiJrdWJlcm5ldGVzL3NlcnZpY2VhY2NvdW50Iiwia3ViZXJuZXRlcy5pby9zZXJ2aWNlYWNjb3VudC9uYW1lc3BhY2UiOiJrdWJlLXN5c3RlbSIsImt1YmVybmV0ZXMuaW8vc2VydmljZWFjY291bnQvc2VjcmV0Lm5hbWUiOiJrdWJlcm5ldGVzLWRhc2hib2FyZC1hZG1pbi10b2tlbi10c3pqNSIsImt1YmVybmV0ZXMuaW8vc2VydmljZWFjY291bnQvc2VydmljZS1hY2NvdW50Lm5hbWUiOiJrdWJlcm5ldGVzLWRhc2hib2FyZC1hZG1pbiIsImt1YmVybmV0ZXMuaW8vc2VydmljZWFjY291bnQvc2VydmljZS1hY2NvdW50LnVpZCI6ImRkMWE1ODJhLWY5Y2QtMTFlNy04NWVjLTAwMGMyOTc1YmU4MSIsInN1YiI6InN5c3RlbTpzZXJ2aWNlYWNjb3VudDprdWJlLXN5c3RlbTprdWJlcm5ldGVzLWRhc2hib2FyZC1hZG1pbiJ9.iuqjGsXy9zohzCDLSCpd4RqUyFptSZ_Al8qEpGb_D46Gfscb8DvV24qLR6QF5ejZKh_3Oe4g42GRROLsy_he8Exlxs86YDA5505QptNMDcNOqJqvlk6y8hovLl8gIu6K70ND4q_i9pIxWLDOOUuYLuDO1re3Z0rUa0jZimXiayBXUjuzbJJYYlHL9SREIjxr4y1FTsFFnbZESCYmMNKcQSwhYyTrSyPA8XiiUm_k4aYVtvWqo84nRyxreZ7DH6Zg7YT57oy8DqXHC-GNXFGj7tmDFWzih1GFvTuFp0zqhkjtS1ZAFsSNLIvIwBhg7Aj-6LyDBE4RSUOJg5UiH2trYA
查询 dashboard 暴露出来的 NodePort,并使用上图的 token 信息输入:
$ kubectl get service -n kube-system
NAME                   TYPE        CLUSTER-IP      EXTERNAL-IP   PORT(S)         AGE
kube-dns               ClusterIP   10.96.0.10      <none>        53/UDP,53/TCP   2h
kubernetes-dashboard   NodePort    10.111.165.62   <none>        443:31290/TCP   5m
在浏览器上输入 https://172.16.132.10:31290, 选择忽略证书,然后输入 Token 既可以访问。
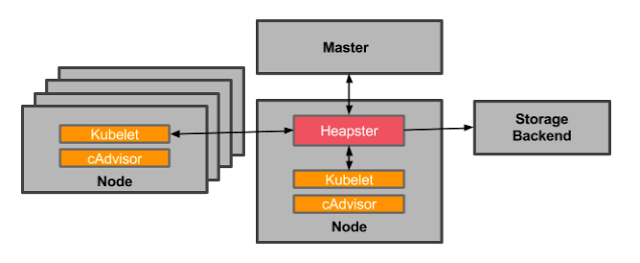
Heapster
Heapster为集群添加使用统计和监控功能,为Dashboard添加仪表盘。 使用InfluxDB做为Heapster的后端存储。
$ mkdir -p ~/k8s/heapster
$ cd ~/k8s/heapster
$ wget https://raw.githubusercontent.com/kubernetes/heapster/master/deploy/kube-config/influxdb/grafana.yaml
$ wget https://raw.githubusercontent.com/kubernetes/heapster/master/deploy/kube-config/rbac/heapster-rbac.yaml
$ wget https://raw.githubusercontent.com/kubernetes/heapster/master/deploy/kube-config/influxdb/heapster.yaml
$ wget https://raw.githubusercontent.com/kubernetes/heapster/master/deploy/kube-config/influxdb/influxdb.yaml

# 修改 grafana 导出的 service
$ cat grafana.yaml
....
spec:
  type: NodePort
  ports:
  - port: 80
    targetPort: 3000
  selector:
    k8s-app: grafana
.....
$ kubectl create -f ./

$ kubectl get service -n kube-system
NAME                   TYPE        CLUSTER-IP      EXTERNAL-IP   PORT(S)         AGE
....
monitoring-grafana     NodePort    10.103.229.66   <none>        80:32447/TCP    18m
...
使用 http://172.16.132.10:32447/?orgId=1 则可以看到 Grafana 的界面,可以通过


 1万+
1万+

 被折叠的 条评论
为什么被折叠?
被折叠的 条评论
为什么被折叠?
 到【灌水乐园】发言


