


 Confd是一款轻量级配置管理工具,能通过查询Etcd并结合模板引擎维持本地配置的实时更新。本文介绍如何使用Confd与Etcd进行简单配置及与Nginx的集成,并列出Confd模板语法。
#Confd是一个轻量级的配置管理工具。
通过查询Etcd,结合配置模板引擎,保持本地配置最新,同时具备定期探测机制,配置变更自动reload。
其后端支持的数据类型有:etcd、consul、vault、environment variables、redis、zookeeper、dynamodb、stackengine、rancher。不过一般使用Confd和etcd的配合使用比较多。
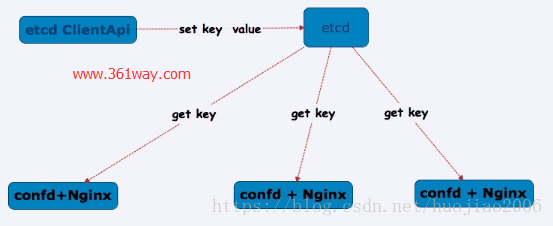
其常用架构如下:
#一、简单配置
##1、配置etcd数据
具体步骤这里略过,这里只配置两条数据
etcdctl set /myapp/database/url www.361way.com
etcdctl set /myapp/database/user rob
##2、confd安装
confd比较简单就一个文件,拿过来就可以执行,可以从github上下载:https://github.com/kelseyhightower/confd/releases ,并将其放到/usr/local/bin目录下即可。不过使用前需要创建相应的配置目录:
[root@etcd1 bin]# mkdir -p /etc/confd/{conf.d,templates}
##3、创建confd配置文件
# vim  /etc/confd/conf.d/myconfig.toml
[template]
src = "myconfig.conf.tmpl"
dest = "/tmp/myconfig.conf"
keys = [
    "/myapp/database/url",
    "/myapp/database/user",
]
##4、创建模板文件
# vim /etc/confd/templates/myconfig.conf.tmpl
[myconfig]
database_url = {{getv "/myapp/database/url"}}
database_user = {{getv "/myapp/database/user"}}
##5、执行生成配置文件
confd -onetime -backend etcd -node http://127.0.0.1:2379    只一次
confd -interval=60 -backend etcd -node http://127.0.0.1:2379 &   按时间轮询
使用onetime参数的,配置文件生成一次后,confd程序就退出了,下面的那句,会每隔60秒轮询一次。一旦后端etcd相应的值发生变化就会重新生成相应的配置文件。
##6、验证文件生成
[root@etcd1 tmp]# cat /tmp/myconfig.conf
[myconfig]
database_url = www.361way.com
database_user = rob
#二、etcd+confd+nginx配置
##1、创建数据
etcdctl set /myapp/subdomain myapp
etcdctl set /myapp/upstream/app2 "10.0.1.100:80"
etcdctl set /myapp/upstream/app1 "10.0.1.101:80"
etcdctl set /yourapp/subdomain yourapp
etcdctl set /yourapp/upstream/app2 "10.0.1.102:80"
etcdctl set /yourapp/upstream/app1 "10.0.1.103:80"
##2、创建配置文件
# cat /etc/confd/conf.d/myapp-nginx.toml
[template]
prefix = "/myapp"
src = "nginx.tmpl"
dest = "/tmp/myapp.conf"
owner = "nginx"
mode = "0644"
keys = [
  "/subdomain",
  "/upstream",
]
check_cmd = "/usr/sbin/nginx -t -c {{.src}}"
reload_cmd = "/usr/sbin/service nginx reload"
# cat /etc/confd/conf.d/yourapp-nginx.toml
[template]
prefix = "/yourapp"
src = "nginx.tmpl"
dest = "/tmp/yourapp.conf"
owner = "nginx"
mode = "0644"
keys = [
  "/subdomain",
  "/upstream",
]
check_cmd = "/usr/sbin/nginx -t -c {{.src}}"
reload_cmd = "/usr/sbin/service nginx reload"
这里创建了两个配置文件。接下来创建一个模板文件,两个配置文件会根据该模板文件生成配置:
# cat /etc/confd/templates/nginx.tmpl
upstream {{getv "/subdomain"}} {
{{range getvs "/upstream/*"}}
    server {{.}};
{{end}}
}
server {
    server_name  {{getv "/subdomain"}}.example.com;
    location / {
        proxy_pass        http://{{getv "/subdomain"}};
        proxy_redirect    off;
        proxy_set_header  Host             $host;
        proxy_set_header  X-Real-IP        $remote_addr;
        proxy_set_header  X-Forwarded-For  $proxy_add_x_forwarded_for;
   }
}
##3、验证
在进行验证启用的时候,会发现有如下报错:
[root@etcd1 conf.d]# 2017-05-08T19:06:07+08:00 etcd1 confd[10949]: INFO Target config /tmp/myapp.conf out of sync
2017-05-08T19:06:07+08:00 etcd1 confd[10949]: ERROR "nginx: [emerg] \"upstream\" directive is not allowed here in /tmp/.myapp.conf835093196:1\nnginx: configuration file /tmp/.myapp.conf835093196 test failed\n"
2017-05-08T19:06:07+08:00 etcd1 confd[10949]: ERROR Config check failed: exit status 1
2017-05-08T19:06:07+08:00 etcd1 confd[10949]: INFO Target config /tmp/yourapp.conf out of sync
2017-05-08T19:06:07+08:00 etcd1 confd[10949]: ERROR "nginx: [emerg] \"upstream\" directive is not allowed here in /tmp/.yourapp.conf196880350:1\nnginx: configuration file /tmp/.yourapp.conf196880350 test failed\n"
2017-05-08T19:06:07+08:00 etcd1 confd[10949]: ERROR Config check failed: exit status 1
原因很简单,注意配置文件中的check_cmd 命令,该命令会进行配置文件检测,检测不通过时,配置文件不会修改,且不会执行后面的reload_cmd命令。这里想不报错也很简单,将配置文件中nginx的配置指向正确的位置,而且让nginx可以正常检测,且检测结果没有错误。再次执行命令,并修改配置文件,会发现有如下信息:
# cat myapp.conf
upstream myapp {
    server 10.0.1.100:80;
    server 10.0.1.101:80;
}
server {
    server_name  myapp.example.com;
    location / {
        proxy_pass        http://myapp;
        proxy_redirect    off;
        proxy_set_header  Host             $host;
        proxy_set_header  X-Real-IP        $remote_addr;
        proxy_set_header  X-Forwarded-For  $proxy_add_x_forwarded_for;
   }
}
#三、其他
在模板文件中,会用到一些函数:map、base、exists、get、gets、getenv、datetime等 ,关于这些函数的使用,可以参看官方文档templates 。
这里再贴下 confd对于模板渲染的语法,貌似没有for这个函数,然后还缺少自定义函数的功能 .
##exists
如果这个key在etcd定义了的话?
{{if exists "/key"}}
    value: {{getv "/key"}}
{{end}}

{{if exists "/key"}}
    value: {{getv "/key"}}
{{end}}
##get
如果这个key没有,他不会返回一个error
{{with get "/key"}}
    key: {{.Key}}
    value: {{.Value}}
{{end}}

{{with get "/key"}}
    key: {{.Key}}
    value: {{.Value}}
{{end}}
##gets
Returns all KVPair, []KVPair, where key matches its argument. Returns an error if key is not found.
{{range gets "/*"}}
    key: {{.Key}}
    value: {{.Value}}
{{end}}

{{range gets "/*"}}
    key: {{.Key}}
    value: {{.Value}}
{{end}}
##getv
Returns the value as a string where key matches its argument. Returns an error if key is not found.
value: {{getv "/key"}}
value: {{getv "/key"}}
##getvs
Returns all values, []string, where key matches its argument. Returns an error if key is not found.
{{range getvs "/*"}}
    value: {{.}}
{{end}}

{{range getvs "/*"}}
    value: {{.}}
{{end}}
##datetime
Alias for time.Now
# Generated by confd {{datetime}}
# Generated by confd {{datetime}}
Outputs:
# Generated by confd 2015-01-23 13:34:56.093250283 -0800 PST
# Generated by confd 2015-01-23 13:34:56.093250283 -0800 PST
# Generated by confd {datetime.Format("Jan 2, 2006 at 3:04pm (MST)")}
# Generated by confd {datetime.Format("Jan 2, 2006 at 3:04pm (MST)")}
Outputs:
# Generated by confd Jan 23, 2015 at 1:34pm (EST)
# Generated by confd Jan 23, 2015 at 1:34pm (EST)
See the time package for more usage: http://golang.org/pkg/time/
##split
可以对于一条数据进行自定义切分,splite
{{ $url := split (getv "/deis/service") ":" }}
    host: {{index $url 0}}
    port: {{index $url 1}}

{{ $url := split (getv "/deis/service") ":" }}
    host: {{index $url 0}}
    port: {{index $url 1}}
##json
Returns an map[string]interface{} of the json value.
etcd+confd 基本上可以和任何应用进行组合,如网上比较常见的etcd+confd+nginx 、etcd+confd+haproxy 、etcd+confd+k8s、etcd+confd+tomcat等等。
和tomcat的整合,在官方上也有相应的示例,具体可以参看官方文档tomcat-sample 。


 1375
1375

 被折叠的 条评论
为什么被折叠?
被折叠的 条评论
为什么被折叠?
 到【灌水乐园】发言


