


 本文回顾了React Native从2013年提出到2021年的历史发展,详细介绍了其架构与版本迭代。并通过NavigatorBar组件的源码解析,展示了React Native的开发实践,包括控件自定义、react-navigation安装与使用、跨平台适配难点及解决方案。
0.前言
大家都知道rn是facebook开源的一个框架,不过关于rn的历史大家可能不太清楚。facebook在客户端2.0版本的时候,将大部分页面使用web技术实现,当时大概是2011年,android还在2.3版本、ios还在5.0版本。可想而知,结果当然是扑街了,在当时网页在手机上的体验相当的糟糕,用户吐槽声一片,facebook只能迅速的换成原生的实现。不得不说虽然是一次失败的尝试,但是facebook算是混合应用的先驱者和探索者,这也为后来facebook开发rn打下了基础。
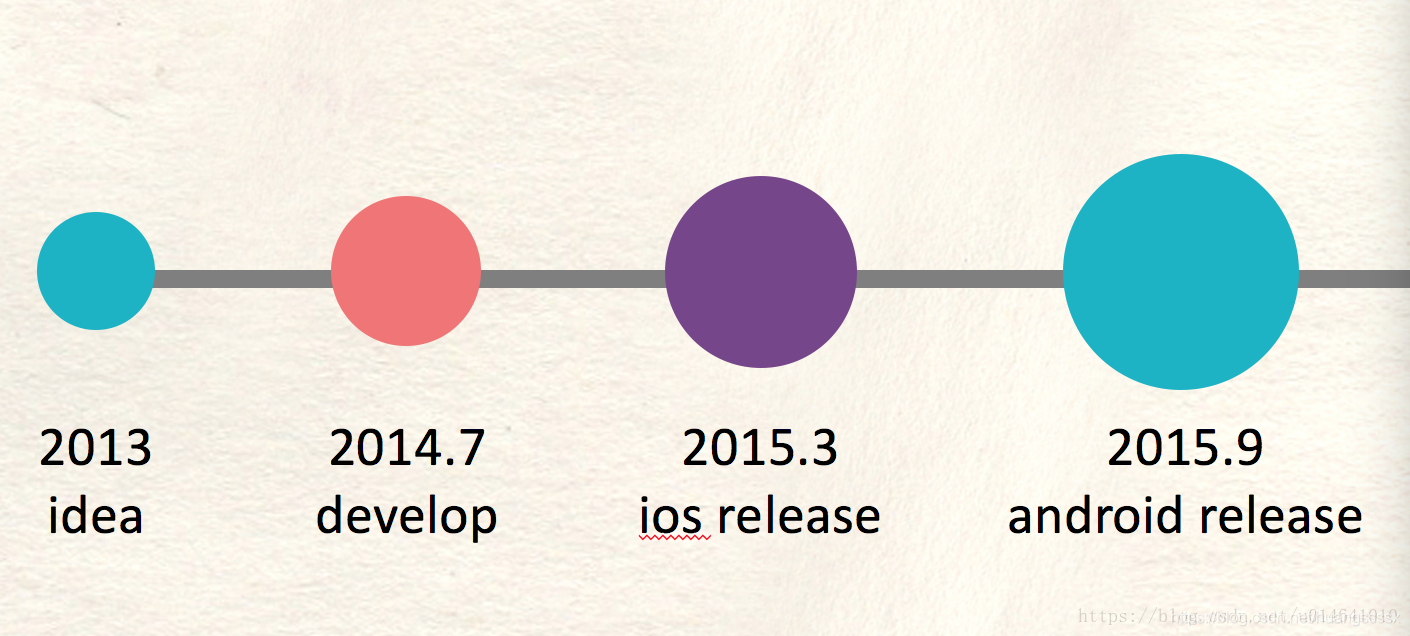
rn的idea是在2013年的一个极客大会上提出的,2014年7月facebook内部开始尝试使用这项技术,到了2015年3月,rn的ios版本正式开源,到了同年9月,rn的android版本也开源了。大概的发展历程如下:
rn虽然开源了接近了3年的时间了,但依然还没有到达1.0的正式版本,目前到了0.54版本,期待2021年1.0版本上线的时候…….不得不说,rn是历史上第一个没到正式版本,github却有7w+星星的项目,大写的服气。
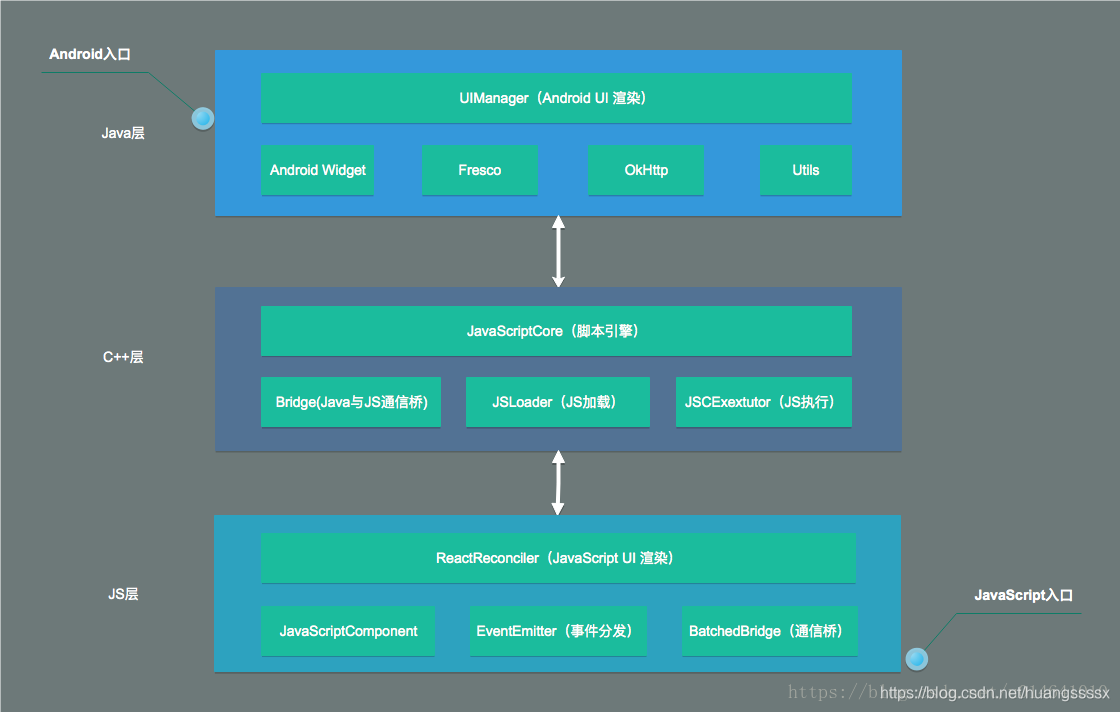
rn的架构分为3层,java/oc层、c++层以及js层。这个结构和app内嵌h5基本一致,同样涉及到js和native通信等,只是将webview层替换为了c++层。
1.rn的开发环境配置
2.控件源码:
1.NavigatorBar的代码:
import React, { Component } from "react";
import PropTypes from "prop-types";
import {
    View,
    Text,
    StyleSheet,
    ViewPropTypes,
    Platform,
    StatusBar
} from 'react-native';
const StatusBarShape = {
    backgroundColor: PropTypes.string,
    barStyle: PropTypes.oneOf(['default', 'light-content', 'dark-content']),
    hidden:PropTypes.bool
};
const NAV_BAR_HEIGHT_IOS = 44;
const NAV_BAR_HEIGHT_ANDROID = 50;
const STATUS_BAR_HEIGHT = 20;
export default class NavigationBar extends Component {
    static propTypes = {
        style: ViewPropTypes.style,
        title: PropTypes.string,
        titleView: PropTypes.element,
        hide: PropTypes.bool,
        leftButton: PropTypes.element,
        rightButton: PropTypes.element,
        //shape指定特定形状参数的对象
        statusBar: PropTypes.shape(StatusBarShape)
    }

    static defaultProps = {
        StatusBar: {
            barStyle: "light-content",
            hidden: false
        }
    };

    constructor(props) {
        super(props);
        this.state = {
            title: "",
            hide: false
        };
    }

    render() {
        let status = <View style={styles.statusBar}>
            <StatusBar {...this.props.statusBar}/>
        </View>;
        let titleView = this.props.titleView ? this.props.titleView : <Text style={styles.title}>{this.props.title}</Text>;
        let content = <View style={styles.navBar}>
            <View style={styles.navBarButton}>
                {this.props.leftButton}
            </View>
            <View style={styles.titleViewContainer}>{titleView}</View>
            <View style={styles.navBarButton}>
                {this.props.rightButton}
            </View>
        </View>;
        return (
            <View style={[styles.container,this.props.style]}>
                {status}
                {content}
            </View>
        );
    }
}

const styles = StyleSheet.create({
    container: {
        backgroundColor: "gray"
    },
    navBar: {
        justifyContent: "space-between",
        alignItems: "center",
        height: Platform.OS === "ios" ? NAV_BAR_HEIGHT_IOS : NAV_BAR_HEIGHT_ANDROID,
        backgroundColor: "red",
        flexDirection: "row"
    },
    titleViewContainer: {
        justifyContent: "center",
        alignItems: "center",
        position: "absolute",
        left: 40,
        right: 40,
        top: 0,
        bottom: 0
    },
    title:{
        fontSize:20,
        color:"#ffffff"
    },
    navBarButton: {
        alignItems: "center",
    },
    statusBar:{
        height:Platform.OS==="ios"?STATUS_BAR_HEIGHT:0
    }
});
2.使用Navigation组件的控件
import React, { Component } from 'react';
import {
    View,
    Text,
    StyleSheet,
    TouchableOpacity,
    Image
} from 'react-native';
import NavigationBar from "./NavigationBar";
export default class Girl extends Component {
    constructor(props) {
        super(props);
        this.state = {
            word: ""
        };
    }

    //渲染按钮
    renderButton = (image) => {
        return (
            <TouchableOpacity style={{ padding: 8 }}
                onPress={() => {
                    this.props.navigator.pop();
                }}
            >
                <Image style={{ width: 26, height: 26 }} source={image} />
            </TouchableOpacity>
        );
    }

    render() {
        return (
            <View style={styles.container}>
                <NavigationBar
                    leftButton={this.renderButton(require("./res/images/ic_arrow_back_white_36pt.png"))}
                    rightButton={this.renderButton(require("./res/images/ic_star.png"))}
                    title={"Girl"}></NavigationBar>
                <Text style={styles.text}>I am Girl</Text>
                <Text style={styles.text}>我收到了男孩送的:{this.props.word}</Text>
                <Text style={styles.text} onPress={() => {
                    this.props.onCallBack("一盒巧克力");
                    this.props.navigator.pop();
                }}>回赠巧克力</Text>
            </View>
        );
    }
}

const styles = StyleSheet.create({
    container: {
        flex: 1,
        backgroundColor:"white"
    },
    text: {
        fontSize: 22
    }
});
3.难点解析:
上面的代码相信对熟悉react语法的coder们不会陌生,就是一个自定义组件的编写和调用,这里主要讲讲我编写这个控件遇到的问题。
-
安装react-navigation
react-navigation安装完成后需要执行“react-native link react-native-gesture-handler”命令将插件代码连接到项目,否则会报错,并且在命令执行完毕后需要来到 android\settings.gradle文件中将‘\’全部修改为‘/’否则也会报错。(这里非常坑,错误提示都不能指向正确的问题点) -
View.propTypes.style问题
由于我使用的是最新版的RN,故而按照例子编写组件的时候,报错:Cannot read property ‘style’ of undefined,这是什么意思?不过所幸控件还少,根据提示我找到了错误地点:
static propTypes = {
        style: View.propTypes.style,
在网上找了一圈,问题应该是出在版本更新上,貌似>0.48的RN使用了ViewPropTypes.style来代替这个类型。
现在RN更新特别快速(可能是和谷大哥的flutter抢市场吧),如果rn升级了配套第三方控件也要及时跟上。
-
flex布局问题
是的没错,我之前只是听说过flex布局,没想到在RN中是推荐布局方式,这种布局方式给了编写者最大的自由性,请好好学习:
flex布局 -
控件的平台适应性:
目前手机系统有两大巨头,嗯也许以后华为和阿里发力系统了咱们就有加倍的快乐了- -||,要注意很多控件在两个平台上是有使用区别的。比如StatusBar:
android系统中,当你给它设置一个高度的时候就会出现一个空白区域:

而在ios环境下,不设置height你会得到一个顶部过窄的效果:

所以使用一个RN控件前,请仔细阅读文档:react native 文档
4.结语:
初次学习遇到了很多麻烦,多数是在环境搭建上的,你不知道用虚拟机Mac搭建环境有多让人沮丧,不过还好是趟过来了也做出了今天第一份日志,以后会有更多的文章一次献上谢谢大家的赏读,记得点个赞哦,亲!


 153
153

 被折叠的 条评论
为什么被折叠?
被折叠的 条评论
为什么被折叠?
 到【灌水乐园】发言


