


 本文详细介绍了如何从零开始创建一个Spring Boot Starter自动配置模块。通过具体步骤,包括项目搭建、配置类编写、自动装配实现等,展示了Starter模块的完整构建过程。文章还涉及了Maven打包、依赖导入及控制器访问示例。
1.新建项目 。
启动器只用来做依赖导入;
专门来写一个自动配置模块;
idea 下建立空项目 hello-spring-boot-starter 添加两个子模块
spring-boot-starter-autoconfigurer,
spring-boot-starter-helloworld。
autoconfigurer 自动配置模块,
<!--引入starter的基本配置-->
	<dependencies>
		<dependency>
			<groupId>org.springframework.boot</groupId>
			<artifactId>spring-boot-starter</artifactId>
		</dependency>
	</dependencies>
helloworld,使用的模块,该模块使用autoconfigurer
 <dependencies>
        <dependency>
            <groupId>com.ccu.hello</groupId>
            <artifactId>spring-boot-starter-autoconfigurer</artifactId>
            <version>0.0.1-SNAPSHOT</version>
        </dependency>
    </dependencies>
2,需要一个配置类,配置类需要提供好装配好的类
加载的配置文件的类
@ConfigurationProperties(prefix = "atguigu.hello")
public class HelloProperties {
    private String prefix;
    private String suffix;
    public String getPrefix() {
        return prefix;
    }
    public void setPrefix(String prefix) {
        this.prefix = prefix;
    }
    public String getSuffix() {
        return suffix;
    }
    public void setSuffix(String suffix) {
        this.suffix = suffix;
    }
}
配置类 需纳入spring容器中
@Configuration
@ConditionalOnWebApplication //web应用才生效
@EnableConfigurationProperties(HelloProperties.class)
public class HelloServiceAutoConfiguration {
    @Autowired
    HelloProperties helloProperties;
    @Bean
    public HelloService helloService(){
        HelloService service = new HelloService();
        service.setHelloProperties(helloProperties);
        return service;
    }
}
完成功能的类
public class HelloService {
    HelloProperties helloProperties;
    public HelloProperties getHelloProperties() {
        return helloProperties;
    }
    public void setHelloProperties(HelloProperties helloProperties) {
        this.helloProperties = helloProperties;
    }
    public String sayHellAtguigu(String name){
        return helloProperties.getPrefix()+"‐" +name + helloProperties.getSuffix();
    }
}
3自动装配(关键)
在classpath下:META-INF/spring.factories配置
org.springframework.boot.autoconfigure.EnableAutoConfiguration=com.ccu.hello.springbootstarterautoconfigurer.HellloAutoConfiguration
最后使用idea maven 打包。
在新建一个项目导入依赖即可

加入properties.yml配置项
hello:
  prefix: xiaozi
  suffer:  nihaoqiang
定义controller访问
@Controller
public class HelloController {

    @Autowired
    private SayService sayService;

    @RequestMapping("/say/hello")
    @ResponseBody
    public String say(){
        return sayService.sayHello("haoren");
    }
}
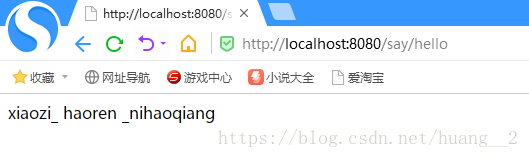
最终效果
一个简单的starter 就完成了。


 1650
1650

 被折叠的 条评论
为什么被折叠?
被折叠的 条评论
为什么被折叠?
 到【灌水乐园】发言


