


1 依赖
<parent>
    <groupId>org.springframework.boot</groupId>
    <artifactId>spring-boot-starter-parent</artifactId>
    <version>2.6.3</version>
    <!-- 默认为 ../pom.xml 中去找该坐标, 避免这样 -->
    <relativePath/> <!-- lookup parent from repository -->
</parent>

...
        <dependency>
            <groupId>mysql</groupId>
            <artifactId>mysql-connector-java</artifactId>
            <scope>runtime</scope>
        </dependency>
        <!-- Mybatis核心 -->
        <dependency>
          <groupId>org.mybatis</groupId>
          <artifactId>mybatis</artifactId>
          <version>3.5.7</version>
        </dependency>

	    <!-- 可选插件 -->
        <dependency>
            <groupId>com.baomidou</groupId>
            <artifactId>mybatis-plus-boot-starter</artifactId>
            <version>3.5.1</version>
        </dependency>
2 (参考)MyBatis的核心配置文件
建议命名为
mybatis-config.xml。整合Spring之后,这个配置文件可以省略,实际很少使用,了解原理即可。核心配置文件主要用于配置连接数据库的环境以及MyBatis的全局配置信息
位于src/main/resources目录下
核心配置文件中的标签必须按照固定的顺序(可以不写,但顺序不能乱):
properties、settings、typeAliases、typeHandlers、objectFactory、objectWrapperFactory、reflectorFactory、plugins、environments、databaseIdProvider、mappers
<?xml version="1.0" encoding="UTF-8" ?>
<!DOCTYPE configuration
        PUBLIC "-//MyBatis.org//DTD Config 3.0//EN"
        "http://MyBatis.org/dtd/MyBatis-3-config.dtd">
<configuration>
    <!--引入properties文件,此时就可以${属性名}的方式访问属性值-->
    <properties resource="jdbc.properties"></properties>
    <settings>
        <!--将表中字段的下划线自动转换为驼峰-->
        <setting name="mapUnderscoreToCamelCase" value="true"/>
        <!--开启延迟加载-->
        <setting name="lazyLoadingEnabled" value="true"/>
    </settings>
    <typeAliases>
        <!--
        typeAlias:设置某个具体的类型的别名
        属性:
        type:需要设置别名的类型的全类名
        alias:设置此类型的别名,且别名不区分大小写。若不设置此属性,该类型拥有默认的别名,即类名
        -->
        <!--<typeAlias type="com.bibi.bean.User"></typeAlias>-->
        <!--<typeAlias type="com.bibi.bean.User" alias="user">
        </typeAlias>-->
        <!--以包为单位,设置改包下所有的类型都拥有默认的别名,即类名且不区分大小写-->
        <package name="com.bibi.bean"/>
    </typeAliases>
    <!--
    environments:设置多个连接数据库的环境
    属性:
	    default:设置默认使用的环境的id
    -->
    <environments default="mysql_test">
        <!--
        environment:设置具体的连接数据库的环境信息
        属性:
	        id:设置环境的唯一标识,可通过environments标签中的default设置某一个环境的id,表示默认使用的环境
        -->
        <environment id="mysql_test">
            <!--
            transactionManager:设置事务管理方式
            属性:
	            type:设置事务管理方式,type="JDBC|MANAGED"
	            type="JDBC":设置当前环境的事务管理都必须手动处理
	            type="MANAGED":设置事务被管理,例如spring中的AOP
            -->
            <transactionManager type="JDBC"/>
            <!--
            dataSource:设置数据源
            属性:
	            type:设置数据源的类型,type="POOLED|UNPOOLED|JNDI"
	            type="POOLED":使用数据库连接池,即会将创建的连接进行缓存,下次使用可以从缓存中直接获取,不需要重新创建
	            type="UNPOOLED":不使用数据库连接池,即每次使用连接都需要重新创建
	            type="JNDI":调用上下文中的数据源
            -->
            <dataSource type="POOLED">
                <!--设置驱动类的全类名-->
                <property name="driver" value="${jdbc.driver}"/>
                <!--设置连接数据库的连接地址-->
                <property name="url" value="${jdbc.url}"/>
                <!--设置连接数据库的用户名-->
                <property name="username" value="${jdbc.username}"/>
                <!--设置连接数据库的密码-->
                <property name="password" value="${jdbc.password}"/>
            </dataSource>
        </environment>
    </environments>
    <!--引入映射文件-->
    <mappers>
        <!-- <mapper resource="UserMapper.xml"/> -->
        <!--
        以包为单位,将包下所有的映射文件引入核心配置文件
        注意:
			1. 此方式必须保证mapper接口和mapper映射文件必须在相同的包下
			2. mapper接口要和mapper映射文件的名字一致
        -->
        <package name="com.bibi.mapper"/>
    </mappers>
</configuration>
3 配置
- 连接池(数据源 + driverClassName)
- 配置 SqlSessionFactory(数据源 + 实体类别名路径 + xml路径)
- 配置 MapperScannerConfigure(绑定 SqlSessionFactory 和 mapper 接口路径)这一步也就是 @MapperScan 的作用
spring:
  datasource:
    type: com.zaxxer.hikari.HikariDataSource
    driver-class-name: com.mysql.cj.jdbc.Driver
    url: jdbc:mysql://127.0.0.1:3306/db_name?useUnicode=true&characterEncoding=utf-8&useSSL=false&nullCatalogMeansCurrent=true&serverTimezone=Asia/Shanghai
    username: root
    password: qweryt

mybatis-plus:
  #  mapper-locations: classpath*:/mapper/**/*.xml 已经默认
  type-aliases-package: com.bibi.domain
  type-enums-package: com.bibi.domain
  global-config:
    db-config:
      table-prefix: ops_
      id-type: assign_uuid
  configuration:
    log-impl: org.apache.ibatis.logging.stdout.StdOutImpl
    auto-mapping-behavior: full
    map-underscore-to-camel-case: true
#    敏感的懒加载 默认boolean未赋值,为false(启用时只要加载对象,就会加载该对象的所有属性;关闭该属性则会按需加载)
    aggressive-lazy-loading: false
#    懒加载开启 默认为false
#    lazy-loading-enabled: true

#    二级缓存(默认开启)
    cache-enabled: true

#    一级缓存(默认开启):session;
#	    关闭(选择 statement 每次查询结束都会清空缓存)
#    local-cache-scope: statement
4 测试
package com.bibi;

import com.bibi.domain.account.BaseOrg;
import com.bibi.domain.device.Fence;
import com.bibi.mapper.BaseOrgMapper;
import com.baomidou.mybatisplus.core.conditions.query.LambdaQueryWrapper;
import com.baomidou.mybatisplus.core.toolkit.Wrappers;
import org.junit.jupiter.api.Test;
import org.springframework.beans.factory.annotation.Autowired;
import org.springframework.boot.test.context.SpringBootTest;

@SpringBootTest
public class MybatisTest {

  @Test
  // @Transactional
  public void testMybatis() {
    BaseOrg baseOrg = new BaseOrg();
    baseOrg.setOrgId("100003644");
    BaseOrg baseOrgs = baseOrg.selectOne(Wrappers.lambdaQuery(baseOrg));

    BaseOrg baseOrgs2 =
        baseOrg.selectOne(Wrappers.lambdaQuery(baseOrg)); // 用同一个session,使用缓存 WHERE org_id = ?
    // BaseOrg baseOrgs1 = baseOrg.selectOne(new
    //     LambdaQueryWrapper<BaseOrg>().eq(BaseOrg::getOrgId,"100003644")); // sql 与上面不一样 WHERE
    // (org_id = ?)
    System.out.println("baseOrg1 = " + baseOrgs);
    System.out.println("baseOrg1 = " + baseOrgs2);
    // System.out.println("baseOrg1 = " + baseOrgs1);

    // List<String> entityIds = SimpleQuery.list(Wrappers.lambdaQuery(), BaseOrg::getOrgId);
    // System.out.println("entityIds = " + entityIds);
    // List<String> names =
    // SimpleQuery.list(Wrappers.lambdaQuery(BaseOrg.class).like(BaseOrg::getOrgName,"总行"),
    // BaseOrg::getOrgName, e ->
    // Optional.ofNullable(e.getOrgName()).map(String::toUpperCase).ifPresent(e::setOrgName));
    // System.out.println("names = " + names);
  }
  public void update() {
    // 在测试类中写增删改会被自动撤销
    Fence fence = new Fence();
    fence.setId("1");
    fence.setCreator("2");
    boolean b = fence.updateById();
    System.out.println("b = " + b);
  }

  @Autowired private BaseOrgMapper baseOrgMapper;

  @Test
  void testCache() {
    // 不在Mapper.xml里面的无法进行二级缓存
    System.out.println(baseOrgMapper.selectSimple());
    System.out.println(baseOrgMapper.selectSimple());
  }

  @Test
  void testCacheII() {
    LambdaQueryWrapper<BaseOrg> eq =
        new LambdaQueryWrapper<BaseOrg>().eq(BaseOrg::getOrgId, "100003644");
    BaseOrg baseOrg = baseOrgMapper.selectOne(eq);
    BaseOrg baseOrg2 = baseOrgMapper.selectOne(eq);
    System.out.println("baseOrg = " + baseOrg);
    System.out.println("baseOrg2 = " + baseOrg2);
  }

}
- 特殊
// 返回[{password=123456, sex=男, id=1, age=23, username=admin},{password=123456, sex=男, id=2, age=23, username=张三}]
List<Map<String, Object>> getAllUserToMap();

// {1={password=123456, sex=男, id=1, age=23, username=admin},2={password=123456, sex=男, id=2, age=23, username=张三}}
@MapKey("id")
Map<String, Object> getAllUserToMap();
5 缓存
dataSource:设置数据源
属性:
type:设置数据源的类型,type=“POOLED|UNPOOLED|JNDI”
type=“POOLED”:使用数据库连接池,即会将创建的连接进行缓存,下次使用可以从缓存中直接获取,不需要重新创建
type=“UNPOOLED”:不使用数据库连接池,即每次使用连接都需要重新创建
type=“JNDI”:调用上下文中的数据源
- 懒加载(需要手动开启,一步):
aggressive-lazy-loading: false # 已经默认为false了
lazy-loading-enabled: true
property select column fetchType(p:对应填充的属性名 s:对方的方法限定名 c:当前类传过去的条件列 f:抓取类型 懒加载否)
fetchType:当开启了全局的延迟加载之后,可以通过该属性手动控制延迟加载的效果,fetchType=“lazy(延迟加载)|eager(立即加载)”
<resultMap id="empAndDeptByStepResultMap" type="Emp">
	<id property="eid" column="eid"></id>
	<result property="empName" column="emp_name"></result>
	<result property="age" column="age"></result>
	<result property="sex" column="sex"></result>
	<result property="email" column="email"></result>
	<association property="dept"
				 select="com.bibi.mapper.DeptMapper.getEmpAndDeptByStepTwo"
				 column="did"
				 fetchType="lazy"></association>
</resultMap>
-
自定义映射 resultMap
- association:多对一(对象组合) (property 当前类填充属性,javaType)
<resultMap id="empAndDeptResultMapTwo" type="Emp"> <id property="eid" column="eid"></id> <result property="empName" column="emp_name"></result> <result property="age" column="age"></result> <association property="dept" javaType="Dept"> <id property="did" column="did"></id> <result property="deptName" column="dept_name"></result> </association> </resultMap> <!--Emp getEmpAndDept(@Param("eid")Integer eid);--> <select id="getEmpAndDept" resultMap="empAndDeptResultMapTwo"> select * from t_emp left join t_dept on t_emp.eid = t_dept.did where t_emp.eid = #{eid} </select> <!--此处的resultMap仅是处理字段和属性的映射关系--> <resultMap id="EmpAndDeptByStepTwoResultMap" type="Dept"> <id property="did" column="did"></id> <result property="deptName" column="dept_name"></result> </resultMap> <!--Dept getEmpAndDeptByStepTwo(@Param("did") Integer did);--> <select id="getEmpAndDeptByStepTwo" resultMap="EmpAndDeptByStepTwoResultMap"> select * from t_dept where did = #{did} </select>-
collection:一对多 (list/set 组合) (property ofType)
<resultMap id="DeptAndEmpResultMap" type="Dept">
	<id property="did" column="did"></id>
	<result property="deptName" column="dept_name"></result>
	<collection property="emps" ofType="Emp">
		<id property="eid" column="eid"></id>
		<result property="empName" column="emp_name"></result>
		<result property="age" column="age"></result>
		<result property="sex" column="sex"></result>
		<result property="email" column="email"></result>
	</collection>
</resultMap>
<!--Dept getDeptAndEmp(@Param("did") Integer did);-->
<select id="getDeptAndEmp" resultMap="DeptAndEmpResultMap">
	select * from t_dept left join t_emp on t_dept.did = t_emp.did where t_dept.did = #{did}
</select>
    <association property="dept"
                 select="com.bibi.mapper.DeptMapper.getEmpAndDeptByStepTwo" column="did" fetchType="lazy"></association>
	</resultMap>
  <select id="getEmpAndDeptByStepOne" resultMap="empAndDeptByStepResultMap">
    select * from t_emp where eid = #{eid}
  </select>
        <collection property="emps"
        select="com.bibi.mapper.EmpMapper.getDeptAndEmpByStepTwo"
        column="did"
        fetchType="lazy"></collection>
@Param 源码
-
一级缓存:sqlSession级别
默认开启,在同一个sqlSession里面会使用缓存 Creating a new SqlSession Closing non transactional SqlSession(was not registered for synchronization because synchronization is not active)
mybatis的sqlSession和数据库连接池中维护的数据库连接Collection不是同一个概念,SqlSession是mybatis框架中的概念,是mybatis持久层框架的顶层API。
在sqlSession中操作数据库的时候会去获取collection,collection的获取是去连接池中取的!所以Creating a new SqlSession并不是每次都去创建了数据库新连接,底层使用的collection还是连接池提供的。至于每次事务执行sql,mybatis都Creating a new SqlSession而不是共享SqlSession,是为了保证sql会话独立避免发生脏数据,从而保证会话线程安全。
-
二级缓存:sqlSessionFactory级别
1. 在核心配置文件中,设置全局配置属性cacheEnabled="true",默认为true,不需要设置
2. 在映射文件中设置标签`<cache />`
3. 二级缓存必须在SqlSession关闭或提交之后有效
4. 查询的数据所转换的实体类类型必须实现序列化的接口
两次查询之间执行了任意的增删改,会使一级和二级缓存同时失效
刷新默认为 增删改语句挂钩,除非设置 flushInterval 属性(刷新间隔,单位毫秒)
size 设置缓存数目(正整数)
readOnly:缓存取出来是拷贝一份给他(false:默认,安全)还是直接把缓存实例给他(true:性能快) -
查询顺序:先查询二级,再查询一级
sqlSession关闭之后,一级缓存中的数据会写入二级缓存 -
二级缓存相关配置
cache标签可以设置一些属性

- eviction属性:缓存回收策略
	- LRU(Least Recently Used) – 最近最少使用的:移除最长时间不被使用的对象。
  - FIFO(First in First out) – 先进先出:按对象进入缓存的顺序来移除它们。
  - SOFT – 软引用:移除基于垃圾回收器状态和软引用规则的对象。
  - WEAK – 弱引用:更积极地移除基于垃圾收集器状态和弱引用规则的对象。
  - 默认的是 LRU
- flushInterval属性:刷新间隔,单位毫秒。默认情况是不设置,也就是没有刷新间隔,缓存仅仅调用语句(增删改)时刷新
- size属性:引用数目,正整数。代表缓存最多可以存储多少个对象,太大容易导致内存溢出
- readOnly属性:只读,true/false
	- true:只读缓存;会给所有调用者返回缓存对象的相同实例。因此这些对象不能被修改。这提供了很重要的性能优势。
	- false:读写缓存;会返回缓存对象的拷贝(通过序列化)。这会慢一些,但是安全,因此默认是false
- type:设置二级缓存类型,如<cache type="org.mybatis.caches.ehcache.EhcacheCache"/>
SQL 片段
- 声明 sql 片段:
<sql>
<sql id="empColumns">eid,emp_name,age,sex,email</sql>
- 引用 sql 片段:
<include refid="sql_id">
<!--List<Emp> getEmpByCondition(Emp emp);-->
<select id="getEmpByCondition" resultType="Emp">
	select <include refid="empColumns"></include> from t_emp
</select>
- 使用 org.apache.ibatis.jdbc.SQL 构建 sql (用于 SelectProvider)
 			SQL sql = new SQL() {{
				UPDATE(SystemOptionItemConstant.TABLENAME);
				SET("ITEMVALUE=#{value}");
				WHERE("ITEMKEY=#{key}");
			}};
			return sql.toString();

			// def selectMaxOrdinalSQL():
			SQL sql = new SQL(){{
				// SELECT("*");
				SELECT("MAX(ORDINAL)");
				FROM(SystemConstant.TABLENAME);
			}};
			return sql.toString();
@SelectProvider(type = SystemDaoProvider.class,method = "selectMaxOrdinalSQL")
6 事务 不需要手动启用
不需要手动启用事务 @EnableTransactionManagement,因为Spring自动配置已经自动开启了:org.springframework.boot.autoconfigure.transaction.TransactionAutoConfiguration
7 mybatis Interceptor 插件机制
https://mybatis.org/mybatis-3/configuration.html#plugins
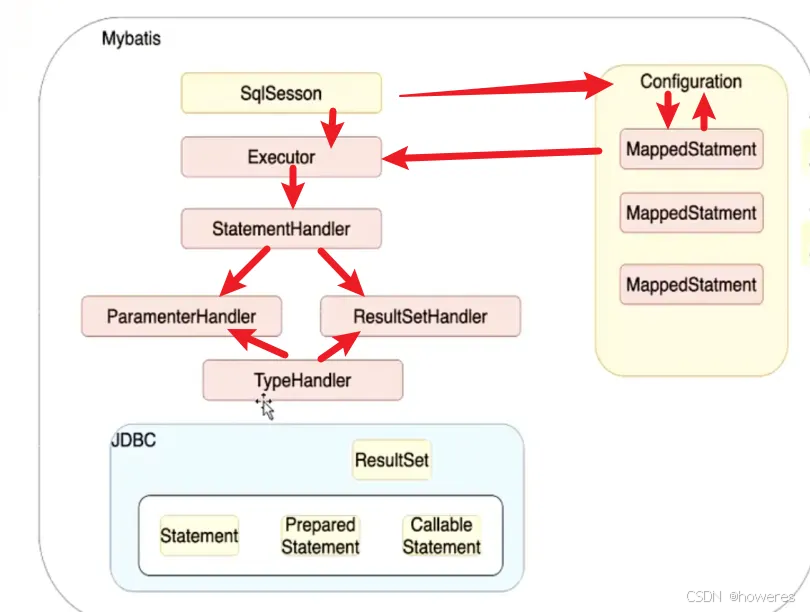
MyBatis有四大核心对象:
(1)ParameterHandler:处理 SQL 的 参数对象
(2)ResultSetHandler:处理 SQL 返回的 结果集
(3)StatementHandler:数据库的 处理对象 ,用于执行SQL语句构建(可以理解为包含sql语句)
(4)Executor:拦截 MyBatis 的执行器,用于执行 crud 操作
Executor (update, query, flushStatements, commit, rollback, getTransaction, close, isClosed)
ParameterHandler (getParameterObject, setParameters)
ResultSetHandler (handleResultSets, handleOutputParameters)
StatementHandler (prepare, parameterize, batch, update, query)

注意,jdbc有提供一种预编译对象 PreparedStatement
- @Intercepts:标识该类是一个拦截器
- @Signature:指明自定义拦截器需要拦截哪一个类型,哪一个方法
- type:上述四种类型中的一种
- method:对应接口中的哪类方法(因为可能存在重载方法)
- args:对应哪一个方法的入参
- @Signature:指明自定义拦截器需要拦截哪一个类型,哪一个方法
import org.apache.ibatis.executor.statement.StatementHandler;
import org.apache.ibatis.plugin.Interceptor;
import org.apache.ibatis.plugin.Intercepts;
import org.apache.ibatis.plugin.Invocation;
import org.apache.ibatis.plugin.Plugin;
import org.apache.ibatis.plugin.Signature;
import org.springframework.stereotype.Component;

import java.sql.Connection;
import java.util.Properties;


  /*
    MyBatis允许使用插件来拦截的方法调用包括:
      Executor (update, query, flushStatements, commit, rollback,getTransaction, close, isClosed) 执行器
      ParameterHandler (getParameterObject, setParameters) 参数
      ResultSetHandler (handleResultSets, handleOutputParameters) 结果集
      StatementHandler (prepare, parameterize, batch, update, query) Sql 构建
    */

@Intercepts(
    value = {
      @Signature(
          type = StatementHandler.class, // 确定要拦截的对象
          method = "prepare", // 确定要拦截的方法
          args = {Connection.class, Integer.class} // 拦截方法的参数
          )
    })
@Component
public class MyInterceptor implements Interceptor {

  @SuppressWarnings("unused")
  private Properties properties;

  @Override
  public Object intercept(Invocation invocation) throws Throwable { // interceptor 能够拦截的四种类型对象,此处入参 invocation 便是指拦截到的对象

    StatementHandler statementHandler = (StatementHandler) invocation.getTarget();
    BoundSql boundSql = statementHandler.getBoundSql();
    Object obj = boundSql.getParameterObject();
    String sql = boundSql.getSql();
    if (sql.trim().toUpperCase().startsWith("INSERT")) {
      ReflectUtil.setFieldValue(obj, "rev", 0);
      ReflectUtil.setFieldValue(obj, "createTime", new Date());
      ReflectUtil.setFieldValue(obj, "operateTime", new Date());
      ReflectUtil.setFieldValue(boundSql,"parameterObject", obj);
    } else if (sql.trim().toUpperCase().startsWith("UPDATE")) {
      sql = sql.replaceAll(" set ", " SET ")
              .replaceAll(" Set ", " SET ")
              .replaceAll(" SET ", " SET rev = rev+1, operate_time = NOW(), ");
      ReflectUtil.setFieldValue(boundSql,"sql", sql);
    }
    return invocation.proceed();
  }

  @Override
  public Object plugin(Object target) { // 每经过一个拦截器对象都会调用 plugin 方法, 该方法会调用 4 次

    // 判断是否拦截这个类型对象(根据@Intercepts注解决定),然后决定是返回一个代理对象还是返回原对象
    // 故我们在实现plugin方法时,要判断一下目标类型,如果是插件要拦截的对象时才执行Plugin.wrap方法,否则的话,直接返回目标本身
    System.out.println("生成代理对象...." + target);
    if (target instanceof StatementHandler) {
      return Plugin.wrap(target, this);
    }
    return target;
    // or
    return Plugin.wrap(target, this);
  }

  @Override
  public void setProperties(Properties properties) {

    System.out.println("拦截器需要一些变量对象,而且这个对象是支持可配置的 who: " + properties.get("who"));
    this.properties = properties;
  }
}
自定义插件实现步骤
- 实现接口org.apache.ibatis.plugin.Interceptor
- @Intercepts 注解修饰插件类,@Signature定义切点
- 插件注册 (三选一)
- @Component 加入 Spring Bean 容器
- SqlSessionFactory 设置插件
- myabtis.xml 文件配置
8 Mybatis 运行原理
- 简述: 主要分为 4 部分, 互相之间独立
- [加载配置+构建Bean] 通过 SqlSessionFactoryBean 来创建 Configuration + SqlSessionFactory
- [构建SqlSession], 通过 new SqlSessionTemplate 的注入实现
- [动态代理创建Mapper类] MapperFactoryBean extends SqlSessionDaoSupport 一个一个创建 Bean, 里面通过动态代理绑定 MapperProxy 类
- [执行Mapper类]
- 在动态代理绑定的 MapperProxy (每个Mapper类都单独 new 一个) 增强方法里执行
new PlainMethodInvoker(new MapperMethod(mapperInterface, method, sqlSession.getConfiguration())) - 增强方法 (MapperProxy 内)
new MapperMethod(i,m,c);(柯里化后的封装对象), 执行MapperMethod#execute(sqlsession, args)方法 - 再根据前面的封装对象, 执行对应的 sqlsession 方法 (如 sqlSession#selectList)
- 在 SqlSession 内, 我们通过 config 获取到方法签名对应的 MappedStatement
- 再通过跟 SqlSession 内部绑定的 Executor 去执行 (如 executor.query(ms,…) 已获取到 sql -> queryFromDatabase())
- 走完 BaseExecutor 中公共的内容后, queryFromDatabase(), 走到抽象方法 doQuery() , 去执行其他类型的 Executor (如 SimpleExecutor#doQuery, Batch, Caching, Reuse - 重用 参数也得一致, Simple, Closed - 什么都不支持).
- [Executor#doQuery] 继续执行 Executor#doQuery 方法, 创建 new StatementHandler (在 configuration 里面创建所有类型的 Handler 时, 均会执行
interceptorChain.pluginAll(statementHandler)应用所有插件) - [StatementHandler] 创建 StatementHandler 的时候, 在构造器里, 会同时创建 ParameterHandler 和 ResultSetHandler, 获取 typeHandlerRegistry
- 调用 handler 里面的方法 (prepare, parameterize, query), 如果是 有参调用, prepare statement的时候, 还会调用 handler.parameterize(stmt); (只有
PreparedStatementHandler实现了执行参数设置, 默认是他, 具体是哪个实现类, 是由 MappedStatement 创建时, 判断后设置的 statementType 决定的, 它在构建器里面有默认值 prepared) - 在 hanlder.query(Statement, ResultHandler) 方法中, 根据类型调用各式各样的 jdbc 方法
- 在 StatementHandler 中, 对返回值进行处理 return resultSetHandler.handleResultSets(ps);
- 结束
- 在动态代理绑定的 MapperProxy (每个Mapper类都单独 new 一个) 增强方法里执行
- JDBC 有3块内容:
- Connection,
- Statement (3种: Statement, PreparedStatement, CallableStatement 存储过程)
- ResultSet
InputStream is = Resources.getResourceAsStream("mybatis-config.xml");
SqlSessionFactory fatory = new SqlSessionFactoryBuilder().build(is);
SqlSession sess = fatory.openSession();
// ---- 分割线 ---- (之前讲的是下面, 现在讲上面)
UserDao uDao = sess.getMapper(UserDao.class);
uDao.query();
uDao.save();
- 详细原理
- [加载配置, 创建SqlSessionFactory] 通过加载 MyBatis 全局配置文件以及 mapper 映射文件, 初始化 Configuration 对象和 Executor 对象
a. 通过全局配置文件中的 defaultExecutorType 初始化 (默认是 Simple, Executor 全局只有一个)
b. Executor 是 SqlSessionFactory 创建, 并放入 SqlSession 里面的
c. XPathParser 通过这个对象来读取 XML 配置
ⅰ. SqlSessionFactoryBuilder -> XMLConfigBuilder.new #parse()
ⅱ. (另一种)new SqlSessionFactoryBean() 也有可能通过yaml读取配置后构建 (如配置数据源 dataSource) 然后 #getObject()
ⅲ. 在读取 config 配置 parseConfiguration() 的过程中, 同时 (方法最后一步) 将 Mapper 文件也进行解析XMLMapperBuilder.new-> parse() -> 在开头configurationElement(xpath表达式读取XNode)-> 在最后buildStatementFromContext(select标签等List) -> buildStatementFromContext有两个参数的重载方法, 进行遍历 -> (每个<>标签 new 1个)new XMLStatementBuilder#parseStatementNode(); 真正解析参数-> (这个 assit 是MapperBuilder 的, 一个文件共用一个)MapperBuilderAssistant.addMappedStatement -> 然后用建造者模式创建完 Mapped 后加入到 Config 中
ⅳ. [提示] MappedStatement 中默认, statementType 是 PREPARE, 这样后续使用, 就会用 configuration 创建对应的 StatementHandler 了
ⅴ. (另一种) springboot 通过 mapperLocations 读取到所有Mapper 通配符 (如 new PathMatchingResourcePatternResolver())
ⅵ. (另一种) tkmapper 通过 SqlSessionDaoSupport -> Configuration.addMapper() -> MapperAnnotationBuilder#parse() -> 遍历方法 parseStatement(method)
d. 将创建好的 config 返回, parse() 方法就完了, 然后 SqlSessionFactoryBuilder 继续执行 build() 方法, 直接 new 一个DefaultSqlSessionFactory(config)进行返回
e. 将 DefaultSqlSession 作为全局 Bean 注册, (他从FactoryBean的getObjcet() 方法产生, 中间过程主要是配置configuration) - [创建 SqlSessionFactory]
a. 一种是 SqlSessionFactoryBuilder 直接 builder(cfg)
b. 另一种是 SqlSessionFactoryBean 通过 afterPropertiesSet() 或FactoryBean#getObject() 间接调用 build(cfg) - [创建 SqlSession]
a. [注入方式] 将 sqlSessionFactory 对象和 executorType 放入 new SqlSessionTemplate(sqlSessionFactory, executorType);
ⅰ. 在构造器中, 对 SqlSession 继续进行了 JDK 动态代理, 是为了接入 Spring 事务
ⅱ. 最终在 SqlSessionInterceptor (JDK代理, SqlSessionTemplate 的内部类) 使用 SqlSessionUtils#getSqlSession -> 在工具类中sessionFactory.openSession(executor) 获取 (会先在 SqlSessionHolder 尝试获取)
ⅲ. sqlsession 同时存在于 holder 和 template 中, 供使用, 另外 template 本身也是 一个 sqlsession (实现类)
b. 一种是手动openSession()创建一个 DefaultSqlSession 对象, 并放入bean
ⅰ. 获取 environment, 创建 TransactionFactory 并 newTransaction 返回 Transaction tx
ⅱ. 并调用 configuration.newExecutor(tx, execType)创建好全局的 Executor (BeseExecutor 提供抽象方法供下面实现, 父类主要是通用比如事务之类)
ⅲ. new DefaultSqlSession(cfg, executor, autoCommit);
c. 另一种是 Spring 直接创建一个 new SqlSessionTemplate(factory) (包含工厂, 实际上是代理模式) - [动态代理为每个接口生成MapperProxy实现类] defaulSqlSession 通过 getMapper() 获取 mapper 接口的代理对象 mapperProxy(mapperProxy 中包含 defaultSqlSession 对象, Config 和 Executor 在 SqlSession 里面)
a. 构建好new MapperMethod 柯里化
ⅰ. SqlCommand
ⅱ. MethodSignature
b. 根据 MapperMethod 方法的信息, 执行对应的 SqlSession 方法
c. SqlSessionDaoSupport创建代理的 MapperProxy 的实现类的 Bean
ⅰ. MapperFactoryBean 里面 通过 SqlSession.getMapper(class) 手动创建
ⅱ. 利用 FactoryBean 创建, 用来创建复杂对象 (实际上是调用方法创建)
ⅲ. MapperSacnnerRegistrar 又是通过 @MapperScan 注解 @Import 的 - 执行增删改查:
a. 在动态代理绑定的 MapperProxy (每个类各 new 一个) 增强方法里 new 一个封装类 MapperMethod, 再通过该类调用 mapperMethod.execute(sqlSession, args);
b. 再根据前面的封装对象, 执行对应的 sqlsession 方法 (如 sqlSession#selectList)
c. 在 SqlSession 的方法内, 从 configuration 中拿到对应 mappedStatement.
d. 通过 SqlSession 绑定的 Executor (工厂创建塞里面的), 执行 executor.query(ms,…), 然后 BaseExecutor 再交给下面对应的 Executor 执行
e. Executor 根据对应属性 (从 ms 里拿) 的 statementType 类型 (默认Prepare), 在 Executor 的方法中 (通过 configuration 创建) 创建对应的 StatementHandler 对象
f. 创建 StatementHandler 对象的同时, 在构造器中也创建 ParameterHandler 和 ResultSetHandler;
g. 通过 ParameterHandler 设置预编译参数及参数值;
h. 调用 StatementHandler 执行增删改查
ⅰ. jdbc 操作, 获取 connection, 准备 statement, 执行 statement.execute(sql), 再 handleResultSets
i. 通过 ResultsetHandler 封装查询结果
j. 当然参数和返回值的类型都有 TypeHandler 的处理 - 事务: 是在 SqlSession 进行调用, 由 Executor 执行 (都在 BaseExecutor 里面)

9 Mybatis实现动态建表
    /**
     * 动态建表
     *
     * @param tableName
     * @return int
     */
    int createNewTableIfNotExists(@Param("tableName") String tableName);
#{name} is for parameters in
PreparedStatement(see String Substitution in Parameters).
一定要使用$符号,#只能用于参数; 另外注意控制字符串长度
<mapper namespace="com.mappers.TableCreatorMapper">
    <cache />
    <update id="createNewTableIfNotExists" parameterType="String" >
        CREATE TABLE IF NOT EXISTS ${tableName}
        (
        `ID` varchar(20) NOT NULL,
        PRIMARY KEY (`ID`)
        )
        ENGINE=InnoDB
    </update>
</mapper>
10 Other
tk.mybatis.mapper
8 大注解 Id KeySql(tk) NameStyle(tk) Table Column ColumnType(tk) Transient Version(tk)
1 @Id (jpa)
上面几个注解都涉及到映射。 @Id 注解和映射无关,它是一个特殊的标记,用于标识数据库中的主键字段
如果实体类中没有一个标记 @Id 的字段,当你使用带有 ByPrimaryKey 的方法时,所有的字段会作为联合主键来使用
2 @KeySql (tk)
替换 @GeneratedValue 注解(JPA)interface GenId<T> 使用;
使用 genId 方式时,字段的值可回写, 因为使用 genId 时,在和数据库交互前,ID 值就已经生成了,由于这个 ID 和数据库的机制无关,因此一个实体中可以出现任意个 使用 genId 方式的 @KeySql 注解,这些注解可以指定不同的实现方法
public class UUIdGenId implements GenId<String> {
    @Override
    public String genId(String table, String column) {
        return UUID.randomUUID().toString();
    }
}

public class User {
    @Id
    @KeySql(genId = UUIdGenId.class)
    private String id;
}
新增加的 tk.mybatis.mapper.additional.insert.InsertListMapper 接口是一个和数据库无关的方法,他不支持任何的主键策略; 但是有了 genId 方式后,这个接口增加了对 @KeySql 注解 genId 方法的支持, 可以批量插入,并且可以回写 ID;
3 @NameStyle (tk)
默认情况下将实体类字段按照 驼峰转下划线 形式的 表名 和 列名 进行转换
normal,                     //原值
camelhump,                  //驼峰转下划线
uppercase,                  //转换为大写
lowercase,                  //转换为小写
camelhumpAndUppercase,      //驼峰转下划线大写形式
camelhumpAndLowercase,      //驼峰转下划线小写形式

@NameStyle(Style.camelhumpAndUppercase)
public class Country
4 @Table (jpa)
支持 name, catalog 和 schema 三个属性
直接使用提供的表名,不再根据实体类名进行转换。
其他两个属性中,同时配置时,catalog 优先级高于 schema,也就是只有 catalog 会生效
5 @Column (jpa)
支持 name, insertable 和 updateable 三个属性;
insertable 对提供的 insert 方法有效,如果设置 false 就不会出现在插入 SQL 中
updateable 对提供的 update 方法有效,设置为 false 后不会出现在更新 SQL 中
@Column(name = "`order`") // 支持自动转换关键字
private String order;
支持自动转换关键字, 也可单独使用 wrapKeyword 配置
wrapKeyword 配置后会自动处理关键字,可以配的值和数据库有关
例如 sqlserver 可以配置为 [{0}],使用 {0} 替代原来的列名
MySql 对应的配置如下:
wrapKeyword=`{0}`
使用该配置后,类似 private String order 就不需要通过 @Column 来指定别名
6 @ColumnType (tk)
column, jdbcType, typeHandler
column 和 @Column 的 name 作用相同, 但 @Column 优先级更高
jdbcType 用于设置特殊 数据库类型 时指定数据库中的 jdbcType
typeHandler 用于设置 特殊类型 处理器 (常见为枚举)
@ColumnType(column = "countryname", jdbcType = JdbcType.VARCHAR,
        typeHandler = StringTypeHandler.class)
private String  countryname;
7 @Transient (jpa)
默认情况下,只有简单类型会被自动认为是表中的字段 (可通过配置中的 useSimpleType 控制, 不包含 Java 中的8种基本类型)
对于类中的复杂对象,以及 Map, List 等属性不需要配置这个注解
对于枚举类型作为数据库字段的情况,需要看配置中的 enumAsSimpleType 参数
8 @Version (tk)
注解有一个 nextVersion 属性,默认值为默认的实现,默认实现 DefaultNextVersion , 支持 Integer, Long 和 java.sql.Timestamp
支持的方法有 6 个
delete
deleteByPrimaryKey
updateByPrimaryKey
updateByPrimaryKeySelective
updateByExample
updateByExampleSelective
由于 tkMapper 是内置的实现,不是通过 拦截器 方式实现的,因此当执行上面支持的方法时,如果版本不一致,那么执行结果影响的行数可能就是 0. 这种情况下也不会报错, 需要在调用方法后自行判断是否执行成功
tk.Example
// 通用
Example example = new Example(Country.class);
example.setForUpdate(true);
example.setDistinct(true);
example.createCriteria().andGreaterThan("id", 100).andLessThan("id",151);
example.or().andLessThan("id", 41);
List<Country> countries = mapper.selectByExample(example);

Example cond = new Example(Template.class);
// define
cond.and().andEqualTo("define", dto.getDefine());
cond.and().andIn("uit", uit);
cond.orderBy("id").desc().orderBy("countryname").orderBy("countrycode").asc(); // default is asc
List<Template> templates = mapper.selectByExample(cond);

// select less
Example example = new Example(Country.class);
example.selectProperties("id", "countryname");
Example.Criteria criteria = example.createCriteria();
if(query.getCountryname() != null){
    criteria.andLike("countryname", query.getCountryname() + "%");
}
if(query.getId() != null){
    criteria.andGreaterThan("id", query.getId());
}
List<Country> countries = mapper.selectByExample(example);
// builder
Example example = Example.builder(Country.class)
        .select("countryname")
        .where(Sqls.custom().andGreaterThan("id", 100))
        .orderByAsc("countrycode")
        .forUpdate()
        .build();
List<Country> countries = mapper.selectByExample(example);
// jdk8
List<Country> selectByWeekendSql = mapper.selectByExample(new Example.Builder(Country.class)
        .where(WeekendSqls.<Country>custom().andLike(Country::getCountryname, "%a%")
                .andGreaterThan(Country::getCountrycode, "123"))
        .build());
(END)


 268
268

 被折叠的 条评论
为什么被折叠?
被折叠的 条评论
为什么被折叠?
 到【灌水乐园】发言


