


MybatisPlus
MybatisPlus
springboot整合mybatis , 参考:https://blog.youkuaiyun.com/shengshenglalalala/article/details/100576106
快速上手
1.创建一个springboot快速项目
2.导入依赖
<!--mybatisplus启动器-->
<!-- https://mvnrepository.com/artifact/com.baomidou/mybatis-plus-boot-starter -->
<dependency>
    <groupId>com.baomidou</groupId>
    <artifactId>mybatis-plus-boot-starter</artifactId>
    <version>3.5.1</version>
</dependency>

<!-- mysql-->
<dependency>
    <groupId>mysql</groupId>
    <artifactId>mysql-connector-java</artifactId>
</dependency>

<!--  lombok-->
<dependency>
    <groupId>org.projectlombok</groupId>
    <artifactId>lombok</artifactId>
</dependency>
mybatis和mybatisplus尽量不要同时引入,会有依赖问题
3.连接mysql
server:
  port: 8888

spring:
  datasource:
    driver-class-name: com.mysql.cj.jdbc.Driver
    url: jdbc:mysql://localhost:3306/huanying?serverTimezone=UTC&characterEncoding=utf8&useUnicode=true&useSSL=false
    username: root
    password: t20010902
4.编写pojo
package com.xxx.pojo;


import lombok.AllArgsConstructor;
import lombok.Data;
import lombok.NoArgsConstructor;

@Data
@AllArgsConstructor
@NoArgsConstructor
public class Good {

    private int goodid;
    private String goodname;
    private int surplus;
    private int goodprice;

}
5.编写mapper接口 ,直接继承BaseMapper即可
package com.xxx.mapper;

import com.baomidou.mybatisplus.core.mapper.BaseMapper;
import com.xxx.pojo.Good;
import org.springframework.stereotype.Repository;

@Repository
public interface GoodMapper extends BaseMapper<Good> {
}
在springAplication添加,自动扫描
package com.xxx;

import org.apache.ibatis.annotations.Mapper;
import org.mybatis.spring.annotation.MapperScan;
import org.springframework.boot.SpringApplication;
import org.springframework.boot.autoconfigure.SpringBootApplication;

@SpringBootApplication
@MapperScan("com.xxx.mapper")
public class MybatisPlusApplication {

    public static void main(String[] args) {
        SpringApplication.run(MybatisPlusApplication.class, args);
    }

}
最后测试:
package com.xxx;

import com.xxx.mapper.GoodMapper;
import org.junit.jupiter.api.Test;
import org.springframework.beans.factory.annotation.Autowired;
import org.springframework.boot.test.context.SpringBootTest;

@SpringBootTest
class MybatisPlusApplicationTests {

    @Autowired
    private GoodMapper goodMapper;

    @Test
    void contextLoads() {
        //wrapper : 条件构造器,没有条件填null
        System.out.println(goodMapper.selectList(null));
    }

}
运行发现报错,这里就要研究 , mybatis-plus处理pojo对象的字段和数据库映射字段问题:
数据库中字段驼峰式命名会被映射成下划线命名,而对应不上数据库里的字段。
解决办法:参考:https://blog.youkuaiyun.com/qq_37288563/article/details/116791592
实体类和数据库表字段的对应
mybatis-plus非常的方便,与mybatis相比,它有我最喜欢的CRUD以及条件构造器等,让反人类的xml文件代码量大大减少,这篇文章主要记录我平常遇到的关于实体类和数据库字段对应的问题,因为用了自带的CRUD,所以与mybatis的写法略有不同
private String newLocation;

@TableField("homecity")
private String homeCity;
上面是我pojo类中的两个字段,newLocation这个属性在mybatis-plus自带的CRUD查询中,会自动映射成
select new_location from XXX;
当数据库字段不满足上述默认的规则时,比如上面pojo类的homeCity属性,按上述规则,就会被映射成home_city的列名,但是我用的那个表字段名是homecity,而不是home_city,那么只需要用@TableField(“homecity”)指定一下即可。
测试成功: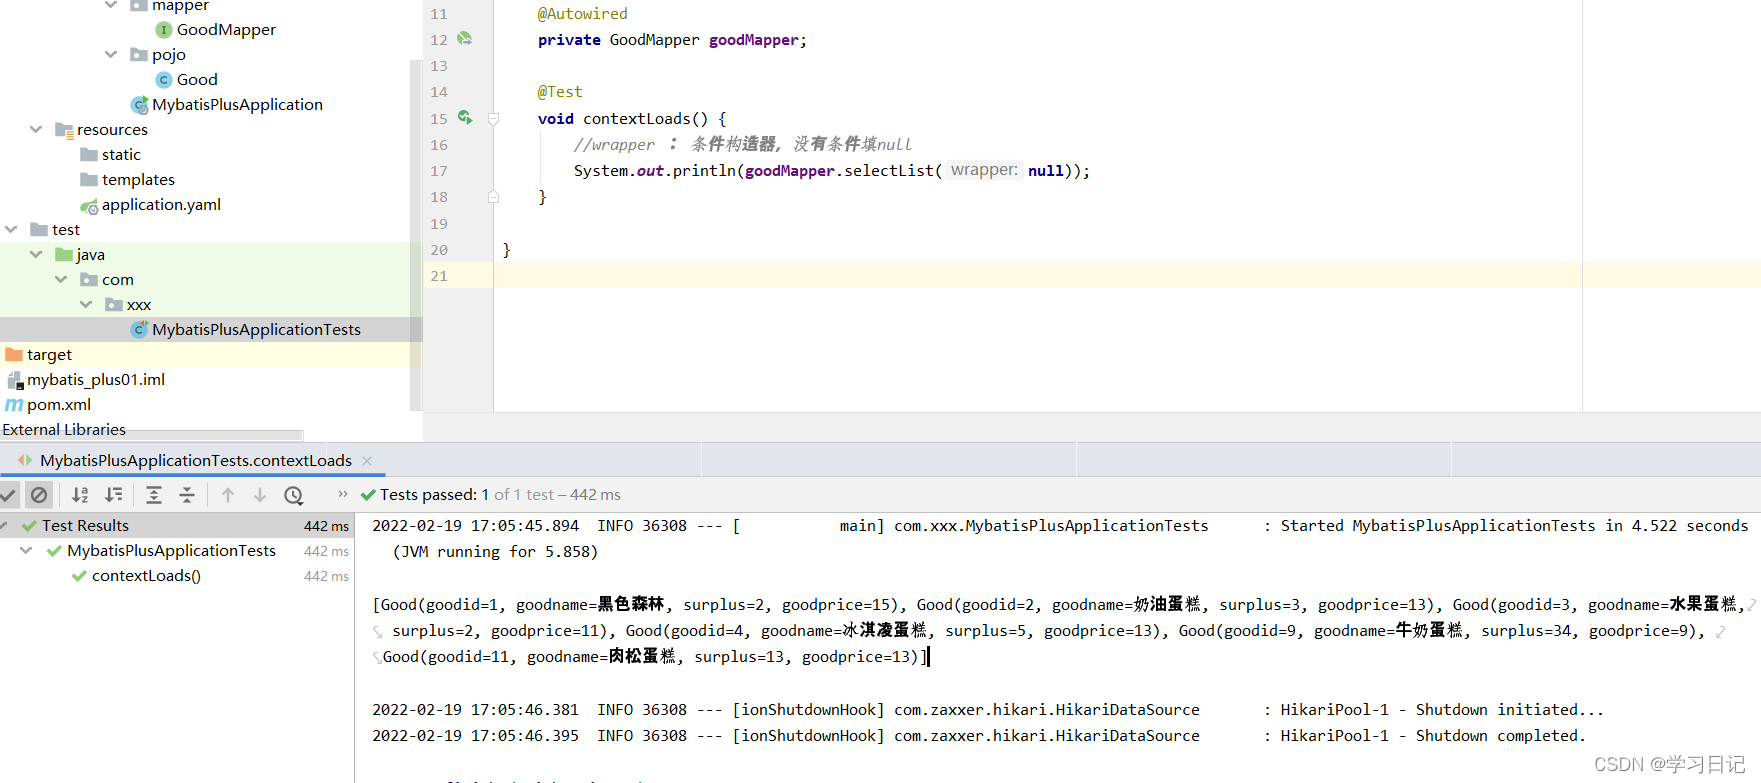
代码生成:https://www.cnblogs.com/liuyj-top/p/12976396.html


 474
474

 被折叠的 条评论
为什么被折叠?
被折叠的 条评论
为什么被折叠?
 到【灌水乐园】发言


