


查看系统
[root@k8s-master ~]# cat /etc/os-release
NAME="CentOS Linux"
VERSION="7 (Core)"
ID="centos"
ID_LIKE="rhel fedora"
VERSION_ID="7"
PRETTY_NAME="CentOS Linux 7 (Core)"
ANSI_COLOR="0;31"
CPE_NAME="cpe:/o:centos:centos:7"
HOME_URL="https://www.centos.org/"
BUG_REPORT_URL="https://bugs.centos.org/"

CENTOS_MANTISBT_PROJECT="CentOS-7"
CENTOS_MANTISBT_PROJECT_VERSION="7"
REDHAT_SUPPORT_PRODUCT="centos"
REDHAT_SUPPORT_PRODUCT_VERSION="7"
一、前置准备(所有节点执行)
1.系统初始化
# 关闭防火墙和SELinux
sudo systemctl stop firewalld && sudo systemctl disable firewalld
sudo setenforce 0
sudo sed -i 's/^SELINUX=enforcing$/SELINUX=permissive/' /etc/selinux/config

# 关闭Swap
sudo swapoff -a
sudo sed -ri '/\bswap\b/s/^/#/' /etc/fstab

# 配置内核参数
cat <<EOF | sudo tee /etc/modules-load.d/k8s.conf
br_netfilter
EOF

cat <<EOF | sudo tee /etc/sysctl.d/k8s.conf
net.bridge.bridge-nf-call-ip6tables = 1
net.bridge.bridge-nf-call-iptables = 1
net.ipv4.ip_forward = 1
EOF
sudo sysctl --system
2.配置主机名和Hosts
echo "172.16.50.24 k8s-master
172.16.50.25 k8s-node1
172.16.50.26 k8s-node2" | sudo tee -a /etc/hosts
3.更新源
vi /etc/resolv.conf
nameserver 8.8.8.8
nameserver 8.8.4.4
替换镜像源为阿里云
# 备份原配置文件
sudo mv /etc/yum.repos.d/CentOS-Base.repo /etc/yum.repos.d/CentOS-Base.repo.bak
# 下载阿里云镜像配置
sudo wget -O /etc/yum.repos.d/CentOS-Base.repo http://mirrors.aliyun.com/repo/Centos-7.repo
# 清理缓存并重建
sudo yum clean all
sudo yum makecache
4.时间同步
sudo yum install -y chrony
sudo systemctl enable --now chronyd
二、安装容器运行时(所有节点)
1.使用Docker作为运行时
# 安装Docker
sudo yum install -y yum-utils
sudo yum-config-manager --add-repo http://mirrors.aliyun.com/docker-ce/linux/centos/docker-ce.repo
sudo yum install -y docker-ce-20.10.23 docker-ce-cli-20.10.23 containerd.io

# 配置cgroup驱动为systemd
cat <<EOF | sudo tee /etc/docker/daemon.json
{
  "exec-opts": ["native.cgroupdriver=systemd"],
  "registry-mirrors": ["https://registry.cn-hangzhou.aliyuncs.com"]
}
EOF

# 启动服务
sudo systemctl enable docker && sudo systemctl start docker
2.docker设置镜像源,重启docker
root@gitlab ~# cat /etc/docker/daemon.json
{
  "registry-mirrors": [
    "https://docker.1ms.run",
    "https://docker.mybacc.com",
    "https://dytt.online",
    "https://lispy.org",
    "https://docker.xiaogenban1993.com",
    "https://docker.yomansunter.com",
    "https://aicarbon.xyz",
    "https://666860.xyz",
    "https://docker.zhai.cm",
    "https://a.ussh.net",
    "https://hub.littlediary.cn",
    "https://hub.rat.dev",
    "https://docker.m.daocloud.io"
  ],
"exec-opts": ["native.cgroupdriver=systemd"]

}
docker restart docker
三、安装Kubernetes组件(所有节点)
1.添加Kubernetes源
cat <<EOF | sudo tee /etc/yum.repos.d/kubernetes.repo
[kubernetes]
name=Kubernetes
baseurl=https://mirrors.aliyun.com/kubernetes/yum/repos/kubernetes-el7-x86_64/
enabled=1
gpgcheck=0
repo_gpgcheck=0
gpgkey=https://mirrors.aliyun.com/kubernetes/yum/doc/yum-key.gpg
EOF
2.安装指定版本组件
sudo yum install -y kubelet-1.23.10 kubeadm-1.23.10 kubectl-1.23.10
sudo systemctl enable kubelet
四、初始化Master节点(仅在Master执行)
需要修改第2行的ip,第6行的网关
sudo kubeadm init \
  --apiserver-advertise-address=172.16.50.24 \
  --image-repository=registry.aliyuncs.com/google_containers \
  --kubernetes-version=v1.23.10 \
  --service-cidr=10.96.0.0/12 \
  --pod-network-cidr=10.10.0.0/16
正常输出
[root@k8s-master ~]# sudo kubeadm init   --apiserver-advertise-address=172.16.50.24   --image-repository=registry.aliyuncs.com/google_containers   --kubernetes-version=v1.23.10   --service-cidr=10.96.0.0/12   --pod-network-cidr=172.16.0.0/16   --ignore-preflight-errors=Swap
[init] Using Kubernetes version: v1.23.10
[preflight] Running pre-flight checks
[preflight] Pulling images required for setting up a Kubernetes cluster
[preflight] This might take a minute or two, depending on the speed of your internet connection
[preflight] You can also perform this action in beforehand using 'kubeadm config images pull'
[certs] Using certificateDir folder "/etc/kubernetes/pki"
[certs] Generating "ca" certificate and key
[certs] Generating "apiserver" certificate and key
[certs] apiserver serving cert is signed for DNS names [k8s-master kubernetes kubernetes.default kubernetes.default.svc kubernetes.default.svc.cluster.local] and IPs [10.96.0.1 172.16.50.24]
[certs] Generating "apiserver-kubelet-client" certificate and key
[certs] Generating "front-proxy-ca" certificate and key
[certs] Generating "front-proxy-client" certificate and key
[certs] Generating "etcd/ca" certificate and key
[certs] Generating "etcd/server" certificate and key
[certs] etcd/server serving cert is signed for DNS names [k8s-master localhost] and IPs [172.16.50.24 127.0.0.1 ::1]
[certs] Generating "etcd/peer" certificate and key
[certs] etcd/peer serving cert is signed for DNS names [k8s-master localhost] and IPs [172.16.50.24 127.0.0.1 ::1]
[certs] Generating "etcd/healthcheck-client" certificate and key
[certs] Generating "apiserver-etcd-client" certificate and key
[certs] Generating "sa" key and public key
[kubeconfig] Using kubeconfig folder "/etc/kubernetes"
[kubeconfig] Writing "admin.conf" kubeconfig file
[kubeconfig] Writing "kubelet.conf" kubeconfig file
[kubeconfig] Writing "controller-manager.conf" kubeconfig file
[kubeconfig] Writing "scheduler.conf" kubeconfig file
[kubelet-start] Writing kubelet environment file with flags to file "/var/lib/kubelet/kubeadm-flags.env"
[kubelet-start] Writing kubelet configuration to file "/var/lib/kubelet/config.yaml"
[kubelet-start] Starting the kubelet
[control-plane] Using manifest folder "/etc/kubernetes/manifests"
[control-plane] Creating static Pod manifest for "kube-apiserver"
[control-plane] Creating static Pod manifest for "kube-controller-manager"
[control-plane] Creating static Pod manifest for "kube-scheduler"
[etcd] Creating static Pod manifest for local etcd in "/etc/kubernetes/manifests"
[wait-control-plane] Waiting for the kubelet to boot up the control plane as static Pods from directory "/etc/kubernetes/manifests". This can take up to 4m0s
[apiclient] All control plane components are healthy after 7.502658 seconds
[upload-config] Storing the configuration used in ConfigMap "kubeadm-config" in the "kube-system" Namespace
[kubelet] Creating a ConfigMap "kubelet-config-1.23" in namespace kube-system with the configuration for the kubelets in the cluster
NOTE: The "kubelet-config-1.23" naming of the kubelet ConfigMap is deprecated. Once the UnversionedKubeletConfigMap feature gate graduates to Beta the default name will become just "kubelet-config". Kubeadm upgrade will handle this transition transparently.
[upload-certs] Skipping phase. Please see --upload-certs
[mark-control-plane] Marking the node k8s-master as control-plane by adding the labels: [node-role.kubernetes.io/master(deprecated) node-role.kubernetes.io/control-plane node.kubernetes.io/exclude-from-external-load-balancers]
[mark-control-plane] Marking the node k8s-master as control-plane by adding the taints [node-role.kubernetes.io/master:NoSchedule]
[bootstrap-token] Using token: psrnnc.bhuc2orrihirgand
[bootstrap-token] Configuring bootstrap tokens, cluster-info ConfigMap, RBAC Roles
[bootstrap-token] configured RBAC rules to allow Node Bootstrap tokens to get nodes
[bootstrap-token] configured RBAC rules to allow Node Bootstrap tokens to post CSRs in order for nodes to get long term certificate credentials
[bootstrap-token] configured RBAC rules to allow the csrapprover controller automatically approve CSRs from a Node Bootstrap Token
[bootstrap-token] configured RBAC rules to allow certificate rotation for all node client certificates in the cluster
[bootstrap-token] Creating the "cluster-info" ConfigMap in the "kube-public" namespace
[kubelet-finalize] Updating "/etc/kubernetes/kubelet.conf" to point to a rotatable kubelet client certificate and key
[addons] Applied essential addon: CoreDNS
[addons] Applied essential addon: kube-proxy

Your Kubernetes control-plane has initialized successfully!

To start using your cluster, you need to run the following as a regular user:

  mkdir -p $HOME/.kube
  sudo cp -i /etc/kubernetes/admin.conf $HOME/.kube/config
  sudo chown $(id -u):$(id -g) $HOME/.kube/config

Alternatively, if you are the root user, you can run:

  export KUBECONFIG=/etc/kubernetes/admin.conf

You should now deploy a pod network to the cluster.
Run "kubectl apply -f [podnetwork].yaml" with one of the options listed at:
  https://kubernetes.io/docs/concepts/cluster-administration/addons/

Then you can join any number of worker nodes by running the following on each as root:

kubeadm join 172.16.50.24:6443 --token psrnnc.bhuc2orrihirgand \
        --discovery-token-ca-cert-hash sha256:54e6a50f89f2382e6358442fc1c4da5576d6700a65bf2213ed37bf0321279051
如果报错,自行百度,但是必须执行下面,清理旧配置,然后再在master重新执行安装命令
kubeadm reset -f
rm -rf /etc/kubernetes /var/lib/kubelet
配置kubelet
mkdir -p $HOME/.kube
sudo cp -i /etc/kubernetes/admin.conf $HOME/.kube/config
sudo chown $(id -u):$(id -g) $HOME/.kube/config
查看节点情况(现在master是notready)
[root@k8s-master ~]# kubectl get node
NAME         STATUS     ROLES                  AGE   VERSION
k8s-master   NotReady   control-plane,master   14m   v1.23.10
五、安装网络插件(Master节点)
下载配置文件calico.yaml
curl -L https://raw.githubusercontent.com/projectcalico/calico/v3.26.0/manifests/calico.yaml -o calico.yaml
修改两个地方,原文中这两个地方是注释的,修改时注意格式
- name: CALICO_IPV4POOL_CIDR
  value: "10.10.0.0/16"
应用calico.yaml
kubectl apply -f calico.yaml
网络插件第一次有一点慢,估计几分钟,查看状态
[root@k8s-master ~]# kubectl get pod -A
NAMESPACE     NAME                                      READY   STATUS    RESTARTS   AGE
kube-system   calico-kube-controllers-6bbd6cfcf-8z6gg   1/1     Running   0          6m43s
kube-system   calico-node-2jztr                         1/1     Running   0          6m43s
kube-system   coredns-6d8c4cb4d-k9wkt                   1/1     Running   0          24m
kube-system   coredns-6d8c4cb4d-xgkpp                   1/1     Running   0          24m
kube-system   etcd-k8s-master                           1/1     Running   2          24m
kube-system   kube-apiserver-k8s-master                 1/1     Running   2          24m
kube-system   kube-controller-manager-k8s-master        1/1     Running   2          24m
kube-system   kube-proxy-jq5rt                          1/1     Running   0          24m
kube-system   kube-scheduler-k8s-master                 1/1     Running   2          24m
[root@k8s-master ~]# kubectl get nodes
NAME         STATUS   ROLES                  AGE   VERSION
k8s-master   Ready    control-plane,master   24m   v1.23.10
六、加入Worker节点(Worker节点执行)
这个是上面第4步,初始化master执行输出的,
kubeadm join 172.16.50.24:6443 --token psrnnc.bhuc2orrihirgand \
>         --discovery-token-ca-cert-hash sha256:54e6a50f89f2382e6358442fc1c4da5576d6700a65bf2213ed37bf0321279051
正常输出
[root@k8s-node1 ~]# kubeadm join 172.16.50.24:6443 --token psrnnc.bhuc2orrihirgand         --discovery-token-ca-cert-hash sha256:54e6a50f89f2382e6358442fc1c4da5576d6700a65bf2213ed37bf0321279051
[preflight] Running pre-flight checks
[preflight] Reading configuration from the cluster...
[preflight] FYI: You can look at this config file with 'kubectl -n kube-system get cm kubeadm-config -o yaml'
[kubelet-start] Writing kubelet configuration to file "/var/lib/kubelet/config.yaml"
[kubelet-start] Writing kubelet environment file with flags to file "/var/lib/kubelet/kubeadm-flags.env"
[kubelet-start] Starting the kubelet
[kubelet-start] Waiting for the kubelet to perform the TLS Bootstrap...

This node has joined the cluster:
* Certificate signing request was sent to apiserver and a response was received.
* The Kubelet was informed of the new secure connection details.

Run 'kubectl get nodes' on the control-plane to see this node join the cluster.
过几分钟查看状态。会多几个pod
[root@k8s-master ~]# kubectl get pod -A
NAMESPACE     NAME                                      READY   STATUS    RESTARTS   AGE
kube-system   calico-kube-controllers-6bbd6cfcf-8z6gg   1/1     Running   0          150m
kube-system   calico-node-2jztr                         1/1     Running   0          150m
kube-system   calico-node-4zgbk                         1/1     Running   0          133m
kube-system   calico-node-r2rgc                         1/1     Running   0          132m
kube-system   coredns-6d8c4cb4d-k9wkt                   1/1     Running   0          168m
kube-system   coredns-6d8c4cb4d-xgkpp                   1/1     Running   0          168m
kube-system   etcd-k8s-master                           1/1     Running   2          168m
kube-system   kube-apiserver-k8s-master                 1/1     Running   2          168m
kube-system   kube-controller-manager-k8s-master        1/1     Running   2          168m
kube-system   kube-proxy-jq5rt                          1/1     Running   0          168m
kube-system   kube-proxy-pz4xz                          1/1     Running   1          133m
kube-system   kube-proxy-z75fg                          1/1     Running   1          132m
kube-system   kube-scheduler-k8s-master                 1/1     Running   2          168m
[root@k8s-master ~]# kubectl get nodes
NAME         STATUS   ROLES                  AGE    VERSION
k8s-master   Ready    control-plane,master   168m   v1.23.10
k8s-node1    Ready    <none>                 132m   v1.23.10
k8s-node2    Ready    <none>                 133m   v1.23.10
七、验证集群状态(node节点)及命令补全
1.master传输配置文件到node节点
scp -r ~/.kube root@k8s-node2:/root/
验证
[root@k8s-node1 ~]# kubectl get nodes
NAME         STATUS   ROLES                  AGE    VERSION
k8s-master   Ready    control-plane,master   174m   v1.23.10
k8s-node1    Ready    <none>                 138m   v1.23.10
k8s-node2    Ready    <none>                 139m   v1.23.10
[root@k8s-node1 ~]# kubectl get pod -A
NAMESPACE     NAME                                      READY   STATUS    RESTARTS   AGE
kube-system   calico-kube-controllers-6bbd6cfcf-8z6gg   1/1     Running   0          156m
kube-system   calico-node-2jztr                         1/1     Running   0          156m
kube-system   calico-node-4zgbk                         1/1     Running   0          139m
kube-system   calico-node-r2rgc                         1/1     Running   0          138m
kube-system   coredns-6d8c4cb4d-k9wkt                   1/1     Running   0          174m
kube-system   coredns-6d8c4cb4d-xgkpp                   1/1     Running   0          174m
kube-system   etcd-k8s-master                           1/1     Running   2          174m
kube-system   kube-apiserver-k8s-master                 1/1     Running   2          174m
kube-system   kube-controller-manager-k8s-master        1/1     Running   2          174m
kube-system   kube-proxy-jq5rt                          1/1     Running   0          174m
kube-system   kube-proxy-pz4xz                          1/1     Running   1          139m
kube-system   kube-proxy-z75fg                          1/1     Running   1          138m
kube-system   kube-scheduler-k8s-master                 1/1     Running   2          174m
2.kubectl自动补全命令
sudo yum install bash-completion -y
echo 'source <(kubectl completion bash)' >> ~/.bashrc
source ~/.bashrc
八、部署nginx测试
1.创建命名空间test
kubectl create ns test
写nginx.yaml
apiVersion: apps/v1
kind: Deployment
metadata:
  name: nginx-deployment
  namespace: test  # 指定命名空间为 test
spec:
  replicas: 3
  selector:
    matchLabels:
      app: nginx
  template:
    metadata:
      labels:
        app: nginx
    spec:
      containers:
      - name: nginx
        image: swr.cn-north-4.myhuaweicloud.com/ddn-k8s/docker.io/nginx:1.24.0
        ports:
        - containerPort: 80  # 容器监听端口
---
apiVersion: v1
kind: Service
metadata:
  name: nginx-service
  namespace: test  # 指定命名空间为 test
spec:
  type: NodePort
  selector:
    app: nginx  # 匹配 Deployment 的 Pod 标签
  ports:
    - protocol: TCP
      port: 80       # Service 的集群内部端口
      targetPort: 80 # 转发到容器的端口
      nodePort: 30001 # 外部访问端口
kubectl create -f nginx.yaml
[root@k8s-master ~]# kubectl get svc -n test
NAME            TYPE       CLUSTER-IP       EXTERNAL-IP   PORT(S)        AGE
nginx-service   NodePort   10.111.132.173   <none>        80:30001/TCP   4m10s
[root@k8s-master ~]# kubectl get pod -n test -o wide
NAME                               READY   STATUS    RESTARTS   AGE     IP               NODE        NOMINATED NODE   READINESS GATES
nginx-deployment-d99dbc95c-695f5   1/1     Running   0          4m15s   172.16.169.129   k8s-node2   <none>           <none>
nginx-deployment-d99dbc95c-h2qz8   1/1     Running   0          4m15s   172.16.36.65     k8s-node1   <none>           <none>
nginx-deployment-d99dbc95c-mdx7j   1/1     Running   0          4m15s   172.16.36.66     k8s-node1   <none>           <none>
访问 web 页面,地址为 IP 地址加端口 30001
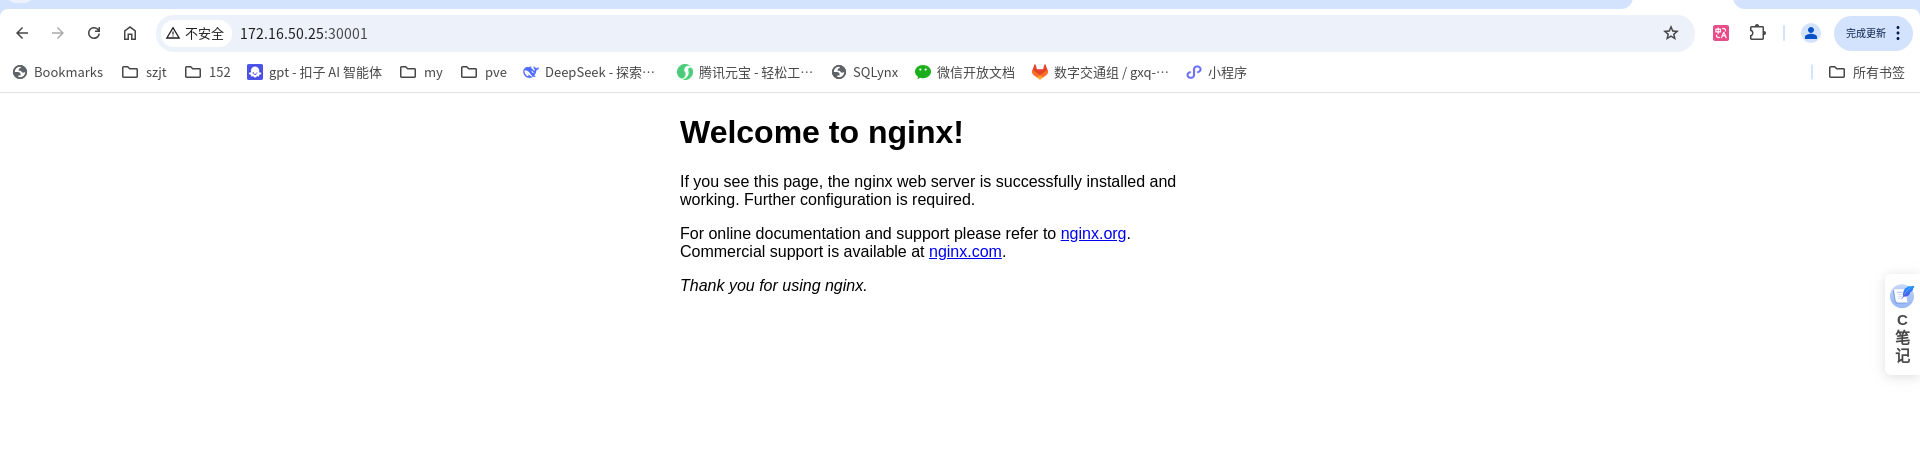
验证成功
八、安装kubesphere(master)
安装helm
curl -fsSL -o get_helm.sh https://raw.githubusercontent.com/helm/helm/main/scripts/get-helm-3
chmod 700 get_helm.sh
./get_helm.sh
helm version
安装KubeSphere
helm upgrade --install -n kubesphere-system --create-namespace ks-core https://charts.kubesphere.com.cn/main/ks-core-1.1.3.tgz --debug --wait --set global.imageRegistry=swr.cn-southwest-2.myhuaweicloud.com/ks
这个要执行几分钟,执行完成查看kubesphere-system 的pod状态,都是running
[root@k8s-master ~]# kubectl get pod -A
NAMESPACE           NAME                                       READY   STATUS    RESTARTS   AGE
kube-system         calico-kube-controllers-74dbdc644f-xm6rb   1/1     Running   0          17h
kube-system         calico-node-5k28h                          1/1     Running   0          17h
kube-system         calico-node-br24z                          1/1     Running   0          17h
kube-system         calico-node-vwntj                          1/1     Running   0          17h
kube-system         coredns-b7c47bcdc-8lksq                    1/1     Running   0          17h
kube-system         coredns-b7c47bcdc-h88r7                    1/1     Running   0          17h
kube-system         kube-apiserver-k8s-master                  1/1     Running   0          17h
kube-system         kube-controller-manager-k8s-master         1/1     Running   0          17h
kube-system         kube-proxy-ch9sg                           1/1     Running   0          17h
kube-system         kube-proxy-j97sq                           1/1     Running   0          17h
kube-system         kube-proxy-wxpqh                           1/1     Running   0          17h
kube-system         kube-scheduler-k8s-master                  1/1     Running   0          17h
kube-system         nodelocaldns-d286p                         1/1     Running   0          17h
kube-system         nodelocaldns-m9k75                         1/1     Running   0          17h
kube-system         nodelocaldns-mwxjd                         1/1     Running   0          17h
kubesphere-system   extensions-museum-7b5f459754-g8bdj         1/1     Running   0          7m58s
kubesphere-system   ks-apiserver-7b998bb597-gs7jx              1/1     Running   0          7m58s
kubesphere-system   ks-console-674d7fdfc7-tjznm                1/1     Running   0          7m58s
kubesphere-system   ks-controller-manager-864bdd6fc8-lw6z5     1/1     Running   0          7m58s
test                nginx-deployment-d99dbc95c-8gz5c           1/1     Running   0          21m
test                nginx-deployment-d99dbc95c-9j7lg           1/1     Running   0          21m
test                nginx-deployment-d99dbc95c-t5t59           1/1     Running   0          21m
浏览器访问ip:30880,账号密码:admin/P@88w0rd
登录之后
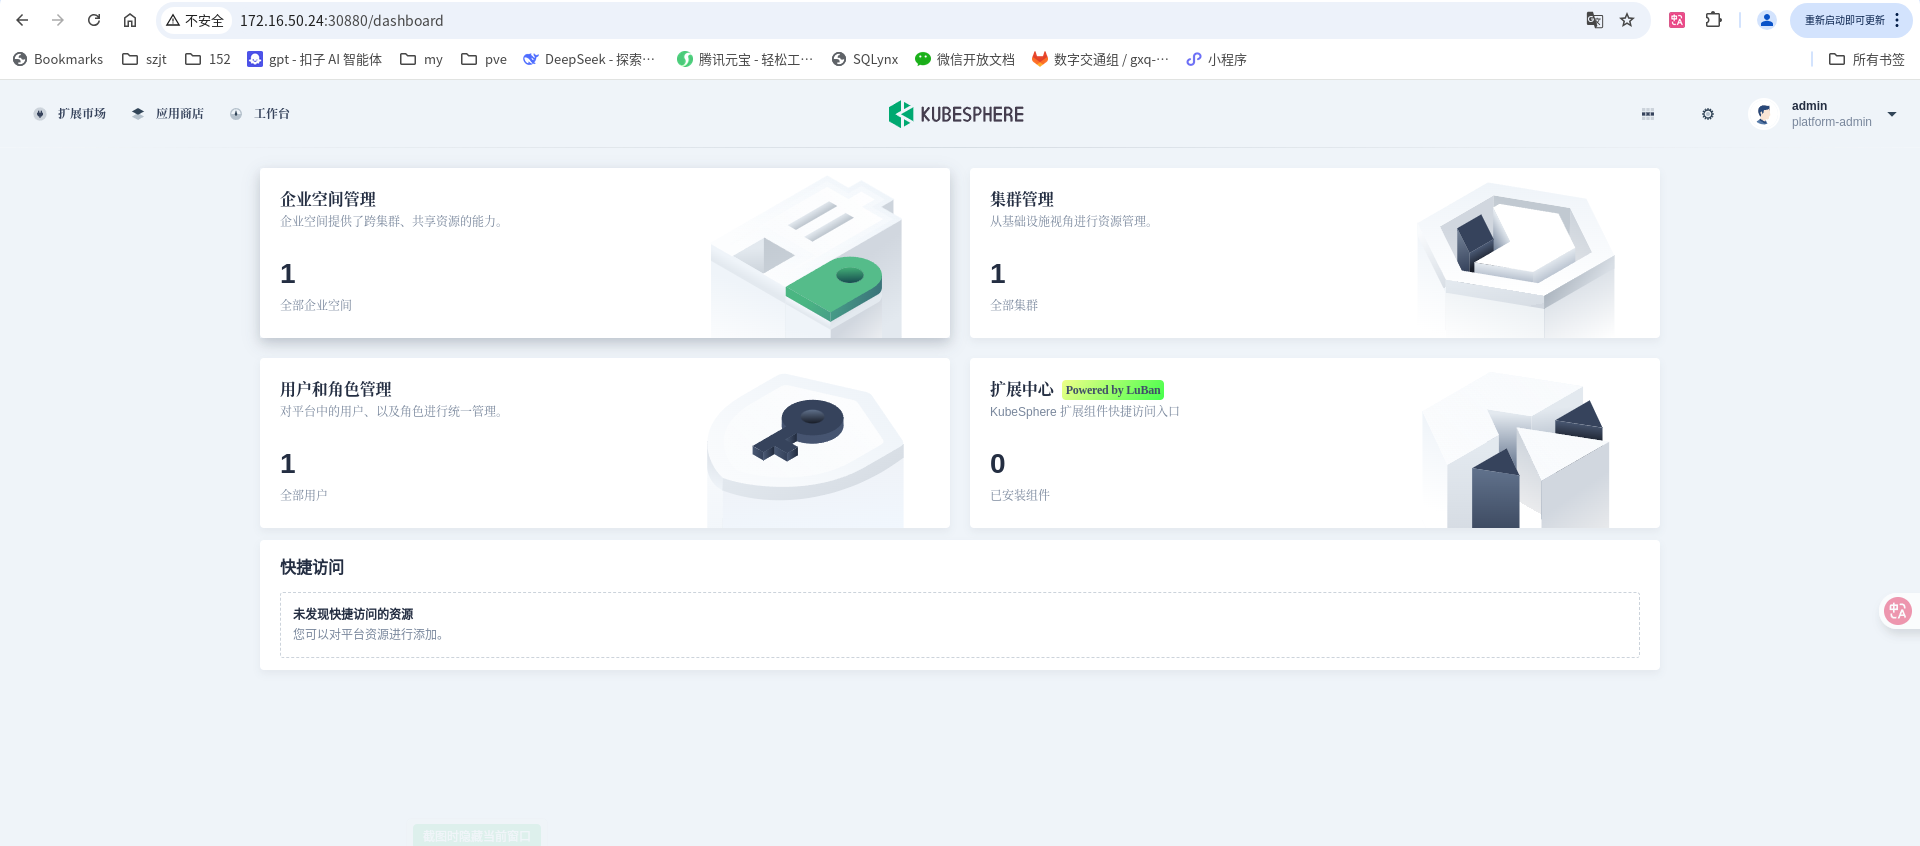

这里可以看到我的k8s版本和kubesphere版本
大功告成


 132
132

 被折叠的 条评论
为什么被折叠?
被折叠的 条评论
为什么被折叠?
 到【灌水乐园】发言


